
Operating and Installation manual
Page 2
... hood in the cabinet 28 4. Contents IMPORTANT SAFETY INSTRUCTIONS 3 Functional description 7 Guide to the Ventilation System 8 Operation 10 Cleaning and care 12 Grease filter 13 Inserting / replacing the active charcoal filters 14 Changing the light bulbs 15 After Sales Service 16 Installation instructions 17 Caring for the environment 19 Appliance dimensions 20 Distance between...
... hood in the cabinet 28 4. Contents IMPORTANT SAFETY INSTRUCTIONS 3 Functional description 7 Guide to the Ventilation System 8 Operation 10 Cleaning and care 12 Grease filter 13 Inserting / replacing the active charcoal filters 14 Changing the light bulbs 15 After Sales Service 16 Installation instructions 17 Caring for the environment 19 Appliance dimensions 20 Distance between...
Operating and Installation manual
Page 7
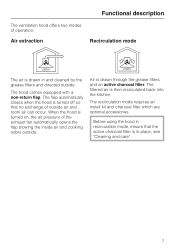
The hood comes equipped with a non-return flap. The filtered air is drawn through the grease filters and an active charcoal filter. The recirculation mode requires an install kit and charcoal filter which are optional accessories. Air is then recirculated back into the kitchen. The flap automatically closes when the hood is turned on, ... extraction Recirculation mode The air is drawn in place, see "Cleaning and care". 7 When the hood is turned off so that the active charcoal filter is in and cleaned by the grease filters and directed outside air and room air can occur.
The hood comes equipped with a non-return flap. The filtered air is drawn through the grease filters and an active charcoal filter. The recirculation mode requires an install kit and charcoal filter which are optional accessories. Air is then recirculated back into the kitchen. The flap automatically closes when the hood is turned on, ... extraction Recirculation mode The air is drawn in place, see "Cleaning and care". 7 When the hood is turned off so that the active charcoal filter is in and cleaned by the grease filters and directed outside air and room air can occur.
Operating and Installation manual
Page 9
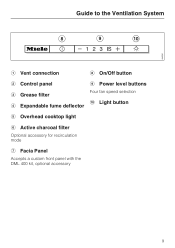
Guide to the Ventilation System a Vent connection h On/Off button b Control panel c Grease filter d Expandable fume deflector i Power level buttons Four fan speed selection j Light button e Overhead cooktop light f Active charcoal filter Optional accessory for recirculation mode g Facia Panel Accepts a custom front panel with the DML 400 kit, optional accessory 9
Guide to the Ventilation System a Vent connection h On/Off button b Control panel c Grease filter d Expandable fume deflector i Power level buttons Four fan speed selection j Light button e Overhead cooktop light f Active charcoal filter Optional accessory for recirculation mode g Facia Panel Accepts a custom front panel with the DML 400 kit, optional accessory 9
Operating and Installation manual
Page 14
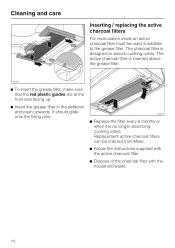
... sure that the red plastic guides are at the front and facing up. ^ Insert the grease filter in addition to absorb cooking odors. Cleaning and care Inserting / replacing the active charcoal filters For recirculation mode an active charcoal filter must be ordered from Miele. ^ Follow the instructions supplied with the active charcoal filter. ^ Dispose of the charcoal filter with the household waste. 14
... sure that the red plastic guides are at the front and facing up. ^ Insert the grease filter in addition to absorb cooking odors. Cleaning and care Inserting / replacing the active charcoal filters For recirculation mode an active charcoal filter must be ordered from Miele. ^ Follow the instructions supplied with the active charcoal filter. ^ Dispose of the charcoal filter with the household waste. 14

Operating and Installation manual
Page 15
..., 50W) in the reverse order and push upwards. ^ Return the grease filter and if existent the active charcoal filter. 15 Follow the bulb manufacturer's instructions. ^ Pull the deflector out and remove the grease filter as described in use halogen bulbs become extremely hot, use caution. Cleaning and... in "Cleaning and Care - Do not attempt to change the bulbs until they have had sufficient time to cool. Grease filter". ^ Remove the active charcoal filter if existent. ^ Reach through the grille opening and push the light fixture downwards. ^ Turn the bulb counterclockwise and pull it...
..., 50W) in the reverse order and push upwards. ^ Return the grease filter and if existent the active charcoal filter. 15 Follow the bulb manufacturer's instructions. ^ Pull the deflector out and remove the grease filter as described in use halogen bulbs become extremely hot, use caution. Cleaning and... in "Cleaning and Care - Do not attempt to change the bulbs until they have had sufficient time to cool. Grease filter". ^ Remove the active charcoal filter if existent. ^ Reach through the grille opening and push the light fixture downwards. ^ Turn the bulb counterclockwise and pull it...
Operating and Installation manual
Page 32
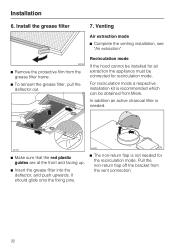
... Make sure that the red plastic guides are at the front and facing up. ^ Insert the grease filter into the deflector, and push upwards. Install the grease filter ^ Remove the protective film from the vent connection. 32 Venting Air extraction mode ^ Complete the venting...filter, pull the deflector out. 7. Recirculation mode If the hood cannot be installed for recirculation mode. It should glide onto the fixing pins. ^ The non-return flap is recommended which can be connected for air extraction the appliance must be obtained from Miele. In addition an active charcoal filter...
... Make sure that the red plastic guides are at the front and facing up. ^ Insert the grease filter into the deflector, and push upwards. Install the grease filter ^ Remove the protective film from the vent connection. 32 Venting Air extraction mode ^ Complete the venting...filter, pull the deflector out. 7. Recirculation mode If the hood cannot be installed for recirculation mode. It should glide onto the fixing pins. ^ The non-return flap is recommended which can be connected for air extraction the appliance must be obtained from Miele. In addition an active charcoal filter...
Operating and Installation manual
Page 33
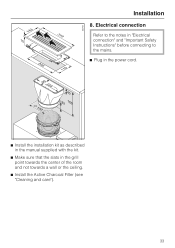
Electrical connection Refer to the notes in "Electrical connection" and "Important Safety Instructions" before connecting to the mains. ^ Plug in the power cord. ^ Install the installation kit as described in the manual supplied with the kit. ^ Make sure that the slats in the grill point towards the center of the room and not towards a wall or the ceiling. ^ Install the Active Charcoal Filter (see "Cleaning and care"). 33 Installation 8.
Electrical connection Refer to the notes in "Electrical connection" and "Important Safety Instructions" before connecting to the mains. ^ Plug in the power cord. ^ Install the installation kit as described in the manual supplied with the kit. ^ Make sure that the slats in the grill point towards the center of the room and not towards a wall or the ceiling. ^ Install the Active Charcoal Filter (see "Cleaning and care"). 33 Installation 8.

