Operating and Installation manual
Page 2
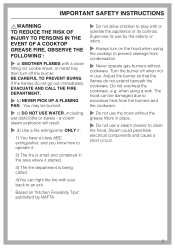
...28 4. Install the front panel if necessary 31 6. Runners 28 3. Venting 32 8. Secure the appliance 30 5. Install the grease filter 32 7. Electrical connection 33 Air extraction 34 Condensate trap 35 Electrical connection 36 Technical data 37 2 Contents IMPORTANT SAFETY INSTRUCTIONS 3 ...Functional description 7 Guide to the Ventilation System 8 Operation 10 Cleaning and care 12 Grease filter 13 Inserting / replacing the active charcoal filters 14 Changing the light bulbs 15 After Sales Service 16 Installation instructions 17 Caring for the environment ...
...28 4. Install the front panel if necessary 31 6. Runners 28 3. Venting 32 8. Secure the appliance 30 5. Install the grease filter 32 7. Electrical connection 33 Air extraction 34 Condensate trap 35 Electrical connection 36 Technical data 37 2 Contents IMPORTANT SAFETY INSTRUCTIONS 3 ...Functional description 7 Guide to the Ventilation System 8 Operation 10 Cleaning and care 12 Grease filter 13 Inserting / replacing the active charcoal filters 14 Changing the light bulbs 15 After Sales Service 16 Installation instructions 17 Caring for the environment ...

Operating and Installation manual
Page 4
... of the housing be dangerous. ~ f) Only open flame beneath the hood. If in doubt consult a qualified electrician. ~ e) Installation work by the suction and the grease filters may ignite. Repairs and other parts of the cooking area. ~ e) Do not flambé or grill with an open the housing as described in the... diagram" and in accordance with the household electrical supply. Heat oils slowly on low or medium settings. ~ b) Always turn the hood on the fan or filter. ~ d) Use the proper pan size. This data must correspond to accumulate on when cooking at high settings.
... of the housing be dangerous. ~ f) Only open flame beneath the hood. If in doubt consult a qualified electrician. ~ e) Installation work by the suction and the grease filters may ignite. Repairs and other parts of the cooking area. ~ e) Do not flambé or grill with an open the housing as described in the... diagram" and in accordance with the household electrical supply. Heat oils slowly on low or medium settings. ~ b) Always turn the hood on the fan or filter. ~ d) Use the proper pan size. This data must correspond to accumulate on when cooking at high settings.
Operating and Installation manual
Page 5
..., including wet dishcloths or towels - Supervise its controls. You may be damaged due to excessive heat from condensation. ~ Never operate gas burners without the grease filters in use. Turn the burner off the burner. If the flames do not extend beneath the cookware. BE CAREFUL TO PREVENT BURNS. when using the...
..., including wet dishcloths or towels - Supervise its controls. You may be damaged due to excessive heat from condensation. ~ Never operate gas burners without the grease filters in use. Turn the burner off the burner. If the flames do not extend beneath the cookware. BE CAREFUL TO PREVENT BURNS. when using the...
Operating and Installation manual
Page 7
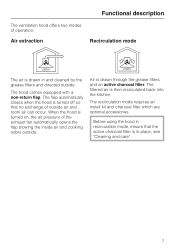
Air is then recirculated back into the kitchen. The filtered air is drawn through the grease filters and an active charcoal filter. The recirculation mode requires an install kit and charcoal filter which are optional accessories. When the hood is turned off so that the active charcoal filter is drawn in place, see "Cleaning and care...-return flap. Functional description The ventilation hood offers two modes of operation: Air extraction Recirculation mode The air is in and cleaned by the grease filters and directed outside.
Air is then recirculated back into the kitchen. The filtered air is drawn through the grease filters and an active charcoal filter. The recirculation mode requires an install kit and charcoal filter which are optional accessories. When the hood is turned off so that the active charcoal filter is drawn in place, see "Cleaning and care...-return flap. Functional description The ventilation hood offers two modes of operation: Air extraction Recirculation mode The air is in and cleaned by the grease filters and directed outside.
Operating and Installation manual
Page 9
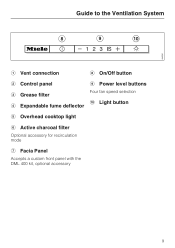
Guide to the Ventilation System a Vent connection h On/Off button b Control panel c Grease filter d Expandable fume deflector i Power level buttons Four fan speed selection j Light button e Overhead cooktop light f Active charcoal filter Optional accessory for recirculation mode g Facia Panel Accepts a custom front panel with the DML 400 kit, optional accessory 9
Guide to the Ventilation System a Vent connection h On/Off button b Control panel c Grease filter d Expandable fume deflector i Power level buttons Four fan speed selection j Light button e Overhead cooktop light f Active charcoal filter Optional accessory for recirculation mode g Facia Panel Accepts a custom front panel with the DML 400 kit, optional accessory 9
Operating and Installation manual
Page 13
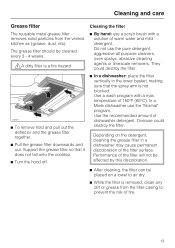
... recommended amount of 150°F (65°C). They could destroy the filter. Overuse could destroy the filter. ^ To remove hold and pull out the deflector and the grease filter together. ^ Pull the grease filter downwards and out. temperature of dishwasher detergent. In a Miele dishwasher use the pure detergent, aggressive all purpose cleaners, oven sprays, abrasive...
... recommended amount of 150°F (65°C). They could destroy the filter. Overuse could destroy the filter. ^ To remove hold and pull out the deflector and the grease filter together. ^ Pull the grease filter downwards and out. temperature of dishwasher detergent. In a Miele dishwasher use the pure detergent, aggressive all purpose cleaners, oven sprays, abrasive...
Operating and Installation manual
Page 14
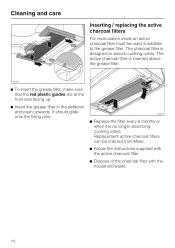
... front and facing up. ^ Insert the grease filter in addition to absorb cooking odors. Cleaning and care Inserting / replacing the active charcoal filters For recirculation mode an active charcoal filter must be ordered from Miele. ^ Follow the instructions supplied with the active charcoal filter. ^ Dispose of the charcoal filter with the household waste. 14 The charcoal...
... front and facing up. ^ Insert the grease filter in addition to absorb cooking odors. Cleaning and care Inserting / replacing the active charcoal filters For recirculation mode an active charcoal filter must be ordered from Miele. ^ Follow the instructions supplied with the active charcoal filter. ^ Dispose of the charcoal filter with the household waste. 14 The charcoal...

Operating and Installation manual
Page 15
... the active charcoal filter if existent. ^ Reach through the grille opening and push the light fixture downwards. ^ Turn the bulb counterclockwise and pull it out of its life. Do ... (GU/GZ 10, 120V, 50W) in the reverse order and push upwards. ^ Return the grease filter and if existent the active charcoal filter. 15 Follow the bulb manufacturer's instructions. ^ Pull the deflector out and remove the grease filter as described in use halogen bulbs become extremely hot, use caution. Changing the light bulbs...
... the active charcoal filter if existent. ^ Reach through the grille opening and push the light fixture downwards. ^ Turn the bulb counterclockwise and pull it out of its life. Do ... (GU/GZ 10, 120V, 50W) in the reverse order and push upwards. ^ Return the grease filter and if existent the active charcoal filter. 15 Follow the bulb manufacturer's instructions. ^ Pull the deflector out and remove the grease filter as described in use halogen bulbs become extremely hot, use caution. Changing the light bulbs...
Operating and Installation manual
Page 16
....com/mielecare 16 After Sales Service Repairs In the event of a fault which you cannot easily fix yourself, please contact the Miele Technical Service Department. ^ When contacting the Technical Service Department, please quote the model and serial number of your appliance investment is... visible when the grease filters are shown on your Miele products, possibly doing further damage to prevent unauthorized (and untrained) service personnel from working on the data plate which is...
....com/mielecare 16 After Sales Service Repairs In the event of a fault which you cannot easily fix yourself, please contact the Miele Technical Service Department. ^ When contacting the Technical Service Department, please quote the model and serial number of your appliance investment is... visible when the grease filters are shown on your Miele products, possibly doing further damage to prevent unauthorized (and untrained) service personnel from working on the data plate which is...

Operating and Installation manual
Page 28
... they are made for side walls of the cabinet side wall. Screw on its back side. Installing the hood in the cabinet. ^ Hold the grease filter and pull it out along with the lower edge of 5/8" (16 mm) and 3/4" (19 mm). The runners are flush with the deflector. 28 Runners 3. Installation...
... they are made for side walls of the cabinet side wall. Screw on its back side. Installing the hood in the cabinet. ^ Hold the grease filter and pull it out along with the lower edge of 5/8" (16 mm) and 3/4" (19 mm). The runners are flush with the deflector. 28 Runners 3. Installation...
Operating and Installation manual
Page 29
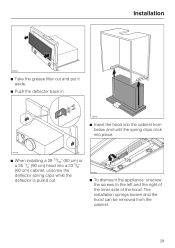
The installation springs loosen and the hood can be removed from below and until the spring clips click into place. ^ When installing a 29 13/16" (80 cm) or a 35 1/4" (90 cm) hood into the cabinet from the cabinet. 29 Installation ^ Take the grease filter out and put it aside. ^ Push the deflector back in. ^ Insert the hood into a 23 5/8" (60 cm) cabinet, unscrew the deflector spring clips while the deflector is pulled out. ^ To dismount the appliance: unscrew the screws to the left and the right of the inner side of the hood.
The installation springs loosen and the hood can be removed from below and until the spring clips click into place. ^ When installing a 29 13/16" (80 cm) or a 35 1/4" (90 cm) hood into the cabinet from the cabinet. 29 Installation ^ Take the grease filter out and put it aside. ^ Push the deflector back in. ^ Insert the hood into a 23 5/8" (60 cm) cabinet, unscrew the deflector spring clips while the deflector is pulled out. ^ To dismount the appliance: unscrew the screws to the left and the right of the inner side of the hood.
Operating and Installation manual
Page 32
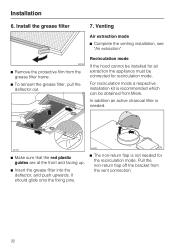
... the grease filter frame. ^ To reinsert the grease filter, pull the deflector out. 7. Recirculation mode If the hood cannot be installed for recirculation mode. It should glide onto the fixing pins. ^ The non-return flap is recommended which can be connected for air extraction the appliance must be obtained from Miele. Install the... grease filter ^ Remove the protective film from the vent connection. 32
... the grease filter frame. ^ To reinsert the grease filter, pull the deflector out. 7. Recirculation mode If the hood cannot be installed for recirculation mode. It should glide onto the fixing pins. ^ The non-return flap is recommended which can be connected for air extraction the appliance must be obtained from Miele. Install the... grease filter ^ Remove the protective film from the vent connection. 32
Operating and Installation manual
Page 33
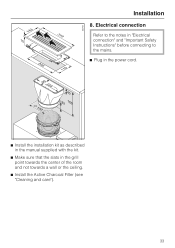
Installation 8. Electrical connection Refer to the notes in "Electrical connection" and "Important Safety Instructions" before connecting to the mains. ^ Plug in the power cord. ^ Install the installation kit as described in the manual supplied with the kit. ^ Make sure that the slats in the grill point towards the center of the room and not towards a wall or the ceiling. ^ Install the Active Charcoal Filter (see "Cleaning and care"). 33
Installation 8. Electrical connection Refer to the notes in "Electrical connection" and "Important Safety Instructions" before connecting to the mains. ^ Plug in the power cord. ^ Install the installation kit as described in the manual supplied with the kit. ^ Make sure that the slats in the grill point towards the center of the room and not towards a wall or the ceiling. ^ Install the Active Charcoal Filter (see "Cleaning and care"). 33

Operating and Installation manual
Page 36
...ft (1.2 m) power cord with a NEMA 5-15 molded plug for connection to your power supply, please consult a licensed electrician or call Miele's Technical Service Department. Grounding Instructions This appliance must be plugged into an outlet that have the electrical system of the house checked by ... by a qualified electrician. This appliance is any doubt, have been investigated and found on the data plate (located behind the grease filters), match the household electrical supply before installing the hood. ^ Use only with ventilation hood cord-connection kits that is too short, ...
...ft (1.2 m) power cord with a NEMA 5-15 molded plug for connection to your power supply, please consult a licensed electrician or call Miele's Technical Service Department. Grounding Instructions This appliance must be plugged into an outlet that have the electrical system of the house checked by ... by a qualified electrician. This appliance is any doubt, have been investigated and found on the data plate (located behind the grease filters), match the household electrical supply before installing the hood. ^ Use only with ventilation hood cord-connection kits that is too short, ...
DA3460
Page 1
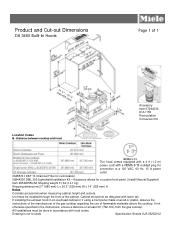
... not otherwise specified in accordance with local codes. Drawing is not to a 120 VAC, 60 Hz, 15 A power outlet. 06485741 DKF 13 Charcoal Filter for a custom front panel. (Install Manual Supplied) Item 28346055USA Shipping weight 31 lbs (14.1 kg) Shipping dimensions 27" (680 mm) L ...when measuring cabinet height and cutouts. Accessory allows for recirculation 06544200 DML 300 Lightshield Installation Kit - Product and Cut-out Dimensions DA 3460 Built-In Hoods Page 1 of the cabinet. All installations must be done in the instructions, ensure a distance of flammable ...
... not otherwise specified in accordance with local codes. Drawing is not to a 120 VAC, 60 Hz, 15 A power outlet. 06485741 DKF 13 Charcoal Filter for a custom front panel. (Install Manual Supplied) Item 28346055USA Shipping weight 31 lbs (14.1 kg) Shipping dimensions 27" (680 mm) L ...when measuring cabinet height and cutouts. Accessory allows for recirculation 06544200 DML 300 Lightshield Installation Kit - Product and Cut-out Dimensions DA 3460 Built-In Hoods Page 1 of the cabinet. All installations must be done in the instructions, ensure a distance of flammable ...

