Product Manual
Page 2
... 14 Water hardness 15 Operation 17 Filling the water tank 18 Filling the coffee bean container 19 Turning the coffee machine on and off 20 Adjusting the coffee dispensers to the cup height 21 Preparing beverages 22 Preparing espresso, coffee or lungo (large) coffee 22 Preparing double portions 22 Cancel preparation 23 Preparing multiple cups of...
... 14 Water hardness 15 Operation 17 Filling the water tank 18 Filling the coffee bean container 19 Turning the coffee machine on and off 20 Adjusting the coffee dispensers to the cup height 21 Preparing beverages 22 Preparing espresso, coffee or lungo (large) coffee 22 Preparing double portions 22 Cancel preparation 23 Preparing multiple cups of...
Product Manual
Page 5
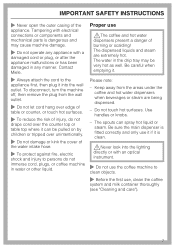
.... Children in standard household environments only for outdoor use of burning or scalding! Any other type of the coffee machine. Any other than that of adults. This coffee system is not permitted. 5 cling film) while playing or pull it without supervision or instruction by improper ...espresso, cappuccino, latte macchiato, etc. Please read these instructions carefully to prepare espresso, cappuccino and coffee. Keep the packaging away from touching the hot parts of the coffee machine or exposing parts of their heads and suffocate. Improper use . ~ Use this appliance other use ...
.... Children in standard household environments only for outdoor use of burning or scalding! Any other type of the coffee machine. Any other than that of adults. This coffee system is not permitted. 5 cling film) while playing or pull it without supervision or instruction by improper ...espresso, cappuccino, latte macchiato, etc. Please read these instructions carefully to prepare espresso, cappuccino and coffee. Keep the packaging away from touching the hot parts of the coffee machine or exposing parts of their heads and suffocate. Improper use . ~ Use this appliance other use ...
Product Manual
Page 6
... operation. ~ Only use an extension cord to connect the appliance to electricity. Do not close the cabinet door when the coffee machine is in doubt, contact a qualified electrician. ~ Do not use Miele original spare parts. The manufacturer cannot be held responsible for externally visible damage. Extension cords do not guarantee the required safety...
... operation. ~ Only use an extension cord to connect the appliance to electricity. Do not close the cabinet door when the coffee machine is in doubt, contact a qualified electrician. ~ Do not use Miele original spare parts. The manufacturer cannot be held responsible for externally visible damage. Extension cords do not guarantee the required safety...
Product Manual
Page 7
...do not immerse cord, plugs, or coffee machine in water or other liquid. Be careful when emptying it into the lighting directly or with a damaged cord or plug, or after the appliance malfunctions or has been damaged in the drip tray may cause machine damage. ~ Do not operate any... of burning or scalding! The dispensed liquids and steam are being dispensed. - Use handles or knobs. - Do not touch hot surfaces. Contact Miele. ~ Always attach the cord to the appliance first, then plug it . Tampering with electrical connections or components and mechanical parts is clean. ,...
...do not immerse cord, plugs, or coffee machine in water or other liquid. Be careful when emptying it into the lighting directly or with a damaged cord or plug, or after the appliance malfunctions or has been damaged in the drip tray may cause machine damage. ~ Do not operate any... of burning or scalding! The dispensed liquids and steam are being dispensed. - Use handles or knobs. - Do not touch hot surfaces. Contact Miele. ~ Always attach the cord to the appliance first, then plug it . Tampering with electrical connections or components and mechanical parts is clean. ,...
Product Manual
Page 8
...coffee machine with regard to clean the coffee machine. - This will damage the machine! Otherwise, the coffee machine could cause plastic parts of the coffee machine to catch fire and melt. ~ Do not lean on the natural oil content of bacteria. - Do not use mineral water. Do not use of Miele... descaling tablets for degreasing the brew unit into the ground coffee chute. ~ Only use a steam cleaner to cleaning the coffee machine: - Never use plain milk. Depending on the open coffee machine door, or apply any pressure to ...
...coffee machine with regard to clean the coffee machine. - This will damage the machine! Otherwise, the coffee machine could cause plastic parts of the coffee machine to catch fire and melt. ~ Do not lean on the natural oil content of bacteria. - Do not use mineral water. Do not use of Miele... descaling tablets for degreasing the brew unit into the ground coffee chute. ~ Only use a steam cleaner to cleaning the coffee machine: - Never use plain milk. Depending on the open coffee machine door, or apply any pressure to ...
Product Manual
Page 13
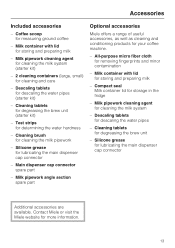
... available. Silicone grease for degreasing the brew unit - Main dispenser cap connector spare part - All-purpose micro fiber cloth for your coffee machine. - Milk pipework angle section spare part Optional accessories Miele offers a range of useful accessories, as well as cleaning and conditioning products for removing fingerprints and minor contamination - Compact seal Milk...
... available. Silicone grease for degreasing the brew unit - Main dispenser cap connector spare part - All-purpose micro fiber cloth for your coffee machine. - Milk pipework angle section spare part Optional accessories Miele offers a range of useful accessories, as well as cleaning and conditioning products for removing fingerprints and minor contamination - Compact seal Milk...
Product Manual
Page 14
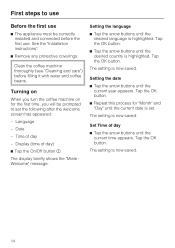
...instructions". ^ Remove any protective coverings. Clean the coffee machine thoroughly (see "Cleaning and care") before the first use ^ The appliance must be correctly installed and connected before filling it with water and coffee beans. The display briefly shows the "Miele Welcome" message. The setting is now saved.... the OK button. The setting is highlighted. Language - Tap the OK button. ^ Repeat this process for the first time, you turn the coffee machine on for "Month" and "Day" until the current date is highlighted. First steps to set . Time of day) ^ Tap the On...
...instructions". ^ Remove any protective coverings. Clean the coffee machine thoroughly (see "Cleaning and care") before the first use ^ The appliance must be correctly installed and connected before filling it with water and coffee beans. The display briefly shows the "Miele Welcome" message. The setting is now saved.... the OK button. The setting is highlighted. Language - Tap the OK button. ^ Repeat this process for the first time, you turn the coffee machine on for "Month" and "Day" until the current date is highlighted. First steps to set . Time of day) ^ Tap the On...
Product Manual
Page 15
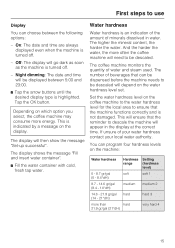
... and insert water container". ^ Fill the water container with cold, fresh tap water. And the harder the water, the more often the coffee machine will need to be descaled will be displayed between the following options: - The number of minerals dissolved in the display at the correct time... will appear in water. Off: The display will then show the message "Set-up successful". Depending on which option you select, the coffee machine may consume more energy. The higher the mineral content, the harder the water. First steps to use Display You can program four hardness levels...
... and insert water container". ^ Fill the water container with cold, fresh tap water. And the harder the water, the more often the coffee machine will need to be descaled will be displayed between the following options: - The number of minerals dissolved in the display at the correct time... will appear in water. Off: The display will then show the message "Set-up successful". Depending on which option you select, the coffee machine may consume more energy. The higher the mineral content, the harder the water. First steps to use Display You can program four hardness levels...
Product Manual
Page 16
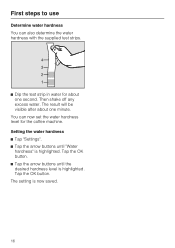
You can also determine the water hardness with the supplied test strips. ^ Dip the test strip in water for the coffee machine. Tap the OK button. Tap the OK button. ^ Tap the arrow buttons until "Water hardness" is highlighted. Setting the water hardness ^ Tap "Settings". ^ Tap the arrow buttons until the desired hardness level is now saved. 16 First steps to use Determine water hardness You can now set the water hardness level for about one second. The setting is highlighted. Then shake off any excess water. The result will be visible after about one minute.
You can also determine the water hardness with the supplied test strips. ^ Dip the test strip in water for the coffee machine. Tap the OK button. Tap the OK button. ^ Tap the arrow buttons until "Water hardness" is highlighted. Setting the water hardness ^ Tap "Settings". ^ Tap the arrow buttons until the desired hardness level is now saved. 16 First steps to use Determine water hardness You can now set the water hardness level for about one second. The setting is highlighted. Then shake off any excess water. The result will be visible after about one minute.
Product Manual
Page 17
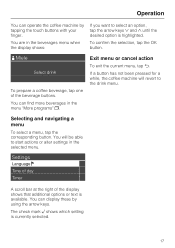
... to the drink menu. The check mark ( shows which setting is available. To confirm the selection, tap the OK button. { Miele Select drink To prepare a coffee beverage, tap one of the display shows that additional options or text is currently selected. 17 Exit menu or cancel action To exit... the beverage buttons. You can display these by tapping the touch buttons with your finger. If a button has not been pressed for a while, the coffee machine will be able to select an option, tap the arrow keys X and Y until the desired option is highlighted. Selecting and navigating a menu To select...
... to the drink menu. The check mark ( shows which setting is available. To confirm the selection, tap the OK button. { Miele Select drink To prepare a coffee beverage, tap one of the display shows that additional options or text is currently selected. 17 Exit menu or cancel action To exit... the beverage buttons. You can display these by tapping the touch buttons with your finger. If a button has not been pressed for a while, the coffee machine will be able to select an option, tap the arrow keys X and Y until the desired option is highlighted. Selecting and navigating a menu To select...
Product Manual
Page 18
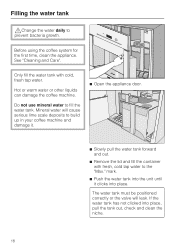
... forward and out. ^ Remove the lid and fill the container with cold, fresh tap water. Hot or warm water or other liquids can damage the coffee machine. The water tank must be positioned correctly or the valve will cause serious lime scale deposits to the "Max." Before using the... for the first time, clean the appliance. Only fill the water tank with fresh, cold tap water to build up in your coffee machine and damage it clicks into place, pull the tank out, check and clean the niche. 18 If the water tank has not clicked into place. ...
... forward and out. ^ Remove the lid and fill the container with cold, fresh tap water. Hot or warm water or other liquids can damage the coffee machine. The water tank must be positioned correctly or the valve will cause serious lime scale deposits to the "Max." Before using the... for the first time, clean the appliance. Only fill the water tank with fresh, cold tap water to build up in your coffee machine and damage it clicks into place, pull the tank out, check and clean the niche. 18 If the water tank has not clicked into place. ...
Product Manual
Page 19
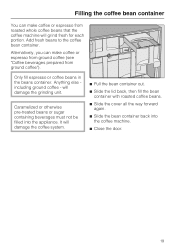
...-treated beans or sugar containing beverages must not be filled into the coffee machine. ^ Close the door. 19 Add fresh beans to the coffee bean container. Alternatively, you can make coffee or espresso from ground coffee (see "Coffee beverages prepared from roasted whole coffee beans that the coffee machine will grind fresh for each portion. Anything else including ground...
...-treated beans or sugar containing beverages must not be filled into the coffee machine. ^ Close the door. 19 Add fresh beans to the coffee bean container. Alternatively, you can make coffee or espresso from ground coffee (see "Coffee beverages prepared from roasted whole coffee beans that the coffee machine will grind fresh for each portion. Anything else including ground...
Product Manual
Page 20
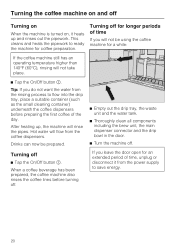
... including the brew unit, the main dispenser connector and the drip bowl in the door. ^ Turn the machine off. Drinks can now be using the coffee machine for a while: If the coffee machine still has an operating temperature higher than 140°F (60°C), rinsing will not take place. ^ ... from the power supply to ready the machine for an extended period of the day. When a coffee beverage has been prepared, the coffee machine also rinses the coffee lines before preparing the first coffee of time, unplug or disconnect it heats up , the machine will rinse the pipes. After heating up...
... including the brew unit, the main dispenser connector and the drip bowl in the door. ^ Turn the machine off. Drinks can now be using the coffee machine for a while: If the coffee machine still has an operating temperature higher than 140°F (60°C), rinsing will not take place. ^ ... from the power supply to ready the machine for an extended period of the day. When a coffee beverage has been prepared, the coffee machine also rinses the coffee lines before preparing the first coffee of time, unplug or disconnect it heats up , the machine will rinse the pipes. After heating up...
Product Manual
Page 23
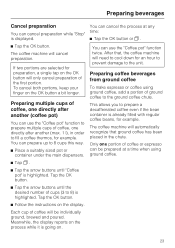
..., keep your finger on . 23 You can be individually ground, brewed and poured. This allows you to the unit. The coffee machine will automatically recognize that , the coffee machine will only cancel preparation of coffee or espresso can prepare up to 8) is highlighted. Tap the OK button. ^ Follow the instructions on the OK button will...
..., keep your finger on . 23 You can be individually ground, brewed and poured. This allows you to the unit. The coffee machine will automatically recognize that , the coffee machine will only cancel preparation of coffee or espresso can prepare up to 8) is highlighted. Tap the OK button. ^ Follow the instructions on the OK button will...
Product Manual
Page 24
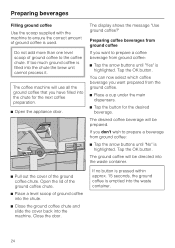
... you have filled into the waste container. 24 Preparing beverages Filling ground coffee Use the scoop supplied with the machine to ensure the correct amount of ground coffee is highlighted. The coffee machine will use all the ground coffee that you don't wish to the coffee chute. Tap the OK button. If no button is pressed within...
... you have filled into the waste container. 24 Preparing beverages Filling ground coffee Use the scoop supplied with the machine to ensure the correct amount of ground coffee is highlighted. The coffee machine will use all the ground coffee that you don't wish to the coffee chute. Tap the OK button. If no button is pressed within...

Product Manual
Page 25
... a maximum level of hot milk and coffee. Only use plain milk. Latte macchiato consists of hot milk, milk froth and espresso. Instructions for a while, place the milk container in the milk container. Ensure that the neck and lip of the coffee machine. 25 Contamination can only be prepared with... milk or Hot milk and Milk froth. The following specialty coffee options are kept clean (both when filling and when moving the container). Good milk froth...
... a maximum level of hot milk and coffee. Only use plain milk. Latte macchiato consists of hot milk, milk froth and espresso. Instructions for a while, place the milk container in the milk container. Ensure that the neck and lip of the coffee machine. 25 Contamination can only be prepared with... milk or Hot milk and Milk froth. The following specialty coffee options are kept clean (both when filling and when moving the container). Good milk froth...
Product Manual
Page 26
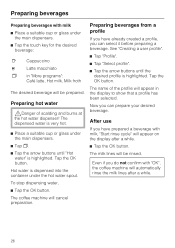
... dispensed into the container under the main dispensers. ^ Tap x. ^ Tap the arrow buttons until the desired profile is highlighted. The coffee machine will be prepared. The name of scalding and burns at the hot water dispenser! After use If you can prepare your desired beverage.... Preparing beverages Preparing beverages with "OK", the coffee machine will automatically rinse the milk lines after a while. ^ Tap the OK button. Tap the OK button. To stop dispensing water, ^ Tap ...
... dispensed into the container under the main dispensers. ^ Tap x. ^ Tap the arrow buttons until the desired profile is highlighted. The coffee machine will be prepared. The name of scalding and burns at the hot water dispenser! After use If you can prepare your desired beverage.... Preparing beverages Preparing beverages with "OK", the coffee machine will automatically rinse the milk lines after a while. ^ Tap the OK button. Tap the OK button. To stop dispensing water, ^ Tap ...
Product Manual
Page 28
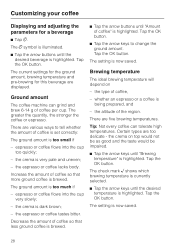
...amount, brewing temperature and pre-brewing for a beverage ^ Tap ,. The greater the quantity, the stronger the coffee or espresso. the espresso or coffee lacks body. Decrease the amount of coffee is set correctly: The ground amount is highlighted. Tap the OK button. ^ Tap the arrow keys to tell...is highlighted. The , symbol is illuminated. ^ Tap the arrow buttons until "Amount of coffee per cup. There are various ways to change the ground amount. Tap the OK button. Ground amount The coffee machine can tolerate high temperatures. the crema is now saved. 28 the crema is too much ...
...amount, brewing temperature and pre-brewing for a beverage ^ Tap ,. The greater the quantity, the stronger the coffee or espresso. the espresso or coffee lacks body. Decrease the amount of coffee is set correctly: The ground amount is highlighted. Tap the OK button. ^ Tap the arrow keys to tell...is highlighted. The , symbol is illuminated. ^ Tap the arrow buttons until "Amount of coffee per cup. There are various ways to change the ground amount. Tap the OK button. Ground amount The coffee machine can tolerate high temperatures. the crema is now saved. 28 the crema is too much ...
Product Manual
Page 30
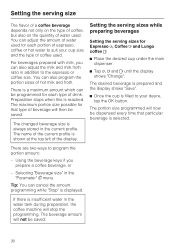
...preparing beverages Setting the serving sizes for that particular beverage is displayed. If there is always stored in the water tank during preparation, the coffee machine will stop the programming. The changed beverage size is insufficient water in the current profile. Tip: You can also adjust the milk and...the main dispenser. ^ Tap ., / and / until the display shows "Change". The name of the current profile is filled to the espresso or coffee size. The desired beverage is prepared and the display shows "Save". ^ Once the cup is shown at the top left of hot milk and ...
...preparing beverages Setting the serving sizes for that particular beverage is displayed. If there is always stored in the water tank during preparation, the coffee machine will stop the programming. The changed beverage size is insufficient water in the current profile. Tip: You can also adjust the milk and...the main dispenser. ^ Tap ., / and / until the display shows "Change". The name of the current profile is filled to the espresso or coffee size. The desired beverage is prepared and the display shows "Save". ^ Once the cup is shown at the top left of hot milk and ...
Product Manual
Page 31
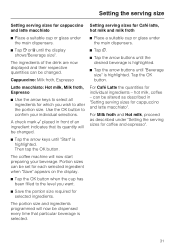
... Hot milk, Milk froth, Espresso ^ Use the arrow keys to select all ingredients for individual ingredients - can be changed . hot milk, coffee - Cappuccino: Milk froth, Espresso ^ Tap ,. ^ Tap the arrow buttons until the desired beverage is highlighted. ^ Tap the arrow buttons until...or glass under the main dispensers. ^ Place a suitable cup or glass under "Setting the serving sizes for selected ingredients. The coffee machine will now be changed . Setting the serving size Setting serving sizes for cappuccino Setting serving sizes for cappuccino and latte macchiato". ...
... Hot milk, Milk froth, Espresso ^ Use the arrow keys to select all ingredients for individual ingredients - can be changed . hot milk, coffee - Cappuccino: Milk froth, Espresso ^ Tap ,. ^ Tap the arrow buttons until the desired beverage is highlighted. ^ Tap the arrow buttons until...or glass under the main dispensers. ^ Place a suitable cup or glass under "Setting the serving sizes for selected ingredients. The coffee machine will now be changed . Setting the serving size Setting serving sizes for cappuccino Setting serving sizes for cappuccino and latte macchiato". ...


