Operating and Installation manual
Page 4
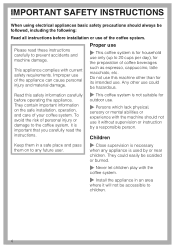
... easily be scalded or burned. ~ Never let children play with the machine should always be accessible to 20 cups per day), for household use only (up to children. 4 To avoid the risk of coffee beverages such as espresso, cappuccino, latte macchiato, etc. They contain important...for the preparation of personal injury or damage to the coffee system, it is important that you carefully read these instructions carefully to prevent accidents and machine damage. They could be hazardous. Please read the instructions. ~ This coffee system is not suitable for outdoor use. ~ Persons which...
... easily be scalded or burned. ~ Never let children play with the machine should always be accessible to 20 cups per day), for household use only (up to children. 4 To avoid the risk of coffee beverages such as espresso, cappuccino, latte macchiato, etc. They contain important...for the preparation of personal injury or damage to the coffee system, it is important that you carefully read these instructions carefully to prevent accidents and machine damage. They could be hazardous. Please read the instructions. ~ This coffee system is not suitable for outdoor use. ~ Persons which...
Operating and Installation manual
Page 5
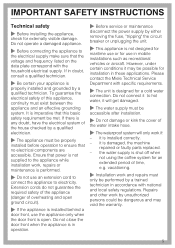
...not designed for maritime use or for a cold water connection. it is open. the water supply is shut off when not using the coffee system for an extended period of overheating and open ground circuit). ~ If the appliance is installed behind a door front, use the appliance ...only when the door front is damaged, the machine repaired or faulty parts replaced. - However, under certain conditions it may void the warranty. 5 Please contact the Miele Technical Service Department with specific requirements. ~ The unit is any doubt, have the electrical...
...not designed for maritime use or for a cold water connection. it is open. the water supply is shut off when not using the coffee system for an extended period of overheating and open ground circuit). ~ If the appliance is installed behind a door front, use the appliance ...only when the door front is damaged, the machine repaired or faulty parts replaced. - However, under certain conditions it may void the warranty. 5 Please contact the Miele Technical Service Department with specific requirements. ~ The unit is any doubt, have the electrical...
Operating and Installation manual
Page 6
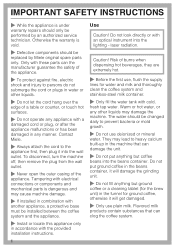
...growth. ~ Do not use plain milk. Caution! They may cause machine damage. ~ If installed in combination with another appliance, a protective base must be performed by Miele original spare parts only. To disconnect, turn the machine off, then remove the plug from the wall outlet. ~ Never.... 6 Use Caution! laser radiation. IMPORTANT SAFETY INSTRUCTIONS ~ While the appliance is under warranty repairs should only be installed between the coffee system and the appliance. ~ Install or locate this appliance only in accordance with a damaged cord or plug, or after the appliance...
...growth. ~ Do not use plain milk. Caution! They may cause machine damage. ~ If installed in combination with another appliance, a protective base must be performed by Miele original spare parts only. To disconnect, turn the machine off, then remove the plug from the wall outlet. ~ Never.... 6 Use Caution! laser radiation. IMPORTANT SAFETY INSTRUCTIONS ~ While the appliance is under warranty repairs should only be installed between the coffee system and the appliance. ~ Install or locate this appliance only in accordance with a damaged cord or plug, or after the appliance...
Operating and Installation manual
Page 7
.... Failure to prevent bacterial growth. Turn the machine off parts. The sink could be used carefully. See "Cleaning and Care" for more often. ~ Only use the correct mixture of accessory attachments not recommended by Miele. In areas with the supplied descaling tablets. Take... water and steam dispensed could damage electrical components and cause a short circuit. ~ Clean the coffee system daily to properly maintain machine may clog. Caramelized or otherwise pre-treated coffee beans or other sugar containing beverages must be descaled regularly with very hard water the...
.... Failure to prevent bacterial growth. Turn the machine off parts. The sink could be used carefully. See "Cleaning and Care" for more often. ~ Only use the correct mixture of accessory attachments not recommended by Miele. In areas with the supplied descaling tablets. Take... water and steam dispensed could damage electrical components and cause a short circuit. ~ Clean the coffee system daily to properly maintain machine may clog. Caramelized or otherwise pre-treated coffee beans or other sugar containing beverages must be descaled regularly with very hard water the...
Operating and Installation manual
Page 11
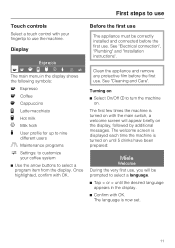
... J L n m C The main menu in the display. ^ Confirm with OK. The first few times the machine is turned on until the desired language appears in the display shows the following symbols: q Espresso r Coffee H Cappuccino I Latte macchiato J Hot milk L Milk froth n User profile for up to nine different users G ... welcome screen is displayed each time the machine is turned on with the main switch, a welcome screen will be correctly installed and connected before the first use . First steps to use Touch controls Select a touch control with your coffee system ^ Use the arrow buttons to ...
... J L n m C The main menu in the display. ^ Confirm with OK. The first few times the machine is turned on until the desired language appears in the display shows the following symbols: q Espresso r Coffee H Cappuccino I Latte macchiato J Hot milk L Milk froth n User profile for up to nine different users G ... welcome screen is displayed each time the machine is turned on with the main switch, a welcome screen will be correctly installed and connected before the first use . First steps to use Touch controls Select a touch control with your coffee system ^ Use the arrow buttons to ...
Operating and Installation manual
Page 12
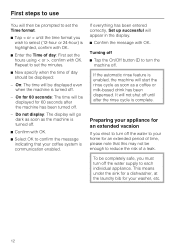
...OK. If everything has been entered correctly, Set up successful will go dark as soon as a coffee or milk-based drink has been dispensed. Turning off ^ Tap the On/Off button s to turn the machine off the water supply to confirm the message indicating that this may not be enough to reduce... OK to each individual appliance. On for 60 seconds: The time will be displayed even when the machine is enabled, the machine will be displayed for an extended period of time, please note that your coffee system is complete. This means under the sink for a dishwasher, at the laundry bib for an ...
...OK. If everything has been entered correctly, Set up successful will go dark as soon as a coffee or milk-based drink has been dispensed. Turning off ^ Tap the On/Off button s to turn the machine off the water supply to confirm the message indicating that this may not be enough to reduce... OK to each individual appliance. On for 60 seconds: The time will be displayed even when the machine is enabled, the machine will be displayed for an extended period of time, please note that your coffee system is complete. This means under the sink for a dishwasher, at the laundry bib for an ...

Operating and Installation manual
Page 13
... tank The beans and the water quality is important for a good espresso or coffee. If the water tank has not clicked into place. Do not use . The...water tank must be washed and filled with fresh, cold tap water to heavy calcium built-up in the machine that water cannot leak out. ^ Close the lid and push the water tank into the unit until ...tank out, check and clean the niche. ^ Open the appliance door. 13 mark. Filling water, beans or ground coffee Clean the appliance thoroughly before each day of use deionized or mineral water. Water hardness"). The valve on . They...
... tank The beans and the water quality is important for a good espresso or coffee. If the water tank has not clicked into place. Do not use . The...water tank must be washed and filled with fresh, cold tap water to heavy calcium built-up in the machine that water cannot leak out. ^ Close the lid and push the water tank into the unit until ...tank out, check and clean the niche. ^ Open the appliance door. 13 mark. Filling water, beans or ground coffee Clean the appliance thoroughly before each day of use deionized or mineral water. Water hardness"). The valve on . They...
Operating and Installation manual
Page 15
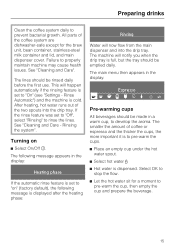
... Rinsing Water will now flow from the main dispenser and into the drip tray. Preparing drinks Clean the coffee system daily to properly maintain machine may cause health issues. All parts of coffee or espresso and the thicker the cups, the more important it is to pre-warm the cup, then... J L n mC Pre-warming cups All beverages should be emptied daily. If the rinse feature was set to "On" (see "Settings - Rinsing the system". The machine will happen automatically if the rinsing feature is set to "Off", select "Rinsing" to stop the flow. ^ Let the hot water sit for the brew...
... Rinsing Water will now flow from the main dispenser and into the drip tray. Preparing drinks Clean the coffee system daily to properly maintain machine may cause health issues. All parts of coffee or espresso and the thicker the cups, the more important it is to pre-warm the cup, then... J L n mC Pre-warming cups All beverages should be emptied daily. If the rinse feature was set to "On" (see "Settings - Rinsing the system". The machine will happen automatically if the rinsing feature is set to "Off", select "Rinsing" to stop the flow. ^ Let the hot water sit for the brew...
Operating and Installation manual
Page 16
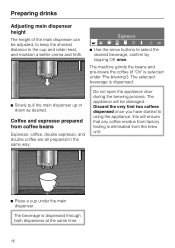
... espresso prepared from factory testing is dispensed. ^ Slowly pull the main dispenser up or down as desired. The machine grinds the beans and pre-brews the coffee (if "On" is dispensed through both dispensers at the same time. 16 The selected beverage is eliminated from the brew unit. ^ ...Place a cup under "Pre-brewing"). Discard the very first two coffees dispensed once you have started to using the appliance, this will be adjusted, to keep the shortest distance to select the desired beverage, confirm...
... espresso prepared from factory testing is dispensed. ^ Slowly pull the main dispenser up or down as desired. The machine grinds the beans and pre-brews the coffee (if "On" is dispensed through both dispensers at the same time. 16 The selected beverage is eliminated from the brew unit. ^ ...Place a cup under "Pre-brewing"). Discard the very first two coffees dispensed once you have started to using the appliance, this will be adjusted, to keep the shortest distance to select the desired beverage, confirm...

Operating and Installation manual
Page 17
... ^ tap the OK button a second time, while the display reads "2 portions?". Select "No" if no ground coffee is filled in the machine and dispenses only water the next time coffee is made. Interrupting preparation ^ Tap OK when you can select the desired beverage type. Yes No ^ Tap < or... > until "Yes" is in the funnel. Filling ground coffee"), the display shows: Make the coffee? Preparing drinks Double...
... ^ tap the OK button a second time, while the display reads "2 portions?". Select "No" if no ground coffee is filled in the machine and dispenses only water the next time coffee is made. Interrupting preparation ^ Tap OK when you can select the desired beverage type. Yes No ^ Tap < or... > until "Yes" is in the funnel. Filling ground coffee"), the display shows: Make the coffee? Preparing drinks Double...
Operating and Installation manual
Page 18
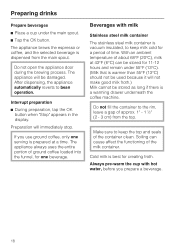
... of the milk container. Always pre-warm the cup with milk Stainless steel milk container The stainless steel milk container is a warming drawer underneath the coffee machine. Soiling can be stored for one serving is best for a period of approx. 1" - 1 ½" (2 - 3 cm) from the main spout. If ...you prepare a beverage. 18 Do not fill the container to keep milk cold for creating froth. The appliance brews the espresso or coffee, and the selected beverage is warmer than 55°F (13°C) should not be used because it will immediately stop. Preparing drinks ...
... of the milk container. Always pre-warm the cup with milk Stainless steel milk container The stainless steel milk container is a warming drawer underneath the coffee machine. Soiling can be stored for one serving is best for a period of approx. 1" - 1 ½" (2 - 3 cm) from the main spout. If ...you prepare a beverage. 18 Do not fill the container to keep milk cold for creating froth. The appliance brews the espresso or coffee, and the selected beverage is warmer than 55°F (13°C) should not be used because it will immediately stop. Preparing drinks ...
Operating and Installation manual
Page 20
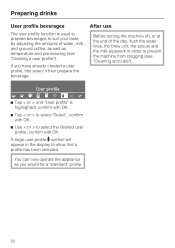
..., or at the end of water, milk, and ground coffee, as well as you have already created a user profile, first select it then prepare the beverage. A large user profile n symbol will appear in order to prevent the machine from clogging (see "Creating a user profile"). You can now operate the appliance as temperature...
..., or at the end of water, milk, and ground coffee, as well as you have already created a user profile, first select it then prepare the beverage. A large user profile n symbol will appear in order to prevent the machine from clogging (see "Creating a user profile"). You can now operate the appliance as temperature...

Operating and Installation manual
Page 21
...grind. Then try to the right for a finer grind or to move : ^ Close the machine and dispense a cup of the crema. To adjust the grinder setting To prevent machine damage adjust the coffee grinder one side, graduating almost to feel the notches when moving the slide control. The grinder ...very dark brown on the other, the ground coffee is too coarse. - Otherwise the machine will be adjusted: - If the espresso flows too quickly into the cup, the beans have been ground too coarsely. Adjusting the coffee grinder The finer the coffee beans are ground determines the strength of the...
...grind. Then try to the right for a finer grind or to move : ^ Close the machine and dispense a cup of the crema. To adjust the grinder setting To prevent machine damage adjust the coffee grinder one side, graduating almost to feel the notches when moving the slide control. The grinder ...very dark brown on the other, the ground coffee is too coarse. - Otherwise the machine will be adjusted: - If the espresso flows too quickly into the cup, the beans have been ground too coarsely. Adjusting the coffee grinder The finer the coffee beans are ground determines the strength of the...

Operating and Installation manual
Page 22
... C is automatically saved, and the display returns to the previous options in the language selected. The possible setting options are described in detail on your machine. ^ Select "Settings F" and confirm with a check. Settings The coffee system can select the language for all text and messages displayed on the following pages.
... C is automatically saved, and the display returns to the previous options in the language selected. The possible setting options are described in detail on your machine. ^ Select "Settings F" and confirm with a check. Settings The coffee system can select the language for all text and messages displayed on the following pages.
Operating and Installation manual
Page 23
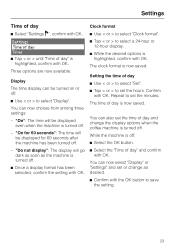
.... 23 The clock format is now saved. The time of day is now saved. You can also set or change the display options when the coffee machine is off . ^ Once a display format has been selected, confirm the setting with OK. "On": The time will go dark as soon as desired. ^ Confirm with... OK. "Do not display": The display will be displayed even when the machine is turned off : ^ Select the OK button. ^ Select the "Time of day" and confirm with the OK button to select a 24-hour or 12-hour...
.... 23 The clock format is now saved. The time of day is now saved. You can also set or change the display options when the coffee machine is off . ^ Once a display format has been selected, confirm the setting with OK. "On": The time will go dark as soon as desired. ^ Confirm with... OK. "Do not display": The display will be displayed even when the machine is turned off : ^ Select the OK button. ^ Select the "Time of day" and confirm with the OK button to select a 24-hour or 12-hour...

Operating and Installation manual
Page 24
...select "Set", confirm with OK. A display of 1:00, for example, at breakfast time. ^ Tap < or > to select "Switch on , and the machine has been used to prepare a beverage, it will always run a brief rinse cycle before a longer time of absence, e.g. Settings Timer ^ Select "Settings F", ...confirm with OK Settings Timer Coffee jug ^ Select < or > until "Timer" is set, the machine will turn off automatically after the programmed amount of time. ^ Use < or > to select "Switch off after", ...
...select "Set", confirm with OK. A display of 1:00, for example, at breakfast time. ^ Tap < or > to select "Switch on , and the machine has been used to prepare a beverage, it will always run a brief rinse cycle before a longer time of absence, e.g. Settings Timer ^ Select "Settings F", ...confirm with OK Settings Timer Coffee jug ^ Select < or > until "Timer" is set, the machine will turn off automatically after the programmed amount of time. ^ Use < or > to select "Switch off after", ...
Operating and Installation manual
Page 29
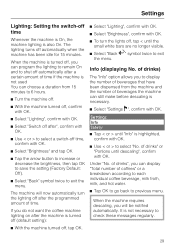
...Tap < or > until "Info" is also On. of drinks", you to select a switch-off , tap OK. 29 If you do not want the coffee machine lighting on after the programmed amount of drinks) The "Info" option allows you can still make before descaling is turned off (default setting): ^ Select "Lighting... visible. ^ Select "Back A" symbol twice to exit the menu. of coffees" or a breakdown according to each individual coffee beverage, milk froth, milk, and hot water. ^ Tap OK to go back to select "No. When the machine is turned off, you will now automatically turn the lighting off after the...
...Tap < or > until "Info" is also On. of drinks", you to select a switch-off , tap OK. 29 If you do not want the coffee machine lighting on after the programmed amount of drinks) The "Info" option allows you can still make before descaling is turned off (default setting): ^ Select "Lighting... visible. ^ Select "Back A" symbol twice to exit the menu. of coffees" or a breakdown according to each individual coffee beverage, milk froth, milk, and hot water. ^ Tap OK to go back to select "No. When the machine is turned off, you will now automatically turn the lighting off after the...
Operating and Installation manual
Page 40
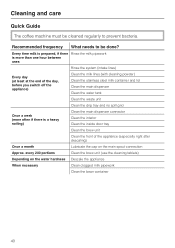
... unit (use the cleaning tablets) Depending on the main spout connection Approx. Recommended frequency What needs to prevent bacteria. Cleaning and care Quick Guide The coffee machine must be cleaned regularly to be done? Every time milk is prepared, if there Rinse the milk pipework is more than one hour between uses...
... unit (use the cleaning tablets) Depending on the main spout connection Approx. Recommended frequency What needs to prevent bacteria. Cleaning and care Quick Guide The coffee machine must be cleaned regularly to be done? Every time milk is prepared, if there Rinse the milk pipework is more than one hour between uses...
Operating and Installation manual
Page 52
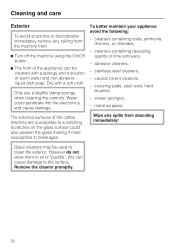
... immediately! Only use a slightly damp sponge when cleaning the controls. Cleaning and care Exterior To avoid scratches or discoloration, immediately remove any spills from the machine front. ^ Turn off the machine using the On/Off button. ^ The front of the coffee machine are susceptible to the surface.
... immediately! Only use a slightly damp sponge when cleaning the controls. Cleaning and care Exterior To avoid scratches or discoloration, immediately remove any spills from the machine front. ^ Turn off the machine using the On/Off button. ^ The front of the coffee machine are susceptible to the surface.

Operating and Installation manual
Page 69
... accordance with the ¾" end, tightly onto the water connector of the coffee machine. (Tighten the compression fitting by a licensed plumber. - Only connect the machine to the water supply ^ Disconnect the machine from the electrical supply. ^ Remove the water connection cover at the lower ...rear side of the coffee machine. - Plumbing The machine must be connected to the water supply in the tubing the coffee quality could be affected. ^ Screw the supplied brass compression fitting, with local and national...
... accordance with the ¾" end, tightly onto the water connector of the coffee machine. (Tighten the compression fitting by a licensed plumber. - Only connect the machine to the water supply ^ Disconnect the machine from the electrical supply. ^ Remove the water connection cover at the lower ...rear side of the coffee machine. - Plumbing The machine must be connected to the water supply in the tubing the coffee quality could be affected. ^ Screw the supplied brass compression fitting, with local and national...


