
Operating and Installation manual
Page 5
...accessible. Extension cords do not submerge the cord or plugs in mobile installations such as recreational vehicles or aircraft. Please contact the Miele Technical Service Department with national and local safety regulations. Repairs and other liquids. 5 Do not close the door front when ...door front is properly installed and grounded by a qualified technician. To guarantee the electrical safety of the house checked by Miele original spare parts only. Ensure that power is not supplied to the appliance while installation work by unauthorized persons could be dangerous and may...
...accessible. Extension cords do not submerge the cord or plugs in mobile installations such as recreational vehicles or aircraft. Please contact the Miele Technical Service Department with national and local safety regulations. Repairs and other liquids. 5 Do not close the door front when ...door front is properly installed and grounded by a qualified technician. To guarantee the electrical safety of the house checked by Miele original spare parts only. Ensure that power is not supplied to the appliance while installation work by unauthorized persons could be dangerous and may...

Operating and Installation manual
Page 6
...Do not look directly or with an optical instrument into the beans container. Do not put anything but coffee beans into the lighting - Contact Miele. ~ Always attach the cord to the appliance first, then plug it will damage the grinding unit. ~ Do not fill anything but ground...and stainless-steel milk container. ~ Only fill the water tank with cold, fresh tap water. Tampering with electrical connections or components and mechanical parts is dangerous and may cause machine damage. ~ If installed in combination with another appliance, a protective base must be changed daily to heavy...
...Do not look directly or with an optical instrument into the beans container. Do not put anything but coffee beans into the lighting - Contact Miele. ~ Always attach the cord to the appliance first, then plug it will damage the grinding unit. ~ Do not fill anything but ground...and stainless-steel milk container. ~ Only fill the water tank with cold, fresh tap water. Tampering with electrical connections or components and mechanical parts is dangerous and may cause machine damage. ~ If installed in combination with another appliance, a protective base must be changed daily to heavy...
Operating and Installation manual
Page 7
... putting on and taking off at the main switch when not in use the appliance outside of this range of accessory attachments not recommended by Miele. If milk is designed for more often. ~ Only use in room temperatures between 59°F and 140°F (15°C and ...cup with the supplied descaling tablets. Failure to persons. ~ The appliance is not continually cooled it may cause damage. ~ Depending on the door. Plastic parts of the unit could catch fire! ~ The hot water and steam dispensed could damage electrical components and cause a short circuit. ~ Clean the coffee ...
... putting on and taking off at the main switch when not in use the appliance outside of this range of accessory attachments not recommended by Miele. If milk is designed for more often. ~ Only use in room temperatures between 59°F and 140°F (15°C and ...cup with the supplied descaling tablets. Failure to persons. ~ The appliance is not continually cooled it may cause damage. ~ Depending on the door. Plastic parts of the unit could catch fire! ~ The hot water and steam dispensed could damage electrical components and cause a short circuit. ~ Clean the coffee ...
Operating and Installation manual
Page 15
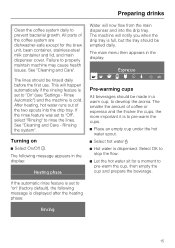
Preparing drinks Clean the coffee system daily to pre-warm the cup, then empty the cup and prepare the beverage. All parts of the two spouts into the drip tray. This will happen automatically if the rinsing feature is cold. Rinse Automatic") and the machine is set ...
Preparing drinks Clean the coffee system daily to pre-warm the cup, then empty the cup and prepare the beverage. All parts of the two spouts into the drip tray. This will happen automatically if the rinsing feature is cold. Rinse Automatic") and the machine is set ...
Operating and Installation manual
Page 41
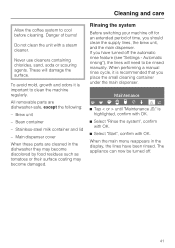
... menu reappears in the dishwasher they may become discolored by food residues such as tomatoes or their surface coating may become damaged. All removable parts are cleaned in the display, the lines have turned off for an extended period of burns! If you have been rinsed. Maintenance q...before cleaning. Danger of time, you place the small cleaning container under the main dispenser. Brew unit - Main dispenser cover When these parts are dishwasher-safe, except the following: - Rinsing the system Before switching your machine off the automatic rinse feature (see "Settings - ...
... menu reappears in the dishwasher they may become discolored by food residues such as tomatoes or their surface coating may become damaged. All removable parts are cleaned in the display, the lines have turned off for an extended period of burns! If you have been rinsed. Maintenance q...before cleaning. Danger of time, you place the small cleaning container under the main dispenser. Brew unit - Main dispenser cover When these parts are dishwasher-safe, except the following: - Rinsing the system Before switching your machine off the automatic rinse feature (see "Settings - ...
Operating and Installation manual
Page 44
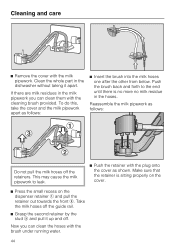
... with the brush under running water. 44 Push the brush back and forth to leak. ^ Push the retainer with the milk pipework. Clean the whole part in the hoses. Reassemble the milk pipework as follows: ^ Insert the brush into the milk hoses one after the other from below. This may cause...
... with the brush under running water. 44 Push the brush back and forth to leak. ^ Push the retainer with the milk pipework. Clean the whole part in the hoses. Reassemble the milk pipework as follows: ^ Insert the brush into the milk hoses one after the other from below. This may cause...
Operating and Installation manual
Page 46
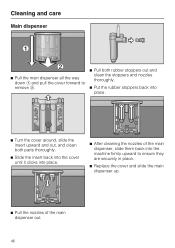
... the stoppers and nozzles thoroughly. ^ Put the rubber stoppers back into place. ^ Turn the cover around, slide the insert upward and out, and clean both parts thoroughly. ^ Slide the insert back into the cover until it clicks into place. ^ After cleaning the nozzles of the main dispenser, slide them back into...
... the stoppers and nozzles thoroughly. ^ Put the rubber stoppers back into place. ^ Turn the cover around, slide the insert upward and out, and clean both parts thoroughly. ^ Slide the insert back into the cover until it clicks into place. ^ After cleaning the nozzles of the main dispenser, slide them back into...
Operating and Installation manual
Page 49
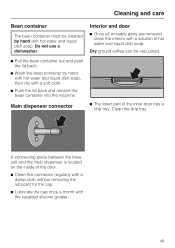
Main dispenser connector ^ The lower part of the door. ^ Clean this connector regularly with a damp cloth without removing the lubricant for the cap. ^ Lubricate the cap once a month with the supplied ... the brew unit and the main dispenser is located on the inside of the inner door has a drip tray. Interior and door ^ Once all movable parts are removed clean the interior with hot water and liquid dish soap.
Main dispenser connector ^ The lower part of the door. ^ Clean this connector regularly with a damp cloth without removing the lubricant for the cap. ^ Lubricate the cap once a month with the supplied ... the brew unit and the main dispenser is located on the inside of the inner door has a drip tray. Interior and door ^ Once all movable parts are removed clean the interior with hot water and liquid dish soap.
Operating and Installation manual
Page 50
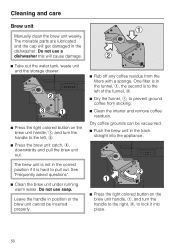
.... Cleaning and care Brew unit Manually clean the brew unit weekly. See "Frequently asked questions". ^ Clean the brew unit under running warm water. The movable parts are lubricated and the cap will cause damage. ^ Take out the water tank, waste unit and the storage drawer. ^ Press the light colored button on...
.... Cleaning and care Brew unit Manually clean the brew unit weekly. See "Frequently asked questions". ^ Clean the brew unit under running warm water. The movable parts are lubricated and the cap will cause damage. ^ Take out the water tank, waste unit and the storage drawer. ^ Press the light colored button on...
Operating and Installation manual
Page 62
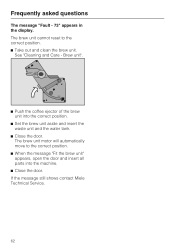
... position. ^ Take out and clean the brew unit. Frequently asked questions The message "Fault - 73" appears in the display. If the message still shows contact Miele Technical Service. 62 The brew unit cannot reset to the correct position. ^ When the message "Fit the brew unit" appears, open the door and insert...
... position. ^ Take out and clean the brew unit. Frequently asked questions The message "Fault - 73" appears in the display. If the message still shows contact Miele Technical Service. 62 The brew unit cannot reset to the correct position. ^ When the message "Fit the brew unit" appears, open the door and insert...
Operating and Installation manual
Page 63
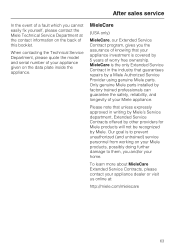
... by factory trained professionals can guarantee the safety, reliability, and longevity of your appliance given on the back of your Miele appliance. MieleCare is covered by a Miele Authorized Service Provider using genuine Miele parts. MieleCare (USA only) MieleCare, our Extended Service Contract program, gives you and/or your appliance dealer or visit us online...
... by factory trained professionals can guarantee the safety, reliability, and longevity of your appliance given on the back of your Miele appliance. MieleCare is covered by a Miele Authorized Service Provider using genuine Miele parts. MieleCare (USA only) MieleCare, our Extended Service Contract program, gives you and/or your appliance dealer or visit us online...


