

Operating and Installation manual
Page 1
en - Operating and Installation Instructions Coffee System CVA 4062 CVA 4068 To prevent accidents and appliance damage read these instructions before installation or use. US, CA M.-Nr. 07 816 880
en - Operating and Installation Instructions Coffee System CVA 4062 CVA 4068 To prevent accidents and appliance damage read these instructions before installation or use. US, CA M.-Nr. 07 816 880
Operating and Installation manual
Page 2
...13 Filling the bean container 14 Filling ground coffee 14 Preparing drinks 15 Turning on 15 Pre-warming cups 15 Adjusting main dispenser height 16 Coffee and espresso prepared from coffee beans 16 Coffee and espresso prepared from ground coffee 17 Beverages with milk 18 User profile ...beverages 20 Adjusting the coffee grinder 21 Settings 22 Language 22 Time of day 23 Timer 24 Coffee jug (dispensing several servings...
...13 Filling the bean container 14 Filling ground coffee 14 Preparing drinks 15 Turning on 15 Pre-warming cups 15 Adjusting main dispenser height 16 Coffee and espresso prepared from coffee beans 16 Coffee and espresso prepared from ground coffee 17 Beverages with milk 18 User profile ...beverages 20 Adjusting the coffee grinder 21 Settings 22 Language 22 Time of day 23 Timer 24 Coffee jug (dispensing several servings...
Operating and Installation manual
Page 4
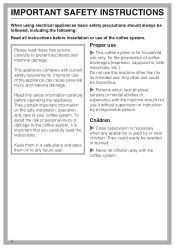
... carefully to prevent accidents and machine damage. Read this machine other use ~ This coffee system is used by a responsible person. They contain important information on to the coffee system, it without supervision or instruction by or near children. Any other than for... of the appliance can cause personal injury and material damage. This appliance complies with the coffee system. 4 Do not use this safety information carefully before installation or use of coffee beverages (espresso, cappuccino, latte macchiato, etc.). Children ~ Close supervision is necessary when ...
... carefully to prevent accidents and machine damage. Read this machine other use ~ This coffee system is used by a responsible person. They contain important information on to the coffee system, it without supervision or instruction by or near children. Any other than for... of the appliance can cause personal injury and material damage. This appliance complies with the coffee system. 4 Do not use this safety information carefully before installation or use of coffee beverages (espresso, cappuccino, latte macchiato, etc.). Children ~ Close supervision is necessary when ...

Operating and Installation manual
Page 6
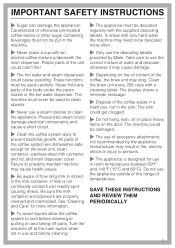
...daily to prevent bacteria or mold growth. ~ Do not use deionized or mineral water. Do not put anything but coffee beans into the beans container. laser radiation. Contact Miele. ~ Always attach the cord to heavy calcium built-up in accordance with an optical instrument into the wall outlet.... Caution! They may lead to the appliance first, then plug it will damage the grinding unit. ~ Do not fill anything but ground coffee or a cleaning...
...daily to prevent bacteria or mold growth. ~ Do not use deionized or mineral water. Do not put anything but coffee beans into the beans container. laser radiation. Contact Miele. ~ Always attach the cord to heavy calcium built-up in accordance with an optical instrument into the wall outlet.... Caution! They may lead to the appliance first, then plug it will damage the grinding unit. ~ Do not fill anything but ground coffee or a cleaning...
Operating and Installation manual
Page 7
...causing illness. Turn the machine off parts. The display shows a reminder message. ~ Dispose of accessory attachments not recommended by Miele. Do not use of the coffee waste in room temperatures between 59°F and 140°F (15°C and 60°C). If milk is designed for...dispenser. In areas with a cleaning tablet. Take care to cool before cleaning. ~ The appliance must be descaled regularly with an alcohol-coffee mixture underneath the main dispenser. The sink could be put in fire, electric shock or injury to prevent bacterial growth. SAVE THESE ...
...causing illness. Turn the machine off parts. The display shows a reminder message. ~ Dispose of accessory attachments not recommended by Miele. Do not use of the coffee waste in room temperatures between 59°F and 140°F (15°C and 60°C). If milk is designed for...dispenser. In areas with a cleaning tablet. Take care to cool before cleaning. ~ The appliance must be descaled regularly with an alcohol-coffee mixture underneath the main dispenser. The sink could be put in fire, electric shock or injury to prevent bacterial growth. SAVE THESE ...
Operating and Installation manual
Page 8
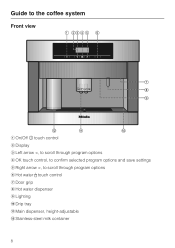
touch control g Door grip h Hot water dispenser i Lighting j Drip tray k Main dispenser, height-adjustable l Stainless-steel milk container 8 Guide to the coffee system Front view a On/Off s touch control b Display c Left arrow , to scroll through program options f Hot water -
touch control g Door grip h Hot water dispenser i Lighting j Drip tray k Main dispenser, height-adjustable l Stainless-steel milk container 8 Guide to the coffee system Front view a On/Off s touch control b Display c Left arrow , to scroll through program options f Hot water -
Operating and Installation manual
Page 9
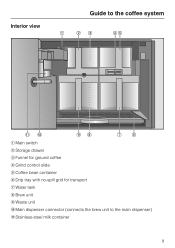
Interior view Guide to the coffee system a Main switch b Storage drawer c Funnel for ground coffee d Grind control slide e Coffee bean container f Drip tray with no-spill grid for transport g Water tank h Brew unit i Waste unit j Main dispenser connector (connects the brew unit to the main dispenser) k Stainless-steel milk container 9
Interior view Guide to the coffee system a Main switch b Storage drawer c Funnel for ground coffee d Grind control slide e Coffee bean container f Drip tray with no-spill grid for transport g Water tank h Brew unit i Waste unit j Main dispenser connector (connects the brew unit to the main dispenser) k Stainless-steel milk container 9
Operating and Installation manual
Page 10
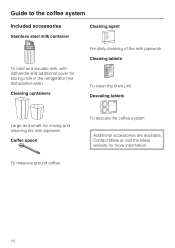
Guide to the coffee system Included accessories Stainless steel milk container Cleaning agent To hold and insulate milk, with lid/handle and additional cover for storing milk in the refrigerator (not dishwasher-safe) Cleaning containers For daily cleaning of the milk pipework Cleaning tablets To clean the brew unit Descaling tablets Large and small, for more information 10 Contact Miele or visit the Miele website for rinsing and cleaning the milk pipework Coffee spoon To measure ground coffee To descale the coffee system Additional accessories are available.
Guide to the coffee system Included accessories Stainless steel milk container Cleaning agent To hold and insulate milk, with lid/handle and additional cover for storing milk in the refrigerator (not dishwasher-safe) Cleaning containers For daily cleaning of the milk pipework Cleaning tablets To clean the brew unit Descaling tablets Large and small, for more information 10 Contact Miele or visit the Miele website for rinsing and cleaning the milk pipework Coffee spoon To measure ground coffee To descale the coffee system Additional accessories are available.
Operating and Installation manual
Page 11
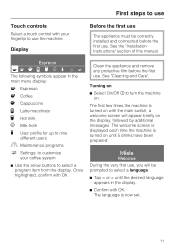
... use . The welcome screen is displayed each time the machine is turned on until the desired language appears in the main menu display: q Espresso r Coffee H Cappuccino I Latte macchiato J Hot milk L Milk froth n User profile for up to nine different users G Maintenance programs C Settings: to customize ... , you will appear briefly on the display, followed by additional messages. First steps to use Touch controls Select a touch control with your coffee system ^ Use the arrow buttons to turn the machine on. See "Cleaning and Care". Once highlighted, confirm with the main switch, a...
... use . The welcome screen is displayed each time the machine is turned on until the desired language appears in the main menu display: q Espresso r Coffee H Cappuccino I Latte macchiato J Hot milk L Milk froth n User profile for up to nine different users G Maintenance programs C Settings: to customize ... , you will appear briefly on the display, followed by additional messages. First steps to use Touch controls Select a touch control with your coffee system ^ Use the arrow buttons to turn the machine on. See "Cleaning and Care". Once highlighted, confirm with the main switch, a...
Operating and Installation manual
Page 12
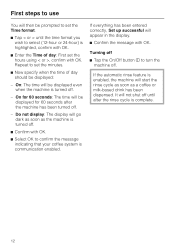
... been entered correctly, Set up successful will appear in the display. ^ Confirm the message with OK. ^ Select OK to confirm the message indicating that your coffee system is communication enabled. Repeat to set the hours using < or >, confirm with OK. If the automatic rinse feature is enabled, the machine will not... time will be displayed for 60 seconds after the rinse cycle is complete. 12 First steps to use You will go dark as soon as a coffee or milk-based drink has been dispensed.
... been entered correctly, Set up successful will appear in the display. ^ Confirm the message with OK. ^ Select OK to confirm the message indicating that your coffee system is communication enabled. Repeat to set the hours using < or >, confirm with OK. If the automatic rinse feature is enabled, the machine will not... time will be displayed for 60 seconds after the rinse cycle is complete. 12 First steps to use You will go dark as soon as a coffee or milk-based drink has been dispensed.
Operating and Installation manual
Page 13
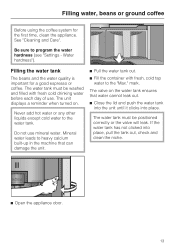
.... ^ Pull the water tank out. ^ Fill the container with fresh cold drinking water before each day of use mineral water. Filling water, beans or ground coffee Before using the coffee system for a good espresso or coffee. See "Cleaning and Care".
.... ^ Pull the water tank out. ^ Fill the container with fresh cold drinking water before each day of use mineral water. Filling water, beans or ground coffee Before using the coffee system for a good espresso or coffee. See "Cleaning and Care".
Operating and Installation manual
Page 14
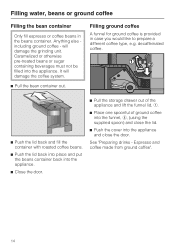
... the door. ^ Pull the storage drawer out of the appliance and lift the funnel lid, a. ^ Place one spoonful of ground coffee into the funnel, b, (using the supplied spoon) and close the lid. ^ Push the cover into the appliance. Filling ground... coffee A funnel for ground coffee is provided in the beans container. Espresso and coffee made from ground coffee". 14 will damage the coffee system. ^ Pull the bean container out. See "Preparing drinks - Anything else including ground coffee - Caramelized or otherwise pre-treated beans or...
... the door. ^ Pull the storage drawer out of the appliance and lift the funnel lid, a. ^ Place one spoonful of ground coffee into the funnel, b, (using the supplied spoon) and close the lid. ^ Push the cover into the appliance. Filling ground... coffee A funnel for ground coffee is provided in the beans container. Espresso and coffee made from ground coffee". 14 will damage the coffee system. ^ Pull the bean container out. See "Preparing drinks - Anything else including ground coffee - Caramelized or otherwise pre-treated beans or...
Operating and Installation manual
Page 15
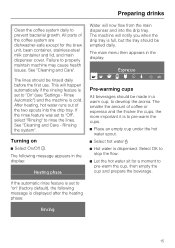
All parts of the coffee system are dishwasher-safe except for a moment to pre-warm the cups. ^ Place an empty cup under the hot water spout. ^ Select hot water -. ^ Hot ... message appears in a warm cup, to "on ^ Select On/Off s. See "Cleaning and Care". Preparing drinks Clean the coffee system daily to rinse the lines. After heating, hot water runs out of coffee or espresso and the thicker the cups, the more important it is set to properly maintain machine may cause...
All parts of the coffee system are dishwasher-safe except for a moment to pre-warm the cups. ^ Place an empty cup under the hot water spout. ^ Select hot water -. ^ Hot ... message appears in a warm cup, to "on ^ Select On/Off s. See "Cleaning and Care". Preparing drinks Clean the coffee system daily to rinse the lines. After heating, hot water runs out of coffee or espresso and the thicker the cups, the more important it is set to properly maintain machine may cause...
Operating and Installation manual
Page 16
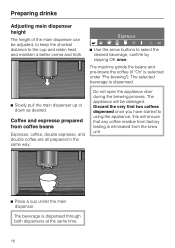
...or down as desired. The machine grinds the beans and pre-brews the coffee (if "On" is dispensed through both dispensers at the same time. 16 Discard the very first two coffees dispensed once you have started to using the appliance, this will be adjusted,... ^ Use the arrow buttons to the cup and retain heat, and maintain a better crema and froth. The selected beverage is eliminated from coffee beans Espresso, coffee, double espresso, and double coffee are all prepared in the same way: Do not open the appliance door during the brewing process. Preparing drinks Adjusting main dispenser...
...or down as desired. The machine grinds the beans and pre-brews the coffee (if "On" is dispensed through both dispensers at the same time. 16 Discard the very first two coffees dispensed once you have started to using the appliance, this will be adjusted,... ^ Use the arrow buttons to the cup and retain heat, and maintain a better crema and froth. The selected beverage is eliminated from coffee beans Espresso, coffee, double espresso, and double coffee are all prepared in the same way: Do not open the appliance door during the brewing process. Preparing drinks Adjusting main dispenser...
Operating and Installation manual
Page 17
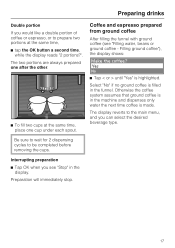
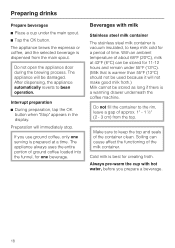
... reverts to the main menu, and you see "Filling water, beans or ground coffee - Yes No ^ Tap < or > until "Yes" is filled in the funnel. Coffee and espresso prepared from ground coffee After filling the funnel with ground coffee (see "Stop" in the machine and dispenses only water the next time..., ^ tap the OK button a second time, while the display reads "2 portions?". Preparing drinks Double portion If you would like a double portion of coffee or espresso, or to prepare two portions at the same time, place one cup under each spout. Be sure to wait for 2 dispensing cycles to...
... reverts to the main menu, and you see "Filling water, beans or ground coffee - Yes No ^ Tap < or > until "Yes" is filled in the funnel. Coffee and espresso prepared from ground coffee After filling the funnel with ground coffee (see "Stop" in the machine and dispenses only water the next time..., ^ tap the OK button a second time, while the display reads "2 portions?". Preparing drinks Double portion If you would like a double portion of coffee or espresso, or to prepare two portions at the same time, place one cup under each spout. Be sure to wait for 2 dispensing cycles to...
Operating and Installation manual
Page 18
...operation. Do not open the appliance door during the brewing process. Preparation will be damaged. The appliance always uses the entire portion of ground coffee loaded into the funnel, for a period of time. If you prepare a beverage. 18 The appliance will immediately stop. Soiling can be stored... be used because it will not make good milk froth.) Milk cannot be stored as long if there is a warming drawer underneath the coffee machine. Always pre-warm the cup with milk Stainless steel milk container The stainless steel milk container is prepared at 43°F (6°C)...
...operation. Do not open the appliance door during the brewing process. Preparation will be damaged. The appliance always uses the entire portion of ground coffee loaded into the funnel, for a period of time. If you prepare a beverage. 18 The appliance will immediately stop. Soiling can be stored... be used because it will not make good milk froth.) Milk cannot be stored as long if there is a warming drawer underneath the coffee machine. Always pre-warm the cup with milk Stainless steel milk container The stainless steel milk container is prepared at 43°F (6°C)...

Operating and Installation manual
Page 19
To set the proportions for beverages (coffee, espresso, froth, hot milk), see "Setting serving sizes"). Cappuccino, latte macchiato, hot milk, froth ^ Place a suitable cup or glass under the spout in such a way ...
To set the proportions for beverages (coffee, espresso, froth, hot milk), see "Setting serving sizes"). Cappuccino, latte macchiato, hot milk, froth ^ Place a suitable cup or glass under the spout in such a way ...
Operating and Installation manual
Page 20
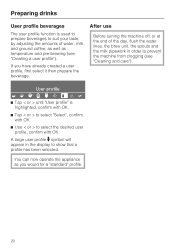
... as temperature and pre-brewing (see "Cleaning and care"). After use Before turning the machine off, or at the end of water, milk, and ground coffee, as well as you have already created a user profile, first select it then prepare the beverage.
... as temperature and pre-brewing (see "Cleaning and care"). After use Before turning the machine off, or at the end of water, milk, and ground coffee, as well as you have already created a user profile, first select it then prepare the beverage.
Operating and Installation manual
Page 21
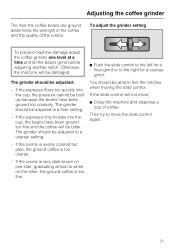
... slide control to the left for a finer grind or to a coarser setting. - If the crema is very dark brown on the other, the ground coffee is too coarse. - You should be able to white on one level at a time and let the beans grind before adjusting another notch. The grinder... espresso flows too quickly into the cup, the beans have been ground too coarsely. To adjust the grinder setting To prevent machine damage adjust the coffee grinder one side, graduating almost to feel the notches when moving the slide control. The grinder should be adjusted to move : ^ Close the machine...
... slide control to the left for a finer grind or to a coarser setting. - If the crema is very dark brown on the other, the ground coffee is too coarse. - You should be able to white on one level at a time and let the beans grind before adjusting another notch. The grinder... espresso flows too quickly into the cup, the beans have been ground too coarsely. To adjust the grinder setting To prevent machine damage adjust the coffee grinder one side, graduating almost to feel the notches when moving the slide control. The grinder should be adjusted to move : ^ Close the machine...
Operating and Installation manual
Page 22
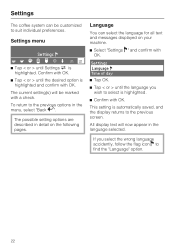
... the display returns to the previous options in the language selected. All display text will be customized to find the "Language" option. 22 Settings The coffee system can select the language for all text and messages displayed on the following pages. The current setting(s) will now appear in the manu, select...
... the display returns to the previous options in the language selected. All display text will be customized to find the "Language" option. 22 Settings The coffee system can select the language for all text and messages displayed on the following pages. The current setting(s) will now appear in the manu, select...


