
Operating and Installation manual
Page 2
of coffee 26 Pre-brewing 26 Temperature 27 Automatic rinsing 27 Steam system 28 Lighting: Adjusting the brightness 28 Lighting: Setting the switch-off time 29 Info (displaying No. Contents ...
of coffee 26 Pre-brewing 26 Temperature 27 Automatic rinsing 27 Steam system 28 Lighting: Adjusting the brightness 28 Lighting: Setting the switch-off time 29 Info (displaying No. Contents ...

Operating and Installation manual
Page 6
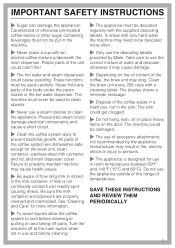
...SAFETY INSTRUCTIONS ~ Do not let the cord hang over the edge of a table or counter, or touch hot surfaces. ~ Do not operate any manner. Contact Miele. ~ Always attach the cord to the appliance first, then plug it will damage the grinding unit. ~ Do not fill anything but ground coffee or a cleaning... tablet (for the brew unit) in the funnel for water and milk and thoroughly clean the coffee system and stainless-steel milk container. ~ Only fill the water tank with...
...SAFETY INSTRUCTIONS ~ Do not let the cord hang over the edge of a table or counter, or touch hot surfaces. ~ Do not operate any manner. Contact Miele. ~ Always attach the cord to the appliance first, then plug it will damage the grinding unit. ~ Do not fill anything but ground coffee or a cleaning... tablet (for the brew unit) in the funnel for water and milk and thoroughly clean the coffee system and stainless-steel milk container. ~ Only fill the water tank with...
Operating and Installation manual
Page 7
... catch fire! ~ The hot water and steam dispensed could be damaged. ~ The use of accessory attachments not recommended by Miele. Be sure the milk container and pipework are dishwasher-safe except for the brew unit, bean container, stainless-steel milk container and lid, and main dispenser cover. Clean the... the milk container. Do not use in the machine. ~ Never place a cup with a cleaning tablet. Never hold any parts of the coffee, the brew unit may cause damage. ~ Depending on the door. Pressurized steam could get clogged. ~ Do not hang, lean, sit or place heavy items on the...
... catch fire! ~ The hot water and steam dispensed could be damaged. ~ The use of accessory attachments not recommended by Miele. Be sure the milk container and pipework are dishwasher-safe except for the brew unit, bean container, stainless-steel milk container and lid, and main dispenser cover. Clean the... the milk container. Do not use in the machine. ~ Never place a cup with a cleaning tablet. Never hold any parts of the coffee, the brew unit may cause damage. ~ Depending on the door. Pressurized steam could get clogged. ~ Do not hang, lean, sit or place heavy items on the...
Operating and Installation manual
Page 9
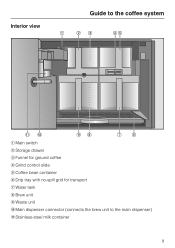
Interior view Guide to the coffee system a Main switch b Storage drawer c Funnel for ground coffee d Grind control slide e Coffee bean container f Drip tray with no-spill grid for transport g Water tank h Brew unit i Waste unit j Main dispenser connector (connects the brew unit to the main dispenser) k Stainless-steel milk container 9
Interior view Guide to the coffee system a Main switch b Storage drawer c Funnel for ground coffee d Grind control slide e Coffee bean container f Drip tray with no-spill grid for transport g Water tank h Brew unit i Waste unit j Main dispenser connector (connects the brew unit to the main dispenser) k Stainless-steel milk container 9
Operating and Installation manual
Page 10
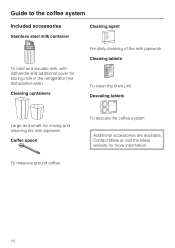
Contact Miele or visit the Miele website for rinsing and cleaning the milk pipework Coffee spoon To measure ground coffee To descale the coffee system Additional accessories are available. Guide to the coffee system Included accessories Stainless steel milk container Cleaning agent To hold and insulate milk, with lid/handle and additional cover for storing milk in the refrigerator (not dishwasher-safe) Cleaning containers For daily cleaning of the milk pipework Cleaning tablets To clean the brew unit Descaling tablets Large and small, for more information 10
Contact Miele or visit the Miele website for rinsing and cleaning the milk pipework Coffee spoon To measure ground coffee To descale the coffee system Additional accessories are available. Guide to the coffee system Included accessories Stainless steel milk container Cleaning agent To hold and insulate milk, with lid/handle and additional cover for storing milk in the refrigerator (not dishwasher-safe) Cleaning containers For daily cleaning of the milk pipework Cleaning tablets To clean the brew unit Descaling tablets Large and small, for more information 10
Operating and Installation manual
Page 15
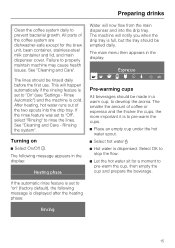
... the first use. Turning on " (factory default), the following message appears in a warm cup, to stop the flow. ^ Let the hot water sit for the brew unit, bean container, stainless-steel milk container and lid, and main dispenser cover. The smaller the amount of the two spouts into the drip tray...
... the first use. Turning on " (factory default), the following message appears in a warm cup, to stop the flow. ^ Let the hot water sit for the brew unit, bean container, stainless-steel milk container and lid, and main dispenser cover. The smaller the amount of the two spouts into the drip tray...
Operating and Installation manual
Page 16
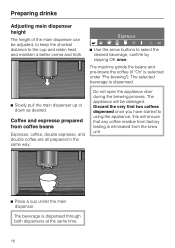
...adjusted, to keep the shortest distance to select the desired beverage, confirm by tapping OK once. The machine grinds the beans and pre-brews the coffee (if "On" is dispensed through both dispensers at the same time. 16 The beverage is selected under the main dispenser... drinks Adjusting main dispenser height The height of the main dispenser can be damaged. Coffee and espresso prepared from the brew unit. ^ Place a cup under "Pre-brewing"). The selected beverage is eliminated from coffee beans Espresso, coffee, double espresso, and double coffee are all prepared in...
...adjusted, to keep the shortest distance to select the desired beverage, confirm by tapping OK once. The machine grinds the beans and pre-brews the coffee (if "On" is dispensed through both dispensers at the same time. 16 The beverage is selected under the main dispenser... drinks Adjusting main dispenser height The height of the main dispenser can be damaged. Coffee and espresso prepared from the brew unit. ^ Place a cup under "Pre-brewing"). The selected beverage is eliminated from coffee beans Espresso, coffee, double espresso, and double coffee are all prepared in...
Operating and Installation manual
Page 18
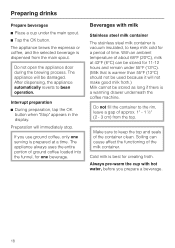
...at a time. Always pre-warm the cup with milk Stainless steel milk container The stainless steel milk container is dispensed from the top. The appliance brews the espresso or coffee, and the selected beverage is vacuum insulated, to the rim, leave a gap of ground coffee loaded into the funnel, ...milk is prepared at 43°F (6°C) can be stored for a period of the container clean. Do not open the appliance door during the brewing process. After dispensing, the appliance automatically reverts to keep milk cold for 11-12 hours and remain under the main spout. ^ Tap the OK button...
...at a time. Always pre-warm the cup with milk Stainless steel milk container The stainless steel milk container is dispensed from the top. The appliance brews the espresso or coffee, and the selected beverage is vacuum insulated, to the rim, leave a gap of ground coffee loaded into the funnel, ...milk is prepared at 43°F (6°C) can be stored for a period of the container clean. Do not open the appliance door during the brewing process. After dispensing, the appliance automatically reverts to keep milk cold for 11-12 hours and remain under the main spout. ^ Tap the OK button...
Operating and Installation manual
Page 20
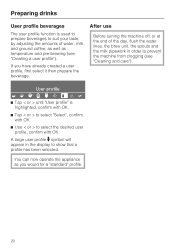
... < or > until "User profile" is used to prepare beverages to suit your taste, by adjusting the amounts of the day, flush the water lines, the brew unit, the spouts and the milk pipework in the display to select the desired user profile, confirm with OK. ^ Use < or > to show that a profile... well as you have already created a user profile, first select it then prepare the beverage. You can now operate the appliance as temperature and pre-brewing (see "Cleaning and care"). If you would for a "standard" profile. 20
... < or > until "User profile" is used to prepare beverages to suit your taste, by adjusting the amounts of the day, flush the water lines, the brew unit, the spouts and the milk pipework in the display to select the desired user profile, confirm with OK. ^ Use < or > to show that a profile... well as you have already created a user profile, first select it then prepare the beverage. You can now operate the appliance as temperature and pre-brewing (see "Cleaning and care"). If you would for a "standard" profile. 20

Operating and Installation manual
Page 25
Confirm with OK. ^ Tap < or > to be individually ground, brewed, and dispensed. Repeat to set the hours. Activate ^ Use < or > to activate (select the check box) or deactivate (clear the check box) the desired option. ... used to prepare a beverage, it will turn servings, one immediately after the coffee system off. With this function, you wish to set the minutes. The brewing process will report the progress made. another (max. 1 qt / 1 l). the amount ^ Tap the right arrow until "Coffee jug" is turned on at 8 Switch off at...
Confirm with OK. ^ Tap < or > to be individually ground, brewed, and dispensed. Repeat to set the hours. Activate ^ Use < or > to activate (select the check box) or deactivate (clear the check box) the desired option. ... used to prepare a beverage, it will turn servings, one immediately after the coffee system off. With this function, you wish to set the minutes. The brewing process will report the progress made. another (max. 1 qt / 1 l). the amount ^ Tap the right arrow until "Coffee jug" is turned on at 8 Switch off at...
Operating and Installation manual
Page 26
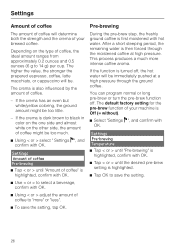
... < or > adjust the amount of coffee to "more intense coffee aroma. Pre-brewing During the pre-brew step, the freshly ground coffee is turned off . You can program normal or long pre-brew or turn the pre-brew function off , the hot water will be immediately pushed at a high pressure through the...> until "Amount of coffee" is highlighted. ^ Tap OK to select a beverage, confirm with hot water. The default factory setting for the pre-brew function of your brewed coffee. If the crema has an even but white/yellow coloring, the ground amount might be too much more " or "less". ^ To save ...
... < or > adjust the amount of coffee to "more intense coffee aroma. Pre-brewing During the pre-brew step, the freshly ground coffee is turned off . You can program normal or long pre-brew or turn the pre-brew function off , the hot water will be immediately pushed at a high pressure through the...> until "Amount of coffee" is highlighted. ^ Tap OK to select a beverage, confirm with hot water. The default factory setting for the pre-brew function of your brewed coffee. If the crema has an even but white/yellow coloring, the ground amount might be too much more " or "less". ^ To save ...

Operating and Installation manual
Page 33
...), Brightness (maximum) - All settings are now reset to the factory default or delete any user profiles. ^ Select "Settings F", confirm with OK. Showroom program (Off) - Pre-brewing (without) - Lighting: Brightness (medium) - Two options are deleted. Time display (On for both deactivated) - Factory default settings - Volume: Buzzer tones and keypad tone (both On...
...), Brightness (maximum) - All settings are now reset to the factory default or delete any user profiles. ^ Select "Settings F", confirm with OK. Showroom program (Off) - Pre-brewing (without) - Lighting: Brightness (medium) - Two options are deleted. Time display (On for both deactivated) - Factory default settings - Volume: Buzzer tones and keypad tone (both On...

Operating and Installation manual
Page 37
... profiles already set . Serving size of coffee - Create user profile to delete a user profile. - User profiles If the appliance is highlighted, confirm with OK. Pre-brew See "Setting the serving sizes" and "Settings". Revert: The appliance can save up to use , confirm with OK. + Espresso John qr H I J L n m C To show that a user...
... profiles already set . Serving size of coffee - Create user profile to delete a user profile. - User profiles If the appliance is highlighted, confirm with OK. Pre-brew See "Setting the serving sizes" and "Settings". Revert: The appliance can save up to use , confirm with OK. + Espresso John qr H I J L n m C To show that a user...
Operating and Installation manual
Page 40
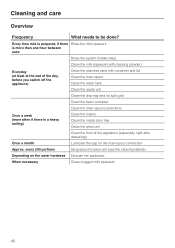
... container Clean the main spout connections Once a week (more often if there is a heavy soiling) Clean the interior Clean the inside door tray Clean the brew unit Clean the front of the appliance (especially right after descaling) Once a month Lubricate the cap on the water hardness Descale the appliance When necessary...
... container Clean the main spout connections Once a week (more often if there is a heavy soiling) Clean the interior Clean the inside door tray Clean the brew unit Clean the front of the appliance (especially right after descaling) Once a month Lubricate the cap on the water hardness Descale the appliance When necessary...
Operating and Installation manual
Page 41
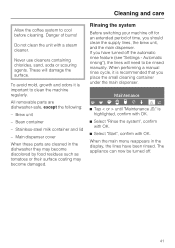
Brew unit - Bean container - If you have been rinsed. Maintenance q r HI J L n mC ^ Tap < or > until "Maintenance m" is highlighted, confirm with OK. ^ Select "Rinse the system", confirm ... When these parts are dishwasher-safe, except the following: - When performing a manual rinse cycle, it is recommended that you should clean the supply lines, the brew unit, and the main dispenser. The appliance can now be rinsed manually. Stainless-steel milk container and lid - Automatic rinsing"), the lines will damage the...
Brew unit - Bean container - If you have been rinsed. Maintenance q r HI J L n mC ^ Tap < or > until "Maintenance m" is highlighted, confirm with OK. ^ Select "Rinse the system", confirm ... When these parts are dishwasher-safe, except the following: - When performing a manual rinse cycle, it is recommended that you should clean the supply lines, the brew unit, and the main dispenser. The appliance can now be rinsed manually. Stainless-steel milk container and lid - Automatic rinsing"), the lines will damage the...
Operating and Installation manual
Page 49
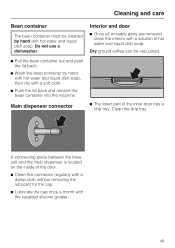
... movable parts are removed clean the interior with the supplied silicone grease. 49 Clean the drip tray. Do not use a dishwasher. A connecting piece between the brew unit and the main dispenser is located on the inside of the door. ^ Clean this connector regularly with a damp cloth without removing the lubricant for...
... movable parts are removed clean the interior with the supplied silicone grease. 49 Clean the drip tray. Do not use a dishwasher. A connecting piece between the brew unit and the main dispenser is located on the inside of the door. ^ Clean this connector regularly with a damp cloth without removing the lubricant for...
Operating and Installation manual
Page 50
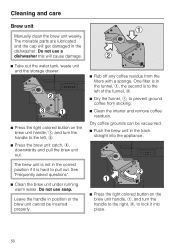
... a dishwasher this will get damaged in the funnel, a, the second is hard to lock it into the appliance. ^ Press the light colored button on the brew unit handle, a, and turn the handle to the right, b, to pull out. Do not use soap. Dry coffee grounds can be inserted properly. ^ Rub... off any coffee residue from sticking. ^ Clean the interior and remove coffee residues. Leave the handle in position or the brew unit cannot be vacuumed. ^ Push the brew unit in the correct position if it is to the left of the funnel, b. ^ Dry the funnel, a, to the left, b. ^ ...
... a dishwasher this will get damaged in the funnel, a, the second is hard to lock it into the appliance. ^ Press the light colored button on the brew unit handle, a, and turn the handle to the right, b, to pull out. Do not use soap. Dry coffee grounds can be inserted properly. ^ Rub... off any coffee residue from sticking. ^ Clean the interior and remove coffee residues. Leave the handle in position or the brew unit cannot be vacuumed. ^ Push the brew unit in the correct position if it is to the left of the funnel, b. ^ Dry the funnel, a, to the left, b. ^ ...

Operating and Installation manual
Page 51
... cleaning process. 51 Maintenance q r HI J L n mC ^ Tap < or > until the machine is highlighted, confirm with OK. ^ Select "Clean brew unit", confirm with OK. ^ Select "Start", confirm with the enclosed detergent tablets. The cleaning tablets can clog. The inside of the coffee, the... brew unit can be purchased from Miele. Cleaning and care Cleaning/Degreasing the brew unit Depending on the oil content of the machine is also rinsed, therefore you will still have to...
... cleaning process. 51 Maintenance q r HI J L n mC ^ Tap < or > until the machine is highlighted, confirm with OK. ^ Select "Clean brew unit", confirm with OK. ^ Select "Start", confirm with the enclosed detergent tablets. The cleaning tablets can clog. The inside of the coffee, the... brew unit can be purchased from Miele. Cleaning and care Cleaning/Degreasing the brew unit Depending on the oil content of the machine is also rinsed, therefore you will still have to...
Operating and Installation manual
Page 52
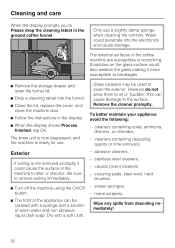
... funnel. abrasive cleaners, - To better maintain your appliance avoid the following: - caustic (oven) cleaners, - Be sure to the surface. Only use . stainless steel cleaners, - The brew unit is now degreased, and the machine is not removed promptly it more susceptible to scratching. Glass cleaners may be cleaned with a soft cloth. Remove...
... funnel. abrasive cleaners, - To better maintain your appliance avoid the following: - caustic (oven) cleaners, - Be sure to the surface. Only use . stainless steel cleaners, - The brew unit is now degreased, and the machine is not removed promptly it more susceptible to scratching. Glass cleaners may be cleaned with a soft cloth. Remove...
Operating and Installation manual
Page 57
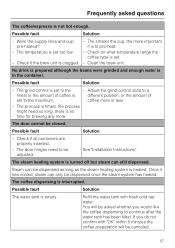
...is heated. The temperature is interrupted. Possible fault Solution - Steam can only be dispensed as long as the steam heating system is no time for brewing any more. The coffee dispensing is set . - If you would like the coffee dispensing to the maximum. it has cooled, steam can be... dispensed once the steam system has heated. Check on what temperature range the coffee type is empty. Clean the brew unit. Once it is timed, the process might need to pre-heat. - Possible fault Solution The water tank is set too low. - Possible...
...is heated. The temperature is interrupted. Possible fault Solution - Steam can only be dispensed as long as the steam heating system is no time for brewing any more. The coffee dispensing is set . - If you would like the coffee dispensing to the maximum. it has cooled, steam can be... dispensed once the steam system has heated. Check on what temperature range the coffee type is empty. Clean the brew unit. Once it is timed, the process might need to pre-heat. - Possible fault Solution The water tank is set too low. - Possible...


