Operating and Installation manual
Page 1
US, CA M.-Nr. 07 357 080 Operating and Installation Instructions Coffee System CVA 2662 To prevent accidents and appliance damage read these instructions before installation or use. en -
US, CA M.-Nr. 07 357 080 Operating and Installation Instructions Coffee System CVA 2662 To prevent accidents and appliance damage read these instructions before installation or use. en -
Operating and Installation manual
Page 2
...33 Info (displaying No. Contents IMPORTANT SAFETY INSTRUCTIONS 4 Guide to the coffee system 8 Display 10 First steps to use 11 Filling water and coffee capsules 13 Allocating various coffee types 15 Making coffee / espresso 17 Coffee and Espresso 18 Preparing hot milk, frothed milk, and Cappuccino 19 ...After use 22 Setting serving sizes 23 User profiles 25 Selecting a user profile 25 Setting a user profile 25 Making coffee / espresso with user profiles 27 Setting serving sizes for user profiles 27 Settings 28 Selecting a language 28 Time of drinks 33 System...
...33 Info (displaying No. Contents IMPORTANT SAFETY INSTRUCTIONS 4 Guide to the coffee system 8 Display 10 First steps to use 11 Filling water and coffee capsules 13 Allocating various coffee types 15 Making coffee / espresso 17 Coffee and Espresso 18 Preparing hot milk, frothed milk, and Cappuccino 19 ...After use 22 Setting serving sizes 23 User profiles 25 Selecting a user profile 25 Setting a user profile 25 Making coffee / espresso with user profiles 27 Setting serving sizes for user profiles 27 Settings 28 Selecting a language 28 Time of drinks 33 System...

Operating and Installation manual
Page 3
Contents Installation instructions 61 Caring for the environment 62 Electrical connection 63 Installation 64 Coffee glossary 66 The Espresso range 67 The "Pure Origin" Espresso range 68 The Lungo range 69 3
Contents Installation instructions 61 Caring for the environment 62 Electrical connection 63 Installation 64 Coffee glossary 66 The Espresso range 67 The "Pure Origin" Espresso range 68 The Lungo range 69 3
Operating and Installation manual
Page 4
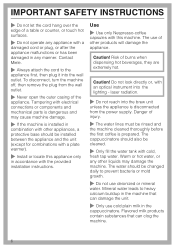
... (up to any appliance is necessary when any future user. ~ Persons which lack physical, sensory or mental abilities or experience with the coffee system. ~ Install the appliance in an area where it without supervision or instruction by or near children. They contain important information on to...day), for its intended use of the appliance can cause personal injury and material damage. Any other than for the preparation of your coffee system. Read this machine other use it will not be scalded or burned. ~ Never let children play with the machine should always ...
... (up to any appliance is necessary when any future user. ~ Persons which lack physical, sensory or mental abilities or experience with the coffee system. ~ Install the appliance in an area where it without supervision or instruction by or near children. They contain important information on to...day), for its intended use of the appliance can cause personal injury and material damage. Any other than for the preparation of your coffee system. Read this machine other use it will not be scalded or burned. ~ Never let children play with the machine should always ...
Operating and Installation manual
Page 6
...Nespresso-coffee capsules with an optical instrument into the lighting - Caution! Do not look directly or, with this appliance only in accordance with the provided installation instructions. Warm or hot water, or any manner. Flavored milk products contain substances that can clog the machine. 6 Contact Miele.... plate warmer). ~ Install or locate this machine. The cappuccinatore should also be rinsed and the machine cleaned thoroughly before the first coffee is disconnected from the wall outlet. ~ Never open the outer casing of the appliance. To disconnect, turn the machine off, then...
...Nespresso-coffee capsules with an optical instrument into the lighting - Caution! Do not look directly or, with this appliance only in accordance with the provided installation instructions. Warm or hot water, or any manner. Flavored milk products contain substances that can clog the machine. 6 Contact Miele.... plate warmer). ~ Install or locate this machine. The cappuccinatore should also be rinsed and the machine cleaned thoroughly before the first coffee is disconnected from the wall outlet. ~ Never open the outer casing of the appliance. To disconnect, turn the machine off, then...
Operating and Installation manual
Page 7
...~ The capsule plate will soil more or less depending on injury. ~ Do not reach into the perforator. In areas with an alcohol-coffee mixture underneath the coffee dispenser. Injuries may jam in use a steam cleaner to be used . Do not use damaged, broken or dented capsules! The machine ... used carefully. Danger of burns. ~ The coffee system must never be used to clean objects. ~ Never use and before cleaning. ~ The water in fire, electric shock or injury to use of accessories not recommended by Miele and be damaged. ~ The use the correct mixture of water and descaler...
...~ The capsule plate will soil more or less depending on injury. ~ Do not reach into the perforator. In areas with an alcohol-coffee mixture underneath the coffee dispenser. Injuries may jam in use a steam cleaner to be used . Do not use damaged, broken or dented capsules! The machine ... used carefully. Danger of burns. ~ The coffee system must never be used to clean objects. ~ Never use and before cleaning. ~ The water in fire, electric shock or injury to use of accessories not recommended by Miele and be damaged. ~ The use the correct mixture of water and descaler...
Operating and Installation manual
Page 8
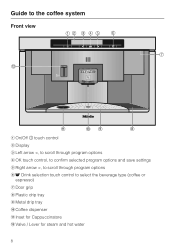
Guide to the coffee system Front view a On/Off s touch control b Display c Left arrow , to scroll through program options f r Drink selection touch control to select the beverage type (coffee or espresso) g Door grip h Plastic drip tray i Metal drip tray j Coffee dispenser k Inset for Cappuccinatore l Valve / Lever for steam and hot water 8
Guide to the coffee system Front view a On/Off s touch control b Display c Left arrow , to scroll through program options f r Drink selection touch control to select the beverage type (coffee or espresso) g Door grip h Plastic drip tray i Metal drip tray j Coffee dispenser k Inset for Cappuccinatore l Valve / Lever for steam and hot water 8

Operating and Installation manual
Page 9
Interior view Guide to the coffee system m Main Switch n Capsule plate (replace with descaling funnel when descaling is performed) o Brew unit p Capsule carousel q Carousel tray r Water tank s Drip tray with grid (with no-spill grid for transport) t Waste container 9
Interior view Guide to the coffee system m Main Switch n Capsule plate (replace with descaling funnel when descaling is performed) o Brew unit p Capsule carousel q Carousel tray r Water tank s Drip tray with grid (with no-spill grid for transport) t Waste container 9

Operating and Installation manual
Page 10
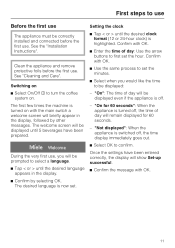
descale C Settings - When the desired program item is highlighted, select OK. 10 Display Touch controls Select a touch control with your fingertip to 9 different users G Maintenance program - rinse k Maintenance program - Display COSI o Espresso K1 K2 K3 K4 K5 L o n G k C The main menu in the display. customize appliance ^ Use < or > to select a program item in the display shows the following symbols: K Up to 5 different coffee types L Steam o Hot water n User profile for up to use the machine.
descale C Settings - When the desired program item is highlighted, select OK. 10 Display Touch controls Select a touch control with your fingertip to 9 different users G Maintenance program - rinse k Maintenance program - Display COSI o Espresso K1 K2 K3 K4 K5 L o n G k C The main menu in the display. customize appliance ^ Use < or > to select a program item in the display shows the following symbols: K Up to 5 different coffee types L Steam o Hot water n User profile for up to use the machine.
Operating and Installation manual
Page 11
The first few times the machine is switched off, the time display immediately goes out. ^ Select OK to turn the coffee system on. See the "Installation Instructions". The welcome screen will be displayed until 5 beverages have been entered correctly, the display will be prompted to use ...
The first few times the machine is switched off, the time display immediately goes out. ^ Select OK to turn the coffee system on. See the "Installation Instructions". The welcome screen will be displayed until 5 beverages have been entered correctly, the display will be prompted to use ...

Operating and Installation manual
Page 12
... lines are now filled with water Switching off The appliance is ready to run into the lines. ^ Place a cup under the coffee dispenser. ^ Select On/Off s to use . 12 When a coffee beverage is prepared, you will need to pump water into a cup. ^ Turn off the water by selecting OK again. Before the...
... lines are now filled with water Switching off The appliance is ready to run into the lines. ^ Place a cup under the coffee dispenser. ^ Select On/Off s to use . 12 When a coffee beverage is prepared, you will need to pump water into a cup. ^ Turn off the water by selecting OK again. Before the...

Operating and Installation manual
Page 13
...^ Lift the water tank a and pull it with fresh, cold tap water to set the water hardness (see "Cleaning and care"). Filling water and coffee capsules The appliance should be cleaned before each day of use deionized or mineral water. Filling the water tank The water tank should be washed... and filled with fresh cold tap water before filling it out b. ^ Fill the container with water and coffee capsules (see "Settings - Water hardness"). Do not use . ,Never put hot water or any other liquid except cold water into the machine. ^ Open ...
...^ Lift the water tank a and pull it with fresh, cold tap water to set the water hardness (see "Cleaning and care"). Filling water and coffee capsules The appliance should be cleaned before each day of use deionized or mineral water. Filling the water tank The water tank should be washed... and filled with fresh cold tap water before filling it out b. ^ Fill the container with water and coffee capsules (see "Settings - Water hardness"). Do not use . ,Never put hot water or any other liquid except cold water into the machine. ^ Open ...

Operating and Installation manual
Page 14
... ^ Pull out the carousel tray and lift out the carousel. ^ Push the carousel ring up and out of the capsule carousel b, with the same coffee type. You can also fill each can also be heard. Take care that the capsules sit loosely in the chambers so they may jam in ... their respective chambers to your preference. The capsule carousel can hold four capsules. A sound will be lifted up and take out the capsules. 14 The coffee types have to be used they do not jam. ^ Insert the carousel into the carousel tray. ^ Push the carousel all the way out. ^ Insert the...
... ^ Pull out the carousel tray and lift out the carousel. ^ Push the carousel ring up and out of the capsule carousel b, with the same coffee type. You can also fill each can also be heard. Take care that the capsules sit loosely in the chambers so they may jam in ... their respective chambers to your preference. The capsule carousel can hold four capsules. A sound will be lifted up and take out the capsules. 14 The coffee types have to be used they do not jam. ^ Insert the carousel into the carousel tray. ^ Push the carousel all the way out. ^ Insert the...

Operating and Installation manual
Page 15
...is highlighted. Confirm with OK. Rename type Allows you will be filled in the upper line of the capsule carousel. Allocating various coffee types Sixteen different Nespresso coffee types are now available: Select type Allows you to select from the main menu. See "The Espresso / Lungo range" for ...the arrow buttons to select the trash can symbol. A new word will then switch to lowercase letters. ^ Use < or > to the desired coffee types or filled with OK. ^ Tap an arrow button until "Rename type" is highlighted. The chambers can be capitalized, and the appliance will ...
...is highlighted. Confirm with OK. Rename type Allows you will be filled in the upper line of the capsule carousel. Allocating various coffee types Sixteen different Nespresso coffee types are now available: Select type Allows you to select from the main menu. See "The Espresso / Lungo range" for ...the arrow buttons to select the trash can symbol. A new word will then switch to lowercase letters. ^ Use < or > to the desired coffee types or filled with OK. ^ Tap an arrow button until "Rename type" is highlighted. The chambers can be capitalized, and the appliance will ...

Operating and Installation manual
Page 16
... you would in the display. You will appear in "Rename type". Confirm with OK. Confirm with a type of coffee a question mark will appear after the coffee bean symbol, regardless of coffee. You can be dispensed from that chamber will appear in any chamber, even if you select a chamber the type ...of the display. Chamber symbols in the display Once you are "loading" will appear in front of the display and coffee cannot be used to select OK. Allocating various coffee types Saving an entry ^ When the entry is empty, an exclamation point will appear after the bean symbol. Confirm...
... you would in the display. You will appear in "Rename type". Confirm with OK. Confirm with a type of coffee a question mark will appear after the coffee bean symbol, regardless of coffee. You can be dispensed from that chamber will appear in any chamber, even if you select a chamber the type ...of the display. Chamber symbols in the display Once you are "loading" will appear in front of the display and coffee cannot be used to select OK. Allocating various coffee types Saving an entry ^ When the entry is empty, an exclamation point will appear after the bean symbol. Confirm...
Operating and Installation manual
Page 17
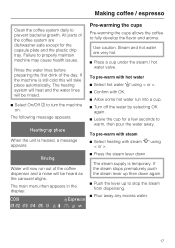
... the steam / hot water valve. The heating system will heat and the water lines will be heard as the carousel aligns. Making coffee / espresso Clean the coffee system daily to properly maintain machine may cause health issues. Failure to prevent bacterial growth. To pre-warm with hot water ^ Select ...again. ^ Push the lever up phase When the unit is heated, a message appears: Pre-warming the cups Pre-warming the cups allows the coffee to warm, then pour the water away. Steam and hot water are dishwasher-safe except for a few seconds to fully develop the flavor and aroma...
... the steam / hot water valve. The heating system will heat and the water lines will be heard as the carousel aligns. Making coffee / espresso Clean the coffee system daily to properly maintain machine may cause health issues. Failure to prevent bacterial growth. To pre-warm with hot water ^ Select ...again. ^ Push the lever up phase When the unit is heated, a message appears: Pre-warming the cups Pre-warming the cups allows the coffee to warm, then pour the water away. Steam and hot water are dishwasher-safe except for a few seconds to fully develop the flavor and aroma...
Operating and Installation manual
Page 18
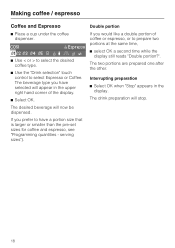
... are prepared one after the other. serving sizes"). 18 COSI o Espresso K1 K2 K3 K4 K5 L o n G k C ^ Use < or > to select the desired coffee type. ^ Use the "Drink selection" touch control to prepare two portions at the same time, ^ select OK a second time while the display still reads "Double... portion?". Interrupting preparation ^ Select OK when "Stop" appears in the upper right hand corner of coffee or espresso, or to select Espresso or Coffee. If you have a portion size that is larger or smaller than the pre-set sizes for...
... are prepared one after the other. serving sizes"). 18 COSI o Espresso K1 K2 K3 K4 K5 L o n G k C ^ Use < or > to select the desired coffee type. ^ Use the "Drink selection" touch control to prepare two portions at the same time, ^ select OK a second time while the display still reads "Double... portion?". Interrupting preparation ^ Select OK when "Stop" appears in the upper right hand corner of coffee or espresso, or to select Espresso or Coffee. If you have a portion size that is larger or smaller than the pre-set sizes for...
Operating and Installation manual
Page 19
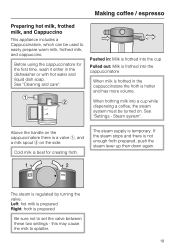
... Before using the cappuccinatore for creating froth. See "Settings - this may cause the milk to set the valve between these two settings - Making coffee / espresso Preparing hot milk, frothed milk, and Cappuccino This appliance includes a Cappuccinatore, which can be turned on the side. Pushed in: Milk ...is frothed into the cup Pulled out: Milk is frothed into a cup while dispensing a coffee, the steam system must be used to easily prepare warm milk, frothed milk, and cappuccino. When frothing milk into the cappuccinatore When milk is...
... Before using the cappuccinatore for creating froth. See "Settings - this may cause the milk to set the valve between these two settings - Making coffee / espresso Preparing hot milk, frothed milk, and Cappuccino This appliance includes a Cappuccinatore, which can be turned on the side. Pushed in: Milk ...is frothed into the cup Pulled out: Milk is frothed into a cup while dispensing a coffee, the steam system must be used to easily prepare warm milk, frothed milk, and cappuccino. When frothing milk into the cappuccinatore When milk is...

Operating and Installation manual
Page 20
otherwise the valve is not properly connected to select Espresso. ^ Select OK. Espresso now flows through the coffee dispenser and the cappuccino is prepared. 20 Making coffee / espresso Frothing milk into a cup Preparing a cappuccino ^ Prepare frothed milk in a cup. ^ Place the cup of frothed milk under the spout. ^ ...mark with cold milk and cover with the lid on. ^ Place the cappuccinatore in the inset on the drip tray, and the cup b under the coffee dispenser. ^ Pre-warm the cup before filling with froth. ^ Push the cappuccinatore spout all the way into the down . ^ Use the drink ...
otherwise the valve is not properly connected to select Espresso. ^ Select OK. Espresso now flows through the coffee dispenser and the cappuccino is prepared. 20 Making coffee / espresso Frothing milk into a cup Preparing a cappuccino ^ Prepare frothed milk in a cup. ^ Place the cup of frothed milk under the spout. ^ ...mark with cold milk and cover with the lid on. ^ Place the cappuccinatore in the inset on the drip tray, and the cup b under the coffee dispenser. ^ Pre-warm the cup before filling with froth. ^ Push the cappuccinatore spout all the way into the down . ^ Use the drink ...

Operating and Installation manual
Page 21
Making coffee / espresso Frothing milk in the cappuccinatore ^ Pull the cappuccinatore spout into the "out" position. ^ Turn the valve all the way to the right for heating. ^ ...
Making coffee / espresso Frothing milk in the cappuccinatore ^ Pull the cappuccinatore spout into the "out" position. ^ Turn the valve all the way to the right for heating. ^ ...


