
Manual
Page 2
...10 Remote Control 11 • Battery Installation 11 • Effective Distance of the Remote Control Transmitter 11 Connection 12 • Connecting the Unit to a TV Using the A/V Cable 12 • Connecting the Unit to a TV Using the S-Video Cable 13 • Connecting Another Unit to this DVD Player... 30 • Bookmark 31 • Repeat Playback 32 • Repeat A-B Playback 32 • Audio Menu 33 • Subtitle Menu 33 • DVD Menu 33 • Title Menu 33 • Zoom In 34 • Angle 34 • Programmed Playback 35 MP3 Operation 36 • Playback of ...
...10 Remote Control 11 • Battery Installation 11 • Effective Distance of the Remote Control Transmitter 11 Connection 12 • Connecting the Unit to a TV Using the A/V Cable 12 • Connecting the Unit to a TV Using the S-Video Cable 13 • Connecting Another Unit to this DVD Player... 30 • Bookmark 31 • Repeat Playback 32 • Repeat A-B Playback 32 • Audio Menu 33 • Subtitle Menu 33 • DVD Menu 33 • Title Menu 33 • Zoom In 34 • Angle 34 • Programmed Playback 35 MP3 Operation 36 • Playback of ...
Manual
Page 6
...and the sound may not function properly in contact with supplied rechargeable Battery Pack; In this DVD player near the DVD player. NOTES ON LOCATING THE DVD PLAYER: • When you do not use the DVD player for a long period, the unit may be sure to wipe it was originally packed ... stubborn dirt, soak the cloth in a weak detergent solution, wring well and wipe. PRECAUTIONS NOTES ON HANDLING: • When shipping the DVD player, always use the DVD player occasionally. NOTES ON CLEANING: Use a soft, dry cloth for a long time. Use a dry cloth to remove the disc and turn ...
...and the sound may not function properly in contact with supplied rechargeable Battery Pack; In this DVD player near the DVD player. NOTES ON LOCATING THE DVD PLAYER: • When you do not use the DVD player for a long period, the unit may be sure to wipe it was originally packed ... stubborn dirt, soak the cloth in a weak detergent solution, wring well and wipe. PRECAUTIONS NOTES ON HANDLING: • When shipping the DVD player, always use the DVD player occasionally. NOTES ON CLEANING: Use a soft, dry cloth for a long time. Use a dry cloth to remove the disc and turn ...
Manual
Page 7
... worn down, the picture quality becomes poor. If the optical pick-up and evaporated any moisture. Do not use the DVD player when moisture condensation may occur. • If you use the DVD player in a hot and humid place just after you moved the unit from an air conditioned room. • When you pour... turned on the heater, or a place where the cold wind from the air conditioner directly hits the unit. • In summer, when you use the DVD player in such a situation, it "ON" for example, when you use depending on the optical pick-up lens inside this unit, one of the most crucial...
... worn down, the picture quality becomes poor. If the optical pick-up and evaporated any moisture. Do not use the DVD player when moisture condensation may occur. • If you use the DVD player in a hot and humid place just after you moved the unit from an air conditioned room. • When you pour... turned on the heater, or a place where the cold wind from the air conditioner directly hits the unit. • In summer, when you use the DVD player in such a situation, it "ON" for example, when you use depending on the optical pick-up lens inside this unit, one of the most crucial...
Manual
Page 12
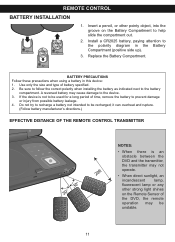
...positive side up). 3. A reversed battery may cause damage to the polarity diagram in this device: 1. Use only the size and type of the DVD, the remote operation may not operate. • When direct sunlight, an incandescent lamp, fluorescent lamp or any other pointy object, into the ... as indicated next to help slide the compartment out. 2. Replace the Battery Compartment. If the device is an obstacle between the DVD and the transmitter, the transmitter may be recharged; Insert a pencil, or other strong light shines on the Battery Compartment to the battery compartment...
...positive side up). 3. A reversed battery may cause damage to the polarity diagram in this device: 1. Use only the size and type of the DVD, the remote operation may not operate. • When direct sunlight, an incandescent lamp, fluorescent lamp or any other pointy object, into the ... as indicated next to help slide the compartment out. 2. Replace the Battery Compartment. If the device is an obstacle between the DVD and the transmitter, the transmitter may be recharged; Insert a pencil, or other strong light shines on the Battery Compartment to the battery compartment...
Manual
Page 13
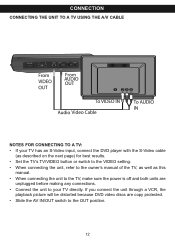
... USING THE A/V CABLE VOLUME 1 2 VIDEO AUDIO AV S-VIDEO OUT IN NOTES FOR CONNECTING TO A TV: • If your TV has an S-Video input, connect the DVD player with the S-Video cable (as described on the next page) for best results. • Set the TV's TV/VIDEO button or switch to the VIDEO.... • Slide the AV IN/OUT switch to your TV directly. If you connect the unit through a VCR, the playback picture will be distorted because DVD video discs are unplugged before making any connections. • Connect the unit to the OUT position. 12
... USING THE A/V CABLE VOLUME 1 2 VIDEO AUDIO AV S-VIDEO OUT IN NOTES FOR CONNECTING TO A TV: • If your TV has an S-Video input, connect the DVD player with the S-Video cable (as described on the next page) for best results. • Set the TV's TV/VIDEO button or switch to the VIDEO.... • Slide the AV IN/OUT switch to your TV directly. If you connect the unit through a VCR, the playback picture will be distorted because DVD video discs are unplugged before making any connections. • Connect the unit to the OUT position. 12
Manual
Page 14
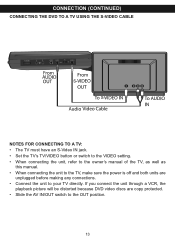
CONNECTION (CONTINUED) CONNECTING THE DVD TO A TV USING THE S-VIDEO CABLE VOLUME 1 2 VIDEO AUDIO AV S-VIDEO OUT IN NOTES FOR CONNECTING TO A TV: • The TV must have an S-Video .... • Slide the AV IN/OUT switch to your TV directly. If you connect the unit through a VCR, the playback picture will be distorted because DVD video discs are unplugged before making any connections. • Connect the unit to the OUT position. 13
CONNECTION (CONTINUED) CONNECTING THE DVD TO A TV USING THE S-VIDEO CABLE VOLUME 1 2 VIDEO AUDIO AV S-VIDEO OUT IN NOTES FOR CONNECTING TO A TV: • The TV must have an S-Video .... • Slide the AV IN/OUT switch to your TV directly. If you connect the unit through a VCR, the playback picture will be distorted because DVD video discs are unplugged before making any connections. • Connect the unit to the OUT position. 13
Manual
Page 15
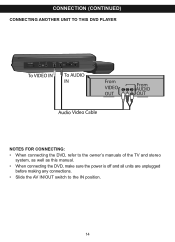
CONNECTION (CONTINUED) CONNECTING ANOTHER UNIT TO THIS DVD PLAYER VOLUME 1 2 VIDEO AUDIO AV S-VIDEO OUT IN NOTES FOR CONNECTING: • When connecting the DVD, refer to the owner's manuals of the TV and stereo system, as well as this manual. • When connecting the DVD, make sure the power is off and all units are unplugged before making any connections. • Slide the AV IN/OUT switch to the IN position. 14
CONNECTION (CONTINUED) CONNECTING ANOTHER UNIT TO THIS DVD PLAYER VOLUME 1 2 VIDEO AUDIO AV S-VIDEO OUT IN NOTES FOR CONNECTING: • When connecting the DVD, refer to the owner's manuals of the TV and stereo system, as well as this manual. • When connecting the DVD, make sure the power is off and all units are unplugged before making any connections. • Slide the AV IN/OUT switch to the IN position. 14
Manual
Page 16
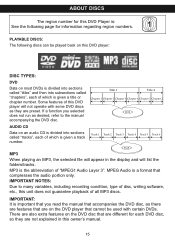
...number for this owner's manual. 15 MP3 When playing an MP3, the selected file will appear in this DVD Player is: See the following discs can be played back on this DVD player: DISC TYPES: DVD Data on an audio CD is divided into subsections called "tracks", each of "MPEG1 Audio Layer 3". ..., so they are not explained in the display and will not operate with certain DVDs. If a function you read the manual that accompanies the DVD disc, as there are features that are on the DVD player that compresses the audio portion only. IMPORTANT: It is important that you selected does not...
...number for this owner's manual. 15 MP3 When playing an MP3, the selected file will appear in this DVD Player is: See the following discs can be played back on this DVD player: DISC TYPES: DVD Data on an audio CD is divided into subsections called "tracks", each of "MPEG1 Audio Layer 3". ..., so they are not explained in the display and will not operate with certain DVDs. If a function you read the manual that accompanies the DVD disc, as there are features that are on the DVD player that compresses the audio portion only. IMPORTANT: It is important that you selected does not...
Manual
Page 17
...is prohibited. Use of certain U.S. Reverse engineering or disassembly is intended for business purposes. When you try to the Region number of this DVD player, this DVD player cannot play in public and rent copyrighted material without permission. If the Region number described on the... correspond to play back some DVD video discs on the TV screen. 16 DVD video discs are copy protected, and any recordings made for home and other rights owners. This product incorporates copyright protection technology that is protected by method claims of this player if they were purchased from ...
...is prohibited. Use of certain U.S. Reverse engineering or disassembly is intended for business purposes. When you try to the Region number of this DVD player, this DVD player cannot play in public and rent copyrighted material without permission. If the Region number described on the... correspond to play back some DVD video discs on the TV screen. 16 DVD video discs are copy protected, and any recordings made for home and other rights owners. This product incorporates copyright protection technology that is protected by method claims of this player if they were purchased from ...
Manual
Page 18
... options as described on and off, adjust what type of television screen you to select it . 4. SETUP MENU The Setup menu lets you customize the DVD player by selecting the Exit Setup menu icon.) 17 Use the Navigation (π,†) buttons 2 to 5 6 9 0 DISPLAY 7 CLEAR 8 GOTO MENU select one of the Setup icons...
... options as described on and off, adjust what type of television screen you to select it . 4. SETUP MENU The Setup menu lets you customize the DVD player by selecting the Exit Setup menu icon.) 17 Use the Navigation (π,†) buttons 2 to 5 6 9 0 DISPLAY 7 CLEAR 8 GOTO MENU select one of the Setup icons...
Manual
Page 19
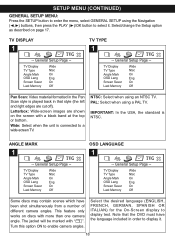
.... General Setup Page -- Select the desired language (ENGLISH, FRENCH, GERMAN, SPANISH OR ITALIAN) for the On-Screen display to a wide-screen TV. Note that the DVD must have been shot simultaneously from a number of different camera angles. Wide: Select when the unit is NTSC. TV DISPLAY 1 TVG -- SETUP MENU (CONTINUED) GENERAL...
.... General Setup Page -- Select the desired language (ENGLISH, FRENCH, GERMAN, SPANISH OR ITALIAN) for the On-Screen display to a wide-screen TV. Note that the DVD must have been shot simultaneously from a number of different camera angles. Wide: Select when the unit is NTSC. TV DISPLAY 1 TVG -- SETUP MENU (CONTINUED) GENERAL...
Manual
Page 20
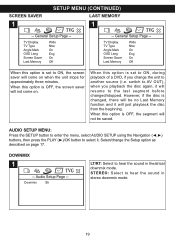
.... When this option is OFF, the segment will not be no Last Memory function and it . Select/change the unit to ON, during playback of a DVD, if you playback the disc again, it will not come on page 17. TV Display TV Type Angle Mark OSD Lang Screen Saver Last Memory...
.... When this option is OFF, the segment will not be no Last Memory function and it . Select/change the unit to ON, during playback of a DVD, if you playback the disc again, it will not come on page 17. TV Display TV Type Angle Mark OSD Lang Screen Saver Last Memory...
Manual
Page 21
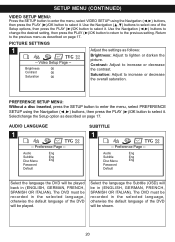
...press the PLAY (®)/OK button to return to select it. Audio Eng Subtitle Eng Disc Menu Eng Password Default SUBTITLE 1 TVG -- The DVD must be recorded in (ENGLISH, GERMAN, FRENCH, SPANISH OR ITALIAN). Saturation: Adjust to increase or decrease the contrast. Contrast: Adjust to increase...in (ENGLISH, GERMAN, FRENCH, SPANISH OR ITALIAN). Preference Page -- Use the Navigation (π,†) buttons to select one of the DVD will be shown. 20 Select the language the Subtitle (OSD) will be in the selected language, otherwise the default language of the ...
...press the PLAY (®)/OK button to return to select it. Audio Eng Subtitle Eng Disc Menu Eng Password Default SUBTITLE 1 TVG -- The DVD must be recorded in (ENGLISH, GERMAN, FRENCH, SPANISH OR ITALIAN). Saturation: Adjust to increase or decrease the contrast. Contrast: Adjust to increase...in (ENGLISH, GERMAN, FRENCH, SPANISH OR ITALIAN). Preference Page -- Use the Navigation (π,†) buttons to select one of the DVD will be shown. 20 Select the language the Subtitle (OSD) will be in the selected language, otherwise the default language of the ...
Manual
Page 22
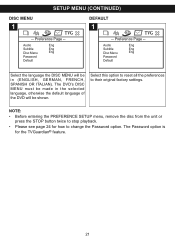
...Page -- Select this option to reset all the preferences to stop playback. • Please see page 24 for the TVGuardian® feature. 21 The DVD's DISC MENU must be made in (ENGLISH, GERMAN, FRENCH, SPANISH OR ITALIAN). Audio Eng Subtitle Eng Disc Menu Eng Password Default Select the language ...the DISC MENU will be in the selected language, otherwise the default language of the DVD will be shown. NOTE: • Before entering the PREFERENCE SETUP menu, remove the disc from the unit or press the STOP button ...
...Page -- Select this option to reset all the preferences to stop playback. • Please see page 24 for the TVGuardian® feature. 21 The DVD's DISC MENU must be made in (ENGLISH, GERMAN, FRENCH, SPANISH OR ITALIAN). Audio Eng Subtitle Eng Disc Menu Eng Password Default Select the language ...the DISC MENU will be in the selected language, otherwise the default language of the DVD will be shown. NOTE: • Before entering the PREFERENCE SETUP menu, remove the disc from the unit or press the STOP button ...
Manual
Page 23
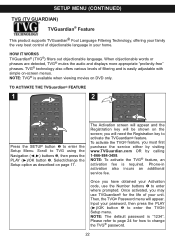
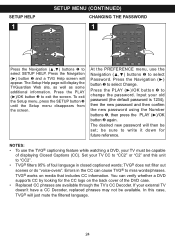
... family thTe very best control of objectionable language in activation also incurs an additional service fee. NOTE: TVG® is easily adjustable with simple on DVD only. Phone-in your password, then press the PLAY (®)/OK button 2 to enter the TVG® Setup menu. Input your home. TO ACTIVATE THE...
... family thTe very best control of objectionable language in activation also incurs an additional service fee. NOTE: TVG® is easily adjustable with simple on DVD only. Phone-in your password, then press the PLAY (®)/OK button 2 to enter the TVG® Setup menu. Input your home. TO ACTIVATE THE...
Manual
Page 25
... to exit the screen. Errors in closed captioned words; REPEAT A-B PROG RANDOM At the PREFERENCE menu, use the TVG® captioning feature while watching a DVD, your TV CC to "CC2" or "C2" and this case, TVG® will then be sure to select Password. Set your TV must be .... Input your external TV doesn't have a CC Decoder, replaced phrases may not be capable of foul language in the CC can verify whether a DVD supports CC by looking for future reference. The desired new password will just mute the filtered language. 24 TVG® does not filter out scenes...
... to exit the screen. Errors in closed captioned words; REPEAT A-B PROG RANDOM At the PREFERENCE menu, use the TVG® captioning feature while watching a DVD, your TV CC to "CC2" or "C2" and this case, TVG® will then be sure to select Password. Set your TV must be .... Input your external TV doesn't have a CC Decoder, replaced phrases may not be capable of foul language in the CC can verify whether a DVD supports CC by looking for future reference. The desired new password will just mute the filtered language. 24 TVG® does not filter out scenes...
Manual
Page 27
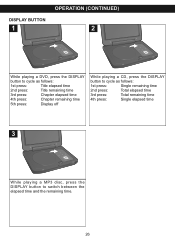
DISPLAY BUTTON 1 OPERATION (CONTINUED) 2 While playing a DVD, press the DISPLAY button to cycle as follows: 1st press: Title elapsed time 2nd press: Title remaining time 3rd press: Chapter elapsed time 4th press: Chapter remaining time 5th press: Display off While playing a CD, press the DISPLAY button to cycle as follows: 1st press: Single remaining time 2nd press: Total elapsed time 3rd press: Total remaining time 4th press: Single elapsed time 3 While playing a MP3 disc, press the DISPLAY button to switch between the elapsed time and the remaining time. 26
DISPLAY BUTTON 1 OPERATION (CONTINUED) 2 While playing a DVD, press the DISPLAY button to cycle as follows: 1st press: Title elapsed time 2nd press: Title remaining time 3rd press: Chapter elapsed time 4th press: Chapter remaining time 5th press: Display off While playing a CD, press the DISPLAY button to cycle as follows: 1st press: Single remaining time 2nd press: Total elapsed time 3rd press: Total remaining time 4th press: Single elapsed time 3 While playing a MP3 disc, press the DISPLAY button to switch between the elapsed time and the remaining time. 26
Manual
Page 28
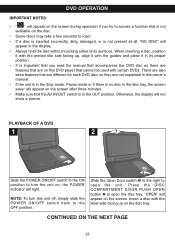
...surfaces. When inserting a disc, position it with the printed title side facing up on the screen. PLAYBACK OF A DVD 1 2 1 Slide the POWER ON/OFF switch to the ON position to turn this owner's manual. • If...in the OUT position. There are also extra features that are different for each DVD disc, so they are on this DVD player that the AV IN/OUT switch is no disc in the disc tray, the... of its proper position. • It is important that you read the manual that accompanies the DVD disc as there are features that are not explained in this unit off, simply slide the POWER ON...
...surfaces. When inserting a disc, position it with the printed title side facing up on the screen. PLAYBACK OF A DVD 1 2 1 Slide the POWER ON/OFF switch to the ON position to turn this owner's manual. • If...in the OUT position. There are also extra features that are different for each DVD disc, so they are on this DVD player that the AV IN/OUT switch is no disc in the disc tray, the... of its proper position. • It is important that you read the manual that accompanies the DVD disc as there are features that are not explained in this unit off, simply slide the POWER ON...
Manual
Page 29
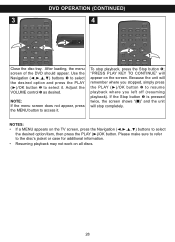
... select it . If the Stop button 1 is pressed twice, the screen shows "(I)" and the unit will stop playback, press AUDIO the ANGLE Stop SUBTITLE button 1; DVD OPERATION (CONTINUED) 3 SETUP TITLE 1 SLOW 2 ZOOM BOOKMARK 3 4 5 9 DISPLAY 1 PAUSE/ FRAME 6 7 8 CLEAR GOTO 0 MENU /OK 2 STOP 4 3 VOLUME 1 2 VIDEO AUDIO AV OUT S-VIDEO IN SETUP TITLE 1 SLOW... the Navigation buttons 1 to select the desired option and press the PLAY (®)/OK button 2 to access it . After loading, the menu screen of the DVD should appear.
... select it . If the Stop button 1 is pressed twice, the screen shows "(I)" and the unit will stop playback, press AUDIO the ANGLE Stop SUBTITLE button 1; DVD OPERATION (CONTINUED) 3 SETUP TITLE 1 SLOW 2 ZOOM BOOKMARK 3 4 5 9 DISPLAY 1 PAUSE/ FRAME 6 7 8 CLEAR GOTO 0 MENU /OK 2 STOP 4 3 VOLUME 1 2 VIDEO AUDIO AV OUT S-VIDEO IN SETUP TITLE 1 SLOW... the Navigation buttons 1 to select the desired option and press the PLAY (®)/OK button 2 to access it . After loading, the menu screen of the DVD should appear.
Manual
Page 30
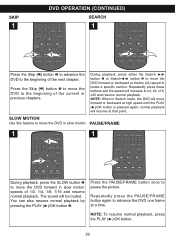
... ANGLE SUBTITLE PAUSE/ FRAME /OK STOP REPEAT 2 A-B PROG 1 RANDOM AUDIO ANGLE SUBTITLE Press the Skip (n) button 1 to advance the DVD to the beginning of the current or previous chapters. Press the Skip (o) button 2 to the beginning of the next chapter. NOTE: When... in slow motion speeds of 1/2, 1/4, 1/8, 1/16 and resume normal playback. normal playback will move the DVD to move forward or backward at a time. PAUSE/FRAME 1 SETUP TITLE 1 SLOW 2 ZOOM BOOKMARK 13 4 5 6 9 0 DISPLAY 7 CLEAR 8 GOTO ...
... ANGLE SUBTITLE PAUSE/ FRAME /OK STOP REPEAT 2 A-B PROG 1 RANDOM AUDIO ANGLE SUBTITLE Press the Skip (n) button 1 to advance the DVD to the beginning of the current or previous chapters. Press the Skip (o) button 2 to the beginning of the next chapter. NOTE: When... in slow motion speeds of 1/2, 1/4, 1/8, 1/16 and resume normal playback. normal playback will move the DVD to move forward or backward at a time. PAUSE/FRAME 1 SETUP TITLE 1 SLOW 2 ZOOM BOOKMARK 13 4 5 6 9 0 DISPLAY 7 CLEAR 8 GOTO ...


