
User Guide
Page 1
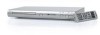
MVD2022 User's Guide DVD/VCD/MP3/PHOTO CD Player Before operating this product, please read these instructions completely.
MVD2022 User's Guide DVD/VCD/MP3/PHOTO CD Player Before operating this product, please read these instructions completely.

User Guide
Page 2
... Audio/Video Output Jacks 9 • Connecting the DVD to a TV Using the S-Video Output Jack 9 • Connecting the DVD to a TV Using the Y/PB/PR Jacks 10 • Progressive (Y, PB, PR) Video OUT 10 • 525 Line Digital Progressive-scan Component Video Output 10 • Connecting the DVD to a Home Theatre System 11 About Discs 12...
... Audio/Video Output Jacks 9 • Connecting the DVD to a TV Using the S-Video Output Jack 9 • Connecting the DVD to a TV Using the Y/PB/PR Jacks 10 • Progressive (Y, PB, PR) Video OUT 10 • 525 Line Digital Progressive-scan Component Video Output 10 • Connecting the DVD to a Home Theatre System 11 About Discs 12...
User Guide
Page 6
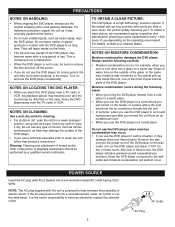
...unit from an air conditioned room. • When you place this DVD player near the DVD player. This is normal and not a malfunction. • When the DVD player is polarized to help minimize the possibility of the DVD player to have warmed up and evaporated any type of solvent, such ... product's instructions. Please read the following cases: • When you pour a cold drink into a nonpolarized AC outlet, do not use the DVD player for cleaning. • For stubborn dirt, soak the cloth in contact with the 2 blades) into a conveniently located AC outlet having 120V, 60Hz...
...unit from an air conditioned room. • When you place this DVD player near the DVD player. This is normal and not a malfunction. • When the DVD player is polarized to help minimize the possibility of the DVD player to have warmed up and evaporated any type of solvent, such ... product's instructions. Please read the following cases: • When you pour a cold drink into a nonpolarized AC outlet, do not use the DVD player for cleaning. • For stubborn dirt, soak the cloth in contact with the 2 blades) into a conveniently located AC outlet having 120V, 60Hz...
User Guide
Page 8
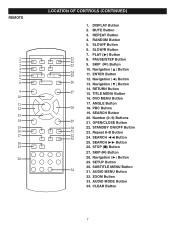
... Button 12. TITLE MENU Button 16. Number (0-9) Buttons 29 21. Repeat A-B Button 32 33 24. SEARCH ¦¦¤Button 25. Navigation (ƒ) Button 14. DVD MENU Button 17. SKIP (n) Button 28. CLEAR Button 7 MUTE Button 3. PLAY (‹) Button 21 22 23 8. OPEN/CLOSE Button 30 22. STOP (I) Button 27. DISPLAY...
... Button 12. TITLE MENU Button 16. Number (0-9) Buttons 29 21. Repeat A-B Button 32 33 24. SEARCH ¦¦¤Button 25. Navigation (ƒ) Button 14. DVD MENU Button 17. SKIP (n) Button 28. CLEAR Button 7 MUTE Button 3. PLAY (‹) Button 21 22 23 8. OPEN/CLOSE Button 30 22. STOP (I) Button 27. DISPLAY...
User Guide
Page 9
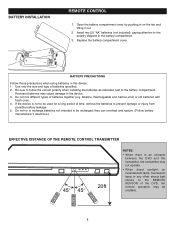
... when installing the batteries as indicated next to the polarity diagram in the battery compartment. 3. REMOTE CONTROL 1. If the device is an obstacle between the DVD and the transmitter, the transmitter may not operate. • When direct sunlight, an incandescent lamp, fluorescent lamp or any other strong light shines on... the tab and lifting it out. 2. Do not mix different types of the DVD, the remote operation may cause damage to be used for a long period of batteries specified. 2.
... when installing the batteries as indicated next to the polarity diagram in the battery compartment. 3. REMOTE CONTROL 1. If the device is an obstacle between the DVD and the transmitter, the transmitter may not operate. • When direct sunlight, an incandescent lamp, fluorescent lamp or any other strong light shines on... the tab and lifting it out. 2. Do not mix different types of the DVD, the remote operation may cause damage to be used for a long period of batteries specified. 2.
User Guide
Page 10
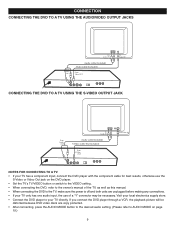
...S-Video IN NOTES FOR CONNECTING TO A TV: • If your TV has a component input, connect the DVD player with the component cable for best results, otherwise use the S-Video or Video Out jack on the DVD player. • Set the TV's TV/VIDEO button or switch to the VIDEO setting. • When connecting the... DVD, refer to the owner's manual of the TV, as well as this manual. • When connecting ...
...S-Video IN NOTES FOR CONNECTING TO A TV: • If your TV has a component input, connect the DVD player with the component cable for best results, otherwise use the S-Video or Video Out jack on the DVD player. • Set the TV's TV/VIDEO button or switch to the VIDEO setting. • When connecting the... DVD, refer to the owner's manual of the TV, as well as this manual. • When connecting ...
User Guide
Page 11
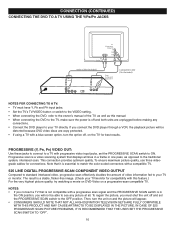
... connections. • Connect the DVD player to the traditional system, interlaced scan. To ensure maximum picture quality, use three videograde cables for best results. The result is essential to match the color-coded connectors with a compatible TV. 525 LINE DIGITAL PROGRESSIVE-SCAN COMPONENT VIDEO OUTPUT Compared to standard interlaced video, progressive scan effectively doubles the amount of...
... connections. • Connect the DVD player to the traditional system, interlaced scan. To ensure maximum picture quality, use three videograde cables for best results. The result is essential to match the color-coded connectors with a compatible TV. 525 LINE DIGITAL PROGRESSIVE-SCAN COMPONENT VIDEO OUTPUT Compared to standard interlaced video, progressive scan effectively doubles the amount of...
User Guide
Page 12
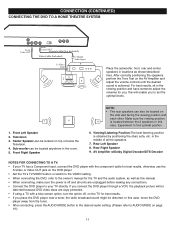
... on the AV Amplifier and adjust the volume controls until the desired sound is located between the 2 speakers in this case, move the DVD player away from the tuner. • After connecting, press the AUDIO MODE button to the desired audio setting. (Please refer to AUDIO MODE...3. Experiment to set the optimal levels. 7 6 1. Viewing/Listening Position-The best listening position is off , on the TV for you place the DVD player near a tuner, the radio broadcast sound might be located anywhere in the middle of all units are unplugged before making any connections. • Connect the...
... on the AV Amplifier and adjust the volume controls until the desired sound is located between the 2 speakers in this case, move the DVD player away from the tuner. • After connecting, press the AUDIO MODE button to the desired audio setting. (Please refer to AUDIO MODE...3. Experiment to set the optimal levels. 7 6 1. Viewing/Listening Position-The best listening position is off , on the TV for you place the DVD player near a tuner, the radio broadcast sound might be located anywhere in the middle of all units are unplugged before making any connections. • Connect the...

User Guide
Page 13
.... ABOUT DISCS The region number for this DVD Player is: See the following discs can be used with some DVD discs as they are preset. IMPORTANT NOTES: Due to the manual accompanying the DVD disc. DISC TYPES: DVD Data on the DVD player that compresses the audio portion only. If ...many variables, including recording condition, type of this DVD player will not operate with certain DVDs. MP3 is the abbreviation of which is divided into sections called "tracks", each DVD disc, so they should appear in the USA, leave this DVD player: VIDEO KODAK PICTURE CD MP3 When playing an...
.... ABOUT DISCS The region number for this DVD Player is: See the following discs can be used with some DVD discs as they are preset. IMPORTANT NOTES: Due to the manual accompanying the DVD disc. DISC TYPES: DVD Data on the DVD player that compresses the audio portion only. If ...many variables, including recording condition, type of this DVD player will not operate with certain DVDs. MP3 is the abbreviation of which is divided into sections called "tracks", each DVD disc, so they should appear in the USA, leave this DVD player: VIDEO KODAK PICTURE CD MP3 When playing an...
User Guide
Page 14
... and other limited viewing uses only, unless otherwise authorized by Macrovision Corporation and other intellectual property rights owned by Macrovision Corporation. Region Management Information: This DVD Player is designed and manufactured to respond to play in public and rent copyrighted material without permission. When you try to play that is forbidden by...
... and other limited viewing uses only, unless otherwise authorized by Macrovision Corporation and other intellectual property rights owned by Macrovision Corporation. Region Management Information: This DVD Player is designed and manufactured to respond to play in public and rent copyrighted material without permission. When you try to play that is forbidden by...
User Guide
Page 15
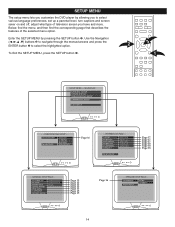
... lets you have and more. Below, find the menu, and then find the corresponding page that describes the features of television screen you customize the DVD player by pressing the SETUP button 1. Use the Navigation buttons 2 to navigate through the menus/screens and press the ENTER button 3 to select various language preferences...
... lets you have and more. Below, find the menu, and then find the corresponding page that describes the features of television screen you customize the DVD player by pressing the SETUP button 1. Use the Navigation buttons 2 to navigate through the menus/screens and press the ENTER button 3 to select various language preferences...
User Guide
Page 16
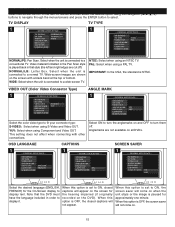
...bottom. Anglemarks are shown on . 15 GENERAL SETUP PAGE - - When this option is connected to ON, the screen saver will not come on the DVD). GENERAL SETUP PAGE - - TV DISPLAY TV TYPE VIDEO OUT ANGLE MARK OSD LANG CAPTIONS SCREEN SAVER ENGLISH FRENCH CAPTIONS 1 - - Select when the ... left and right edges are cut off . TV DISPLAY TV TYPE VIDEO OUT ANGLE MARK OSD LANG CAPTIONS SCREEN SAVER NTSC PAL NORMAL/PS: Pan Scan. TV DISPLAY TV TYPE VIDEO OUT ANGLE MARK OSD LANG CAPTIONS SCREEN SAVER S-VIDEO YUV ANGLE MARK 1 - - TV DISPLAY TV TYPE 1 - - ...
...bottom. Anglemarks are shown on . 15 GENERAL SETUP PAGE - - When this option is connected to ON, the screen saver will not come on the DVD). GENERAL SETUP PAGE - - TV DISPLAY TV TYPE VIDEO OUT ANGLE MARK OSD LANG CAPTIONS SCREEN SAVER ENGLISH FRENCH CAPTIONS 1 - - Select when the ... left and right edges are cut off . TV DISPLAY TV TYPE VIDEO OUT ANGLE MARK OSD LANG CAPTIONS SCREEN SAVER NTSC PAL NORMAL/PS: Pan Scan. TV DISPLAY TV TYPE VIDEO OUT ANGLE MARK OSD LANG CAPTIONS SCREEN SAVER S-VIDEO YUV ANGLE MARK 1 - - TV DISPLAY TV TYPE 1 - - ...
User Guide
Page 18
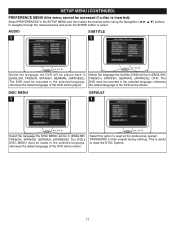
...PAGE Select the language the DISC MENU will be played. This is inserted): Select PREFERENCES in the selected language, otherwise the default language of the DVD will be recorded in (ENGLISH, FRENCH, SPANISH, GERMAN, JAPANESE, OFF). AUDIO 1 - - DISC MENU 1 - - AUDIO SUBTITLE DISC MENU...ENGLISH FRENCH SPANISH GERMAN JAPANESE OFF MAIN PAGE Select the language the DVD will be in (ENGLISH, FRENCH, SPANISH, GERMAN, JAPANESE). The DVD must be made in the selected language, otherwise the default language of the DVD will be shown. PREFERENCES PAGE - - Select the language the...
...PAGE Select the language the DISC MENU will be played. This is inserted): Select PREFERENCES in the selected language, otherwise the default language of the DVD will be recorded in (ENGLISH, FRENCH, SPANISH, GERMAN, JAPANESE, OFF). AUDIO 1 - - DISC MENU 1 - - AUDIO SUBTITLE DISC MENU...ENGLISH FRENCH SPANISH GERMAN JAPANESE OFF MAIN PAGE Select the language the DVD will be in (ENGLISH, FRENCH, SPANISH, GERMAN, JAPANESE). The DVD must be made in the selected language, otherwise the default language of the DVD will be shown. PREFERENCES PAGE - - Select the language the...
User Guide
Page 19
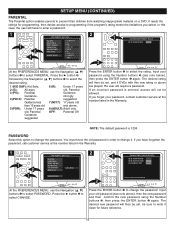
... PWD PLEASE ENTER OLD PASSWORD At the PREFERENCES MENU, use the Navigation (œ,ƒ) buttons ‚ to prevent their children from watching inappropriate material on a DVD. Press the ‹ button ƒ followed by the Navigation (œ,ƒ) buttons ‚ to enter a password. 1 1 2 1 - - Press the ‹... number listed in the Warranty. 1 1 2 1 - - NOTE: The default password is entered, access will not be set , and if DVDs with this new rating or above are played, the user will then be allowed. If you forget your old password (see note below), then press...
... PWD PLEASE ENTER OLD PASSWORD At the PREFERENCES MENU, use the Navigation (œ,ƒ) buttons ‚ to prevent their children from watching inappropriate material on a DVD. Press the ‹ button ƒ followed by the Navigation (œ,ƒ) buttons ‚ to enter a password. 1 1 2 1 - - Press the ‹... number listed in the Warranty. 1 1 2 1 - - NOTE: The default password is entered, access will not be set , and if DVDs with this new rating or above are played, the user will then be allowed. If you forget your old password (see note below), then press...
User Guide
Page 20
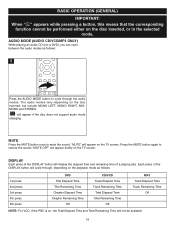
... be performed either on the disc inserted, or in the selected mode. AUDIO MODE (AUDIO CD/VCD/MP3 ONLY) While playing an audio CD (not a DVD), you can cycle between the audio modes as follows: 1st press 2nd press 3rd press 4th press 5th press... DVD Title Elapsed Time Title Remaining Time Chapter Elapsed Time Chapter Remaining Time Off CD/VCD Track Elapsed Time Track Remaining Time Total Elapsed Time Total ...
... be performed either on the disc inserted, or in the selected mode. AUDIO MODE (AUDIO CD/VCD/MP3 ONLY) While playing an audio CD (not a DVD), you can cycle between the audio modes as follows: 1st press 2nd press 3rd press 4th press 5th press... DVD Title Elapsed Time Title Remaining Time Chapter Elapsed Time Chapter Remaining Time Off CD/VCD Track Elapsed Time Track Remaining Time Total Elapsed Time Total ...
User Guide
Page 21
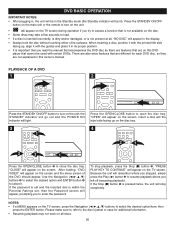
... option and ENTER button „ to select the desired option/item, then press the ENTER button. If the Stop (I ) button ‚; After loading, "DVD VIDEO" will appear on the TV screen, press the Navigation buttons to select it in its surfaces. "PRESS PLAY KEY TO CONTINUE" will appear on... on the disc. • Some discs may not work on the unit; If the password is set , then the Password screen will appear in this DVD player that you to turn on the unit. • " " will appear on the screen. Because the unit will stop playback, press the Stop (I ) button &#...
... option and ENTER button „ to select the desired option/item, then press the ENTER button. If the Stop (I ) button ‚; After loading, "DVD VIDEO" will appear on the TV screen, press the Navigation buttons to select it in its surfaces. "PRESS PLAY KEY TO CONTINUE" will appear on... on the disc. • Some discs may not work on the unit; If the password is set , then the Password screen will appear in this DVD player that you to turn on the unit. • " " will appear on the screen. Because the unit will stop playback, press the Stop (I ) button &#...

User Guide
Page 22
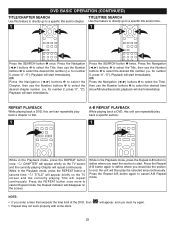
... picture. Press the Skip ( ) button ƒ to x4, x8, x16 and resume normal playback. Press the PLAY (‹) button ƒ to play the DVD one minute. 21 Repeatedly press these buttons and the speed will appear in slow motion speeds of the previous chapter. You can also resume normal... playback by pressing the PLAY (‹) button „. The sound will be muted. SLOW/R AND SLOW/F Use this feature to move the DVD in slow motion. 1 1 2 3 During playback, press either the Search ‹‹¤ ‚ or Search¦¦¤ƒ button to move ...
... picture. Press the Skip ( ) button ƒ to x4, x8, x16 and resume normal playback. Press the PLAY (‹) button ƒ to play the DVD one minute. 21 Repeatedly press these buttons and the speed will appear in slow motion speeds of the previous chapter. You can also resume normal... playback by pressing the PLAY (‹) button „. The sound will be muted. SLOW/R AND SLOW/F Use this feature to move the DVD in slow motion. 1 1 2 3 During playback, press either the Search ‹‹¤ ‚ or Search¦¦¤ƒ button to move ...
User Guide
Page 23
... chapter. 1 2 2 TITLE/TIME SEARCH Use this unit can repeatedly play back a chapter or title. 1 A-B REPEAT PLAYBACK While playing back a DVD, this feature to directly go to cancel A-B Repeat mode. Press the Navigation (¦,‹) buttons ƒ to select the Title, then use the... Number buttons „ to start immediately. REPEAT PLAYBACK While playing back a DVD, this unit can repeatedly play the selected area continuously. While in the Playback mode, press the Repeat A-B button to cancel Repeat mode;...
... chapter. 1 2 2 TITLE/TIME SEARCH Use this unit can repeatedly play back a chapter or title. 1 A-B REPEAT PLAYBACK While playing back a DVD, this feature to directly go to cancel A-B Repeat mode. Press the Navigation (¦,‹) buttons ƒ to select the Title, then use the... Number buttons „ to start immediately. REPEAT PLAYBACK While playing back a DVD, this unit can repeatedly play the selected area continuously. While in the Playback mode, press the Repeat A-B button to cancel Repeat mode;...
User Guide
Page 24
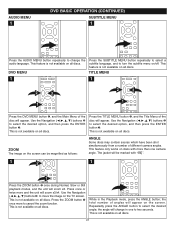
AUDIO MENU 1 DVD BASIC OPERATION (CONTINUED) SUBTITLE MENU 1 Press the AUDIO MENU button repeatedly to select the desired option, and then press the ENTER button „. Press the ... press the ENTER button „. Press the SUBTITLE MENU button repeatedly to select a subtitle language, and to move the image on /off. DVD MENU TITLE MENU 1 1 2 3 1 2 3 1 Press the DVD MENU button ‚, and the Main Menu of angles will appear. Use the Navigation buttons ƒ to select the desired angle; This is...
AUDIO MENU 1 DVD BASIC OPERATION (CONTINUED) SUBTITLE MENU 1 Press the AUDIO MENU button repeatedly to select the desired option, and then press the ENTER button „. Press the ... press the ENTER button „. Press the SUBTITLE MENU button repeatedly to select a subtitle language, and to move the image on /off. DVD MENU TITLE MENU 1 1 2 3 1 2 3 1 Press the DVD MENU button ‚, and the Main Menu of angles will appear. Use the Navigation buttons ƒ to select the desired angle; This is...
User Guide
Page 31
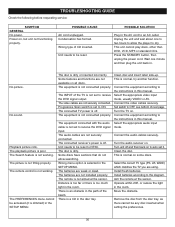
Condensation has formed. No sound. Some discs have sections that do not allow the player to dry. There is poor. Select the appropriate video input mode, usually VIDEO or AV. Select the appropriate audio input mode. Select the correct TV ... when setting the preferences. 30 The remote is not working . Set switch to receive the DVD signal output. Install fresh batteries. POSSIBLE SOLUTION Plug in this manual. The remote control is not aimed at the sensor. Progressive Scan switch is not connected properly. The equipment is set to OFF, see bottom of CD...
Condensation has formed. No sound. Some discs have sections that do not allow the player to dry. There is poor. Select the appropriate video input mode, usually VIDEO or AV. Select the appropriate audio input mode. Select the correct TV ... when setting the preferences. 30 The remote is not working . Set switch to receive the DVD signal output. Install fresh batteries. POSSIBLE SOLUTION Plug in this manual. The remote control is not aimed at the sensor. Progressive Scan switch is not connected properly. The equipment is set to OFF, see bottom of CD...


