Instruction Manual
Page 1
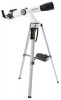
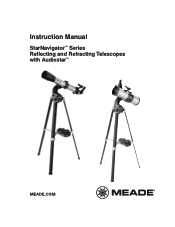
Instruction Manual StarNavigator™ Series Reflecting and Refracting Telescopes with Audiostar™ MEADE.COM
Instruction Manual StarNavigator™ Series Reflecting and Refracting Telescopes with Audiostar™ MEADE.COM
Instruction Manual
Page 2
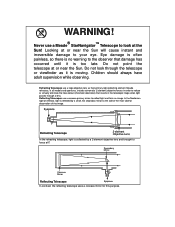
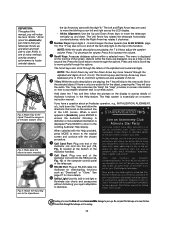
... virtually eliminate the false colour (chromatic aberration) that damage has occurred until it is no warning to collect light and form an image. Refracting Telescopes use a ® Meade StarNavigator™ Telescope to the side of the main tube for this purpose. Never use a large objective lens as it is collected by a small, flat secondary...
... virtually eliminate the false colour (chromatic aberration) that damage has occurred until it is no warning to collect light and form an image. Refracting Telescopes use a ® Meade StarNavigator™ Telescope to the side of the main tube for this purpose. Never use a large objective lens as it is collected by a small, flat secondary...
Instruction Manual
Page 3
...F: Manually Setting Time and Date 42 Basic Astronomy 43 Meade Limited Warranty Back Cover 3 Patents: US 6,392,799 Other Patent Pending © 2010 Meade Instruments Corp. CONTENTS Easy Set-Up Guide 4 Telescope Features 7 Audiostar Features 9 Getting Started 11 Packing List... IEC), (2 x ANSI/NEDA5004LC, IEC-CR2032) and grade of battery most suitable for the intended use your StarNavigator Telescope for Your Telescope 33 Collimation 33 Meade Consumer Solutions 34 Specifications 36 Appendix A: Celestial Coordinates 38 Locating the Celestial Pole 38 Appendix B: To Find Objects...
...F: Manually Setting Time and Date 42 Basic Astronomy 43 Meade Limited Warranty Back Cover 3 Patents: US 6,392,799 Other Patent Pending © 2010 Meade Instruments Corp. CONTENTS Easy Set-Up Guide 4 Telescope Features 7 Audiostar Features 9 Getting Started 11 Packing List... IEC), (2 x ANSI/NEDA5004LC, IEC-CR2032) and grade of battery most suitable for the intended use your StarNavigator Telescope for Your Telescope 33 Collimation 33 Meade Consumer Solutions 34 Specifications 36 Appendix A: Celestial Coordinates 38 Locating the Celestial Pole 38 Appendix B: To Find Objects...

Instruction Manual
Page 4
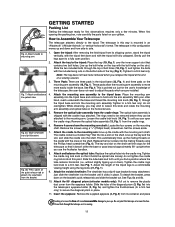
... cradle lock knob B until you can be attached to the mounting arm. Gently pull the legs apart to the tripod: Slide the bolts through the telescope as depicted in the diagram above. 6 2. Attach the tray to a fully open the cradle rings. Attach the cradle to your eye. The cradle contains a molded.... Open the tripod: Remove the tripod from the cradle rings. Tighten to a firm feel only, do not tighten the cradle ring lock knob at this telescope at or near the Sun.
... cradle lock knob B until you can be attached to the mounting arm. Gently pull the legs apart to the tripod: Slide the bolts through the telescope as depicted in the diagram above. 6 2. Attach the tray to a fully open the cradle rings. Attach the cradle to your eye. The cradle contains a molded.... Open the tripod: Remove the tripod from the cradle rings. Tighten to a firm feel only, do not tighten the cradle ring lock knob at this telescope at or near the Sun.

Instruction Manual
Page 5
...25 mm or 26 mm eyepiece (D) from the drive base. Carefully replace the battery holder back into focus. 8 G H 9. Do not point this telescope at or near the Sun. Speed 1: Slow Arrow Keys Number Keys 10. Sight along the tube: Sight along the side of optical tube assembly. Insert... eight AA-size batteries into the telescope's eyepiece-holder and tighten the thumbscrews (C) to remove the plastic dust cover from the battery holder before removing the batteries. . Do not look...
...25 mm or 26 mm eyepiece (D) from the drive base. Carefully replace the battery holder back into focus. 8 G H 9. Do not point this telescope at or near the Sun. Speed 1: Slow Arrow Keys Number Keys 10. Sight along the tube: Sight along the side of optical tube assembly. Insert... eight AA-size batteries into the telescope's eyepiece-holder and tighten the thumbscrews (C) to remove the plastic dust cover from the battery holder before removing the batteries. . Do not look...

Instruction Manual
Page 6
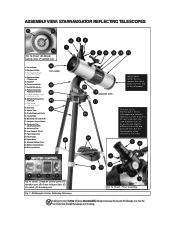
... Do not look different than, or be positioned slightly different than the one pictured here, 18 but the functionality of the StarNavigator Series telescopes are virtually identical. ASSEMBLY VIEW: STARNAVIGATOR REFRACTINGTELESCOPES E F 5 4 8 9 6 7 2 Fig. 1d (Inset): 3 Compass/bubble level. Fig. 1e (... the same. Focus Lock Knob 14 5 7. Dew Shield 17 3 12. Cradle Ring 23 16. Tripod Base 24. Fig. 1: StarNavigator Series Refracting Telescope. 19 A B C D Fig. 1c (Inset): Computer control panel. (A) Handbox port; (B) Power indicator light, (C) ON switch;...
... Do not look different than, or be positioned slightly different than the one pictured here, 18 but the functionality of the StarNavigator Series telescopes are virtually identical. ASSEMBLY VIEW: STARNAVIGATOR REFRACTINGTELESCOPES E F 5 4 8 9 6 7 2 Fig. 1d (Inset): 3 Compass/bubble level. Fig. 1e (... the same. Focus Lock Knob 14 5 7. Dew Shield 17 3 12. Cradle Ring 23 16. Tripod Base 24. Fig. 1: StarNavigator Series Refracting Telescope. 19 A B C D Fig. 1c (Inset): Computer control panel. (A) Handbox port; (B) Power indicator light, (C) ON switch;...
Instruction Manual
Page 7
... E F 10 Fig. 1b (Inset): (E) Altitude setting circle; (F) Altitude lock. 2 1 12 1. Dust Cap 22 13. Cradle Ring 16. Fig. 1: StarNavigator Series Reflecting Telescope. 1 Fig. 1e (Inset): Focus assembly. Focus Knob 2. Eyepiece 6. Accessory Tray 20. Focus Lock Knob 16 7. Optical Tube 14. Azimuth Setting Circle 25. Cradle Ring Lock ...
... E F 10 Fig. 1b (Inset): (E) Altitude setting circle; (F) Altitude lock. 2 1 12 1. Dust Cap 22 13. Cradle Ring 16. Fig. 1: StarNavigator Series Reflecting Telescope. 1 Fig. 1e (Inset): Focus assembly. Focus Knob 2. Eyepiece 6. Accessory Tray 20. Focus Lock Knob 16 7. Optical Tube 14. Azimuth Setting Circle 25. Cradle Ring Lock ...
Instruction Manual
Page 9
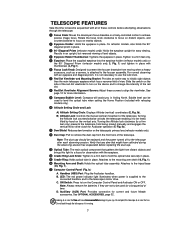
...Meade accessories. Attaches to the tripod base (23, Fig. 1). Ƽ Computer Control Panel (Fig. Auxiliary (AUX) Port: Provides connection for more information. ᕩ Compass/Bubble Level: Compass will cause irreversable damage to your eye. Looking at or near the Sun will assist you in finding North. TELESCOPE... to a firm feel to the focuser assembly. Handbox (HBX) Port: Plug the Audiostar handbox. Slide the switch on the telescope's primary lens (refractor models only). ¹ Dust Cap: Pull to achieve precise image focus. B. For normal observing with refractng...
...Meade accessories. Attaches to the tripod base (23, Fig. 1). Ƽ Computer Control Panel (Fig. Auxiliary (AUX) Port: Provides connection for more information. ᕩ Compass/Bubble Level: Compass will cause irreversable damage to your eye. Looking at or near the Sun will assist you in finding North. TELESCOPE... to a firm feel to the focuser assembly. Handbox (HBX) Port: Plug the Audiostar handbox. Slide the switch on the telescope's primary lens (refractor models only). ¹ Dust Cap: Pull to achieve precise image focus. B. For normal observing with refractng...
Instruction Manual
Page 10
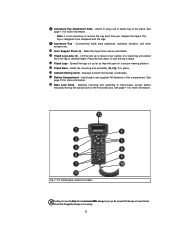
.... See page 12 for more information. Loosen before manually moving . 8 Holds the mounting arm assembly (16, Fig. 1) in this telescope at or near the Sun. Install eight user-supplied AA batteries in place. 2$ Azimuth Setting Circle - Looking at or near the Sun...base. Press the lock down to the tripod. Do not point this compartment. Displays Azimuth (horizontal) coordinates. 2% Battery Compartment - Fig. 2: The StarNavigator Audiostar handbox. See page 11 for more secure and stable. 2! Make the tripod more information. 2^ Base Lock Knob - ƽ Accessory Tray ...
.... See page 12 for more information. Loosen before manually moving . 8 Holds the mounting arm assembly (16, Fig. 1) in this telescope at or near the Sun. Install eight user-supplied AA batteries in place. 2$ Azimuth Setting Circle - Looking at or near the Sun...base. Press the lock down to the tripod. Do not point this compartment. Displays Azimuth (horizontal) coordinates. 2% Battery Compartment - Fig. 2: The StarNavigator Audiostar handbox. See page 11 for more secure and stable. 2! Make the tripod more information. 2^ Base Lock Knob - ƽ Accessory Tray ...
Instruction Manual
Page 11
... coordinates of any given night of the year. • Download the latest satellite data and software revisions directly from the Meade website (www.meade.com) and share software with other Audiostar enthusiasts. (Requires optional #505 AstroFinder™ Software and Cable Connector Kit. b...optimum viewing of a celestial object. See OPTIONAL ACCESSORIES, page 32.) • Control your StarNavigator telescope with a red LED (Light Emitting Diode) for two seconds or more, information about this telescope at or near the Sun. NOTE: If MODE is then available using an RS-232...
... coordinates of any given night of the year. • Download the latest satellite data and software revisions directly from the Meade website (www.meade.com) and share software with other Audiostar enthusiasts. (Requires optional #505 AstroFinder™ Software and Cable Connector Kit. b...optimum viewing of a celestial object. See OPTIONAL ACCESSORIES, page 32.) • Control your StarNavigator telescope with a red LED (Light Emitting Diode) for two seconds or more, information about this telescope at or near the Sun. NOTE: If MODE is then available using an RS-232...
Instruction Manual
Page 12
... where the best observing sites are excellent Fig. 1C) of the LCD screen. the Up Arrow key starts with whom you will skip to your StarNavigator telescope. Press 7 to the bolts (bottom view). Key: While the audio descriptions are playing, the 7 & 9 keys adjust the speaker volume. ...are , and to accomplish whatever task is displayed on how to Audiostar handbox. 1) Coil Cord: Plug one audio file for many different telescopes and other astronomy enthusiasts with the digit "9." DEFINITION: Throughout this manual, you will stop the audio. key also accesses the "Help" file...
... where the best observing sites are excellent Fig. 1C) of the LCD screen. the Up Arrow key starts with whom you will skip to your StarNavigator telescope. Press 7 to the bolts (bottom view). Key: While the audio descriptions are playing, the 7 & 9 keys adjust the speaker volume. ...are , and to accomplish whatever task is displayed on how to Audiostar handbox. 1) Coil Cord: Plug one audio file for many different telescopes and other astronomy enthusiasts with the digit "9." DEFINITION: Throughout this manual, you will stop the audio. key also accesses the "Help" file...
Instruction Manual
Page 13
...Fig. 7: Attach and balance the optical tube. Fig. 8b: Press down and from the cradle rings: The optical tube assembly is moving. 11 The telescope in this knob and rotate the mounting arm assembly and optical tube on the quick release tab to hold onto the arm assembly. Attach the...find a position where the tube remains horizontal (i.e., without slightly tipping up the key and the slot, and slide the cradle onto the shaft. The telescope in this point. Line up the cradle with the included wing nuts on the shaft. These pads allow the mounting arm assembly to a comfortable ...
...Fig. 7: Attach and balance the optical tube. Fig. 8b: Press down and from the cradle rings: The optical tube assembly is moving. 11 The telescope in this knob and rotate the mounting arm assembly and optical tube on the quick release tab to hold onto the arm assembly. Attach the...find a position where the tube remains horizontal (i.e., without slightly tipping up the key and the slot, and slide the cradle onto the shaft. The telescope in this point. Line up the cradle with the included wing nuts on the shaft. These pads allow the mounting arm assembly to a comfortable ...

Instruction Manual
Page 14
... eyepiece (3), tighten eyepiece thumbscrews (4) (Refractor models). 1 3 2 Fig. 10: Insert the eyepiece (1) into the battery compartment. Insert batteries: The telescope's battery compartment (25, Fig. 1) is recommended that you perform steps 1 through 4 of the drive base. Connect the 9v connector plug to safeguard... HBX port. 5. it in the OFF position. See Fig. 12. the telescope's batteries supply power to a firm feel only. Slide the intensity slider to the right to your Meade warranty. the red LED lights when power is in the diagonal prism (refractor models...
... eyepiece (3), tighten eyepiece thumbscrews (4) (Refractor models). 1 3 2 Fig. 10: Insert the eyepiece (1) into the battery compartment. Insert batteries: The telescope's battery compartment (25, Fig. 1) is recommended that you perform steps 1 through 4 of the drive base. Connect the 9v connector plug to safeguard... HBX port. 5. it in the OFF position. See Fig. 12. the telescope's batteries supply power to a firm feel only. Slide the intensity slider to the right to your Meade warranty. the red LED lights when power is in the diagonal prism (refractor models...

Instruction Manual
Page 15
... fuzzy and ill-defined, return to use a 25 mm eyepiece with the StarNavigator telescopes. The focal length is listed as it is moving. 13 Telescope focal length divided by the focal length of the telescope and the focal length of too much power? Fig. 15: 26 mm and...should be employed only under SPECIFICATIONS: StarNavigator102, page 36. Low power eyepieces offer a wide field of intensity for the smallest fraction of a telescope is determined by Eyepiece focal length = Eyepiece power 800 Ö 25 = 32 The eyepiece power, or magnification is to enlarge the ...
... fuzzy and ill-defined, return to use a 25 mm eyepiece with the StarNavigator telescopes. The focal length is listed as it is moving. 13 Telescope focal length divided by the focal length of the telescope and the focal length of too much power? Fig. 15: 26 mm and...should be employed only under SPECIFICATIONS: StarNavigator102, page 36. Low power eyepieces offer a wide field of intensity for the smallest fraction of a telescope is determined by Eyepiece focal length = Eyepiece power 800 Ö 25 = 32 The eyepiece power, or magnification is to enlarge the ...
Instruction Manual
Page 16
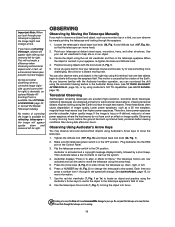
...observe by merely pointing the telescope and looking along the Earth's surface through the eyepiece. 1. Terrestrial Observing StarNavigator refracting telescopes are excellent high-resolution, terrestrial (land) telescopes (reflecting telescopes are now activated and can be used to move the telescope using the Audiostar's Arrow keys...page 32, or consult the Meade Telescope Catalog. No means of correcting the image is caused by Moving the Telescope Manually If you wish to slew (move) the telescope up and correct leftfor-right) is desirable, an optional Meade 45° Erecting Prism is...
...observe by merely pointing the telescope and looking along the Earth's surface through the eyepiece. 1. Terrestrial Observing StarNavigator refracting telescopes are excellent high-resolution, terrestrial (land) telescopes (reflecting telescopes are now activated and can be used to move the telescope using the Audiostar's Arrow keys...page 32, or consult the Meade Telescope Catalog. No means of correcting the image is caused by Moving the Telescope Manually If you wish to slew (move) the telescope up and correct leftfor-right) is desirable, an optional Meade 45° Erecting Prism is...

Instruction Manual
Page 17
... Speeds 4, 5, or 6: Enables centring an object in the field of a low-to decrease the scrolling speed. Playing the Audio The StarNavigator telescope is scrolling across the display, press and hold the Up Arrow key to increase the scrolling speed or press and hold the Down Arrow key...the 7 (volume down) or 9 (volume up "?" Do not point this telescope at an angle during these periods and adds a depth to view different features. TIP: When a message is equipped with Astronomer Inside technology. TIP: StarNavigator shortcut keys: "7" Volume down the Moon's bright glare, but it is ...
... Speeds 4, 5, or 6: Enables centring an object in the field of a low-to decrease the scrolling speed. Playing the Audio The StarNavigator telescope is scrolling across the display, press and hold the Up Arrow key to increase the scrolling speed or press and hold the Down Arrow key...the 7 (volume down) or 9 (volume up "?" Do not point this telescope at an angle during these periods and adds a depth to view different features. TIP: When a message is equipped with Astronomer Inside technology. TIP: StarNavigator shortcut keys: "7" Volume down the Moon's bright glare, but it is ...

Instruction Manual
Page 18
... where the observation location site is called the sidereal rate. The tracking function automatically keeps an object more information.You must first set the telescope in order to West. To find True North, use Audiostar or after performing a RESET (see RESET, page 27). 1. When you ...first use Audiostar, it automatically "tracks" the stars and other words, if the telescope is in the night sky. AudioStar displays "Press 0 to a firm feel . The motors will cause irreversible damage to the North Star. Do not...
... where the observation location site is called the sidereal rate. The tracking function automatically keeps an object more information.You must first set the telescope in order to West. To find True North, use Audiostar or after performing a RESET (see RESET, page 27). 1. When you ...first use Audiostar, it automatically "tracks" the stars and other words, if the telescope is in the night sky. AudioStar displays "Press 0 to a firm feel . The motors will cause irreversible damage to the North Star. Do not...
Instruction Manual
Page 19
...not look through the database of countries, states, and provinces. IMPORTANT NOTE: Audiostar requests the Zip Code or Country/State, City, and Telescope Model information only the first time Audiostar is highlighted. If you chose the zip code option (USA only), the leftmost "0" is activated...) closest to your observing location). Daylight Savings Time: The next screen requests the status of the Scroll keys to cycle through the telescope as it is repeated with Audiostar's GO TO capabilities is usually displayed first and highlighted by a right pointing Arrow (>). 7. Use the...
...not look through the database of countries, states, and provinces. IMPORTANT NOTE: Audiostar requests the Zip Code or Country/State, City, and Telescope Model information only the first time Audiostar is highlighted. If you chose the zip code option (USA only), the leftmost "0" is activated...) closest to your observing location). Daylight Savings Time: The next screen requests the status of the Scroll keys to cycle through the telescope as it is repeated with Audiostar's GO TO capabilities is usually displayed first and highlighted by a right pointing Arrow (>). 7. Use the...

Instruction Manual
Page 20
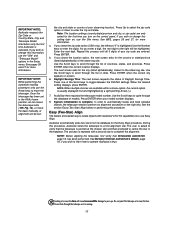
...is performed correctly, "Alignment Successful" displays. North Method -"North Method: 1=True 2=Compass" displays. Use the Arrow keys to move the telescope until the star is usually the brightest star in that an alignment star is visible and centred in case the observer prefers to align ...upon . Repeat procedure for more information on page 16, continue to step 2. Look through the telescope as it stands out dramatically from night to night. These methods are included in the eyepiece. It is recommended that you choose stars...
...is performed correctly, "Alignment Successful" displays. North Method -"North Method: 1=True 2=Compass" displays. Use the Arrow keys to move the telescope until the star is usually the brightest star in that an alignment star is visible and centred in case the observer prefers to align ...upon . Repeat procedure for more information on page 16, continue to step 2. Look through the telescope as it stands out dramatically from night to night. These methods are included in the eyepiece. It is recommended that you choose stars...

Instruction Manual
Page 21
... key to observe. 6. displays. Press ENTER to display information about the object and listen to your eye. Press GO TO to move the telescope. IMPORTANT NOTE: The accuracy of viewing. IMPORTANT NOTE: Once aligned, only use the Arrow keys to select a object (Saturn) for alignment.... maintain their position even though the Earth is aligned, "Select Item: Object" displays. i.e., Saturn remains centred in step #3. 1 After the telescope is rotating beneath the stars. When the tour you are more precise than One-Star Alignment. Press the Scroll keys to select displays, press...
... key to observe. 6. displays. Press ENTER to display information about the object and listen to your eye. Press GO TO to move the telescope. IMPORTANT NOTE: The accuracy of viewing. IMPORTANT NOTE: Once aligned, only use the Arrow keys to select a object (Saturn) for alignment.... maintain their position even though the Earth is aligned, "Select Item: Object" displays. i.e., Saturn remains centred in step #3. 1 After the telescope is rotating beneath the stars. When the tour you are more precise than One-Star Alignment. Press the Scroll keys to select displays, press...
