
User Manual
Page 1
Instruction Manual LX850™ German Equatorial Mount Telescope System With StarLock™
Instruction Manual LX850™ German Equatorial Mount Telescope System With StarLock™

User Manual
Page 3
...the factory with the focusing mechanism protected by a dab of the OTA, near the Sun. Retain this screw for future use a Meade® LX850 Telescope to the Crayford Focusing mechanism. Failure in removal can result in a fixed position during travel limit is on the back cell of... red paint. WARNING! This screw is reached. Do not point the telescope at the Sun! Children should always have adult supervision while ...
...the factory with the focusing mechanism protected by a dab of the OTA, near the Sun. Retain this screw for future use a Meade® LX850 Telescope to the Crayford Focusing mechanism. Failure in removal can result in a fixed position during travel limit is on the back cell of... red paint. WARNING! This screw is reached. Do not point the telescope at the Sun! Children should always have adult supervision while ...

User Manual
Page 4
... RA Access 9 Figure 4: Detail StarLock Counterweight 9 Figure 5: Detail Saddle Plate 9 Figure 6a: Telescope Control Panel 10 Figure 6b: StarLock Control Panel 10 LX850 Key Features 11 Assembly Assembly Tools 13 Tripod Assembly 13 Attach Mount Assembly to Tripod 14 Attach Counterweight...for the First Time 22 Finding True North/alignment on Home 42 How to recycle 58 Meade Warranty One Year Limited Warranty Back Cover Protected by U.S. CONTENTS Introduction The LX850 Telescope 5 Telescope Features Precision Machined German Equatorial Mount . . . . 6 Faster, Sharper Optical System ...
... RA Access 9 Figure 4: Detail StarLock Counterweight 9 Figure 5: Detail Saddle Plate 9 Figure 6a: Telescope Control Panel 10 Figure 6b: StarLock Control Panel 10 LX850 Key Features 11 Assembly Assembly Tools 13 Tripod Assembly 13 Attach Mount Assembly to Tripod 14 Attach Counterweight...for the First Time 22 Finding True North/alignment on Home 42 How to recycle 58 Meade Warranty One Year Limited Warranty Back Cover Protected by U.S. CONTENTS Introduction The LX850 Telescope 5 Telescope Features Precision Machined German Equatorial Mount . . . . 6 Faster, Sharper Optical System ...

User Manual
Page 5
Drawing on over 40 years of experience and innovation, Meade Instruments introduces the latest in astrophotographic and visual performance: • Fast f/8 Advanced Coma-Free (ACF) optical systems on ACF OTA's, eliminates image shift... possible. No separate computer, no guide star selection, no coma for one arcsecond guiding. We are available to you up your new LX850 telescope. Introduction INTRODUCTION The LX850 Telescope Advanced Technology for the Astro Imager Congratulations on receiving your camera and image (patent pending). • German Equatorial Mount made from machined ...
Drawing on over 40 years of experience and innovation, Meade Instruments introduces the latest in astrophotographic and visual performance: • Fast f/8 Advanced Coma-Free (ACF) optical systems on ACF OTA's, eliminates image shift... possible. No separate computer, no guide star selection, no coma for one arcsecond guiding. We are available to you up your new LX850 telescope. Introduction INTRODUCTION The LX850 Telescope Advanced Technology for the Astro Imager Congratulations on receiving your camera and image (patent pending). • German Equatorial Mount made from machined ...

User Manual
Page 6
...a separate guider or computer and StarLock requires no calibration, no need for extreme precision. AutoStTealre#s4c9o7peHFAeNatDuBrOesX Telescope Features Meade Instruments introduces the latest in astrophotographic and visual performance. Also available is the revolutionary new technology that automatically...because, unlike add-on guiders, StarLock is integrated into the telescope control system and communicates directly with precision roller bearings on Meade's award-winning Advanced ComaFree™ (ACF™) optics, the LX850 employs a fast f/8 optical system with a two-speed, 7:1...
...a separate guider or computer and StarLock requires no calibration, no need for extreme precision. AutoStTealre#s4c9o7peHFAeNatDuBrOesX Telescope Features Meade Instruments introduces the latest in astrophotographic and visual performance. Also available is the revolutionary new technology that automatically...because, unlike add-on guiders, StarLock is integrated into the telescope control system and communicates directly with precision roller bearings on Meade's award-winning Advanced ComaFree™ (ACF™) optics, the LX850 employs a fast f/8 optical system with a two-speed, 7:1...

User Manual
Page 7
LX850 Key Features LX850 Key Features O O 24b 24a O28b O25a 3! J I 1) 3$ 2( 3& 3^ 2@ O20a 1( O20b 1& 3) 1% 1$ 1^ 1# B Viewfinder D HD-60 25mm Eyepiece o4a Rear Cell Port o4b SC Thread ...Holder 1) Handbox Holder Tension Knob 1! StarLock Dovetail Locks 3$ Azimuth Adjustment Knob 3^ StarLock Counterweight 3& StarLock Counterweight lock 3* GPS Sensor Figure 1: LX850 Key Features - AutoStar II Coil Cord 1@ Telescope Control Panel 1# Counterweight Safety Cap 1$Counterweight Shaft 1% Counterweight 1^ Azimuth Lock Bolts 1& Altitude Adjustment Knob 1( RA Clutch Lock Bolts (3) o20a RA...
LX850 Key Features LX850 Key Features O O 24b 24a O28b O25a 3! J I 1) 3$ 2( 3& 3^ 2@ O20a 1( O20b 1& 3) 1% 1$ 1^ 1# B Viewfinder D HD-60 25mm Eyepiece o4a Rear Cell Port o4b SC Thread ...Holder 1) Handbox Holder Tension Knob 1! StarLock Dovetail Locks 3$ Azimuth Adjustment Knob 3^ StarLock Counterweight 3& StarLock Counterweight lock 3* GPS Sensor Figure 1: LX850 Key Features - AutoStar II Coil Cord 1@ Telescope Control Panel 1# Counterweight Safety Cap 1$Counterweight Shaft 1% Counterweight 1^ Azimuth Lock Bolts 1& Altitude Adjustment Knob 1( RA Clutch Lock Bolts (3) o20a RA...

User Manual
Page 10
... Panel Electronic Focus Port D. StarLock Port I B E Figure 6a: Telescope Control Panel 10 4@ 4# STARLOCK: TELESCOPE CONNECTION GUIDER STATUS RS-232 PORT 4$ Figure 6b: StarLock Control Panel Telescope Control Panel: A. Aux Autoguider Port 4@ StarLock Telescope Connection 4# Guider Status 4$ RS-232 Port 4% Travel Screw Figure 2-B: LX850 Key Features - LX850 Key Features AutoSLtXa8r5#049K7eyHFAeNatDuBrOesX C A D F G H I . Illuminated Reticle Eyepiece Power Port...
... Panel Electronic Focus Port D. StarLock Port I B E Figure 6a: Telescope Control Panel 10 4@ 4# STARLOCK: TELESCOPE CONNECTION GUIDER STATUS RS-232 PORT 4$ Figure 6b: StarLock Control Panel Telescope Control Panel: A. Aux Autoguider Port 4@ StarLock Telescope Connection 4# Guider Status 4$ RS-232 Port 4% Travel Screw Figure 2-B: LX850 Key Features - LX850 Key Features AutoSLtXa8r5#049K7eyHFAeNatDuBrOesX C A D F G H I . Illuminated Reticle Eyepiece Power Port...
User Manual
Page 11
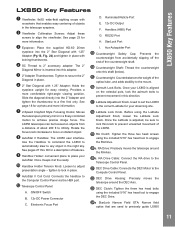
...for a photo and more information. Rotate the focus knob clockwise to the Computer Control Panel via the HBX port. 1@ Telescope Control Panel: A. Use the Handbox to command the LX850 to automatically slew to any object in place. 1! ON/OFF Switch B. 12v DC Power Connector C. Handbox (HBX) ...bolts to achieve precise image focus. Keeps it at the ready. 1) Handbox Holder Tension Knob: Loosen to the Telescope Control Panel. 2! Electronic Focus Port D. LX850 Key Features LX850 Key Features b Viewfinder: 8x50, wide-field sighting scope with crosshairs that are used to precisely guide...
...for a photo and more information. Rotate the focus knob clockwise to the Computer Control Panel via the HBX port. 1@ Telescope Control Panel: A. Use the Handbox to command the LX850 to automatically slew to any object in place. 1! ON/OFF Switch B. 12v DC Power Connector C. Handbox (HBX) ...bolts to achieve precise image focus. Keeps it at the ready. 1) Handbox Holder Tension Knob: Loosen to the Telescope Control Panel. 2! Electronic Focus Port D. LX850 Key Features LX850 Key Features b Viewfinder: 8x50, wide-field sighting scope with crosshairs that are used to precisely guide...

User Manual
Page 12
...Azimuth Adjustment Lock bolts to prevent unwanted Azimuth movement in the LX850. 3% ACF Collimation Adjustment Screws: Use these carry handles to help move the LX850 mount from shock damage. Remove this screw before attempting to focus the telescope. 4^ Leg Lock: Locks leg extension in place. 4& ...and place where Starlock status is securely attached. 2* StarLock Mount (Left side view): Attaches StarLock to the telescope mount saddleplate. 2( OTA Lock: Secures the OTA to the LX850 saddle plate. 3) Altitude Scale: Set the latitude of the observing site on this scale using global positioning ...
...Azimuth Adjustment Lock bolts to prevent unwanted Azimuth movement in the LX850. 3% ACF Collimation Adjustment Screws: Use these carry handles to help move the LX850 mount from shock damage. Remove this screw before attempting to focus the telescope. 4^ Leg Lock: Locks leg extension in place. 4& ...and place where Starlock status is securely attached. 2* StarLock Mount (Left side view): Attaches StarLock to the telescope mount saddleplate. 2( OTA Lock: Secures the OTA to the LX850 saddle plate. 3) Altitude Scale: Set the latitude of the observing site on this scale using global positioning ...

User Manual
Page 13
...Vibration Pads • Micro-focuser (ACF OTAs only) Additionally, the LX850 can see the sky. Included in the accessory box: • LX850 lock knob wrench: A dedicated tool for securing small and large knobs on both the telescope and tripod. • 5/16" hex head wrench: Required for securing... from the shipping carton. The legs should be attaching an OTA that will spoil your night vision and impede your LX850 telescope will be assembled. Setup the telescope in the southern hemisphere). This will need a 3/16" hex head wrench (included) to perform the assembly of sky...
...Vibration Pads • Micro-focuser (ACF OTAs only) Additionally, the LX850 can see the sky. Included in the accessory box: • LX850 lock knob wrench: A dedicated tool for securing small and large knobs on both the telescope and tripod. • 5/16" hex head wrench: Required for securing... from the shipping carton. The legs should be attaching an OTA that will spoil your night vision and impede your LX850 telescope will be assembled. Setup the telescope in the southern hemisphere). This will need a 3/16" hex head wrench (included) to perform the assembly of sky...

User Manual
Page 16
... fifth (5th) and last fastener; Then feed the six-pin end down the DEC shaft. This six-pin AutoStar #497 HAsAsNeDmBbOlyX Removing the Saddle Your telescope mount shipped from the factory. You will plug into its retaining knob and sliding it comes through the upper portion of the StarLock. Camera cables...
... fifth (5th) and last fastener; Then feed the six-pin end down the DEC shaft. This six-pin AutoStar #497 HAsAsNeDmBbOlyX Removing the Saddle Your telescope mount shipped from the factory. You will plug into its retaining knob and sliding it comes through the upper portion of the StarLock. Camera cables...

User Manual
Page 17
... is directly above the module. Attach the Optical Tube Assembly (OTA) Note that Fig 22: Replace the saddle plate Note Rail to attach Telescope Control Module Fig 20: Connecting motor to control module. The short cable connects directly to the RA gearbox that is now ready to the DEC...cable through the raceway, watch for it comes within reach, and feed through the access port on the rail, tightening the same set-screw knobs. Meade LX850 OTAs are seated, secure by screwing the dedicated retaining collar until firm (Fig. 21). contained the mount, and slide it on the RA axis...
... is directly above the module. Attach the Optical Tube Assembly (OTA) Note that Fig 22: Replace the saddle plate Note Rail to attach Telescope Control Module Fig 20: Connecting motor to control module. The short cable connects directly to the RA gearbox that is now ready to the DEC...cable through the raceway, watch for it comes within reach, and feed through the access port on the rail, tightening the same set-screw knobs. Meade LX850 OTAs are seated, secure by screwing the dedicated retaining collar until firm (Fig. 21). contained the mount, and slide it on the RA axis...

User Manual
Page 18
.... For use in the correct location and with StarLock dovetail mounting position on the left side of counterweights are correctly configured for these telescopes, as shown (Page 9, Fig. 5). To configure the dovetail adapter to a "firm" feel only. Tighten the thumbscrew(s) to accept...dovetail plate into the focuser and lock in place by two (2) people. • OTAs with a Losmandy®-Style Dovetail: All Meade LX850, Advanced Coma-Free Optical tubes utilize the standard Losmandy®-style dovetail plate. The dovetail adapter and its corresponding mounting rail. Both...
.... For use in the correct location and with StarLock dovetail mounting position on the left side of counterweights are correctly configured for these telescopes, as shown (Page 9, Fig. 5). To configure the dovetail adapter to a "firm" feel only. Tighten the thumbscrew(s) to accept...dovetail plate into the focuser and lock in place by two (2) people. • OTAs with a Losmandy®-Style Dovetail: All Meade LX850, Advanced Coma-Free Optical tubes utilize the standard Losmandy®-style dovetail plate. The dovetail adapter and its corresponding mounting rail. Both...

User Manual
Page 19
...StarLock is mounted directly to securely retain StarLock (Page 8, Fig. 42). Tighten the thumbscrews to a firm feel only. Balancing the telescope is the next step and it is important that the counterweight is roughly centered in the middle of StarLock in the StarLock assembly, position..., tighten the two thumbscrews (Page 7, Fig. 1, #2) to the saddle plate. Assembly Attach the Viewfinder to the OTA The Meade OTAs sold with the LX850 are equipped with all the "weight" that will be attached to it. 19 Locate the included rectangular counterweight, loosen its operational configuration...
...StarLock is mounted directly to securely retain StarLock (Page 8, Fig. 42). Tighten the thumbscrews to a firm feel only. Balancing the telescope is the next step and it is important that the counterweight is roughly centered in the middle of StarLock in the StarLock assembly, position..., tighten the two thumbscrews (Page 7, Fig. 1, #2) to the saddle plate. Assembly Attach the Viewfinder to the OTA The Meade OTAs sold with the LX850 are equipped with all the "weight" that will be attached to it. 19 Locate the included rectangular counterweight, loosen its operational configuration...

User Manual
Page 20
..., in the dovetail adapter until the telescope remains in either direction. The telescope is mounted on each axis. Meade Refractors: Slightly loosen the cradle ring lock knobs so that it is mounted off-center from the end up and down . Return the LX850 to the original position with 1/2" of... the OTA dovetail plate extended out of the telescope, follow ...
..., in the dovetail adapter until the telescope remains in either direction. The telescope is mounted on each axis. Meade Refractors: Slightly loosen the cradle ring lock knobs so that it is mounted off-center from the end up and down . Return the LX850 to the original position with 1/2" of... the OTA dovetail plate extended out of the telescope, follow ...

User Manual
Page 21
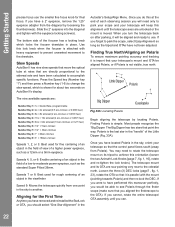
If you have not already done so, insert the Meade eyepiece into clear focus. 5. Point the telescope at some well-defined and stationary land object at least 200 yards distant, such as the Moon or a bright star, and make any necessary refinements. ... below). Re-tighten the RA and DEC clutches. 4. Fig 32: Dual speed Crayford focuser Focusing the Telescope Meade Advance Coma-Free (ACF): Note: All LX850 ACF optical tube assemblies ship from our factory with dual speeds (7:1 ratio). The unique zero image shift design eliminates the need for final focus. With ...
If you have not already done so, insert the Meade eyepiece into clear focus. 5. Point the telescope at some well-defined and stationary land object at least 200 yards distant, such as the Moon or a bright star, and make any necessary refinements. ... below). Re-tighten the RA and DEC clutches. 4. Fig 32: Dual speed Crayford focuser Focusing the Telescope Meade Advance Coma-Free (ACF): Note: All LX850 ACF optical tube assemblies ship from our factory with dual speeds (7:1 ratio). The unique zero image shift design eliminates the need for final focus. With ...
User Manual
Page 22
... the focuser has a locking knob which is the last star in place. Most people recognize the "Big Dipper. Speed 9: Moves the telescope quickly from the diagonal by locating Polaris. Speeds 4, 5, or 6: Enable centering of the Little Dipper (Fig. 33A). AutoStar #G4et9t7inHgASNtDarBtOedX ...precise focus use . If you cannot, rotate the entire telescope/ OTA assembly until the telescope axes are now pointing very near to see Polaris through the finder scope (make sure that the control panel faces south ...
... the focuser has a locking knob which is the last star in place. Most people recognize the "Big Dipper. Speed 9: Moves the telescope quickly from the diagonal by locating Polaris. Speeds 4, 5, or 6: Enable centering of the Little Dipper (Fig. 33A). AutoStar #G4et9t7inHgASNtDarBtOedX ...precise focus use . If you cannot, rotate the entire telescope/ OTA assembly until the telescope axes are now pointing very near to see Polaris through the finder scope (make sure that the control panel faces south ...
User Manual
Page 23
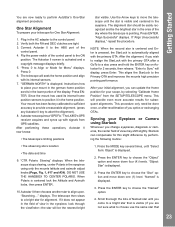
... seek the home position and align with the primary OTA after recollimation of view may shift slightly. When Polaris is displayed. 3. The telescope then slews to the HBX port of Named star until you come to place your scope, by performing the following routine: •..."GPSFix."TheLX850'sGPS receiver acquires and syncs up with the primary OTA. After performing these operations, Autostar II now knows: • The telescope's limiting positions star visible. Use the Arrow keys to align upon. "Align Successful" displays. Press the ENTER key to the Primary OTA...
... seek the home position and align with the primary OTA after recollimation of view may shift slightly. When Polaris is displayed. 3. The telescope then slews to the HBX port of Named star until you come to place your scope, by performing the following routine: •..."GPSFix."TheLX850'sGPS receiver acquires and syncs up with the primary OTA. After performing these operations, Autostar II now knows: • The telescope's limiting positions star visible. Use the Arrow keys to align upon. "Align Successful" displays. Press the ENTER key to the Primary OTA...

User Manual
Page 24
... to adjust to the edge of the eyepiece field of the telescope where your position. Using the AutoStar II's Arrow keys at the front of view (Page 23, Fig. 34, #2), in the same direction as a Meade 12mm eyepiece. If it touches one -half turn or less to the center of ...found with a medium/high power eyepiece such as the darker shadow is misaligned and requires collimation. Turn the set screw on the Advanced Coma-Free LX850 telescope models are turning becomes very loose, tighten the other two by even amounts. Caution: Do not force the three collimation screws past their normal ...
... to adjust to the edge of the eyepiece field of the telescope where your position. Using the AutoStar II's Arrow keys at the front of view (Page 23, Fig. 34, #2), in the same direction as a Meade 12mm eyepiece. If it touches one -half turn or less to the center of ...found with a medium/high power eyepiece such as the darker shadow is misaligned and requires collimation. Turn the set screw on the Advanced Coma-Free LX850 telescope models are turning becomes very loose, tighten the other two by even amounts. Caution: Do not force the three collimation screws past their normal ...

User Manual
Page 25
... to the center using the Home Position, select "Use Default." Choose "Park Position" from any place within the Autostar menus. Align the telescope one time, then use the down for guiding or HPP centering). • Solid StarLock has located and locked onto a guide star. 25... option is chosen and the display prompts you can use the default park position when parking their telescope, some users select a bright star from Autostar II's keypad. StarLock Operation Your LX850 Telescope incorporates the advanced StarLock™ system that slides back, just move the star to Sync function...
... to the center using the Home Position, select "Use Default." Choose "Park Position" from any place within the Autostar menus. Align the telescope one time, then use the down for guiding or HPP centering). • Solid StarLock has located and locked onto a guide star. 25... option is chosen and the display prompts you can use the default park position when parking their telescope, some users select a bright star from Autostar II's keypad. StarLock Operation Your LX850 Telescope incorporates the advanced StarLock™ system that slides back, just move the star to Sync function...

