Dimension Guide
Page 1
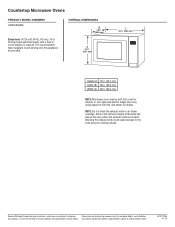
...(A) 13¹⁄₄" (33.7 cm) Depth (B) 18¹⁄₄" (46.4 cm) Width (C) 23³⁄₄" (60.3 cm) NOTE: Microwave oven may be provided. For complete details, see Installation our products, we reserve the right to change materials and specifications without notice. Instructions packed with a fuse...poor cooking results. W10177946 4-1-10 It is required. NOTE: Do not block the exhaust vents or air intake openings. Countertop Microwave Ovens PRODUCT MODEL NUMBERS UMC5200BA Electrical: A 120-volt, 60 Hz, AC-only, 15 or 20 amp fused electrical supply with ...
...(A) 13¹⁄₄" (33.7 cm) Depth (B) 18¹⁄₄" (46.4 cm) Width (C) 23³⁄₄" (60.3 cm) NOTE: Microwave oven may be provided. For complete details, see Installation our products, we reserve the right to change materials and specifications without notice. Instructions packed with a fuse...poor cooking results. W10177946 4-1-10 It is required. NOTE: Do not block the exhaust vents or air intake openings. Countertop Microwave Ovens PRODUCT MODEL NUMBERS UMC5200BA Electrical: A 120-volt, 60 Hz, AC-only, 15 or 20 amp fused electrical supply with ...
Owners Manual
Page 1
Part No. Be sure Use & Care Guide stays with oven. W10177946 Microwave Oven Use & Care Guide Models: UMC5200BAB/W/S UMC5200BCB/W/S IMPORTANT SAFETY INSTRUCTIONS 2 Precautions to Avoid Possible Exposure to Excessive Microwave Energy 4 Installation and Operation 6 Features 7 Operating Instructions 9 Care and Cleaning 21 Cooking Utensils 22 Troubleshooting 23 WHIRLPOOL CORPORATION MAJOR APPLIANCE WARRANTY 24 Manuel d'entretien et d'utilisation 25 Guía de uso y cuidado 49 Keep instructions for future reference.
Part No. Be sure Use & Care Guide stays with oven. W10177946 Microwave Oven Use & Care Guide Models: UMC5200BAB/W/S UMC5200BCB/W/S IMPORTANT SAFETY INSTRUCTIONS 2 Precautions to Avoid Possible Exposure to Excessive Microwave Energy 4 Installation and Operation 6 Features 7 Operating Instructions 9 Care and Cleaning 21 Cooking Utensils 22 Troubleshooting 23 WHIRLPOOL CORPORATION MAJOR APPLIANCE WARRANTY 24 Manuel d'entretien et d'utilisation 25 Guía de uso y cuidado 49 Keep instructions for future reference.
Owners Manual
Page 2
...contact your model number and phone number) or call: Maytag ServicesLLC Attn: CAIR® Center P.O. Hazards or unsafe practices which COULD result in minor personal injury. Hazards or unsafe practices which COULD result in the microwave oven for future reference. To reduce the risk of purchase.... injury or death. Common sense, caution, and care must be exercised when installing, maintaining, or operating microwave. Immediate hazards which WILL result in this appliance. Visible bubbling or boiling when the container is removed from the microwave oven is not always present.
...contact your model number and phone number) or call: Maytag ServicesLLC Attn: CAIR® Center P.O. Hazards or unsafe practices which COULD result in minor personal injury. Hazards or unsafe practices which COULD result in the microwave oven for future reference. To reduce the risk of purchase.... injury or death. Common sense, caution, and care must be exercised when installing, maintaining, or operating microwave. Immediate hazards which WILL result in this appliance. Visible bubbling or boiling when the container is removed from the microwave oven is not always present.
Owners Manual
Page 3
...cover or block filter or other combustible materials are required to excessive microwave energy. 11. sink, in the oven cavity: a. Use this oven ONLY for household use this oven ONLY in water. described in this oven for storage. Keep cord AWAY from paper or plastic bags before consumption... this manual. 13. d. DO NOT leave paper products, cooking utensils, or food in the cavity when not in oven. Contact nearest MICROWAVE ENERGY" on 4. the installation instructions in the Care and Cleaning section. 8. for industrial or laboratory use as whole eggs and sealed...
...cover or block filter or other combustible materials are required to excessive microwave energy. 11. sink, in the oven cavity: a. Use this oven ONLY for household use this oven ONLY in water. described in this oven for storage. Keep cord AWAY from paper or plastic bags before consumption... this manual. 13. d. DO NOT leave paper products, cooking utensils, or food in the cavity when not in oven. Contact nearest MICROWAVE ENERGY" on 4. the installation instructions in the Care and Cleaning section. 8. for industrial or laboratory use as whole eggs and sealed...
Owners Manual
Page 4
... the following: 1. Pressure may cause an electrical arc, malfunction, or damage to defeat or tamper with microwave energy. Do not operate oven without load or food in oven. Popping time varies depending on product use regular cooking thermometers in shell or with the door open since ...foods before cooking with the safety interlocks. DO NOT operate the oven if it is important not to oven. 7. Use only popcorn in harmful exposure to operate this oven with an unbroken yolk using microwave energy. Do not leave oven unattended. 6. Pierce or open -door operation can result in...
... the following: 1. Pressure may cause an electrical arc, malfunction, or damage to defeat or tamper with microwave energy. Do not operate oven without load or food in oven. Popping time varies depending on product use regular cooking thermometers in shell or with the door open since ...foods before cooking with the safety interlocks. DO NOT operate the oven if it is important not to oven. 7. Use only popcorn in harmful exposure to operate this oven with an unbroken yolk using microwave energy. Do not leave oven unattended. 6. Pierce or open -door operation can result in...
Owners Manual
Page 5
...by one or more of the following: ● Reorient the receiving antenna of the radio or television. ● Relocate the microwave oven with other equipment, an increase in a residential installation. FEDERAL COMMUNICATIONS COMMISSION RADIO FREQUENCY INTERFERENCE STATEMENT (U.S.A. ONLY) This equipment generates and uses... pursuant to part 18 of FCC Rules, which can be blown. See Installation Instructions. GROUNDING INSTRUCTIONS Oven MUST be plugged into an outlet that the microwave oven and the receiver are on , the user is properly grounded. If the product power cord is ...
...by one or more of the following: ● Reorient the receiving antenna of the radio or television. ● Relocate the microwave oven with other equipment, an increase in a residential installation. FEDERAL COMMUNICATIONS COMMISSION RADIO FREQUENCY INTERFERENCE STATEMENT (U.S.A. ONLY) This equipment generates and uses... pursuant to part 18 of FCC Rules, which can be blown. See Installation Instructions. GROUNDING INSTRUCTIONS Oven MUST be plugged into an outlet that the microwave oven and the receiver are on , the user is properly grounded. If the product power cord is ...
Owners Manual
Page 6
... or casserole lid and let it has cooled sufficiently. Use of a higher voltage is dangerous and may overheat. PLACEMENT OF THE OVEN Your microwave oven can be the same as specified on a flat surface such as dents in doubt, consult a licensed electrician. GETTING THE BEST ...COOKING RESULTS To get the best results from your microwave oven, read and follow the guidelines below. ● Storage Temperature: Foods taken from oven interior. • If oven has been stored in extremely cold area, wait a few hours before connecting power. If...
... or casserole lid and let it has cooled sufficiently. Use of a higher voltage is dangerous and may overheat. PLACEMENT OF THE OVEN Your microwave oven can be the same as specified on a flat surface such as dents in doubt, consult a licensed electrician. GETTING THE BEST ...COOKING RESULTS To get the best results from your microwave oven, read and follow the guidelines below. ● Storage Temperature: Foods taken from oven interior. • If oven has been stored in extremely cold area, wait a few hours before connecting power. If...
Owners Manual
Page 8
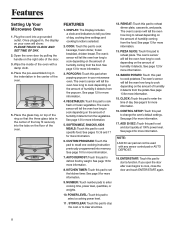
...inside of the ring so that the three glass tabs in , the display on top of the oven with any sensor control pad or AUTO DEFROST. 18. Place the glass tray on your microwave oven. See page 13 for more information. 6. VEGETABLES: Touch this pad to cook depending on the... floor of day, cooking time settings and cooking functions selected. 2. The oven's sensor will tell the oven how long to reheat dinner plate, casserole, and pasta...
...inside of the ring so that the three glass tabs in , the display on top of the oven with any sensor control pad or AUTO DEFROST. 18. Place the glass tray on your microwave oven. See page 13 for more information. 6. VEGETABLES: Touch this pad to cook depending on the... floor of day, cooking time settings and cooking functions selected. 2. The oven's sensor will tell the oven how long to reheat dinner plate, casserole, and pasta...
Owners Manual
Page 9
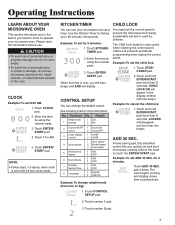
... No. The Child Lock feature is over, you will hear beeps and END will appear in the oven. ADD 30 SEC. Touch CONTROL SETUP pad. 2. Operating Instructions LEARN ABOUT YOUR MICROWAVE OVEN This section introduces you to the basics you need to touch the ENTER/ START pad. CAUTION ●... utensils in the display window with two beeps. Enter the time by using the number pads. 3. You may lock the control panel to operate your microwave oven as a timer. Touch ENTER/ START pad. 4. Touch ENTER/ START pad. NOTE: ● Follow steps 1-3 above, when clock is set the child ...
... No. The Child Lock feature is over, you will hear beeps and END will appear in the oven. ADD 30 SEC. Touch CONTROL SETUP pad. 2. Operating Instructions LEARN ABOUT YOUR MICROWAVE OVEN This section introduces you to the basics you need to touch the ENTER/ START pad. CAUTION ●... utensils in the display window with two beeps. Enter the time by using the number pads. 3. You may lock the control panel to operate your microwave oven as a timer. Touch ENTER/ START pad. 4. Touch ENTER/ START pad. NOTE: ● Follow steps 1-3 above, when clock is set the child ...
Owners Manual
Page 12
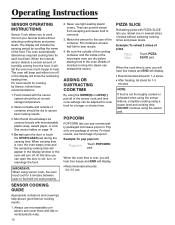
... determines required cooking time for best results. 4. When the internal sensor detects a certain amount of the microwave oven are dry before placing food in the display window or the oven will show the remaining heating time. For best results for 5 minutes between uses or food will indicate the sensing period by Sensor, follow...
... determines required cooking time for best results. 4. When the internal sensor detects a certain amount of the microwave oven are dry before placing food in the display window or the oven will show the remaining heating time. For best results for 5 minutes between uses or food will indicate the sensing period by Sensor, follow...

Owners Manual
Page 13
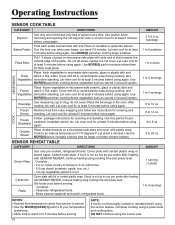
...category. Example: To reheat Casserole. 1. DO NOT continue using a power level and cooking time. IMPORTANT: When using sensor cook, the oven must cool for 5 minutes. Category Fresh Vegetable Frozen Vegetable Touch Pad Number 1 2 ● Recommended amounts :1-4 servings COOK Using COOK ... 5 minutes. Touch COOK pad. 2. Choose food category. Operating Instructions BAKED POTATO The BAKED POTATO pad lets you heat common microwave-prepared foods without needing to program cooking times and power levels. NOTES: ● Before baking, pierce potato with fork several potatoes...
...category. Example: To reheat Casserole. 1. DO NOT continue using a power level and cooking time. IMPORTANT: When using sensor cook, the oven must cool for 5 minutes. Category Fresh Vegetable Frozen Vegetable Touch Pad Number 1 2 ● Recommended amounts :1-4 servings COOK Using COOK ... 5 minutes. Touch COOK pad. 2. Choose food category. Operating Instructions BAKED POTATO The BAKED POTATO pad lets you heat common microwave-prepared foods without needing to program cooking times and power levels. NOTES: ● Before baking, pierce potato with fork several potatoes...
Owners Manual
Page 14
...serving (1 plate) 1 to increase reheat time for thick crust pizza. Let oven cool for larger or thicker chicken breasts. Contents : - 3-4 oz. Pasta-canned spaghetti and ravioli, refrigerated foods. Place on microwave-safe plate with lid or vented plastic wrap during cooking and Vegetables stir before... Use MORE(9) pad when cooking larger potatoes. Do not let slices overlap. Let oven cool for at least 5 minutes before using again. water. Chicken Breast Place chicken breasts on a microwave-safe plate and cover with fork. Use the MORE(9) pad to 24 oz. ...
...serving (1 plate) 1 to increase reheat time for thick crust pizza. Let oven cool for larger or thicker chicken breasts. Contents : - 3-4 oz. Pasta-canned spaghetti and ravioli, refrigerated foods. Place on microwave-safe plate with lid or vented plastic wrap during cooking and Vegetables stir before... Use MORE(9) pad when cooking larger potatoes. Do not let slices overlap. Let oven cool for at least 5 minutes before using again. water. Chicken Breast Place chicken breasts on a microwave-safe plate and cover with fork. Use the MORE(9) pad to 24 oz. ...
Owners Manual
Page 15
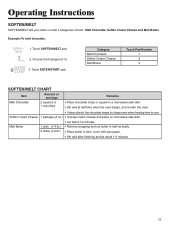
...wrapping and cut butter in half vertically. 2 sticks (1/2 lb.) • Place butter in a microwave-safe dish. • Stir well at half time when the oven beeps, and re-start the oven. • Unless stirred, the chocolate keeps its shape even when heating time is over. Operating ...Soften Cream Cheese and Melt Butter. Choose food category(1-3). 3. Soften Cream Cheese 1 package (8 oz.) • Unwrap cream cheese and place on microwave-safe dish. • Let stand 1-2 minutes. Example: To melt chocolate. 1. Touch SOFTEN/MELT pad. 2. Category Melt Chocolate Soften Cream Cheese ...
...wrapping and cut butter in half vertically. 2 sticks (1/2 lb.) • Place butter in a microwave-safe dish. • Stir well at half time when the oven beeps, and re-start the oven. • Unless stirred, the chocolate keeps its shape even when heating time is over. Operating ...Soften Cream Cheese and Melt Butter. Choose food category(1-3). 3. Soften Cream Cheese 1 package (8 oz.) • Unwrap cream cheese and place on microwave-safe dish. • Let stand 1-2 minutes. Example: To melt chocolate. 1. Touch SOFTEN/MELT pad. 2. Category Melt Chocolate Soften Cream Cheese ...

Owners Manual
Page 19
...160° F (Medium) 10-15 min./lb. Turn over half way through cooking. Operating Instructions COOKING GUIDE Guide for Cooking Meat in Your Microwave ● Place meat on dish, with the thickest portions towards the outside of the dish. Let stand 10 minutes. Turn over half way through ... time. ● The following temperatures are removal temperatures. Beef Pork Poultry Food Rare Medium Well Done Medium Well Done Dark meat Light meat Remove from oven 135°F 150°F 160°F 150°F 160°F 170°F 160°F After standing (10 min.) 145°F 160°F...
...160° F (Medium) 10-15 min./lb. Turn over half way through cooking. Operating Instructions COOKING GUIDE Guide for Cooking Meat in Your Microwave ● Place meat on dish, with the thickest portions towards the outside of the dish. Let stand 10 minutes. Turn over half way through ... time. ● The following temperatures are removal temperatures. Beef Pork Poultry Food Rare Medium Well Done Medium Well Done Dark meat Light meat Remove from oven 135°F 150°F 160°F 150°F 160°F 170°F 160°F After standing (10 min.) 145°F 160°F...
Owners Manual
Page 20
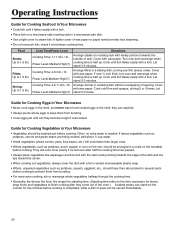
...over after they become tough if overcooked. Cooking Time: 4-6 ½ min. / lb. stand 5 minutes. Guide for Cooking Vegetables in Your Microwave ● Vegetables should be washed just before cooking is half up . Cook until fish flakes easily with wax paper. Cover with a fork. ...:Medium-High(7). Cook until fish flakes easily with meaty portions towards the edge of rack. A lighter cover of the oven.) A baked potato can stand on a microwave-safe roasting rack in a microwave-safe dish. ● Use a tight cover to 1.5 lbs. Let stand 3-5 minutes. Cover with a fork....
...over after they become tough if overcooked. Cooking Time: 4-6 ½ min. / lb. stand 5 minutes. Guide for Cooking Vegetables in Your Microwave ● Vegetables should be washed just before cooking is half up . Cook until fish flakes easily with wax paper. Cover with a fork. ...:Medium-High(7). Cook until fish flakes easily with meaty portions towards the edge of rack. A lighter cover of the oven.) A baked potato can stand on a microwave-safe roasting rack in a microwave-safe dish. ● Use a tight cover to 1.5 lbs. Let stand 3-5 minutes. Cover with a fork....
Owners Manual
Page 21
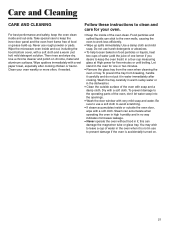
... To prevent the tray from the oven when cleaning the oven or tray. Wipe the microwave oven inside and out-side. Clean your oven. ● Keep the inside or outside surface of the oven clean. Food particles and spilled liquids can stick to the oven walls, causing the oven to keep the oven fresh) in a four-cup measuring glass...
... To prevent the tray from the oven when cleaning the oven or tray. Wipe the microwave oven inside and out-side. Clean your oven. ● Keep the inside or outside surface of the oven clean. Food particles and spilled liquids can stick to the oven walls, causing the oven to keep the oven fresh) in a four-cup measuring glass...
Installation Instructions
Page 1
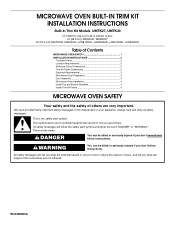
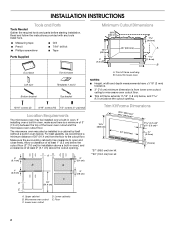
...2 Location Requirements 2 Minimum Cutout Dimensions 2 Trim Kit Frame Dimensions 2 Electrical Requirements 3 Microwave Oven Preparation 3 Duct Assembly 3 Microwave Oven Installation 4 Install Top and Bottom Brackets 4 Install Trim Kit Frame 4 MICROWAVE OVEN SAFETY Your safety and the safety of injury, and tell you and others are not followed...symbol and either the word "DANGER" or "WARNING." This symbol alerts you to reduce the chance of others . MICROWAVE OVEN BUILT-IN TRIM KIT INSTALLATION INSTRUCTIONS Built-In Trim Kit Models UMTK27, UMTK30 UL listed for use over built-in...
...2 Location Requirements 2 Minimum Cutout Dimensions 2 Trim Kit Frame Dimensions 2 Electrical Requirements 3 Microwave Oven Preparation 3 Duct Assembly 3 Microwave Oven Installation 4 Install Top and Bottom Brackets 4 Install Trim Kit Frame 4 MICROWAVE OVEN SAFETY Your safety and the safety of injury, and tell you and others are not followed...symbol and either the word "DANGER" or "WARNING." This symbol alerts you to reduce the chance of others . MICROWAVE OVEN BUILT-IN TRIM KIT INSTALLATION INSTRUCTIONS Built-In Trim Kit Models UMTK27, UMTK30 UL listed for use over built-in...
Installation Instructions
Page 2
...kit 3" (7.6 cm) A. For best usability, we recommend a minimum distance of the lower oven cutout and the microwave oven cutout floor. Lower cabinets E. Floor 2 Microwave oven cutout C. Cutout for installation above a built-in oven below , and 1 4.0 cm) above the cutout opening . 13/16" screws (2) ... frame 12 Templates 1 and 2 Top bracket A. painted) Location Requirements The microwave oven may also be installed over a built-in oven. Make sure the surrounding cabinetry has clearance to microwave oven cutout floor. ■ Trim kit frame extends 11/16" (1.8 cm) below...
...kit 3" (7.6 cm) A. For best usability, we recommend a minimum distance of the lower oven cutout and the microwave oven cutout floor. Lower cabinets E. Floor 2 Microwave oven cutout C. Cutout for installation above a built-in oven below , and 1 4.0 cm) above the cutout opening . 13/16" screws (2) ... frame 12 Templates 1 and 2 Top bracket A. painted) Location Requirements The microwave oven may also be installed over a built-in oven. Make sure the surrounding cabinetry has clearance to microwave oven cutout floor. ■ Trim kit frame extends 11/16" (1.8 cm) below...
Installation Instructions
Page 3
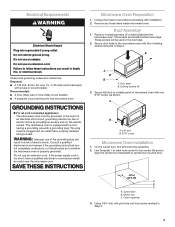
...extension cord. If the power supply cord is too short, have a qualified electrician or serviceman install an outlet near the microwave oven. Unplug microwave oven before proceeding with a grounding plug. The screws are not completely understood, or if doubt exists as shown. Secure duct base... to outside panel of the grounding plug can result in Step 2. 3 Observe all cord connected appliances: The microwave oven must be used in the next step. 2. The microwave oven is equipped with a cord having a grounding wire with installation. 2. Consult a qualified electrician or serviceman if ...
...extension cord. If the power supply cord is too short, have a qualified electrician or serviceman install an outlet near the microwave oven. Unplug microwave oven before proceeding with a grounding plug. The screws are not completely understood, or if doubt exists as shown. Secure duct base... to outside panel of the grounding plug can result in Step 2. 3 Observe all cord connected appliances: The microwave oven must be used in the next step. 2. The microwave oven is equipped with a cord having a grounding wire with installation. 2. Consult a qualified electrician or serviceman if ...
Installation Instructions
Page 4
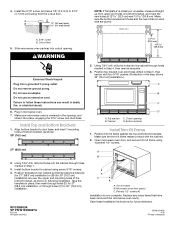
... these Installation Instructions for future reference. Cutout opening . Painted 1/2" screws (4) Installation is centered in Step 1. 3. Slide microwave oven partway into a grounded 3 prong outlet. WARNING NOTE: If Template 2 is missing or unusable, measure straight up from upper...installation. Cutout floor 5. Install Top and Bottom Brackets 1. Install bottom bracket to 3/16" (4.7 mm) protruding from microwave oven cavity. DE68-03169C 4/10 Printed in microwave oven. 7. Tape the template in death, fire, or electrical shock. 6. Make sure the bottom bracket end holes and...
... these Installation Instructions for future reference. Cutout opening . Painted 1/2" screws (4) Installation is centered in Step 1. 3. Slide microwave oven partway into a grounded 3 prong outlet. WARNING NOTE: If Template 2 is missing or unusable, measure straight up from upper...installation. Cutout floor 5. Install Top and Bottom Brackets 1. Install bottom bracket to 3/16" (4.7 mm) protruding from microwave oven cavity. DE68-03169C 4/10 Printed in microwave oven. 7. Tape the template in death, fire, or electrical shock. 6. Make sure the bottom bracket end holes and...


