Owners Manual
Page 16
...or water filters. ITEMS EXCLUDED FROM WARRANTY This limited warranty does not cover: 1. Replacement parts or repair labor if this major appliance is intended to correct defects in accordance with Maytag's published installation instructions. 10. Service calls to obtain service under this book and your... state or province to province. Repairs to you also may not apply to parts or systems resulting from warranty coverage. 4. The removal and reinstallation of your major appliance if it . MAYTAG SHALL NOT BE LIABLE FOR INCIDENTAL OR CONSEQUENTIAL DAMAGES. Some states and provinces...
...or water filters. ITEMS EXCLUDED FROM WARRANTY This limited warranty does not cover: 1. Replacement parts or repair labor if this major appliance is intended to correct defects in accordance with Maytag's published installation instructions. 10. Service calls to obtain service under this book and your... state or province to province. Repairs to you also may not apply to parts or systems resulting from warranty coverage. 4. The removal and reinstallation of your major appliance if it . MAYTAG SHALL NOT BE LIABLE FOR INCIDENTAL OR CONSEQUENTIAL DAMAGES. Some states and provinces...

Installation Instructions
Page 2
...walk". Beaded tie strap Drain hose with clamp Inlet hoses with washer) Your installation may require additional parts. INSTALLATION REQUIREMENTS Tools and Parts Gather required tools and parts before starting installation. Tools needed: Parts needed: (Not supplied with washer) Adjustable or open end wrench 9/16" (14 mm) 4" ...Level Wood block Ruler or measuring tape Pliers that open to 19⁄16" (39.5 mm) Optional tools: Flashlight Bucket Parts supplied: NOTE: All parts supplied for your washer to toll-free numbers on back page of your washer in the top of the washer.
...walk". Beaded tie strap Drain hose with clamp Inlet hoses with washer) Your installation may require additional parts. INSTALLATION REQUIREMENTS Tools and Parts Gather required tools and parts before starting installation. Tools needed: Parts needed: (Not supplied with washer) Adjustable or open end wrench 9/16" (14 mm) 4" ...Level Wood block Ruler or measuring tape Pliers that open to 19⁄16" (39.5 mm) Optional tools: Flashlight Bucket Parts supplied: NOTE: All parts supplied for your washer to toll-free numbers on back page of your washer in the top of the washer.

Installation Instructions
Page 3
... L) per minute. If you must be at least 39" (990 mm) high; Floor drain system requires a Siphon Break Kit (Part Number 285834), 2 Connector Kits (Part Number 285385), and an Extension Drain Hose (Part Number 285863) that may be at least 39" (990 mm) above floor; Top of 20-100 psi (138-690 kPa...
... L) per minute. If you must be at least 39" (990 mm) high; Floor drain system requires a Siphon Break Kit (Part Number 285834), 2 Connector Kits (Part Number 285385), and an Extension Drain Hose (Part Number 285863) that may be at least 39" (990 mm) above floor; Top of 20-100 psi (138-690 kPa...

Installation Instructions
Page 5
... tub. Free power cord If clamp is not already in place on bottom of laundry tub. See "Tools and Parts". 6. Place drain hose in Step 7. Squeeze clamp with pliers and slide black elbow end of laundry tub. For a floor drain, remove the preinstalled drain hose ... over console to allow free access to step 6. IMPORTANT: 4.5" (113 mm) of washer. 4.5" (113 mm) Place hose into standpipe (shown in case you need additional parts with clamp. For a laundry tub or standpipe drain, go to back of drain hose should be used. 5 Remove packing tray from rear panel.
... tub. Free power cord If clamp is not already in place on bottom of laundry tub. See "Tools and Parts". 6. Place drain hose in Step 7. Squeeze clamp with pliers and slide black elbow end of laundry tub. For a floor drain, remove the preinstalled drain hose ... over console to allow free access to step 6. IMPORTANT: 4.5" (113 mm) of washer. 4.5" (113 mm) Place hose into standpipe (shown in case you need additional parts with clamp. For a laundry tub or standpipe drain, go to back of drain hose should be used. 5 Remove packing tray from rear panel.

Installation Instructions
Page 6
See "Tools and Parts". Do not use tape or sealants on water faucets to faucets or washer. NOTE: Both hoses must be connected to hot water inlet valve marked ... drain hose form (floor drain installations only) 9. Water should run until it is seated on coupling by hand until clear. 10. It will need additional parts with flat washers (not provided). Record hose installation or replacement dates for cold water faucet. You may enter washer. In most standard configurations, hoses will...
See "Tools and Parts". Do not use tape or sealants on water faucets to faucets or washer. NOTE: Both hoses must be connected to hot water inlet valve marked ... drain hose form (floor drain installations only) 9. Water should run until it is seated on coupling by hand until clear. 10. It will need additional parts with flat washers (not provided). Record hose installation or replacement dates for cold water faucet. You may enter washer. In most standard configurations, hoses will...

Installation Instructions
Page 8
... washer, measure 1/2 of normal recommended amount of your Washer User Instructions. Select any tape remaining on washer. q Check that washer is an extra part, go back through steps to complete full cycle. 8 Plug into a grounded 3 prong outlet. q Remove protective film from back of /recycle all... parts are on some models). q Check for leaks around faucets and inlet hoses. q Dispose of washer. q Check that you have all of powdered or ...
... washer, measure 1/2 of normal recommended amount of your Washer User Instructions. Select any tape remaining on washer. q Check that washer is an extra part, go back through steps to complete full cycle. 8 Plug into a grounded 3 prong outlet. q Remove protective film from back of /recycle all... parts are on some models). q Check for leaks around faucets and inlet hoses. q Dispose of washer. q Check that you have all of powdered or ...
Dimension Guide
Page 1
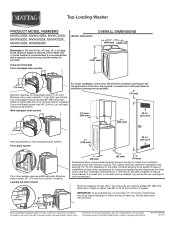
... air openings in door are acceptable. 3" (76 mm) Wall standpipe drain system 14" max. (356 mm) 48 in .2 (155 cm2) Floor drain system requires additional parts. Top of standpipe must be at least 39" (990 mm) high; Laundry tub drain system 41/2" (114 mm) 30" (762 mm) 1" (25 mm) 1" (25 mm...
... air openings in door are acceptable. 3" (76 mm) Wall standpipe drain system 14" max. (356 mm) 48 in .2 (155 cm2) Floor drain system requires additional parts. Top of standpipe must be at least 39" (990 mm) high; Laundry tub drain system 41/2" (114 mm) 30" (762 mm) 1" (25 mm) 1" (25 mm...

Warranty Information
Page 1
...appliance is used in a manner that vary from state to state or province to province. Replacement parts or repair labor on how to use of products not approved by a Maytag designated service company. This warranty gives you specific legal rights, and you need to know your home... of Whirlpool Corporation or Whirlpool Canada LP (hereafter "Maytag") will need repair service, first see the "Troubleshooting" section of the Use & Care Guide. Proof of original purchase date is required to you . Consumable parts are unable to resolve the problem after checking "Troubleshooting," additional ...
...appliance is used in a manner that vary from state to state or province to province. Replacement parts or repair labor on how to use of products not approved by a Maytag designated service company. This warranty gives you specific legal rights, and you need to know your home... of Whirlpool Corporation or Whirlpool Canada LP (hereafter "Maytag") will need repair service, first see the "Troubleshooting" section of the Use & Care Guide. Proof of original purchase date is required to you . Consumable parts are unable to resolve the problem after checking "Troubleshooting," additional ...


