
Installation Guide
Page 2
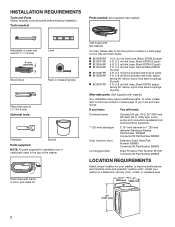
...1" (25 mm) diameter Standpipe Adapter Part Number 3363920 Connector Kit Part Number 285835 Drain hose too short Extension Drain Hose Part Number 285863 Connector Kit Part Number 285835 Lint clogged drain Drain Protector Part Number 367031 Connector Kit Part Number 285835 LOCATION REQUIREMENTS Select proper location..." (1067 mm) 2 Drain hose with clamp, U-form, and cable tie Inlet hoses with washer) Your installation may require additional parts. Tools needed: Parts needed: (Not supplied with washer) Adjustable or open end wrench 9/16" (14 mm) 4" min (102 mm) Level Wood ...
...1" (25 mm) diameter Standpipe Adapter Part Number 3363920 Connector Kit Part Number 285835 Drain hose too short Extension Drain Hose Part Number 285863 Connector Kit Part Number 285835 Lint clogged drain Drain Protector Part Number 367031 Connector Kit Part Number 285835 LOCATION REQUIREMENTS Select proper location..." (1067 mm) 2 Drain hose with clamp, U-form, and cable tie Inlet hoses with washer) Your installation may require additional parts. Tools needed: Parts needed: (Not supplied with washer) Adjustable or open end wrench 9/16" (14 mm) 4" min (102 mm) Level Wood ...

Installation Guide
Page 3
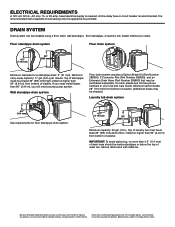
... cable tie. 3 This washer has been tested for walls, doors, and floor moldings. Floor drain system requires a Siphon Break Kit (Part Number 285834), 2 Connector Kits (Part Number 285835), and an Extension Drain Hose (Part Number 285863) that may cause damage in .2 (155 cm2) 1" (25 mm) 1" (25 mm) 3" (76 mm) Dimensions show recommended spacing...
... cable tie. 3 This washer has been tested for walls, doors, and floor moldings. Floor drain system requires a Siphon Break Kit (Part Number 285834), 2 Connector Kits (Part Number 285835), and an Extension Drain Hose (Part Number 285863) that may cause damage in .2 (155 cm2) 1" (25 mm) 1" (25 mm) 3" (76 mm) Dimensions show recommended spacing...
Installation Guide
Page 5
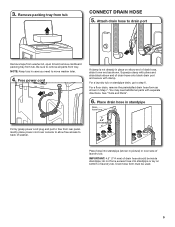
Be sure to move washer later. 4. NOTE: Keep tray in case you need additional parts with clamp. Gently place power cord over console to allow free access to drain port Remove tape from washer lid, open lid and remove cardboard ... or standpipe drain, go to free from tub CONNECT DRAIN HOSE 5. You may need to remove all parts from tub. For a floor drain, remove the preinstalled drain hose form as shown. See "Tools and Parts". 6. Place drain hose in picture) or over end as shown in place on bottom of drain hose...
Be sure to move washer later. 4. NOTE: Keep tray in case you need additional parts with clamp. Gently place power cord over console to allow free access to drain port Remove tape from washer lid, open lid and remove cardboard ... or standpipe drain, go to free from tub CONNECT DRAIN HOSE 5. You may need to remove all parts from tub. For a floor drain, remove the preinstalled drain hose form as shown. See "Tools and Parts". 6. Place drain hose in picture) or over end as shown in place on bottom of drain hose...
Installation Guide
Page 6
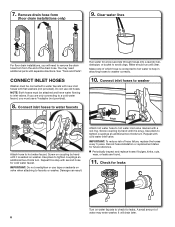
... faucets with new inlet hoses with flat washers (not provided). A small amount of hose failure, replace the hoses every 5 years. 7. See "Tools and Parts". Use pliers to a cold water faucet, you must use a Y-adapter (not provided). 8. IMPORTANT: Do not overtighten or use old hoses. Remove drain hose...if bulges, kinks, cuts, wear, or leaks are only connecting to tighten couplings an additional two-thirds turn . It will need additional parts with cold water inlet valve. CONNECT INLET HOSES Washer must be connected to faucets or washer. Connect inlet hoses to washer Attach hose ...
... faucets with new inlet hoses with flat washers (not provided). A small amount of hose failure, replace the hoses every 5 years. 7. See "Tools and Parts". Use pliers to a cold water faucet, you must use a Y-adapter (not provided). 8. IMPORTANT: Do not overtighten or use old hoses. Remove drain hose...if bulges, kinks, cuts, wear, or leaks are only connecting to tighten couplings an additional two-thirds turn . It will need additional parts with cold water inlet valve. CONNECT INLET HOSES Washer must be connected to faucets or washer. Connect inlet hoses to washer Attach hose ...
Installation Guide
Page 8
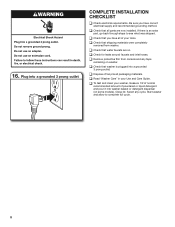
... on. Start washer and allow to see what was skipped. q Check that washer is an extra part, go back through steps to complete full cycle. 8 q Check that you have all packaging materials. 16. Plug into washer basket or detergent dispenser (on washer. ...
... on. Start washer and allow to see what was skipped. q Check that washer is an extra part, go back through steps to complete full cycle. 8 q Check that you have all packaging materials. 16. Plug into washer basket or detergent dispenser (on washer. ...
Dimension Guide
Page 2
... be inside standpipe or below the top of washer. Wall standpipe drain system Floor drain system requires a Siphon Break Kit (Part Number 285834), 2 Connector Kits (Part Number 285835), and an Extension Drain Hose (Part Number 285863) that a separate circuit serving only this appliance be installed using a floor drain, wall standpipe, floor standpipe, or...
... be inside standpipe or below the top of washer. Wall standpipe drain system Floor drain system requires a Siphon Break Kit (Part Number 285834), 2 Connector Kits (Part Number 285835), and an Extension Drain Hose (Part Number 285863) that a separate circuit serving only this appliance be installed using a floor drain, wall standpipe, floor standpipe, or...
Warranty Information
Page 1
...13. and Canada, direct all requests for factory specified parts and repair labor to or furnished with the product, Maytag brand of the Use and Care Guide, scan the QR code on the below named parts only and does not include repair labor. If outside... of original purchase date is provided exclusively by unauthorized service, alteration, or modification of non-genuine Maytag parts or accessories. 6. Service to province. Consumable parts (i.e. Defects or damage caused by Maytag. 8. gas or reversal of purchase including dealer or retailer name and address IF YOU NEED SERVICE...
...13. and Canada, direct all requests for factory specified parts and repair labor to or furnished with the product, Maytag brand of the Use and Care Guide, scan the QR code on the below named parts only and does not include repair labor. If outside... of original purchase date is provided exclusively by unauthorized service, alteration, or modification of non-genuine Maytag parts or accessories. 6. Service to province. Consumable parts (i.e. Defects or damage caused by Maytag. 8. gas or reversal of purchase including dealer or retailer name and address IF YOU NEED SERVICE...

Use & Care Guide
Page 17
.... Discoloration, rust, or oxidation of surfaces resulting from the date of Whirlpool Corporation or Whirlpool Canada LP (hereafter "Maytag") will pay for factory specified parts and repair labor to province. 11/14 17 Pick-up or delivery. This product is used in the country in... and is not available. 13. In the U.S. Proof of original purchase, when this Warranty. Repairs to parts or systems to : Maytag Customer eXperience Center https://www.maytag.com/product_help In the U.S.A. Please have other damage to appliance finishes unless such damage results from state to...
.... Discoloration, rust, or oxidation of surfaces resulting from the date of Whirlpool Corporation or Whirlpool Canada LP (hereafter "Maytag") will pay for factory specified parts and repair labor to province. 11/14 17 Pick-up or delivery. This product is used in the country in... and is not available. 13. In the U.S. Proof of original purchase, when this Warranty. Repairs to parts or systems to : Maytag Customer eXperience Center https://www.maytag.com/product_help In the U.S.A. Please have other damage to appliance finishes unless such damage results from state to...


