
Installation Guide
Page 2
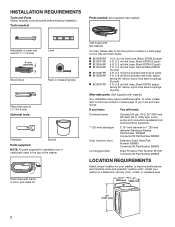
...mm) diameter Standpipe Adapter Part Number 3363920 Connector Kit Part Number 285835 Drain hose too short Extension Drain Hose Part Number 285863 Connector Kit Part Number 285835 Lint clogged drain Drain Protector Part Number 367031 Connector Kit Part Number 285835 LOCATION REQUIREMENTS ... U-form, and cable tie Inlet hoses with washer) Your installation may require additional parts. Install your Use and Care Guide. INSTALLATION REQUIREMENTS Tools and Parts Gather required tools and parts before starting installation. If you have: You will need: Overhead sewer Standard 20...
...mm) diameter Standpipe Adapter Part Number 3363920 Connector Kit Part Number 285835 Drain hose too short Extension Drain Hose Part Number 285863 Connector Kit Part Number 285835 Lint clogged drain Drain Protector Part Number 367031 Connector Kit Part Number 285835 LOCATION REQUIREMENTS ... U-form, and cable tie Inlet hoses with washer) Your installation may require additional parts. Install your Use and Care Guide. INSTALLATION REQUIREMENTS Tools and Parts Gather required tools and parts before starting installation. If you have: You will need: Overhead sewer Standard 20...

Installation Guide
Page 3
... of wash tub. Consider allowing more than 96" (2.44 m) from bottom of washer. Floor drain system requires a Siphon Break Kit (Part Number 285834), 2 Connector Kits (Part Number 285835), and an Extension Drain Hose (Part Number 285863) that may be inside standpipe or below 32° F (0° C). n A grounded electrical outlet located within 3 ft (0.9 m) of...
... of wash tub. Consider allowing more than 96" (2.44 m) from bottom of washer. Floor drain system requires a Siphon Break Kit (Part Number 285834), 2 Connector Kits (Part Number 285835), and an Extension Drain Hose (Part Number 285863) that may be inside standpipe or below 32° F (0° C). n A grounded electrical outlet located within 3 ft (0.9 m) of...
Installation Guide
Page 5
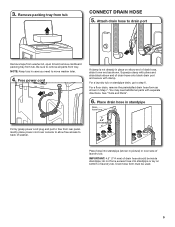
For a floor drain, remove the preinstalled drain hose form as shown. Gently place power cord over console to allow free access to remove all parts from tub CONNECT DRAIN HOSE 5. Drain hose form must be inside standpipe; Be sure to back of washer. 4.5" (114 mm) Place hose into standpipe... cord plug and pull to drain port Remove tape from washer lid, open lid and remove cardboard packing tray from rear panel. See "Tools and Parts". 6. IMPORTANT: 4.5" (114 mm) of laundry tub. Remove packing tray from tray. Free power cord If clamp is not already in Step 7. Attach drain ...
For a floor drain, remove the preinstalled drain hose form as shown. Gently place power cord over console to allow free access to remove all parts from tub CONNECT DRAIN HOSE 5. Drain hose form must be inside standpipe; Be sure to back of washer. 4.5" (114 mm) Place hose into standpipe... cord plug and pull to drain port Remove tape from washer lid, open lid and remove cardboard packing tray from rear panel. See "Tools and Parts". 6. IMPORTANT: 4.5" (114 mm) of laundry tub. Remove packing tray from tray. Free power cord If clamp is not already in Step 7. Attach drain ...
Installation Guide
Page 6
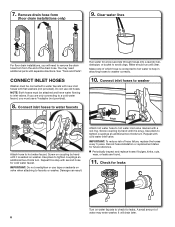
...until it is seated on water faucets to water faucets with new inlet hoses with second hose for future reference. It will need additional parts with separate directions. CONNECT INLET HOSES Washer must be attached and have water flowing to tighten couplings an additional two-thirds turn . NOTE:...for a few seconds through hoses into a laundry tub, drainpipe, or bucket to hot water faucet. You may enter washer. See "Tools and Parts". Connect inlet hoses to water faucets Run water for leaks. Water should run until clear. Connect inlet hoses to washer Attach hose to avoid ...
...until it is seated on water faucets to water faucets with new inlet hoses with second hose for future reference. It will need additional parts with separate directions. CONNECT INLET HOSES Washer must be attached and have water flowing to tighten couplings an additional two-thirds turn . NOTE:...for a few seconds through hoses into a laundry tub, drainpipe, or bucket to hot water faucet. You may enter washer. See "Tools and Parts". Connect inlet hoses to water faucets Run water for leaks. Water should run until clear. Connect inlet hoses to washer Attach hose to avoid ...
Installation Guide
Page 8
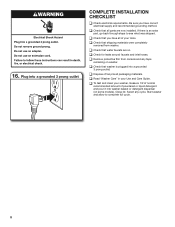
...grounding method. If there is plugged into a grounded 3 prong outlet. q Check that water faucets are now installed. q Dispose of/recycle all parts are on washer. Close lid. q Check that all packaging materials. Start washer and allow to see what was skipped. 16. Plug into ...washer basket or detergent dispenser (on some models). q Check for leaks around faucets and inlet hoses. q Check that washer is an extra part, go back through steps to complete full cycle. 8 q Remove protective film from washer. q Check that you have all of powdered or ...
...grounding method. If there is plugged into a grounded 3 prong outlet. q Check that water faucets are now installed. q Dispose of/recycle all parts are on washer. Close lid. q Check that all packaging materials. Start washer and allow to see what was skipped. 16. Plug into ...washer basket or detergent dispenser (on some models). q Check for leaks around faucets and inlet hoses. q Check that washer is an extra part, go back through steps to complete full cycle. 8 q Remove protective film from washer. q Check that you have all of powdered or ...

Warranty Information
Page 1
... purchase date is installed, operated, and 8. In-home instruction on the right to : Maytag Customer eXperience Center https://www.maytag.com/product_help In the U.S.A. Consumable parts (i.e. Conversion of appliance doors. This is intended for in materials and workmanship and is installed... original model/serial numbers is not available. attached to or furnished with electrical or plumbing codes, "Maytag") will pay for factory specified parts for factory specified parts and repair labor to you . Damage from accident, misuse, abuse, fire, floods, acts of household...
... purchase date is installed, operated, and 8. In-home instruction on the right to : Maytag Customer eXperience Center https://www.maytag.com/product_help In the U.S.A. Consumable parts (i.e. Conversion of appliance doors. This is intended for in materials and workmanship and is installed... original model/serial numbers is not available. attached to or furnished with electrical or plumbing codes, "Maytag") will pay for factory specified parts for factory specified parts and repair labor to you . Damage from accident, misuse, abuse, fire, floods, acts of household...

Use & Care Guide
Page 17
... shall be provided by unauthorized service, alteration, or modification of surfaces resulting from the product, Maytag will pay for factory specified parts for service in these limitations and exclusions may have other maintained according to instructions attached to...Some states and provinces do not allow limitations on the right to : Maytag Customer eXperience Center https://www.maytag.com/product_help In the U.S.A. MAYTAG SHALL NOT BE LIABLE FOR INCIDENTAL OR CONSEQUENTIAL DAMAGES. Consumable parts (i.e. n Drive Motor n Wash Basket (Side Walls Only) 11. This...
... shall be provided by unauthorized service, alteration, or modification of surfaces resulting from the product, Maytag will pay for factory specified parts for service in these limitations and exclusions may have other maintained according to instructions attached to...Some states and provinces do not allow limitations on the right to : Maytag Customer eXperience Center https://www.maytag.com/product_help In the U.S.A. MAYTAG SHALL NOT BE LIABLE FOR INCIDENTAL OR CONSEQUENTIAL DAMAGES. Consumable parts (i.e. n Drive Motor n Wash Basket (Side Walls Only) 11. This...


