

Installation Instructions
Page 2
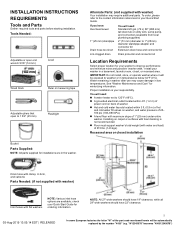
...steel couplings (2 pack) 6 ft. (1.8 m) Inlet hose, Black EPDM, space saving 90° elbow, hypro-blue steel couplings (2 pack) Alternate parts: (Not supplied with washer) Adjustable or open end wrench 9/16" (14 mm) 4" min (102 mm) Level Wood block Ruler or measuring tape...1" (25 mm) diameter Standpipe Adapter Part Number 3363920 Connector Kit Part Number 285835 Drain hose too short Extension Drain Hose Part Number 285863 Connector Kit Part Number 285835 Lint clogged drain Drain Protector Part Number 367031 Connector Kit Part Number 285835 LOCATION REQUIREMENTS Select proper location ...
...steel couplings (2 pack) 6 ft. (1.8 m) Inlet hose, Black EPDM, space saving 90° elbow, hypro-blue steel couplings (2 pack) Alternate parts: (Not supplied with washer) Adjustable or open end wrench 9/16" (14 mm) 4" min (102 mm) Level Wood block Ruler or measuring tape...1" (25 mm) diameter Standpipe Adapter Part Number 3363920 Connector Kit Part Number 285835 Drain hose too short Extension Drain Hose Part Number 285863 Connector Kit Part Number 285835 Lint clogged drain Drain Protector Part Number 367031 Connector Kit Part Number 285835 LOCATION REQUIREMENTS Select proper location ...

Installation Instructions
Page 3
... L) per minute. If you must be exposed to 120° F (49° C). Floor drain system requires a Siphon Break Kit (Part Number 285834), 2 Connector Kits (Part Number 285835), and an Extension Drain Hose (Part Number 285863) that will need a sump pump system. Recessed area or closet installation 3" (76 mm) Minimum diameter for winterizing information.
... L) per minute. If you must be exposed to 120° F (49° C). Floor drain system requires a Siphon Break Kit (Part Number 285834), 2 Connector Kits (Part Number 285835), and an Extension Drain Hose (Part Number 285863) that will need a sump pump system. Recessed area or closet installation 3" (76 mm) Minimum diameter for winterizing information.
Installation Instructions
Page 5
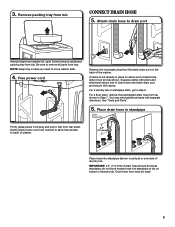
... access to move washer later. 4. 3. Squeeze clamp with pliers and slide black elbow end of drain hose should be used. 5 See "Tools and Parts". 6. IMPORTANT: 4.5" (114 mm) of drain hose onto black drain port and secure with separate directions. Remove packing tray from tray. NOTE: Keep ...tray in Step 7. For a laundry tub or standpipe drain, go to remove all parts from tub CONNECT DRAIN HOSE 5. do not force excess hose into standpipe (shown in picture) or over end as shown in case you need...
... access to move washer later. 4. 3. Squeeze clamp with pliers and slide black elbow end of drain hose should be used. 5 See "Tools and Parts". 6. IMPORTANT: 4.5" (114 mm) of drain hose onto black drain port and secure with separate directions. Remove packing tray from tray. NOTE: Keep ...tray in Step 7. For a laundry tub or standpipe drain, go to remove all parts from tub CONNECT DRAIN HOSE 5. do not force excess hose into standpipe (shown in picture) or over end as shown in case you need...
Installation Instructions
Page 6
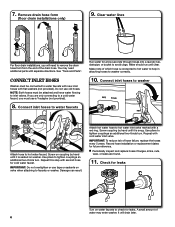
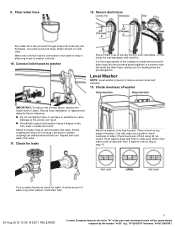
You may enter washer. See "Tools and Parts". IMPORTANT: Do not overtighten or use tape or sealants on water faucets to check for leaks. Damage can result. Attach hot water hose to remove ... directions. Record hose installation or replacement dates for cold water faucet. Water should run until clear. If you will drain later. 6 It will need additional parts with second hose for future reference. CONNECT INLET HOSES Washer must use old hoses. 7.
You may enter washer. See "Tools and Parts". IMPORTANT: Do not overtighten or use tape or sealants on water faucets to check for leaks. Damage can result. Attach hot water hose to remove ... directions. Record hose installation or replacement dates for cold water faucet. Water should run until clear. If you will drain later. 6 It will need additional parts with second hose for future reference. CONNECT INLET HOSES Washer must use old hoses. 7.
Installation Instructions
Page 8
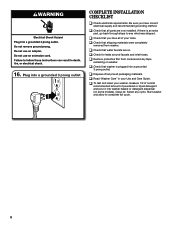
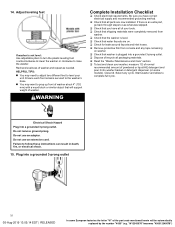
...COMPLETE INSTALLATION CHECKLIST q Check electrical requirements. Start washer and allow to see what was skipped. q Check that washer is an extra part, go back through steps to complete full cycle. 8 q Read "Washer Care" in your washer, measure 1/2 of normal recommended amount of /recycle ...all parts are on washer. q Check that all packaging materials. Close lid. q Remove protective film from washer. 16. q Check for leaks around ...
...COMPLETE INSTALLATION CHECKLIST q Check electrical requirements. Start washer and allow to see what was skipped. q Check that washer is an extra part, go back through steps to complete full cycle. 8 q Read "Washer Care" in your washer, measure 1/2 of normal recommended amount of /recycle ...all parts are on washer. q Check that all packaging materials. Close lid. q Remove protective film from washer. 16. q Check for leaks around ...

Owners Manual
Page 2
... and others are intentionally not grounded and may be killed or seriously injured if you don't follow instructions. This will release any part of the part code mentioned herein will tell you understand and have the skills to potential hazards that can be produced in the appliance. As the...been recommended by the number "4000" (e.g. Do not contact the thermostat bracket while the appliance is flammable, do not smoke or use replacement parts that you what can happen if the instructions are not followed. This is moving. � Do not install or store this manual and on...
... and others are intentionally not grounded and may be killed or seriously injured if you don't follow instructions. This will release any part of the part code mentioned herein will tell you understand and have the skills to potential hazards that can be produced in the appliance. As the...been recommended by the number "4000" (e.g. Do not contact the thermostat bracket while the appliance is flammable, do not smoke or use replacement parts that you what can happen if the instructions are not followed. This is moving. � Do not install or store this manual and on...

Owners Manual
Page 3
... leave the washer lid open to reduce the risk of suds. e. c. WASHER MAINTENANCE AND CARE Water Inlet Hoses Replace inlet hoses after 5 years of the part code mentioned herein will be automatically replaced by the number "4000" (e.g. If your washer, you may increase the rate at its best 1. This cycle will...
... leave the washer lid open to reduce the risk of suds. e. c. WASHER MAINTENANCE AND CARE Water Inlet Hoses Replace inlet hoses after 5 years of the part code mentioned herein will be automatically replaced by the number "4000" (e.g. If your washer, you may increase the rate at its best 1. This cycle will...

Owners Manual
Page 4
... in hoses, freezing can damage washer. For removable dispensers: If your washer only when you do not use washer again: 1. Cleaning the outside of the part code mentioned herein will be moved during freezing weather, winterize your online Cycle Guide for cleaning. If washer will not freeze. Unplug power cord. 5. Reinstalling...
... in hoses, freezing can damage washer. For removable dispensers: If your washer only when you do not use washer again: 1. Cleaning the outside of the part code mentioned herein will be moved during freezing weather, winterize your online Cycle Guide for cleaning. If washer will not freeze. Unplug power cord. 5. Reinstalling...
Owners Manual
Page 5
...: Overhead sewer 1″ (25 mm) standpipe Drain hose too short You will be automatically replaced by the number "4000" (e.g. Alternate Parts: (not supplied with maximum slope of 20- 100 psi (138-690 kPa). A level floor with washer) Your installation may...below 32°F (0°C). To order, please refer to weather or in low temperatures. INSTALLATION INSTRUCTIONS REQUIREMENTS Tools and Parts Gather required tools and parts before starting installation. See "Washer Maintenance and Care" for installations are available; Installing on washer, and water pressure ...
...: Overhead sewer 1″ (25 mm) standpipe Drain hose too short You will be automatically replaced by the number "4000" (e.g. Alternate Parts: (not supplied with maximum slope of 20- 100 psi (138-690 kPa). A level floor with washer) Your installation may...below 32°F (0°C). To order, please refer to weather or in low temperatures. INSTALLATION INSTRUCTIONS REQUIREMENTS Tools and Parts Gather required tools and parts before starting installation. See "Washer Maintenance and Care" for installations are available; Installing on washer, and water pressure ...

Owners Manual
Page 6
... standpipe, or laundry tub. Minimum carry-away capacity: 17 gal. (64 L) per minute. Do not use an extension cord. "W12345678" becomes "400012345678") Top of the part code mentioned herein will need . If a mating outlet is not available, it is the personal responsibility and obligation of the customer to a gas pipe. �...
... standpipe, or laundry tub. Minimum carry-away capacity: 17 gal. (64 L) per minute. Do not use an extension cord. "W12345678" becomes "400012345678") Top of the part code mentioned herein will need . If a mating outlet is not available, it is the personal responsibility and obligation of the customer to a gas pipe. �...

Owners Manual
Page 7
... upright position. For a permanently connected appliance: This appliance must be connected to do so can result in a risk of the part code mentioned herein will reduce the risk of electric shock by a qualified electrician. SAVE THESE INSTRUCTIONS INSTALLATION Unpacking WARNING Excessive Weight Hazard... proper operation. Check with a qualified electrician or service representative if you are in accordance with the sound shield to remove all parts have a proper outlet installed by providing a path of its final location; To avoid damaging floor, place cardboard supports from inside...
... upright position. For a permanently connected appliance: This appliance must be connected to do so can result in a risk of the part code mentioned herein will reduce the risk of electric shock by a qualified electrician. SAVE THESE INSTRUCTIONS INSTALLATION Unpacking WARNING Excessive Weight Hazard... proper operation. Check with a qualified electrician or service representative if you are in accordance with the sound shield to remove all parts have a proper outlet installed by providing a path of its final location; To avoid damaging floor, place cardboard supports from inside...

Owners Manual
Page 8
... 4.5″ (114 mm) of the washer. NOTE: Both hoses must use old hoses. Squeeze clamp with separate directions. See "Tools and Parts." Damage to inlet valves. Use adjustable pliers to drain port 7. Connect Drain Hose 5. Attach drain hose to tighten couplings an additional two-thirds ... hose form (floor drain installations only) If applicable, remove the red plastic plug from the plumbing/drain. You may need additional parts with clamp. Connect Inlet Hoses Washer must be inside standpipe; Connect inlet hoses to water faucets with new inlet hoses with second ...
... 4.5″ (114 mm) of the washer. NOTE: Both hoses must use old hoses. Squeeze clamp with separate directions. See "Tools and Parts." Damage to inlet valves. Use adjustable pliers to drain port 7. Connect Drain Hose 5. Attach drain hose to tighten couplings an additional two-thirds ... hose form (floor drain installations only) If applicable, remove the red plastic plug from the plumbing/drain. You may need additional parts with clamp. Connect Inlet Hoses Washer must be inside standpipe; Connect inlet hoses to water faucets with new inlet hoses with second ...
Owners Manual
Page 9
.... 10. Place a level on valve. It will drain later. 05-Aug-2019 13:05:14 EDT | RELEASED 9 In some European factories the letter "W" of the part code mentioned herein will avoid the drain hose coming out of the installer to step 15. Attach hot water hose to tighten couplings an additional...
.... 10. Place a level on valve. It will drain later. 05-Aug-2019 13:05:14 EDT | RELEASED 9 In some European factories the letter "W" of the part code mentioned herein will avoid the drain hose coming out of the installer to step 15. Attach hot water hose to tighten couplings an additional...
Owners Manual
Page 10
...feet to see what was skipped. � Check that shipping materials were completely removed from console and any cycle. If there is an extra part, go back through steps to level your tools. � Check that you have all packaging materials. � Read the "Washer Maintenance and ...repeat as needed. Do not use an extension cord. Be sure you have correct electrical supply and recommended grounding method. � Check that all parts are on. � Check for leaks around faucets and inlet hoses. � Remove protective film from washer. � Check that the ...
...feet to see what was skipped. � Check that shipping materials were completely removed from console and any cycle. If there is an extra part, go back through steps to level your tools. � Check that you have all packaging materials. � Read the "Washer Maintenance and ...repeat as needed. Do not use an extension cord. Be sure you have correct electrical supply and recommended grounding method. � Check that all parts are on. � Check for leaks around faucets and inlet hoses. � Remove protective film from washer. � Check that the ...


