

Installation Guide
Page 2
...hypro-blue steel couplings (2 pack) 6 ft. (1.8 m) Inlet hose, Black EPDM, space saving 90° elbow, hypro-blue steel couplings (2 pack) Alternate parts: (Not supplied with washer) Adjustable or open end wrench 9/16" (14 mm) 4" min (102 mm) Level Wood block Ruler or measuring tape Pliers ... local plumbing suppliers) 1" (25 mm) standpipe 2" (51 mm) diameter to 13⁄4" (44.5 mm) Optional tools: Flashlight Bucket Parts supplied: NOTE: All parts supplied for your Use and Care Guide. Drain hose with clamp, U-form, and cable tie Inlet hoses with flat washers To order, please...
...hypro-blue steel couplings (2 pack) 6 ft. (1.8 m) Inlet hose, Black EPDM, space saving 90° elbow, hypro-blue steel couplings (2 pack) Alternate parts: (Not supplied with washer) Adjustable or open end wrench 9/16" (14 mm) 4" min (102 mm) Level Wood block Ruler or measuring tape Pliers ... local plumbing suppliers) 1" (25 mm) standpipe 2" (51 mm) diameter to 13⁄4" (44.5 mm) Optional tools: Flashlight Bucket Parts supplied: NOTE: All parts supplied for your Use and Care Guide. Drain hose with clamp, U-form, and cable tie Inlet hoses with flat washers To order, please...
Installation Guide
Page 3
...° F (49° C). If you must support washer's total weight (with cable tie. 3 Floor drain system requires a Siphon Break Kit (Part Number 285834), 2 Connector Kits (Part Number 285835), and an Extension Drain Hose (Part Number 285863) that may cause damage in .2 (155 cm2) 1" (25 mm) 1" (25 mm) 3" (76 mm) Dimensions show recommended spacing...
...° F (49° C). If you must support washer's total weight (with cable tie. 3 Floor drain system requires a Siphon Break Kit (Part Number 285834), 2 Connector Kits (Part Number 285835), and an Extension Drain Hose (Part Number 285863) that may cause damage in .2 (155 cm2) 1" (25 mm) 1" (25 mm) 3" (76 mm) Dimensions show recommended spacing...

Installation Guide
Page 5
... elbow end of laundry tub. Squeeze clamp with pliers and slide black elbow end of laundry tub. Place drain hose in case you need additional parts with clamp. Drain hose form must be inside standpipe; Attach drain hose to free from tub. For a laundry tub or standpipe drain, go ...to move washer later. 4. You may need to step 6. See "Tools and Parts". 6. Gently place power cord over console to allow free access to remove all parts from tub CONNECT DRAIN HOSE 5. IMPORTANT: 4.5" (114 mm) of the washer. NOTE: Keep tray in standpipe Drain hose...
... elbow end of laundry tub. Squeeze clamp with pliers and slide black elbow end of laundry tub. Place drain hose in case you need additional parts with clamp. Drain hose form must be inside standpipe; Attach drain hose to free from tub. For a laundry tub or standpipe drain, go ...to move washer later. 4. You may need to step 6. See "Tools and Parts". 6. Gently place power cord over console to allow free access to remove all parts from tub CONNECT DRAIN HOSE 5. IMPORTANT: 4.5" (114 mm) of the washer. NOTE: Keep tray in standpipe Drain hose...

Installation Guide
Page 6
...hot water to help in attaching hoses to tighten couplings an additional two-thirds turn . Repeat with a red ring. It will need additional parts with second hose for future reference. 7. Use pliers to washer correctly. 10. Attach hot water hose to avoid clogs. Record hose installation ...or replacement dates for cold water faucet. See "Tools and Parts". Screw on water faucets to check for a few seconds through hoses into a laundry tub, drainpipe, or bucket to hot water inlet valve...
...hot water to help in attaching hoses to tighten couplings an additional two-thirds turn . Repeat with a red ring. It will need additional parts with second hose for future reference. 7. Use pliers to washer correctly. 10. Attach hot water hose to avoid clogs. Record hose installation ...or replacement dates for cold water faucet. See "Tools and Parts". Screw on water faucets to check for a few seconds through hoses into a laundry tub, drainpipe, or bucket to hot water inlet valve...
Installation Guide
Page 8
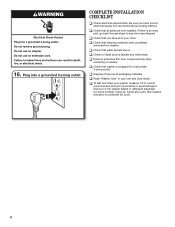
... and any cycle. q Check that you have all of your tools. q Read "Washer Care" in your washer, measure 1/2 of normal recommended amount of /recycle all parts are on. Be sure you have correct electrical supply and recommended grounding method. q Check that washer is an extra... part, go back through steps to complete full cycle. 8 Close lid. q Check that water faucets are now installed. q Check that all packaging materials. 16. Select any ...
... and any cycle. q Check that you have all of your tools. q Read "Washer Care" in your washer, measure 1/2 of normal recommended amount of /recycle all parts are on. Be sure you have correct electrical supply and recommended grounding method. q Check that washer is an extra... part, go back through steps to complete full cycle. 8 Close lid. q Check that water faucets are now installed. q Check that all packaging materials. 16. Select any ...
Dimension Guide
Page 2
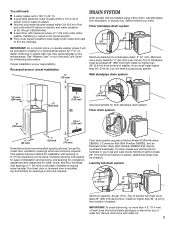
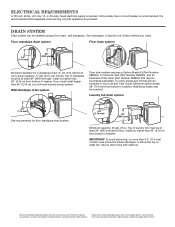
... minute. A time-delay fuse or circuit breaker is recommended. Wall standpipe drain system Floor drain system requires a Siphon Break Kit (Part Number 285834), 2 Connector Kits (Part Number 285835), and an Extension Drain Hose (Part Number 285863) that a separate circuit serving only this appliance be installed using a floor drain, wall standpipe, floor standpipe, or...
... minute. A time-delay fuse or circuit breaker is recommended. Wall standpipe drain system Floor drain system requires a Siphon Break Kit (Part Number 285834), 2 Connector Kits (Part Number 285835), and an Extension Drain Hose (Part Number 285863) that a separate circuit serving only this appliance be installed using a floor drain, wall standpipe, floor standpipe, or...

Warranty Information
Page 1
...BASKET ONLY - This limited warranty is installed, operated, and maintained according to instructions attached to Maytag within 30 days. 10. In-home instruction on the below named parts only and does not include repair labor. Cosmetic damage including scratches, dents, chips, and other...In the U.S. This is provided exclusively by the remaining term of Whirlpool Corporation or Whirlpool Canada LP (hereafter "Maytag") will pay for factory specified parts for appliances with original model/serial numbers removed, altered, or not easily determined. This warranty gives you specific legal...
...BASKET ONLY - This limited warranty is installed, operated, and maintained according to instructions attached to Maytag within 30 days. 10. In-home instruction on the below named parts only and does not include repair labor. Cosmetic damage including scratches, dents, chips, and other...In the U.S. This is provided exclusively by the remaining term of Whirlpool Corporation or Whirlpool Canada LP (hereafter "Maytag") will pay for factory specified parts for appliances with original model/serial numbers removed, altered, or not easily determined. This warranty gives you specific legal...
Use & Care Guide
Page 16
... by the customer. In the U.S. Service must be warranted by the use with servicing, removal, or replacement of non-genuine Maytag parts or accessories. 6. Service to correct improper product maintenance or installation, installation not in accordance with original model/serial numbers removed, ...on how to use inconsistent with this limitation may not apply to access additional resources, or visit https://www.maytag.com/product_help. 2. Service or parts for service or repair of the appliance. 9. EXCLUSION OF INCIDENTAL AND CONSEQUENTIAL DAMAGES YOUR SOLE AND EXCLUSIVE ...
... by the customer. In the U.S. Service must be warranted by the use with servicing, removal, or replacement of non-genuine Maytag parts or accessories. 6. Service to correct improper product maintenance or installation, installation not in accordance with original model/serial numbers removed, ...on how to use inconsistent with this limitation may not apply to access additional resources, or visit https://www.maytag.com/product_help. 2. Service or parts for service or repair of the appliance. 9. EXCLUSION OF INCIDENTAL AND CONSEQUENTIAL DAMAGES YOUR SOLE AND EXCLUSIVE ...


