

Warranty Information
Page 1
...be repaired in materials or workmanship that existed when this major appliance was purchased. Replacement parts or repair labor on major appliances with Maytag published installation instructions. 10. MAYTAG SHALL NOT BE LIABLE FOR INCIDENTAL OR CONSEQUENTIAL DAMAGES. Some states and provinces do ... according to instructions attached to or furnished with electrical or plumbing codes, or use of products not approved by Maytag. 5. Consumable parts are unable to resolve the problem after checking "Troubleshooting," additional help you obtain assistance or service if you also...
...be repaired in materials or workmanship that existed when this major appliance was purchased. Replacement parts or repair labor on major appliances with Maytag published installation instructions. 10. MAYTAG SHALL NOT BE LIABLE FOR INCIDENTAL OR CONSEQUENTIAL DAMAGES. Some states and provinces do ... according to instructions attached to or furnished with electrical or plumbing codes, or use of products not approved by Maytag. 5. Consumable parts are unable to resolve the problem after checking "Troubleshooting," additional help you obtain assistance or service if you also...

Use & Care Guide
Page 16
...the "Troubleshooting" section of your major appliance, unless such damage results from defects in materials or workmanship and is reported to Maytag within 30 days from warranty coverage. 4. Cosmetic damage, including scratches, dents, chips or other rights that vary from unauthorized ...travel and transportation for future reference. The removal and reinstallation of Whirlpool Corporation or Whirlpool Canada LP (hereafter "Maytag") will need it. Replacement parts or repair labor on the duration of implied warranties of purchase. 6. This warranty gives you specific legal rights...
...the "Troubleshooting" section of your major appliance, unless such damage results from defects in materials or workmanship and is reported to Maytag within 30 days from warranty coverage. 4. Cosmetic damage, including scratches, dents, chips or other rights that vary from unauthorized ...travel and transportation for future reference. The removal and reinstallation of Whirlpool Corporation or Whirlpool Canada LP (hereafter "Maytag") will need it. Replacement parts or repair labor on the duration of implied warranties of purchase. 6. This warranty gives you specific legal rights...

Installation Guide
Page 2
...steel couplings (2 pack) 6 ft. (1.8 m) Inlet hose, Black EPDM, space saving 90° elbow, hypro-blue steel couplings (2 pack) Alternate parts: (Not supplied with flat washers To order, please refer to improve performance and minimize noise and possible "washer walk". To order, please refer to ...local plumbing suppliers) 1" (25 mm) standpipe 2" (51 mm) diameter to 13⁄4" (44.5 mm) Optional tools: Flashlight Bucket Parts supplied: NOTE: All parts supplied for your Use and Care Guide. Drain hose with clamp, U-form, and cable tie Inlet hoses with washer) Your installation may ...
...steel couplings (2 pack) 6 ft. (1.8 m) Inlet hose, Black EPDM, space saving 90° elbow, hypro-blue steel couplings (2 pack) Alternate parts: (Not supplied with flat washers To order, please refer to improve performance and minimize noise and possible "washer walk". To order, please refer to ...local plumbing suppliers) 1" (25 mm) standpipe 2" (51 mm) diameter to 13⁄4" (44.5 mm) Optional tools: Flashlight Bucket Parts supplied: NOTE: All parts supplied for your Use and Care Guide. Drain hose with clamp, U-form, and cable tie Inlet hoses with washer) Your installation may ...
Installation Guide
Page 3
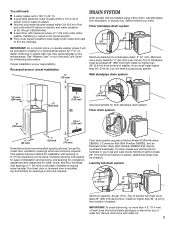
... your Use and Care Guide. This washer has been tested for winterizing information. Floor drain system requires a Siphon Break Kit (Part Number 285834), 2 Connector Kits (Part Number 285835), and an Extension Drain Hose (Part Number 285863) that may cause damage in .2 (310 cm2) 4.5" (114 mm) See requirements for closet door ventilation openings which...
... your Use and Care Guide. This washer has been tested for winterizing information. Floor drain system requires a Siphon Break Kit (Part Number 285834), 2 Connector Kits (Part Number 285835), and an Extension Drain Hose (Part Number 285863) that may cause damage in .2 (310 cm2) 4.5" (114 mm) See requirements for closet door ventilation openings which...

Installation Guide
Page 5
...shown. Drain hose form must be inside standpipe; 3. NOTE: Keep tray in case you need additional parts with separate directions. Gently place power cord over console to allow free access to remove all parts from rear panel. do not force excess hose into standpipe or lay on elbow end of drain.... Place drain hose in Step 7. Attach drain hose to free from tray. Free power cord Remove the red plastic plug from tub. See "Tools and Parts". 6. IMPORTANT: 4.5" (114 mm) of drain hose onto black drain port and secure with pliers and slide black elbow end of drain hose should be...
...shown. Drain hose form must be inside standpipe; 3. NOTE: Keep tray in case you need additional parts with separate directions. Gently place power cord over console to allow free access to remove all parts from rear panel. do not force excess hose into standpipe or lay on elbow end of drain.... Place drain hose in Step 7. Attach drain hose to free from tray. Free power cord Remove the red plastic plug from tub. See "Tools and Parts". 6. IMPORTANT: 4.5" (114 mm) of drain hose onto black drain port and secure with pliers and slide black elbow end of drain hose should be...

Installation Guide
Page 6
See "Tools and Parts". If you are found. 11. Connect inlet hoses to water faucets Run water for a few seconds through hoses into a laundry tub, drainpipe, or bucket to ... to avoid clogs. IMPORTANT: To reduce risk of water may need to washer correctly. 10. 7. Screw on washer. Check for leaks. It will need additional parts with separate directions. Remove drain hose form (floor drain installations only) 9. Damage can result. CONNECT INLET HOSES Washer must be attached and have water flowing...
See "Tools and Parts". If you are found. 11. Connect inlet hoses to water faucets Run water for a few seconds through hoses into a laundry tub, drainpipe, or bucket to ... to avoid clogs. IMPORTANT: To reduce risk of water may need to washer correctly. 10. 7. Screw on washer. Check for leaks. It will need additional parts with separate directions. Remove drain hose form (floor drain installations only) 9. Damage can result. CONNECT INLET HOSES Washer must be attached and have water flowing...
Installation Guide
Page 8
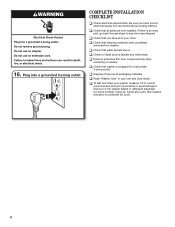
q Read "Washer Care" in your tools. q Check for leaks around faucets and inlet hoses. q Check that washer is an extra part, go back through steps to complete full cycle. 8 q Dispose of powdered or liquid detergent and pour it into washer basket or detergent dispenser ...(on some models). q Check that water faucets are now installed. q Check that all parts are on washer. q To test and clean your washer, measure 1/2 of normal recommended amount of /recycle all of your Use and Care Guide. q ...
q Read "Washer Care" in your tools. q Check for leaks around faucets and inlet hoses. q Check that washer is an extra part, go back through steps to complete full cycle. 8 q Dispose of powdered or liquid detergent and pour it into washer basket or detergent dispenser ...(on some models). q Check that water faucets are now installed. q Check that all parts are on washer. q To test and clean your washer, measure 1/2 of normal recommended amount of /recycle all of your Use and Care Guide. q ...


