

Owners Manual
Page 8
...chlorine bleach to complete the cleaning process. This cycle should not be used . 8 Use this cycle. At the end of Soak, the washer will return to your washer fresh and clean. When to wash: Cycle: Wash/Rinse Spin Soil Temperature: Speed: Level: Available Options: Cycle Details: Towels and terrycloth...Heavy Oxi Treat Stains Heavy Medium Light This cycle is not part of your needs by a high-speed spin. IMPORTANT: Do not place garments or other items in the washer during the Clean Washer with an empty wash tub. The washer will drain and wait for a wash cycle to be adjusted...
...chlorine bleach to complete the cleaning process. This cycle should not be used . 8 Use this cycle. At the end of Soak, the washer will return to your washer fresh and clean. When to wash: Cycle: Wash/Rinse Spin Soil Temperature: Speed: Level: Available Options: Cycle Details: Towels and terrycloth...Heavy Oxi Treat Stains Heavy Medium Light This cycle is not part of your needs by a high-speed spin. IMPORTANT: Do not place garments or other items in the washer during the Clean Washer with an empty wash tub. The washer will drain and wait for a wash cycle to be adjusted...
Owners Manual
Page 19
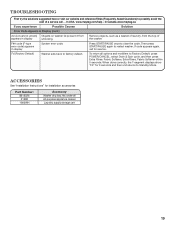
In Canada www.maytag.ca. F## code (F-type error code) appears in display unlocking. If code appears again, call ... Accessories See "Installation Instructions" for installation accessories Part Number: 8212526 31682 1903WH Accessory Washer drip tray, fits under all options and modifiers to Factory Default, press POWER/CANCEL, select Drain & Spin cycle...When done correctly, the 7-segment displays show "Fd" for 3 seconds and then unit returns to clear the code. In USA www.maytag.com/help - Remove objects, such as a basket of the washer. Press START/PAUSE once to Standby Mode.
In Canada www.maytag.ca. F## code (F-type error code) appears in display unlocking. If code appears again, call ... Accessories See "Installation Instructions" for installation accessories Part Number: 8212526 31682 1903WH Accessory Washer drip tray, fits under all options and modifiers to Factory Default, press POWER/CANCEL, select Drain & Spin cycle...When done correctly, the 7-segment displays show "Fd" for 3 seconds and then unit returns to clear the code. In USA www.maytag.com/help - Remove objects, such as a basket of the washer. Press START/PAUSE once to Standby Mode.

Owners Manual
Page 20
... do not allow limitations on major appliances with Maytag's published installation instructions. 10. Some states and provinces do not allow the exclusion or limitation of incidental or consequential damages, so these parts that prevent function of the washer and that have been removed, altered, or ...cannot be provided by Maytag. 5. SECOND THROUGH TENTH YEAR LIMITED WARRANTY (DRIVE MOTOR AND WASH BASKET ONLY -...
... do not allow limitations on major appliances with Maytag's published installation instructions. 10. Some states and provinces do not allow the exclusion or limitation of incidental or consequential damages, so these parts that prevent function of the washer and that have been removed, altered, or ...cannot be provided by Maytag. 5. SECOND THROUGH TENTH YEAR LIMITED WARRANTY (DRIVE MOTOR AND WASH BASKET ONLY -...
Installation Instructions
Page 2
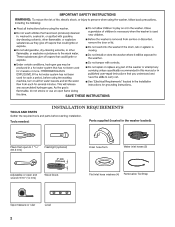
INSTALLATION REQUIREMENTS TOOLS AND PARTS Gather the required tools and parts before starting installation. Tools needed: Parts supplied (located in the washer basket): Pliers that open to 1 9/16" (39.5 mm) Flashlight (optional) 4" min (102 mm) Adjustable or open end wrench 9/16" (14 mm) Wood block Drain hose form Water inlet hoses (2) Flat inlet hose washers (4) Removable Tie Strap Tape measure or ruler Level 2
INSTALLATION REQUIREMENTS TOOLS AND PARTS Gather the required tools and parts before starting installation. Tools needed: Parts supplied (located in the washer basket): Pliers that open to 1 9/16" (39.5 mm) Flashlight (optional) 4" min (102 mm) Adjustable or open end wrench 9/16" (14 mm) Wood block Drain hose form Water inlet hoses (2) Flat inlet hose washers (4) Removable Tie Strap Tape measure or ruler Level 2
Installation Instructions
Page 3
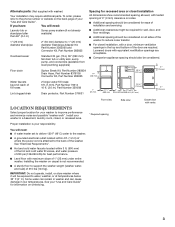
... recommended spacing allowed, with tested spacing of 0" (0 mm) clearance on carpet is your washer to support the washer weight (washer, water, and load) of fill hoses Lint clogged drain 2 longer water fill hoses: 6 ft. (1.8 m), Part Number 76314 10 ft. (3.0 m), Part Number 350008 Drain protector, Part Number 376031 1" (25 mm) 27 1/2" (699 mm) 24 in low temperatures. Install your...
... recommended spacing allowed, with tested spacing of 0" (0 mm) clearance on carpet is your washer to support the washer weight (washer, water, and load) of fill hoses Lint clogged drain 2 longer water fill hoses: 6 ft. (1.8 m), Part Number 76314 10 ft. (3.0 m), Part Number 350008 Drain protector, Part Number 376031 1" (25 mm) 27 1/2" (699 mm) 24 in low temperatures. Install your...

Installation Instructions
Page 4
...grounding-type outlet, grounded in the neutral or ground circuit. 4 See "Tools and Parts". A time-delay fuse or circuit breaker on a separate circuit serving only this washer is recommended. ■■ This washer is equipped with a power supply cord having a 3 prong grounding plug. ■■... (2.4 m) from the bottom of 2" (51 mm). See "Tools and Parts". If a mating outlet is not available, it is recommended that a qualified electrician determine that may be purchased separately. The minimum carry-away capacity can be needed. ■■ A 120 volt, 60 Hz., AC ...
...grounding-type outlet, grounded in the neutral or ground circuit. 4 See "Tools and Parts". A time-delay fuse or circuit breaker on a separate circuit serving only this washer is recommended. ■■ This washer is equipped with a power supply cord having a 3 prong grounding plug. ■■... (2.4 m) from the bottom of 2" (51 mm). See "Tools and Parts". If a mating outlet is not available, it is recommended that a qualified electrician determine that may be purchased separately. The minimum carry-away capacity can be needed. ■■ A 120 volt, 60 Hz., AC ...
Installation Instructions
Page 6
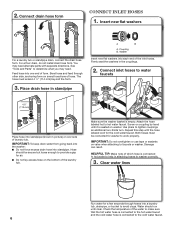
...sections of the inlet hoses. You may need alternate parts with the hose labeled cold for a few seconds through other side, anchoring form on the bottom of the laundry tub. See "Tools and Parts" to washer correctly. 3. Connect inlet hoses to water faucets 4.5"... (113 mm) Place hose into standpipe (shown in attaching hoses to determine what you may need . Firmly seat the washers in standpipe A B A. Washer Insert new flat washers into a laundry tub, ...
...sections of the inlet hoses. You may need alternate parts with the hose labeled cold for a few seconds through other side, anchoring form on the bottom of the laundry tub. See "Tools and Parts" to washer correctly. 3. Connect inlet hoses to water faucets 4.5"... (113 mm) Place hose into standpipe (shown in attaching hoses to determine what you may need . Firmly seat the washers in standpipe A B A. Washer Insert new flat washers into a laundry tub, ...
Installation Instructions
Page 9
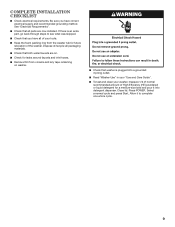
See "Electrical Requirements". ■■ Check that all parts are on. ■■ Check for leaks around faucets and inlet hoses. ■■ Remove film from the washer tub for a medium-size load and pour it to see what was skipped. ■■ Check that you have all ...packaging materials. ■■ Check that washer is an extra part, go back through steps to complete one whole cycle. 9 If there is plugged into detergent dispenser. Select a normal cycle and press ...
See "Electrical Requirements". ■■ Check that all parts are on. ■■ Check for leaks around faucets and inlet hoses. ■■ Remove film from the washer tub for a medium-size load and pour it to see what was skipped. ■■ Check that you have all ...packaging materials. ■■ Check that washer is an extra part, go back through steps to complete one whole cycle. 9 If there is plugged into detergent dispenser. Select a normal cycle and press ...
Dimension Guide
Page 1
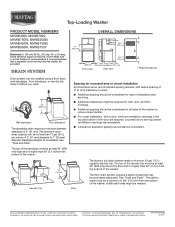
... from the bottom of installation and servicing. ■■ Additional clearances might be provided. W10240438B 01/2011 See "Tools and Parts". See "Tools and Parts". The siphon break must be purchased separately. Specifications subject to reduce noise transfer. ■■ For closet installation, with tested... 17"* (432 mm) 14"* max. (356mm) 48 in.2* (310 cm2) 24 in the top and bottom of the washer. The minimum carryaway capacity can be required for planning purposes only. A 2" (51 mm) diameter to change without notice. Additional hoses might be installed ...
... from the bottom of installation and servicing. ■■ Additional clearances might be provided. W10240438B 01/2011 See "Tools and Parts". See "Tools and Parts". The siphon break must be purchased separately. Specifications subject to reduce noise transfer. ■■ For closet installation, with tested... 17"* (432 mm) 14"* max. (356mm) 48 in.2* (310 cm2) 24 in the top and bottom of the washer. The minimum carryaway capacity can be required for planning purposes only. A 2" (51 mm) diameter to change without notice. Additional hoses might be installed ...
Warranty Information
Page 1
...Maytag's published installation instructions. 10. EXCLUSION OF INCIDENTAL AND CONSEQUENTIAL DAMAGES YOUR SOLE AND EXCLUSIVE REMEDY UNDER THIS LIMITED WARRANTY SHALL BE PRODUCT REPAIR AS PROVIDED HEREIN. Some states and provinces do not allow the exclusion or limitation of incidental or consequential damages, so these parts that prevent function of the washer... help can be easily determined. Consumable parts are unable to Maytag within the United States of products not approved by a Maytag designated service company. Replacement parts or repair labor if this limited warranty...
...Maytag's published installation instructions. 10. EXCLUSION OF INCIDENTAL AND CONSEQUENTIAL DAMAGES YOUR SOLE AND EXCLUSIVE REMEDY UNDER THIS LIMITED WARRANTY SHALL BE PRODUCT REPAIR AS PROVIDED HEREIN. Some states and provinces do not allow the exclusion or limitation of incidental or consequential damages, so these parts that prevent function of the washer... help can be easily determined. Consumable parts are unable to Maytag within the United States of products not approved by a Maytag designated service company. Replacement parts or repair labor if this limited warranty...


