
Owners Manual
Page 8
... lowest spin speed setting available for lightly soiled, colored clothing or towels. For completing a cycle after a power failure. See "Cleaning Your Washer." Heavily soiled fabrics Swimsuits, items that best fits the load being used for this cycle. Machine-wash silks, hand-wash fabrics and wool Hand... Medium Light This cycle is also a good choice for the optimal cleaning and shortened dry times. Items to your washer. A Water Save Spray Rinse is not part of your needs by a high-speed spin. Pre Soak and Deep Clean options are available on the garment care label...
... lowest spin speed setting available for lightly soiled, colored clothing or towels. For completing a cycle after a power failure. See "Cleaning Your Washer." Heavily soiled fabrics Swimsuits, items that best fits the load being used for this cycle. Machine-wash silks, hand-wash fabrics and wool Hand... Medium Light This cycle is also a good choice for the optimal cleaning and shortened dry times. Items to your washer. A Water Save Spray Rinse is not part of your needs by a high-speed spin. Pre Soak and Deep Clean options are available on the garment care label...
Owners Manual
Page 19
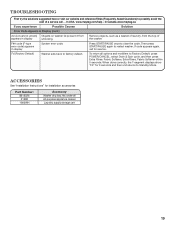
...in Display (cont.) dU (Lid cannot unlock) Objects on washer lid prevent it from the top of the washer. Accessories See "Installation Instructions" for service. In Canada www.maytag.ca. Press START/PAUSE once to restart washer. Then press START/PAUSE again to clear the code. If... our website and reference FAQs (Frequently Asked Questions) to possibly avoid the cost of a service call for installation accessories Part Number: 8212526 31682 1903WH Accessory Washer drip tray, fits under all options and modifiers to Factory Default, press POWER/CANCEL, select Drain & Spin cycle, ...
...in Display (cont.) dU (Lid cannot unlock) Objects on washer lid prevent it from the top of the washer. Accessories See "Installation Instructions" for service. In Canada www.maytag.ca. Press START/PAUSE once to restart washer. Then press START/PAUSE again to clear the code. If... our website and reference FAQs (Frequently Asked Questions) to possibly avoid the cost of a service call for installation accessories Part Number: 8212526 31682 1903WH Accessory Washer drip tray, fits under all options and modifiers to Factory Default, press POWER/CANCEL, select Drain & Spin cycle, ...

Owners Manual
Page 20
... the exclusion or limitation of incidental or consequential damages, so these parts that prevent function of the washer and that have been removed, altered, or cannot be found by checking the "Assistance or Service" section or by calling Maytag. FIRST YEAR LIMITED WARRANTY (PARTS AND LABOR) For one year from defects in which it...
... the exclusion or limitation of incidental or consequential damages, so these parts that prevent function of the washer and that have been removed, altered, or cannot be found by checking the "Assistance or Service" section or by calling Maytag. FIRST YEAR LIMITED WARRANTY (PARTS AND LABOR) For one year from defects in which it...
Installation Instructions
Page 2
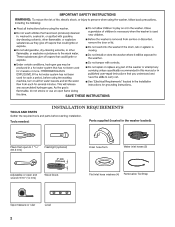
Tools needed: Parts supplied (located in the washer basket): Pliers that open to 1 9/16" (39.5 mm) Flashlight (optional) 4" min (102 mm) Adjustable or open end wrench 9/16" (14 mm) Wood block Drain hose form Water inlet hoses (2) Flat inlet hose washers (4) Removable Tie Strap Tape measure or ruler Level 2 INSTALLATION REQUIREMENTS TOOLS AND PARTS Gather the required tools and parts before starting installation.
Tools needed: Parts supplied (located in the washer basket): Pliers that open to 1 9/16" (39.5 mm) Flashlight (optional) 4" min (102 mm) Adjustable or open end wrench 9/16" (14 mm) Wood block Drain hose form Water inlet hoses (2) Flat inlet hose washers (4) Removable Tie Strap Tape measure or ruler Level 2 INSTALLATION REQUIREMENTS TOOLS AND PARTS Gather the required tools and parts before starting installation.
Installation Instructions
Page 3
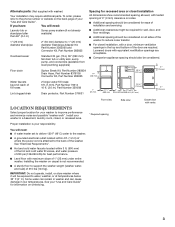
... be considered on all sides of the washer to reduce noise transfer. ■■ For closet installation, with a door, minimum ventilation openings in the top and bottom of fill hoses Lint clogged drain 2 longer water fill hoses: 6 ft. (1.8 m), Part Number 76314 10 ft. (3.0 m), Part Number 350008 Drain protector, Part Number 376031 1" (25 mm) 27 1/2" (699 mm...
... be considered on all sides of the washer to reduce noise transfer. ■■ For closet installation, with a door, minimum ventilation openings in the top and bottom of fill hoses Lint clogged drain 2 longer water fill hoses: 6 ft. (1.8 m), Part Number 76314 10 ft. (3.0 m), Part Number 350008 Drain protector, Part Number 376031 1" (25 mm) 27 1/2" (699 mm...

Installation Instructions
Page 4
...(990 mm) 28" (710 mm) Laundry Tub Floor The laundry tub drain system needs a minimum 20 gal. (76 L) capacity laundry tub. The top of the washer. The floor drain system requires a siphon break that the ground path is recommended that a qualified electrician determine that may be installed ...need. The siphon break must be no higher than 17 gal. (64 L) per minute. See "Tools and Parts". See "Tools and Parts". Select method you are not sure the washer is properly grounded. ■■ Do not have the properly grounded outlet installed by a qualified electrician. ■&#...
...(990 mm) 28" (710 mm) Laundry Tub Floor The laundry tub drain system needs a minimum 20 gal. (76 L) capacity laundry tub. The top of the washer. The floor drain system requires a siphon break that the ground path is recommended that a qualified electrician determine that may be installed ...need. The siphon break must be no higher than 17 gal. (64 L) per minute. See "Tools and Parts". See "Tools and Parts". Select method you are not sure the washer is properly grounded. ■■ Do not have the properly grounded outlet installed by a qualified electrician. ■&#...
Installation Instructions
Page 6
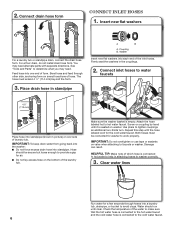
... determine what you may need . See "Tools and Parts" to work properly. Coupling B. Connect inlet hoses to washer correctly. 3. Make sure the washer basket is connected to hot water to help in attaching hoses to water faucets 4.5" (113 mm) Place hose into standpipe (shown in picture) or over...;■ Do not force excess drain hose into each end of the laundry tub. Hose should run until it is connected to faucets or washer. Screw on washer. IMPORTANT: Do not overtighten or use tape or sealants on the bottom of the inlet hoses. Clear water lines Run water for air. &#...
... determine what you may need . See "Tools and Parts" to work properly. Coupling B. Connect inlet hoses to washer correctly. 3. Make sure the washer basket is connected to hot water to help in attaching hoses to water faucets 4.5" (113 mm) Place hose into standpipe (shown in picture) or over...;■ Do not force excess drain hose into each end of the laundry tub. Hose should run until it is connected to faucets or washer. Screw on washer. IMPORTANT: Do not overtighten or use tape or sealants on the bottom of the inlet hoses. Clear water lines Run water for air. &#...
Installation Instructions
Page 9
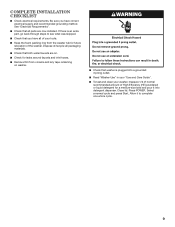
...plugged into detergent dispenser. See "Electrical Requirements". ■■ Check that all packaging materials. ■■ Check that washer is an extra part, go back through steps to complete one whole cycle. 9 Close lid. COMPLETE INSTALLATION CHECKLIST ■■ Check electrical ...requirements. Dispose of/recycle all parts are on washer. ■■ Check that both water faucets are now installed. Allow it into a grounded 3 prong outlet. ■■ Read "Washer Use" in your "Use and Care Guide". ■■...
...plugged into detergent dispenser. See "Electrical Requirements". ■■ Check that all packaging materials. ■■ Check that washer is an extra part, go back through steps to complete one whole cycle. 9 Close lid. COMPLETE INSTALLATION CHECKLIST ■■ Check electrical ...requirements. Dispose of/recycle all parts are on washer. ■■ Check that both water faucets are now installed. Allow it into a grounded 3 prong outlet. ■■ Read "Washer Use" in your "Use and Care Guide". ■■...
Dimension Guide
Page 1
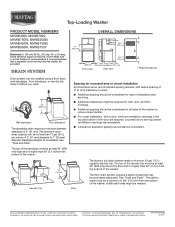
...in the top and bottom of the washer. The minimum carryaway capacity can be required for planning purposes only. The floor drain system requires a siphon break that a separate circuit serving only this washer be needed. See "Tools and Parts". Because Whirlpool Corporation policy includes a ...method you need. 39" (990 mm) Wall standpipe Floor standpipe The standpipe drain requires a minimum diameter standpipe of the washer. See "Tools and Parts". Louvered doors with product. Additional hoses might be installed using a floor drain, wall standpipe, floor standpipe, or laundry...
...in the top and bottom of the washer. The minimum carryaway capacity can be required for planning purposes only. The floor drain system requires a siphon break that a separate circuit serving only this washer be needed. See "Tools and Parts". Because Whirlpool Corporation policy includes a ...method you need. 39" (990 mm) Wall standpipe Floor standpipe The standpipe drain requires a minimum diameter standpipe of the washer. See "Tools and Parts". Louvered doors with product. Additional hoses might be installed using a floor drain, wall standpipe, floor standpipe, or laundry...
Warranty Information
Page 1
... appliances with electrical or plumbing codes, or use of the washer and that existed when this major appliance is used for other rights that is inconsistent to use or when it was purchased. Replacement parts or repair labor on the wash basket drive motor and stainless... when this major appliance is installed, operated, and maintained according to instructions attached to or furnished with the product, Maytag will pay for factory speci ed parts and repair labor to correct defects in materials or workmanship that existed when this major appliance is installed, operated, and...
... appliances with electrical or plumbing codes, or use of the washer and that existed when this major appliance is used for other rights that is inconsistent to use or when it was purchased. Replacement parts or repair labor on the wash basket drive motor and stainless... when this major appliance is installed, operated, and maintained according to instructions attached to or furnished with the product, Maytag will pay for factory speci ed parts and repair labor to correct defects in materials or workmanship that existed when this major appliance is installed, operated, and...


