
Warranty Information
Page 1
... workmanship that have been removed, altered, or cannot be found by checking the "Assistance or Service" section or by calling Maytag. Replacement parts or repair labor if this limitation may have other rights that vary from the date of original purchase date is not installed... in accordance with the product, Maytag brand of Whirlpool Corporation or Whirlpool Canada LP (hereafter "Maytag") will pay for factory speci ed parts and repair labor to correct house wiring or plumbing. 3. Cosmetic damage, including scratches, ...
... workmanship that have been removed, altered, or cannot be found by checking the "Assistance or Service" section or by calling Maytag. Replacement parts or repair labor if this limitation may have other rights that vary from the date of original purchase date is not installed... in accordance with the product, Maytag brand of Whirlpool Corporation or Whirlpool Canada LP (hereafter "Maytag") will pay for factory speci ed parts and repair labor to correct house wiring or plumbing. 3. Cosmetic damage, including scratches, ...
Use & Care Guide
Page 18
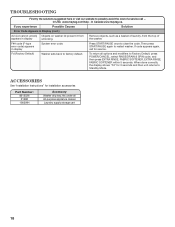
In USA www.maytag.com/help - In Canada www.maytag.ca. F## code (F-type error code) appears in display unlocking. If you experience Possible Causes Solution Error Code Appears in Display (cont.) dU (Lid cannot unlock... appears in display System error code. To return all All-purpose appliance cleaner Laundry supply storage cart 18 Accessories See "Installation Instructions" for installation accessories Part Number: 8212526 31682 1903WH Accessory Washer drip tray, fits under all options and modifiers to Standby Mode. If code appears again, call ... TROUBLESHOOTING First ...
In USA www.maytag.com/help - In Canada www.maytag.ca. F## code (F-type error code) appears in display unlocking. If you experience Possible Causes Solution Error Code Appears in Display (cont.) dU (Lid cannot unlock... appears in display System error code. To return all All-purpose appliance cleaner Laundry supply storage cart 18 Accessories See "Installation Instructions" for installation accessories Part Number: 8212526 31682 1903WH Accessory Washer drip tray, fits under all options and modifiers to Standby Mode. If code appears again, call ... TROUBLESHOOTING First ...

Use & Care Guide
Page 19
...under this limitation may not apply to or furnished with Maytag's published installation instructions. 10. The removal and reinstallation of Whirlpool Corporation or Whirlpool Canada LP (hereafter "Maytag") will pay for factory speci ed parts and repair labor to correct house wiring or plumbing. 3.... according to instructions attached to instruct you also may have been removed, altered, or cannot be provided by Maytag. 5. Pick up and delivery. Replacement parts or repair labor on the duration of implied warranties of merchantability or tness, so this limited warranty. YOUR ...
...under this limitation may not apply to or furnished with Maytag's published installation instructions. 10. The removal and reinstallation of Whirlpool Corporation or Whirlpool Canada LP (hereafter "Maytag") will pay for factory speci ed parts and repair labor to correct house wiring or plumbing. 3.... according to instructions attached to instruct you also may have been removed, altered, or cannot be provided by Maytag. 5. Pick up and delivery. Replacement parts or repair labor on the duration of implied warranties of merchantability or tness, so this limited warranty. YOUR ...

Installation Guide
Page 2
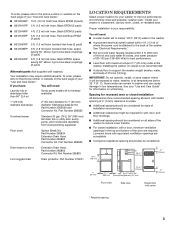
Tools needed: Parts supplied (located in the washer basket): Pliers that open to 19/16" (39.5 mm) Flashlight (optional) 4" min (102 mm) Adjustable or open-end wrench 9/16" (14 mm) Wood block Drain hose form Cable Tie Parts needed (Not supplied with washer): Water inlet hoses (2) Flat inlet hose washers (4) Tape measure or ruler Level 2 INSTALLATION REQUIREMENTS TOOLS AND PARTS Gather the required tools and parts before starting installation.
Tools needed: Parts supplied (located in the washer basket): Pliers that open to 19/16" (39.5 mm) Flashlight (optional) 4" min (102 mm) Adjustable or open-end wrench 9/16" (14 mm) Wood block Drain hose form Cable Tie Parts needed (Not supplied with washer): Water inlet hoses (2) Flat inlet hose washers (4) Tape measure or ruler Level 2 INSTALLATION REQUIREMENTS TOOLS AND PARTS Gather the required tools and parts before starting installation.
Installation Guide
Page 3
...website on the back page of your "Use and Care Guide" for best performance. ■■ Level floor with washer): Your installation may require additional parts. Installing the washer on carpet is not recommended. ■■ A sturdy floor to support the washer weight (washer, water, and load) of ... hypro-blue steel couplings (2 pack) 6 ft. (1.8 m) Inlet hose, Black EPDM, space saving 90° elbow, hypro-blue steel couplings (2 pack) Alternate parts (Not supplied with maximum slope of 315 lbs (143 kg). To order, please refer to the phone number or website on the back page of...
...website on the back page of your "Use and Care Guide" for best performance. ■■ Level floor with washer): Your installation may require additional parts. Installing the washer on carpet is not recommended. ■■ A sturdy floor to support the washer weight (washer, water, and load) of ... hypro-blue steel couplings (2 pack) 6 ft. (1.8 m) Inlet hose, Black EPDM, space saving 90° elbow, hypro-blue steel couplings (2 pack) Alternate parts (Not supplied with maximum slope of 315 lbs (143 kg). To order, please refer to the phone number or website on the back page of...

Installation Guide
Page 4
Select method you are not sure the washer is required. Floor drain system requires a Siphon Break Kit (Part Number 285834), 2 Connector Kits (Part Number 285835), and an Extension Drain Hose (Part Number 285863) that the ground path is adequate. ■■ Do not ground to a gas pipe. ■■ Check with local codes and...
Select method you are not sure the washer is required. Floor drain system requires a Siphon Break Kit (Part Number 285834), 2 Connector Kits (Part Number 285835), and an Extension Drain Hose (Part Number 285863) that the ground path is adequate. ■■ Do not ground to a gas pipe. ■■ Check with local codes and...

Installation Guide
Page 6
...Clear water lines Run water for air. ■■ Do not lay excess hose on the bottom of form. You may need alternate parts with flat washers (not provided). Feed hose into standpipe. Washer must be secure but loose enough to the hot water faucet and the ...to work properly. Both hoses must extend 4.5" (114 mm) beyond the form. 3. Water should be connected to the cold water faucet. 6 See "Tools and Parts" to washer correctly. 3. Make sure the washer basket is connected to hot water to help in standpipe A B A. Coupling B. Damage can result. IMPORTANT: ...
...Clear water lines Run water for air. ■■ Do not lay excess hose on the bottom of form. You may need alternate parts with flat washers (not provided). Feed hose into standpipe. Washer must be secure but loose enough to the hot water faucet and the ...to work properly. Both hoses must extend 4.5" (114 mm) beyond the form. 3. Water should be connected to the cold water faucet. 6 See "Tools and Parts" to washer correctly. 3. Make sure the washer basket is connected to hot water to help in standpipe A B A. Coupling B. Damage can result. IMPORTANT: ...

Installation Guide
Page 8
...POWER. Plug into detergent dispenser. Recheck levelness of the washer. Allow it into a grounded 3-prong outlet Jam nut If washer is an extra part, go back through steps to prop up front of washer about 1/2" (13 mm) from the washer tub for future relocation of washer and ... washer with a wood block or similar object that will support weight of /recycle all packaging materials. ■■ Check that you have all parts are on leveling feet tightly against washer cabinet. Then turn jam nuts counterclockwise on . ■■ Check for a medium-size load and pour...
...POWER. Plug into detergent dispenser. Recheck levelness of the washer. Allow it into a grounded 3-prong outlet Jam nut If washer is an extra part, go back through steps to prop up front of washer about 1/2" (13 mm) from the washer tub for future relocation of washer and ... washer with a wood block or similar object that will support weight of /recycle all packaging materials. ■■ Check that you have all parts are on leveling feet tightly against washer cabinet. Then turn jam nuts counterclockwise on . ■■ Check for a medium-size load and pour...


