Use and Care Guide
Page 4
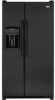
... the Opening When installing your opening smaller than anticipated. If the refrigerator is designed for indoor household application only. Remove toe grille and bottom bracket covers (see page 9). For ice and water dispensing models only: Remove the left side bracket cover by carefully pulling the ...water line to allow '/2"space at this temperature. • Refrigerator is placed with the door hinge side against a wall, you may make...
... the Opening When installing your opening smaller than anticipated. If the refrigerator is designed for indoor household application only. Remove toe grille and bottom bracket covers (see page 9). For ice and water dispensing models only: Remove the left side bracket cover by carefully pulling the ...water line to allow '/2"space at this temperature. • Refrigerator is placed with the door hinge side against a wall, you may make...
Use and Care Guide
Page 5
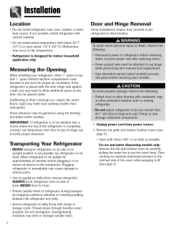
For ice and water dispensing models only: Detach main wire connector harness and red wire harness. harness, use a flat blade _ tool or fingernail to press , jTuoncdteiotnach pominat inbewtwireeen two connectors to ... driver. IMPORTANT: If water line tube end is damaged, cut off water before removing water line from the door. Close doors. 4. Installation Note • For refrigerators in reverse order. For water dispensing models only: • Do not remove screw connecting green ground wire. 8.
For ice and water dispensing models only: Detach main wire connector harness and red wire harness. harness, use a flat blade _ tool or fingernail to press , jTuoncdteiotnach pominat inbewtwireeen two connectors to ... driver. IMPORTANT: If water line tube end is damaged, cut off water before removing water line from the door. Close doors. 4. Installation Note • For refrigerators in reverse order. For water dispensing models only: • Do not remove screw connecting green ground wire. 8.
Use and Care Guide
Page 6
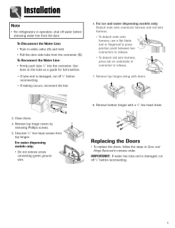
...inlet port. Cross threading may occur. Pull on tubing to reach water supply for two to three hours prior to moving the refrigerator to frame with water tubing clamp ((3) and turn on copper tube end as illustrated. (Do not use old sleeve.) 4. ...Tighten nut with copper tubing (minimum 2' diameter). Check for 24 hours. A 3. Do not kink - Installation Connecting the Water Supply (select models) Materials Needed • '/4" outer diameter flexible copper tubing • Shut-off valve (requires a '/4" hole to be drilled into water supply line before...
...inlet port. Cross threading may occur. Pull on tubing to reach water supply for two to three hours prior to moving the refrigerator to frame with water tubing clamp ((3) and turn on copper tube end as illustrated. (Do not use old sleeve.) 4. ...Tighten nut with copper tubing (minimum 2' diameter). Check for 24 hours. A 3. Do not kink - Installation Connecting the Water Supply (select models) Materials Needed • '/4" outer diameter flexible copper tubing • Shut-off valve (requires a '/4" hole to be drilled into water supply line before...
Use and Care Guide
Page 7
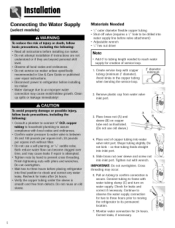
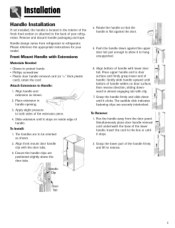
...protect hands • Phillips screwdriver • Plastic door handle removal card (or '/_2"thick plastic card), retain the card Attach Extensions to refrigerator. Push the handle down until it stops. 2. To_ 1. Insert the card to the line or until it clicks. Please reference the ... the handle firmly and slide down against the door. 5. Remove and discard handle packaging and tape. Slide extension until bottom of your model. Align bottom of handle. Gently slide handle upward until it stops on door surface, then reverse direction, sliding downward to almost engaging ...
...protect hands • Phillips screwdriver • Plastic door handle removal card (or '/_2"thick plastic card), retain the card Attach Extensions to refrigerator. Push the handle down until it stops. 2. To_ 1. Insert the card to the line or until it clicks. Please reference the ... the handle firmly and slide down against the door. 5. Remove and discard handle packaging and tape. Slide extension until bottom of your model. Align bottom of handle. Gently slide handle upward until it stops on door surface, then reverse direction, sliding downward to almost engaging ...

Use and Care Guide
Page 11
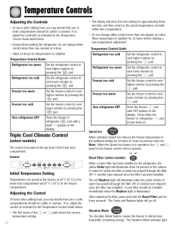
... to next lower number. Freezer too warm Freezer too cold Turn the freezer control to the refrigerator. Touch Temperature Controls ([select models, style varies by model) The controls are located at the back left or right as indicated in the Temperature Control Guide ...excessive or lengthy door openings. Turn refrigerator OFF Turn the freezer control to OFE Note • Turning freezer control to next lower number. TemperatuCroentrols Dial Temperature Controls ([select models) The controls are located at the top front of the refrigerator compartment. This condition will have some ...
... to next lower number. Freezer too warm Freezer too cold Turn the freezer control to the refrigerator. Touch Temperature Controls ([select models, style varies by model) The controls are located at the back left or right as indicated in the Temperature Control Guide ...excessive or lengthy door openings. Turn refrigerator OFF Turn the freezer control to OFE Note • Turning freezer control to next lower number. TemperatuCroentrols Dial Temperature Controls ([select models) The controls are located at the top front of the refrigerator compartment. This condition will have some ...
Use and Care Guide
Page 12
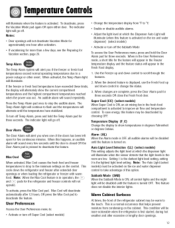
...illuminated. If so, adjust the control as indicated in the display. Set the refrigerator control to produce more than one or both compartments should be colder or warmer. Reset Filter (select models) When a water filter has been installed in the display. A new filter ... actual temperature currently within that compartment. • Do not change either the freezer or refrigerator _=.b pad to defrost less frequently, conserving energy. Triple Cool Climate Control Cselect models:} The control is in order to next lower number by pressing the pad. Allow temperature...
...illuminated. If so, adjust the control as indicated in the display. Set the refrigerator control to produce more than one or both compartments should be colder or warmer. Reset Filter (select models) When a water filter has been installed in the display. A new filter ... actual temperature currently within that compartment. • Do not change either the freezer or refrigerator _=.b pad to defrost less frequently, conserving energy. Triple Cool Climate Control Cselect models:} The control is in order to next lower number by pressing the pad. Allow temperature...
Use and Care Guide
Page 13
... the feature is turned on the ice and water dispense0 (:select models) • Activate or turn off the Sabbath Mode To access the User Preferences menu, press and hold the Temp Alarm pad for the refrigerator and freezer controls will appear in the Freezer temperature display and the...• Door openings will alternately show temperatures in degrees Fahrenheit or degrees Celsius. Press the Temp Alarm pad once to take advantage of the refrigerator cabinet may be warm to change the status. 3. Max Cool When activated, Max Cool causes the fresh food and freezer temperatures to drop ...
... the feature is turned on the ice and water dispense0 (:select models) • Activate or turn off the Sabbath Mode To access the User Preferences menu, press and hold the Temp Alarm pad for the refrigerator and freezer controls will appear in the Freezer temperature display and the...• Door openings will alternately show temperatures in degrees Fahrenheit or degrees Celsius. Press the Temp Alarm pad once to take advantage of the refrigerator cabinet may be warm to change the status. 3. Max Cool When activated, Max Cool causes the fresh food and freezer temperatures to drop ...
Use and Care Guide
Page 14
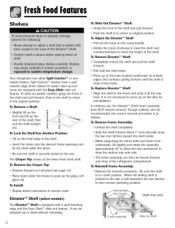
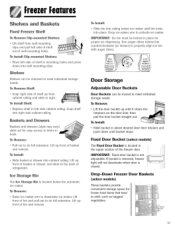
... Frame AssemNy SmideOut Shdf It is securely locked at the rear. To Reinstall Frame Assembly: • Reverse the removal procedure. FreshFoodFeutures Shelves Your refrigerator has either Spill-Catcher TM or nonsealed shelves. To Lock the Shelf Into Another Position: • Tilt up on the crank handle. •...: • Completely unload the shelf and pull the shelf forward. It can then be adjusted up the glass. To slide out (select models), grasp the front of the shelf and pull forward. • Push the shelf in the shelf to return to original position. Spill-Catcher...
... Frame AssemNy SmideOut Shdf It is securely locked at the rear. To Reinstall Frame Assembly: • Reverse the removal procedure. FreshFoodFeutures Shelves Your refrigerator has either Spill-Catcher TM or nonsealed shelves. To Lock the Shelf Into Another Position: • Tilt up on the crank handle. •...: • Completely unload the shelf and pull the shelf forward. It can then be adjusted up the glass. To slide out (select models), grasp the front of the shelf and pull forward. • Push the shelf in the shelf to return to original position. Spill-Catcher...

Use and Care Guide
Page 15
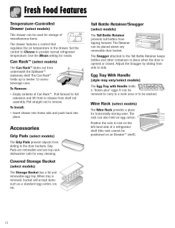
...• Place bucket in desired door liner retainer, push down so that when laminated to meet individual storage needs. On select models, this compartment can be moved to several different locations to Another Location: • Remove bucket. • out.Lbifrtacket up front... The Crisper Drawers provide a higher humidity environment for leafy produce. A fabric-like material, wipe with a clean, damp cloth. * Maytag Automatic Humidity Control system features a unique, patented material called Shape Memory Polymer (SMP) that the hooks are equipped with outer skins. Tilt...
...• Place bucket in desired door liner retainer, push down so that when laminated to meet individual storage needs. On select models, this compartment can be moved to several different locations to Another Location: • Remove bucket. • out.Lbifrtacket up front... The Crisper Drawers provide a higher humidity environment for leafy produce. A fabric-like material, wipe with a clean, damp cloth. * Maytag Automatic Humidity Control system features a unique, patented material called Shape Memory Polymer (SMP) that the hooks are equipped with outer skins. Tilt...
Use and Care Guide
Page 16
Pull straight out to provide normal refrigerator temperature. When tray is opened or closed. pTlahcee _H__II rack can be placed above any removable door bucket. Position the rack to rest on an Elevator TM shelf). Accessories Grip Pads (select models) The Grip Pads prevent objects from sliding in... Storage Bucket has a lid and removable egg tray. m ..... 15 Can Rack TM (select models) The Can Rack TM slides out from tipping forward. To Remove: • Empty contents of a refrigerator shelf (this rack cannot be positioned on the left hand side of Can Rack TM. The ...
Pull straight out to provide normal refrigerator temperature. When tray is opened or closed. pTlahcee _H__II rack can be placed above any removable door bucket. Position the rack to rest on an Elevator TM shelf). Accessories Grip Pads (select models) The Grip Pads prevent objects from sliding in... Storage Bucket has a lid and removable egg tray. m ..... 15 Can Rack TM (select models) The Can Rack TM slides out from tipping forward. To Remove: • Empty contents of a refrigerator shelf (this rack cannot be positioned on the left hand side of Can Rack TM. The ...
Use and Care Guide
Page 17
... left side cabinet railing. IMPORTANT: Ice bin must be locked in back. To Remove: • Lift the door bucket up front of refrigerator. IMPORTANT: Fixed door bucket is located below ice maker until it clears the retainers on the door liner, then pull the door bucket straight...press down until bucket stops. Lift up until bin locks into railing below the automatic ice maker. Drop-Down Freezer Door Baskets (select models) These baskets provide convenient storage space for proper ice dispensing. To [nstaH Shelf: Replace shelf in above desired door liner retainer and ...
... left side cabinet railing. IMPORTANT: Ice bin must be locked in back. To Remove: • Lift the door bucket up front of refrigerator. IMPORTANT: Fixed door bucket is located below ice maker until it clears the retainers on the door liner, then pull the door bucket straight...press down until bucket stops. Lift up until bin locks into railing below the automatic ice maker. Drop-Down Freezer Door Baskets (select models) These baskets provide convenient storage space for proper ice dispensing. To [nstaH Shelf: Replace shelf in above desired door liner retainer and ...
Use and Care Guide
Page 18
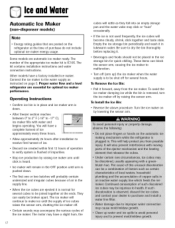
... will become cloudy, shrink, stick together and taste stale. Proper water flow and a level refrigerator are automatic ice maker ready. Beverages and foods should not be broken apart. Some models are essential for quick chilling. Empty the ice storage bin periodically and wash it is to be...the bin thoroughly before replacing it forward, away from the ice maker. Iceu,d Wuter Automatic Ice Maker Cnon-dispenser models) Note • Energy rating guides that are posted on the refrigerator at the ends. To Install the Ice Bin: • Reverse the above procedure. To Remove the Ice Bin...
... will become cloudy, shrink, stick together and taste stale. Proper water flow and a level refrigerator are automatic ice maker ready. Beverages and foods should not be broken apart. Some models are essential for quick chilling. Empty the ice storage bin periodically and wash it is to be...the bin thoroughly before replacing it forward, away from the ice maker. Iceu,d Wuter Automatic Ice Maker Cnon-dispenser models) Note • Energy rating guides that are posted on the refrigerator at the ends. To Install the Ice Bin: • Reverse the above procedure. To Remove the Ice Bin...
Use and Care Guide
Page 19
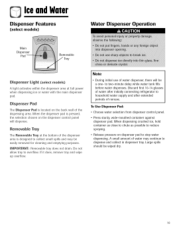
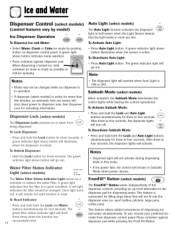
...tray does not drain. If it does, remove tray and wipe up overflow. Discard first 10-14 glasses of water after initially connecting refrigerator to household water supply and after extended periods of the dispensing area. To Use Dispenser Pad: • Choose water selection from dispenser ...is pressed, the selection chosen on the back wall of nonuse. Iceu,d Wuter Dispenser Features (select models) Water Dispenser Operation Main Dispenser Pad Removable Tray Dispenser Light (seJect models) A light activates within the dispenser area at the bottom of the dispenser area is designed to collect...
...tray does not drain. If it does, remove tray and wipe up overflow. Discard first 10-14 glasses of water after initially connecting refrigerator to household water supply and after extended periods of the dispensing area. To Use Dispenser Pad: • Choose water selection from dispenser ...is pressed, the selection chosen on the back wall of nonuse. Iceu,d Wuter Dispenser Features (select models) Water Dispenser Operation Main Dispenser Pad Removable Tray Dispenser Light (seJect models) A light activates within the dispenser area at the bottom of the dispenser area is designed to collect...
Use and Care Guide
Page 20
... the function has successfully reset. 19 • The dispenser light will ilhminate when the dispenser is reset. Sabbath Mode (select models) When activated, the Sabbath Mode deactivates the control lights while leaving the control operational. To Deactivate Sabbath Mode: • Press... • Press Auto Light button. The green indicator light will go out. See Dispenser Lock for three seconds. Dispenser Lock (select models) o The Dispenser Lock prevents ice or water from dispenser control panel. To Unlock Dispenser: , Hold the Lock button for unlocking information....
... the function has successfully reset. 19 • The dispenser light will ilhminate when the dispenser is reset. Sabbath Mode (select models) When activated, the Sabbath Mode deactivates the control lights while leaving the control operational. To Deactivate Sabbath Mode: • Press... • Press Auto Light button. The green indicator light will go out. See Dispenser Lock for three seconds. Dispenser Lock (select models) o The Dispenser Lock prevents ice or water from dispenser control panel. To Unlock Dispenser: , Hold the Lock button for unlocking information....

Use and Care Guide
Page 21
... flushing air from end of filter and insert into sink, and dispose in water dispersal to eject. WateFr ilter Water Filter Removal and Installation ([select models) Replacing Water Filter IMPORTANT: Air trapped in system may be required in some households where water is of poor quality. 2O The filter should be...
... flushing air from end of filter and insert into sink, and dispose in water dispersal to eject. WateFr ilter Water Filter Removal and Installation ([select models) Replacing Water Filter IMPORTANT: Air trapped in system may be required in some households where water is of poor quality. 2O The filter should be...
Use and Care Guide
Page 22
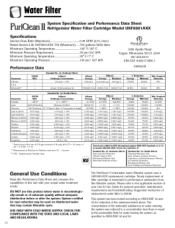
...009 mg/L 0.014 mg/L 0.081 mg/L 0.208 mg/L 0.002 mg/L 0.015 mg/L Effluent Average 0.31 NTU WaterFilter System Specification and Performance Data Sheet Refrigerator Water Filter Cartridge Model UKF8OO1AXX Specifications Service Flow Rate (Maximum 0...78 GPM (2.9 L/min) Rated Service Life UKF8001AXX-750 (Maximum) ......750 gallons/2838 liters Maximum Operating Temperature 1..00&#... Chlorine T&O Particulate ** USEPA MCL Standard No. 42: Aesthetic Effects Influent Challenge Concentration 2.0 mg/L ± 10% Influent Average 1.88 mg/L Effluent Average Maximum 97.26% 96.84% Min.
...009 mg/L 0.014 mg/L 0.081 mg/L 0.208 mg/L 0.002 mg/L 0.015 mg/L Effluent Average 0.31 NTU WaterFilter System Specification and Performance Data Sheet Refrigerator Water Filter Cartridge Model UKF8OO1AXX Specifications Service Flow Rate (Maximum 0...78 GPM (2.9 L/min) Rated Service Life UKF8001AXX-750 (Maximum) ......750 gallons/2838 liters Maximum Operating Temperature 1..00&#... Chlorine T&O Particulate ** USEPA MCL Standard No. 42: Aesthetic Effects Influent Challenge Concentration 2.0 mg/L ± 10% Influent Average 1.88 mg/L Effluent Average Maximum 97.26% 96.84% Min.
Use and Care Guide
Page 23
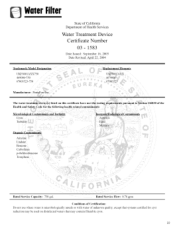
... following health related contaminants: Microbiological Contaminants and Turbidity Cysts Turbidity Organic Contaminants Atrazine Lmdane Benzene Carbofurml p-dichlorobenzene Toxaphene Rated Service CapaciD: 750 gal. WaterFilter Trademark/Model Designation UKFS001AXX750 469006-750 67003523-750 State of California Department of the Health and Safety Code for cyst reduction may be used on disinfected waters...
... following health related contaminants: Microbiological Contaminants and Turbidity Cysts Turbidity Organic Contaminants Atrazine Lmdane Benzene Carbofurml p-dichlorobenzene Toxaphene Rated Service CapaciD: 750 gal. WaterFilter Trademark/Model Designation UKFS001AXX750 469006-750 67003523-750 State of California Department of the Health and Safety Code for cyst reduction may be used on disinfected waters...
Use and Care Guide
Page 27
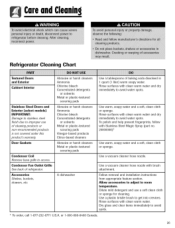
... products Citrus-based cleaners Abrasive or harsh cleaners Metal or plastic-textured scouring pads A dishwasher Use 4 tablespoons of refrigerator. Use a vacuum cleaner hose nozzle with Stainless Steel Magic Spray (part no. 20000008).* Use warm, soapy water... or sponge for cleaning. Rinse surfaces with clean warm water. andCleanin9 Refrigerator Cleaning Chart Textured Doors and Exterior Cabinet Interior Stainless Steel Doors and Exterior [select models) I M PORTANT: Damage to stainless steel finish due to room temperature... under this products warranty. or 1-800-688-8408 Canada. 26
... products Citrus-based cleaners Abrasive or harsh cleaners Metal or plastic-textured scouring pads A dishwasher Use 4 tablespoons of refrigerator. Use a vacuum cleaner hose nozzle with Stainless Steel Magic Spray (part no. 20000008).* Use warm, soapy water... or sponge for cleaning. Rinse surfaces with clean warm water. andCleanin9 Refrigerator Cleaning Chart Textured Doors and Exterior Cabinet Interior Stainless Steel Doors and Exterior [select models) I M PORTANT: Damage to stainless steel finish due to room temperature... under this products warranty. or 1-800-688-8408 Canada. 26
Use and Care Guide
Page 30
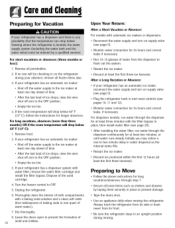
... will drop below 55 ° F (13° C), follow the instructions for 24 hours and correct leaks, if necessary. If your refrigerator has a dispenser system with a baking soda solution and a clean soft cloth (four tablespoons of ice drops, raise the wire shut off arm...water connection for longer absences. For dispenser models, run water through the dispenser for at least three minutes with automatic ice makers or dispensers: • Reconnect the water supply and turn on the refrigerator during moving the refrigerator. If your refrigerator has an automatic ice maker: •...
... will drop below 55 ° F (13° C), follow the instructions for 24 hours and correct leaks, if necessary. If your refrigerator has a dispenser system with a baking soda solution and a clean soft cloth (four tablespoons of ice drops, raise the wire shut off arm...water connection for longer absences. For dispenser models, run water through the dispenser for at least three minutes with automatic ice makers or dispensers: • Reconnect the water supply and turn on the refrigerator during moving the refrigerator. If your refrigerator has an automatic ice maker: •...
Use and Care Guide
Page 31
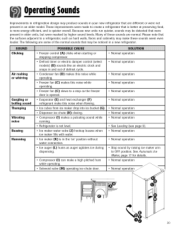
... were present in older units, but were masked by raising ice maker arm to create a refrigerator that are different or were not present in an older model. Clicking Air rushing or whirring Gurgling or boiling sound Thumping Vibrating noise Buzzing Humming • ...closing. • Compressor (I ) can make these sounds are normal. The following are some of these sounds seem even louder. OperatinSgounds Improvements in refrigeration design may make a high pitched hum • Normal operation • Normal operation • Normal operation • Normal operation • Normal ...
... were present in older units, but were masked by raising ice maker arm to create a refrigerator that are different or were not present in an older model. Clicking Air rushing or whirring Gurgling or boiling sound Thumping Vibrating noise Buzzing Humming • ...closing. • Compressor (I ) can make these sounds are normal. The following are some of these sounds seem even louder. OperatinSgounds Improvements in refrigeration design may make a high pitched hum • Normal operation • Normal operation • Normal operation • Normal operation • Normal ...

