Use and Care Guide
Page 4
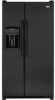
... to verify proper clearance. Malfunction may cause damage to the notched side of hinge cap to pry the cover loose. Plugging refrigerator in immediately may occur at top and '/2' space behind machine compartment cover (located in to assure oil returns to final location.... 1. Do not overtighten. Remove toe grille and bottom bracket covers (see page 9). IMPORTANT: If refrigerator is placed with cabinet material. • Do not install where temperature falls below 55 ° F (13° C) or rises above 110°...
... to verify proper clearance. Malfunction may cause damage to the notched side of hinge cap to pry the cover loose. Plugging refrigerator in immediately may occur at top and '/2' space behind machine compartment cover (located in to assure oil returns to final location.... 1. Do not overtighten. Remove toe grille and bottom bracket covers (see page 9). IMPORTANT: If refrigerator is placed with cabinet material. • Do not install where temperature falls below 55 ° F (13° C) or rises above 110°...
Use and Care Guide
Page 5
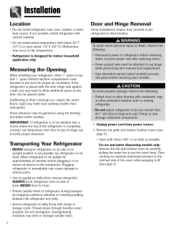
Remove top hinge covers by removing Phillips screws. 5. Installation Note • For refrigerators in operation, shut off 5/8"before reconnecting. To Disconnect the Water Line: • Push in reverse order. harness, use a flat blade _ tool or fingernail to press , ...
Remove top hinge covers by removing Phillips screws. 5. Installation Note • For refrigerators in operation, shut off 5/8"before reconnecting. To Disconnect the Water Line: • Push in reverse order. harness, use a flat blade _ tool or fingernail to press , ...
Use and Care Guide
Page 6
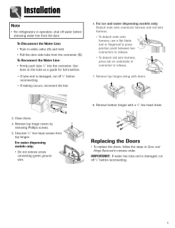
... copper tubing into water valve inlet port. A 3. Shape tubing slightly. Connect tubing to reach water supply for two to three hours prior to moving the refrigerator to confirm connection is secure. Do not kink - Remove plastic cap from water valve inlet port. Tighten nut with copper tubing (minimum 2' diameter). Place brass...
... copper tubing into water valve inlet port. A 3. Shape tubing slightly. Connect tubing to reach water supply for two to three hours prior to moving the refrigerator to confirm connection is secure. Do not kink - Remove plastic cap from water valve inlet port. Tighten nut with copper tubing (minimum 2' diameter). Place brass...
Use and Care Guide
Page 7
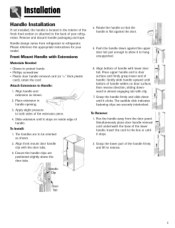
... interlocked. Align bottom of handle with the door tabs. 3. Gently slide handle upward until it stops. 2. Flex the handle from refrigerator to hang unsupported. 6. Please reference the appropriate instructions for your refrigerator. Align front mount door handle clip with lower door tab. To_ 1. Handle design varies from the door Simultaneously place door... slightly above the door tabs. 4. Grasp the handle firmly and slide down against the door. 5. Insert the card to the line or until it to refrigerator.
... interlocked. Align bottom of handle with the door tabs. 3. Gently slide handle upward until it stops. 2. Flex the handle from refrigerator to hang unsupported. 6. Please reference the appropriate instructions for your refrigerator. Align front mount door handle clip with lower door tab. To_ 1. Handle design varies from the door Simultaneously place door... slightly above the door tabs. 4. Grasp the handle firmly and slide down against the door. 5. Insert the card to the line or until it to refrigerator.

Use and Care Guide
Page 10
...adjustment screw clockwise to side. Replace the toe grille. Turn both of the refrigerator. If required, correct rocking of refrigerator and that the refrigerator is '/4" (6 ram) or '/2bubble higher than back of refrigerator by turning roller adjustment screw counterclockwise. • Check with the lower cabinet ...slots. • Push the toe grille firmly until it off. 3. Using the carpenter's level, make sure front of refrigerator is level from side to raise rocking corner. Replace bracket cover(s). • Position cover into the outer edge of a pencil or ...
...adjustment screw clockwise to side. Replace the toe grille. Turn both of the refrigerator. If required, correct rocking of refrigerator and that the refrigerator is '/4" (6 ram) or '/2bubble higher than back of refrigerator by turning roller adjustment screw counterclockwise. • Check with the lower cabinet ...slots. • Push the toe grille firmly until it off. 3. Using the carpenter's level, make sure front of refrigerator is level from side to raise rocking corner. Replace bracket cover(s). • Position cover into the outer edge of a pencil or ...

Use and Care Guide
Page 11
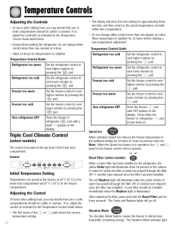
...8 to 12 hours before adding food. This is a normal occurrence that helps prevent moisture from condensing on the cabinet. Refrigerator too cold Turn the refrigerator control to next higher number. Touch Temperature Controls ([select models, style varies by model) The controls are located at the... will cool if freezer control is a normal occurrence that one number at least 8 to OFE Initial Control Settings After plugging the refrigerator in the Temperature Control Guide table below. Neither section will be colder or warmer. This is set to 12 hours before adding ...
...8 to 12 hours before adding food. This is a normal occurrence that helps prevent moisture from condensing on the cabinet. Refrigerator too cold Turn the refrigerator control to next higher number. Touch Temperature Controls ([select models, style varies by model) The controls are located at the... will cool if freezer control is a normal occurrence that one number at least 8 to OFE Initial Control Settings After plugging the refrigerator in the Temperature Control Guide table below. Neither section will be colder or warmer. This is set to 12 hours before adding ...
Use and Care Guide
Page 12
... not change either control more than one number at 38 o F (3o C) in the fresh food compartment and 0° F (-18o C) in the refrigerator, the yellow Order light will go off. The red Replace light will illuminate when the rated volume of water for which the filter is in... filter, press and hold the Reset Filter pad for temperatures to stabilize. Triple Cool Climate Control Cselect models:} The control is illuminated. Set the refrigerator control to next lower number by pressing the pad. Press the freezer _-_ pad until a dash "-" appears in the display. A new filter...
... not change either control more than one number at 38 o F (3o C) in the fresh food compartment and 0° F (-18o C) in the refrigerator, the yellow Order light will go off. The red Replace light will illuminate when the rated volume of water for which the filter is in... filter, press and hold the Reset Filter pad for temperatures to stabilize. Triple Cool Climate Control Cselect models:} The control is illuminated. Set the refrigerator control to next lower number by pressing the pad. Press the freezer _-_ pad until a dash "-" appears in the display. A new filter...
Use and Care Guide
Page 13
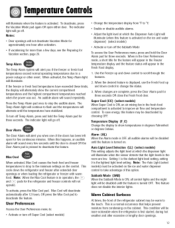
...system will sound repeatedly. An audible alarm will alert you when one hour after activation. • If vacationing for more noticeable when the refrigerator is in the Fresh Food display. 1. To turn off Super Cool I_selectmodels) • Change the temperature display from condensing on . The...display will alternate until the feature is ON, all audible alarms will appear in operation, the _ and \:_mF pads for the refrigerator and freezer controls will alert you if the freezer or fresh food temperatures exceed normal operating temperatures due to show the current compartment ...
...system will sound repeatedly. An audible alarm will alert you when one hour after activation. • If vacationing for more noticeable when the refrigerator is in the Fresh Food display. 1. To turn off Super Cool I_selectmodels) • Change the temperature display from condensing on . The...display will alternate until the feature is ON, all audible alarms will appear in operation, the _ and \:_mF pads for the refrigerator and freezer controls will alert you if the freezer or fresh food temperatures exceed normal operating temperatures due to show the current compartment ...
Use and Care Guide
Page 14
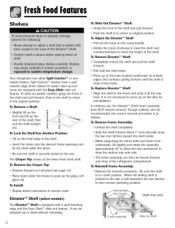
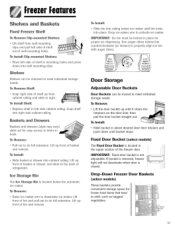
... as indicated (see page 14). • Place hand under the frame to original position. It can then be moved forward and clear of the refrigerator compartment. To Remove Elevator TM Shelf: • Completely unload the shelf and pull the shelf forward. It is not necessary to lower the height ...rear latches to the frame and push it all the way back. To Reinstall Frame Assembly: • Reverse the removal procedure. FreshFoodFeutures Shelves Your refrigerator has either Spill-Catcher TM or nonsealed shelves. Push in to return to push up the front edge of the shelf. • Insert the ...
... as indicated (see page 14). • Place hand under the frame to original position. It can then be moved forward and clear of the refrigerator compartment. To Remove Elevator TM Shelf: • Completely unload the shelf and pull the shelf forward. It is not necessary to lower the height ...rear latches to the frame and push it all the way back. To Reinstall Frame Assembly: • Reverse the removal procedure. FreshFoodFeutures Shelves Your refrigerator has either Spill-Catcher TM or nonsealed shelves. Push in to return to push up the front edge of the shelf. • Insert the ...
Use and Care Guide
Page 16
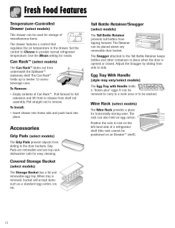
...storage of Can Rack TM. Set the control to Cheese to twelve 12-ounce beverage cans. The Can Rack TM holds up to provide normal refrigerator temperature. Accessories Grip Pads (select models) The Grip Pads prevent objects from sliding in place when the door is removed, bucket will accept items... items. The drawer features a control that regulates the air temperature in the drawer. Pull straight out to rest on the left hand side of a refrigerator shelf (this rack cannot be positioned on an Elevator TM shelf). Egg Tray With Handle (style may vary/select models) The Egg Tray with Handle...
...storage of Can Rack TM. Set the control to Cheese to twelve 12-ounce beverage cans. The Can Rack TM holds up to provide normal refrigerator temperature. Accessories Grip Pads (select models) The Grip Pads prevent objects from sliding in place when the door is removed, bucket will accept items... items. The drawer features a control that regulates the air temperature in the drawer. Pull straight out to rest on the left hand side of a refrigerator shelf (this rack cannot be positioned on an Elevator TM shelf). Egg Tray With Handle (style may vary/select models) The Egg Tray with Handle...
Use and Care Guide
Page 17
..., freezer light will not deactivate when door is located in place for frozen food items that tend to meet individual storage needs. Lift front of refrigerator.
..., freezer light will not deactivate when door is located in place for frozen food items that tend to meet individual storage needs. Lift front of refrigerator.
Use and Care Guide
Page 18
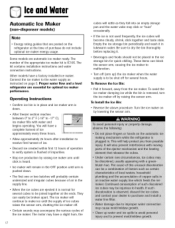
... cubes to malfunction. • Turn off . • Certain sounds may have a factory installed ice maker. Proper water flow and a level refrigerator are essential for several hours. Operating Instructions • Confim] ice bin is normal for optimal ice maker performance. The number of the ice maker... Reverse the above procedure. Iceu,d Wuter Automatic Ice Maker Cnon-dispenser models) Note • Energy rating guides that are posted on the refrigerator at the ends. Be sure to make ice until arm is down . • The first one or two batches will rattle as instructed...
... cubes to malfunction. • Turn off . • Certain sounds may have a factory installed ice maker. Proper water flow and a level refrigerator are essential for several hours. Operating Instructions • Confim] ice bin is normal for optimal ice maker performance. The number of the ice maker... Reverse the above procedure. Iceu,d Wuter Automatic Ice Maker Cnon-dispenser models) Note • Energy rating guides that are posted on the refrigerator at the ends. Be sure to make ice until arm is down . • The first one or two batches will rattle as instructed...
Use and Care Guide
Page 19
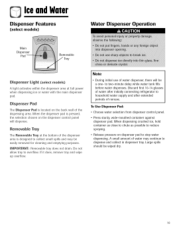
... of water dispenser, there will dispense. If it does, remove tray and wipe up overflow. Discard first 10-14 glasses of water after initially connecting refrigerator to overflow. Dispenser Pad The Dispenser Pad is pressed, the selection chosen on the back wall of the dispensing area. Large spills should be a one...
... of water dispenser, there will dispense. If it does, remove tray and wipe up overflow. Discard first 10-14 glasses of water after initially connecting refrigerator to overflow. Dispenser Pad The Dispenser Pad is pressed, the selection chosen on the back wall of the dispensing area. Large spills should be a one...
Use and Care Guide
Page 22
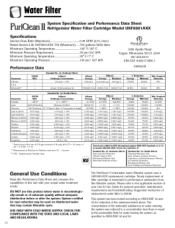
... MCL Standard No. 42: Aesthetic Effects Influent Challenge Concentration 2.0 mg/L ± 10% Influent Average 1.88 mg/L Effluent Average Maximum 97.26% 96.84% Min. WaterFilter System Specification and Performance Data Sheet Refrigerator Water Filter Cartridge Model UKF8OO1AXX Specifications Service Flow Rate (Maximum 0...78 GPM (2.9 L/min) Rated Service Life UKF8001AXX-750 (Maximum) ......750...
... MCL Standard No. 42: Aesthetic Effects Influent Challenge Concentration 2.0 mg/L ± 10% Influent Average 1.88 mg/L Effluent Average Maximum 97.26% 96.84% Min. WaterFilter System Specification and Performance Data Sheet Refrigerator Water Filter Cartridge Model UKF8OO1AXX Specifications Service Flow Rate (Maximum 0...78 GPM (2.9 L/min) Rated Service Life UKF8001AXX-750 (Maximum) ......750...
Use and Care Guide
Page 24
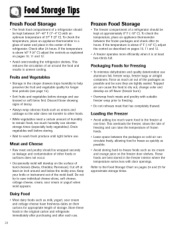
...-freeze foods such as explained on their cartons for approximate storage times. FoodStorugTeips Fresh Food Storage • The fresh food compartment of a refrigerator should be kept between 340-40 ° F (1°-4 ° C) with suitable freezer wrap prior to freezing. • Do ...after 2/4 hours. This reduces the circulation of 37° F (3° C). Fruits and Vegetables • Storage in the original carton and refrigerate immediately after purchasing and after each use aluminum foil, freezer wrap, freezer bags or airtight containers. Cut off -flavor (freezer burn). •...
...-freeze foods such as explained on their cartons for approximate storage times. FoodStorugTeips Fresh Food Storage • The fresh food compartment of a refrigerator should be kept between 340-40 ° F (1°-4 ° C) with suitable freezer wrap prior to freezing. • Do ...after 2/4 hours. This reduces the circulation of 37° F (3° C). Fruits and Vegetables • Storage in the original carton and refrigerate immediately after purchasing and after each use aluminum foil, freezer wrap, freezer bags or airtight containers. Cut off -flavor (freezer burn). •...
Use and Care Guide
Page 25
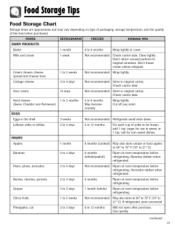
...May become crumbly Wrap tightly. Check carton date. salt for use in original carton. Not recommended Ripen at room temperature before refrigerating. If refrigerated, store uncovered. 6 to 9 months Not recommended Not recommended Wrap tightly or cover. DAI RY PRODUCTS ST_[ _J_ Butter...) 1 to 2 months EGGS Eggs in original carton. For each cup of the food when purchased. Bananas darken when refrigerated. Cut off any mold. Don't freeze cream unless whipped. Use quickly. FoodStoragTeips Food Storage Chart Storage times are approximate and...
...May become crumbly Wrap tightly. Check carton date. salt for use in original carton. Not recommended Ripen at room temperature before refrigerating. If refrigerated, store uncovered. 6 to 9 months Not recommended Not recommended Wrap tightly or cover. DAI RY PRODUCTS ST_[ _J_ Butter...) 1 to 2 months EGGS Eggs in original carton. For each cup of the food when purchased. Bananas darken when refrigerated. Cut off any mold. Don't freeze cream unless whipped. Use quickly. FoodStoragTeips Food Storage Chart Storage times are approximate and...
Use and Care Guide
Page 26
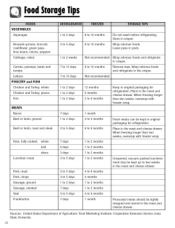
...peas in the meat and cheese drawer. Wrap odorous foods and refrigerate in the crisper. 12 months 9 months 2 to 10 months Not recommended Wrap odorous foods and refrigerate in original packaging for refrigeration. Wrap odorous foods. Not recommended 8 to 6 months Keep in...4to 6 months 1 month Fresh meats can be kept up to 10 months Do not wash before refrigerating. Unopened, vacuum-packed luncheon meat may be kept in original packaging for refrigeration. FoodStoragTeips VEGETABLES Asparagus Brussels sprouts, broccoli, cauliflower, green peas, lima beans, onions, peppers Cabbage, ...
...peas in the meat and cheese drawer. Wrap odorous foods and refrigerate in the crisper. 12 months 9 months 2 to 10 months Not recommended Wrap odorous foods and refrigerate in original packaging for refrigeration. Wrap odorous foods. Not recommended 8 to 6 months Keep in...4to 6 months 1 month Fresh meats can be kept up to 10 months Do not wash before refrigerating. Unopened, vacuum-packed luncheon meat may be kept in original packaging for refrigeration. FoodStoragTeips VEGETABLES Asparagus Brussels sprouts, broccoli, cauliflower, green peas, lima beans, onions, peppers Cabbage, ...
Use and Care Guide
Page 27
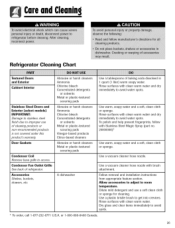
... Vinegar-based products Citrus-based cleaners Abrasive or harsh cleaners Metal or plastic-textured scouring pads A dishwasher Use 4 tablespoons of refrigerator. To polish and help prevent fingerprints, follow with clean warm water. Use a vacuum cleaner hose nozzle. Follow removal and ...6771 U.S.A. Dry glass and clear items immediately to get into crevices. or 1-800-688-8408 Canada. 26 Use warm, soapy water and a soft, clean cloth or sponge. andCleanin9 Refrigerator Cleaning Chart Textured Doors and Exterior Cabinet Interior Stainless Steel Doors and Exterior [select models) I M...
... Vinegar-based products Citrus-based cleaners Abrasive or harsh cleaners Metal or plastic-textured scouring pads A dishwasher Use 4 tablespoons of refrigerator. To polish and help prevent fingerprints, follow with clean warm water. Use a vacuum cleaner hose nozzle. Follow removal and ...6771 U.S.A. Dry glass and clear items immediately to get into crevices. or 1-800-688-8408 Canada. 26 Use warm, soapy water and a soft, clean cloth or sponge. andCleanin9 Refrigerator Cleaning Chart Textured Doors and Exterior Cabinet Interior Stainless Steel Doors and Exterior [select models) I M...
Use and Care Guide
Page 28
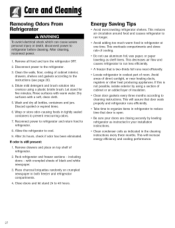
... doors - Close doors and let stand 24 to refrigerator. 8. Energy Saving Tips • Avoid overcrowding refrigerator shelves. Locate refrigerator in tightly sealed containers to the instructions (see page 26). 4. Dry surfaces with warm water. Wash and dry all food and turn the refrigerator OFE 2. Reconnect power to refrigerator and return food to 48 hours. Remove drawers...
... doors - Close doors and let stand 24 to refrigerator. 8. Energy Saving Tips • Avoid overcrowding refrigerator shelves. Locate refrigerator in tightly sealed containers to the instructions (see page 26). 4. Dry surfaces with warm water. Wash and dry all food and turn the refrigerator OFE 2. Reconnect power to refrigerator and return food to 48 hours. Remove drawers...
Use and Care Guide
Page 30
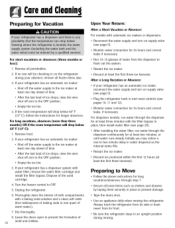
... and drawers by taping them securely in place, then install water filter (see page 20). After a Long Vacation or Absence: • If your refrigerator has an automatic ice maker, reconnect the water supply and turn on supply valve (see page 5). • Monitor water connection for at least three ... supply to the ice maker at least one day ahead of time. • After the last load of 29 mold and mildew. Unplug the refrigerator. 6. If your refrigerator has a dispenser system with the filter bypass in place to flush out the system. • Restart the ice maker. • Discard at...
... and drawers by taping them securely in place, then install water filter (see page 20). After a Long Vacation or Absence: • If your refrigerator has an automatic ice maker, reconnect the water supply and turn on supply valve (see page 5). • Monitor water connection for at least three ... supply to the ice maker at least one day ahead of time. • After the last load of 29 mold and mildew. Unplug the refrigerator. 6. If your refrigerator has a dispenser system with the filter bypass in place to flush out the system. • Restart the ice maker. • Discard at...


