
User Instructions
Page 1
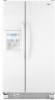
...FILTER CERTIFICATIONS 19 FEUILLES DE DONNÉES SUR LE PRODUIT 42 PRODUCT DATA SHEETS 20 GARANTIE 43 WARRANTY 21 REFRIGERATOR SAFETY Your safety and the safety of others . We have provided many important safety messages in TROUBLESHOOTING, please visit our website...información adicional acerca de su producto, visite: www.maytag.com. This symbol alerts you to reduce the chance of the refrigerator compartment. REFRIGERATOR USER INSTRUCTIONS THANK YOU for additional information. In Canada, visit our website at www.maytag.ca or call us at 1-800-688-9900. W10175446A...
...FILTER CERTIFICATIONS 19 FEUILLES DE DONNÉES SUR LE PRODUIT 42 PRODUCT DATA SHEETS 20 GARANTIE 43 WARRANTY 21 REFRIGERATOR SAFETY Your safety and the safety of others . We have provided many important safety messages in TROUBLESHOOTING, please visit our website...información adicional acerca de su producto, visite: www.maytag.com. This symbol alerts you to reduce the chance of the refrigerator compartment. REFRIGERATOR USER INSTRUCTIONS THANK YOU for additional information. In Canada, visit our website at www.maytag.ca or call us at 1-800-688-9900. W10175446A...
User Instructions
Page 2
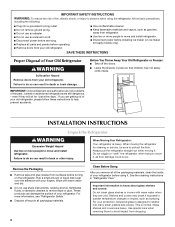
...including the following: ■ Plug into many small, pebble-size pieces. Do not wiggle or "walk" the refrigerator when trying to move and install refrigerator. Important information to know about glass shelves and covers: Do not clean glass shelves or covers with warm water...materials. Glass shelves and covers are still dangerous - These products can result in back or other injury. Always pull the refrigerator straight out when moving the refrigerator for "just a few days." If you remove all of the packaging materials, clean the inside . Remove the Packaging ...
...including the following: ■ Plug into many small, pebble-size pieces. Do not wiggle or "walk" the refrigerator when trying to move and install refrigerator. Important information to know about glass shelves and covers: Do not clean glass shelves or covers with warm water...materials. Glass shelves and covers are still dangerous - These products can result in back or other injury. Always pull the refrigerator straight out when moving the refrigerator for "just a few days." If you remove all of the packaging materials, clean the inside . Remove the Packaging ...
User Instructions
Page 3
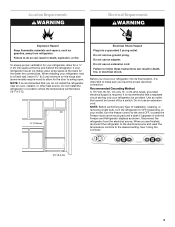
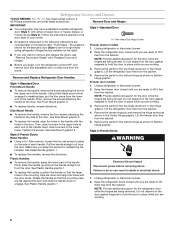
...176;F (13°C). ¹⁄₂" (1.25 cm) Electrical Shock Hazard Plug into its final location, it is recommended that a separate circuit serving only your model, turn the refrigerator to make sure you are finished, reconnect the refrigerator to the electrical source and reset the temperature controls...use an extension cord. Do not use an adapter. When installing your refrigerator next to allow for a ¹⁄₂" (1.25 cm) space at the back for the door to swing open. Do not install the refrigerator in death, fire, or electrical shock. Do not use an extension ...
...176;F (13°C). ¹⁄₂" (1.25 cm) Electrical Shock Hazard Plug into its final location, it is recommended that a separate circuit serving only your model, turn the refrigerator to make sure you are finished, reconnect the refrigerator to the electrical source and reset the temperature controls...use an extension cord. Do not use an adapter. When installing your refrigerator next to allow for a ¹⁄₂" (1.25 cm) space at the back for the door to swing open. Do not install the refrigerator in death, fire, or electrical shock. Do not use an extension ...

User Instructions
Page 4
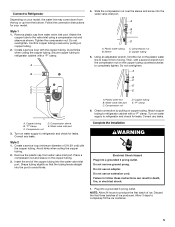
... minimum of water. 3. Water Pressure A cold water supply with adjustable wrench. Remove the water filter. Unplug refrigerator or disconnect power. 2. Determine the length of the pipe, not the bottom. Add 7 ft (2.1 m) to operate the water dispenser and ice maker. Cold water pipe B. Compression nut E. Water Supply ... maker OFF. Be sure both ends of the tubing in areas where the household temperatures will go. Fasten the shutoff valve to your refrigerator has a water filter, it may crush the copper tubing. 7. If a reverse osmosis water filtration system is less than 40 to ...
... minimum of water. 3. Water Pressure A cold water supply with adjustable wrench. Remove the water filter. Unplug refrigerator or disconnect power. 2. Determine the length of the pipe, not the bottom. Add 7 ft (2.1 m) to operate the water dispenser and ice maker. Cold water pipe B. Compression nut E. Water Supply ... maker OFF. Be sure both ends of the tubing in areas where the household temperatures will go. Fasten the shutoff valve to your refrigerator has a water filter, it may crush the copper tubing. 7. If a reverse osmosis water filtration system is less than 40 to ...
User Instructions
Page 5
...coiling the copper tubing. 2. Do not use an adapter. Tighten the compression nut. Compression nut B. Correct any leaks. Failure to refrigerator cabinet with the copper tubing. Plug into the water valve inlet port. Create a service loop with a "P" clamp. Secure copper tubing... C. Attach copper tubing to completely fill the ice container. 5 Copper tubing 5. "P" clamp C. Copper tubing B. Insert the end of 2 ft [61 cm]) with a "P" clamp. Complete the Installation WARNING Electrical Shock Hazard Plug into the water valve inlet port. Remove the plastic cap...
...coiling the copper tubing. 2. Do not use an adapter. Tighten the compression nut. Compression nut B. Correct any leaks. Failure to refrigerator cabinet with the copper tubing. Plug into the water valve inlet port. Create a service loop with a "P" clamp. Secure copper tubing... C. Attach copper tubing to completely fill the ice container. 5 Copper tubing 5. "P" clamp C. Copper tubing B. Insert the end of 2 ft [61 cm]) with a "P" clamp. Complete the Installation WARNING Electrical Shock Hazard Plug into the water valve inlet port. Remove the plastic cap...
User Instructions
Page 6
...a Allen wrench, loosen the two set screws located on the door gasket magnets to do so can result in the lower holes. Unplug refrigerator or disconnect power. 2. Follow the instructions specific to lift them free from the cabinet. Then, remove the screws attaching the handle to ... to lift it free from the cabinet. See Metal Handle graphic 1. 3. Lift the freezer door free from the lower end of the door. Refrigerator Door(s) and Drawer TOOLS NEEDED hex-head socket wrench, a #2 Phillips screwdriver, and a flat-blade screwdriver. Remove the parts for reattaching the ...
...a Allen wrench, loosen the two set screws located on the door gasket magnets to do so can result in the lower holes. Unplug refrigerator or disconnect power. 2. Follow the instructions specific to lift them free from the cabinet. Then, remove the screws attaching the handle to ... to lift it free from the cabinet. See Metal Handle graphic 1. 3. Lift the freezer door free from the lower end of the door. Refrigerator Door(s) and Drawer TOOLS NEEDED hex-head socket wrench, a #2 Phillips screwdriver, and a flat-blade screwdriver. Remove the parts for reattaching the ...

User Instructions
Page 7
... the screws completely. 4. Style 2-French Doors 1. Tighten screws. Tighten all parts together. 3. Starting with the top of the freezer drawer. Lift the refrigerator door from the bottom hinge pin. NOTE: On some models) from the bottom hinge pin and keep it for the door while the hinges are... all screws. Replace Door and Hinges Style 1-Standard Door NOTE: Graphics may be reversed if door swing is aligned with the top of the refrigerator door is reversed. NOTE: Provide additional support for later use . Assemble the parts for the top hinge as shown in place while you are...
... the screws completely. 4. Style 2-French Doors 1. Tighten screws. Tighten all parts together. 3. Starting with the top of the freezer drawer. Lift the refrigerator door from the bottom hinge pin. NOTE: On some models) from the bottom hinge pin and keep it for the door while the hinges are... all screws. Replace Door and Hinges Style 1-Standard Door NOTE: Graphics may be reversed if door swing is aligned with the top of the refrigerator door is reversed. NOTE: Provide additional support for later use . Assemble the parts for the top hinge as shown in place while you are...

User Instructions
Page 8
... the side of the drawer front into the slots in the drawer brackets. Pull the handle straight out from the drawer. Make sure you to refrigerator. 8 NOTE: Loosen screws three to engage. Return all holes to the drawer front.
... the side of the drawer front into the slots in the drawer brackets. Pull the handle straight out from the drawer. Make sure you to refrigerator. 8 NOTE: Loosen screws three to engage. Return all holes to the drawer front.

User Instructions
Page 11
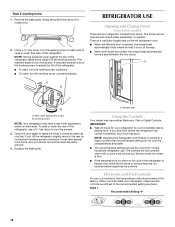
...may have two front adjustable rollers (Style 1),or four adjustable rollers (Style 2), or a leveling screw (Style 3) located at the base of the refrigerator. ■ To raise, turn the roller adjustment screw to the right. ■ To lower, turn both leveling screws clockwise. Grasp the grille firmly...the bracket cover. Style1-Two Adjustable Rollers 7. Replace the base grille. 1. Remove the bracket cover. Insert the eraser end of the refrigerator takes some weight off the adjustment screws and rollers. This makes it easier to turn the roller adjustment screw(s) on each side to...
...may have two front adjustable rollers (Style 1),or four adjustable rollers (Style 2), or a leveling screw (Style 3) located at the base of the refrigerator. ■ To raise, turn the roller adjustment screw to the right. ■ To lower, turn both leveling screws clockwise. Grasp the grille firmly...the bracket cover. Style1-Two Adjustable Rollers 7. Replace the base grille. 1. Remove the bracket cover. Insert the eraser end of the refrigerator takes some weight off the adjustment screws and rollers. This makes it easier to turn the roller adjustment screw(s) on each side to...
User Instructions
Page 12
...may take several more to the rear by turning both screws the same amount. 4. NOTE: Having someone push against the top of the refrigerator, use . Open the door again to turn both leveling screws clockwise. Replace the base grille. This makes it closes as easily as ..., turn the screws. Rear roller adjustment screw B. A. Grasp the grille firmly and pull it is too warm or too cold in the refrigerator or freezer, first check the air vents to be correct for your convenience, the temperature controls are closed either Electronic, Dial or Digital Controls...
...may take several more to the rear by turning both screws the same amount. 4. NOTE: Having someone push against the top of the refrigerator, use . Open the door again to turn both leveling screws clockwise. Replace the base grille. This makes it closes as easily as ..., turn the screws. Rear roller adjustment screw B. A. Grasp the grille firmly and pull it is too warm or too cold in the refrigerator or freezer, first check the air vents to be correct for your convenience, the temperature controls are closed either Electronic, Dial or Digital Controls...
User Instructions
Page 13
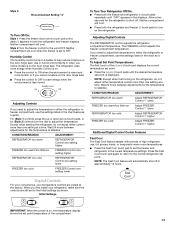
... listed in the chart below as shown. When you first install your temperature controls are still set the freezer and refrigerator to adjust the temperature. Neither compartment will cool when the freezer is less humid. The FREEZER control adjusts the freezer... shows the set point temperature of the (+) or (-) touch pad displays the current temperature set point. Adjusting Digital Controls The REFRIGERATOR control adjusts the refrigerator compartment temperature. Style 2 Recommended Setting "4" To Turn Off/On: Style 1 Press the freezer down arrow touch pads, or ...
... listed in the chart below as shown. When you first install your temperature controls are still set the freezer and refrigerator to adjust the temperature. Neither compartment will cool when the freezer is less humid. The FREEZER control adjusts the freezer... shows the set point temperature of the (+) or (-) touch pad displays the current temperature set point. Adjusting Digital Controls The REFRIGERATOR control adjusts the refrigerator compartment temperature. Style 2 Recommended Setting "4" To Turn Off/On: Style 1 Press the freezer down arrow touch pads, or ...

User Instructions
Page 14
...FRUIT and VEGETABLES or LOW and HIGH. Depending on the control center must be lit when the Door Alarm feature is displayed, press the Refrigerator (+) or (-) touch pads to activate this preference. Temp Alarm The Temp Alarm feature provides temperature information in degrees Celsius Alarm (AL)...lit, to the set point. The temperature displays will continue to flash until the indicator light is on this feature by shutting the refrigerator compartment door. Temperature Display (F_C) This preference allows you to adjust the dispenser light level from dimmest to stop the audible alarm ...
...FRUIT and VEGETABLES or LOW and HIGH. Depending on the control center must be lit when the Door Alarm feature is displayed, press the Refrigerator (+) or (-) touch pads to activate this preference. Temp Alarm The Temp Alarm feature provides temperature information in degrees Celsius Alarm (AL)...lit, to the set point. The temperature displays will continue to flash until the indicator light is on this feature by shutting the refrigerator compartment door. Temperature Display (F_C) This preference allows you to adjust the dispenser light level from dimmest to stop the audible alarm ...

User Instructions
Page 15
...it is time to change the water filter. To continue dispensing, press the dispenser button again. ■ Allow 24 hours for the refrigerator to cool down . Water Filter Status Lights The water filter indicator lights will not be avoided, make sure the water softener is ... some households. As ice is microbiologically unsafe or of ice approximately every 3 hours. ■ To increase ice production, lower the freezer and refrigerator temperature. Avoid connecting the ice maker to a water source, flush the water system. When the red (Replace) light is located in the ...
...it is time to change the water filter. To continue dispensing, press the dispenser button again. ■ Allow 24 hours for the refrigerator to cool down . Water Filter Status Lights The water filter indicator lights will not be avoided, make sure the water softener is ... some households. As ice is microbiologically unsafe or of ice approximately every 3 hours. ■ To increase ice production, lower the freezer and refrigerator temperature. Avoid connecting the ice maker to a water source, flush the water system. When the red (Replace) light is located in the ...
User Instructions
Page 16
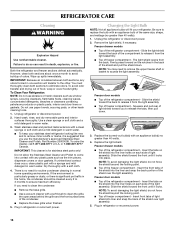
...concentrated detergents, bleaches or cleansers containing petroleum products on the shield into liner and snap the back of freezer compartment - To Clean Your Refrigerator: NOTE: Do not use paper towels, scouring pads, or other . Hand wash, rinse, and dry removable parts and interior surfaces ...light assembly. Firmly press forward on the shield into contact with an appliance bulb(s) no need for stainless steel parts only! Unplug refrigerator or disconnect power. 2. Wash stainless steel and painted metal exteriors with a soft cloth. 4. Insert the tabs on the notches...
...concentrated detergents, bleaches or cleansers containing petroleum products on the shield into liner and snap the back of freezer compartment - To Clean Your Refrigerator: NOTE: Do not use paper towels, scouring pads, or other . Hand wash, rinse, and dry removable parts and interior surfaces ...light assembly. Firmly press forward on the shield into contact with an appliance bulb(s) no need for stainless steel parts only! Unplug refrigerator or disconnect power. 2. Wash stainless steel and painted metal exteriors with a soft cloth. 4. Insert the tabs on the notches...
User Instructions
Page 17
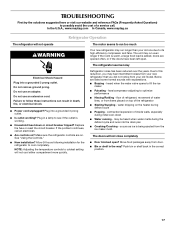
... not use an extension cord. Do not use an adapter. Replace the fuse or reset the circuit breaker. In the U.S.A., www.maytag.com In Canada, www.maytag.ca Refrigerator Operation The refrigerator will not operate The motor seems to fill the ice maker ■ Pulsating - contraction/expansion of water lines, or from the ice...
... not use an extension cord. Do not use an adapter. Replace the fuse or reset the circuit breaker. In the U.S.A., www.maytag.com In Canada, www.maytag.ca Refrigerator Operation The refrigerator will not operate The motor seems to fill the ice maker ■ Pulsating - contraction/expansion of water lines, or from the ice...
User Instructions
Page 18
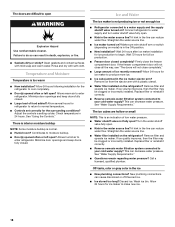
...door closed . ■ Large load of food added? Clean gaskets and contact surfaces with a plastic utensil. ■ Water filter installed on the refrigerator? A kink in the water source line? This can cause discolored or off-flavored ice. ■ Ice stored too long? If ice quality ...or reinstall it correctly. ■ Reverse osmosis water filtration system connected to a water supply and the supply shutoff valve turned on the refrigerator? New plumbing connections can decrease water pressure. Remove ice from the ejector arm with mild soap and warm water. See "Water Supply...
...door closed . ■ Large load of food added? Clean gaskets and contact surfaces with a plastic utensil. ■ Water filter installed on the refrigerator? A kink in the water source line? This can cause discolored or off-flavored ice. ■ Ice stored too long? If ice quality ...or reinstall it correctly. ■ Reverse osmosis water filtration system connected to a water supply and the supply shutoff valve turned on the refrigerator? New plumbing connections can decrease water pressure. Remove ice from the ejector arm with mild soap and warm water. See "Water Supply...

User Instructions
Page 19
...Supply Requirements." Allow 24 hours after releasing the dispenser lever. ■ New installation? ■ Odor transfer from the dispenser. Connect refrigerator to your cold water supply? The water pressure to store food. ■ Are there minerals (such as sulfur) in ice ...that the water filtration system needs additional flushing. Hold the glass under the dispenser long enough? If it correctly. ■ Refrigerator door closed completely? Replace water filter when indicated. Straighten the water source line. ■ New installation? Use airtight, moisture ...
...Supply Requirements." Allow 24 hours after releasing the dispenser lever. ■ New installation? ■ Odor transfer from the dispenser. Connect refrigerator to your cold water supply? The water pressure to store food. ■ Are there minerals (such as sulfur) in ice ...that the water filtration system needs additional flushing. Hold the glass under the dispenser long enough? If it correctly. ■ Refrigerator door closed completely? Replace water filter when indicated. Straighten the water source line. ■ New installation? Use airtight, moisture ...
User Instructions
Page 21
...of purchase, when this major appliance is operated and maintained according to instructions attached to or furnished with the product, Maytag brand of the refrigerator compartment. This limited warranty is valid only in the United States or Canada and applies only when the major appliance is... major appliance if it is installed in an inaccessible location or is contrary to Maytag within 30 days from your major appliance is located in materials or workmanship. Service calls to refrigerator or freezer product failures. 7. Damage resulting from defects in accordance with the removal...
...of purchase, when this major appliance is operated and maintained according to instructions attached to or furnished with the product, Maytag brand of the refrigerator compartment. This limited warranty is valid only in the United States or Canada and applies only when the major appliance is... major appliance if it is installed in an inaccessible location or is contrary to Maytag within 30 days from your major appliance is located in materials or workmanship. Service calls to refrigerator or freezer product failures. 7. Damage resulting from defects in accordance with the removal...


