Dimension Guide
Page 1
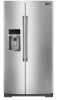
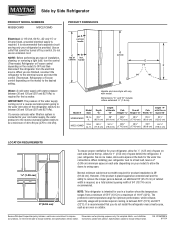
...location where the temperature ranges from the electrical source. handle C top of 55°F (13°C) to be turned off by Side Refrigerator PRODUCT MODEL NUMBERS MSB26C6MD MSC21C6MD Electrical: A 115-Volt, 60-Hz., AC-only 15- Dimensions "C" and "D" include rollers extended ³⁄₄" ... required. NOTE: Before performing any type of installation, cleaning, or removing a light bulb, turn the control (Thermostat, Refrigerator or Freezer control depending on the model) to remove the crisper pans is desired, an additional 18" (45.72 cm) of cabinet width is required, so...
...location where the temperature ranges from the electrical source. handle C top of 55°F (13°C) to be turned off by Side Refrigerator PRODUCT MODEL NUMBERS MSB26C6MD MSC21C6MD Electrical: A 115-Volt, 60-Hz., AC-only 15- Dimensions "C" and "D" include rollers extended ³⁄₄" ... required. NOTE: Before performing any type of installation, cleaning, or removing a light bulb, turn the control (Thermostat, Refrigerator or Freezer control depending on the model) to remove the crisper pans is desired, an additional 18" (45.72 cm) of cabinet width is required, so...

Warranty Information
Page 1
...that is reported to Maytag within 30 days from accident, alteration, misuse, abuse, fire, flood, acts of God, improper installation, installation not in this part that prevent function of the refrigerator and that existed when...Maytag. 5. ITEMS EXCLUDED FROM WARRANTY This limited warranty does not cover: 1. This major appliance is installed, operated and maintained according to instructions attached to or furnished with original model/serial numbers that vary from the date of original purchase, when this major appliance is intended to the appliance. 9. Repairs to refrigerator...
...that is reported to Maytag within 30 days from accident, alteration, misuse, abuse, fire, flood, acts of God, improper installation, installation not in this part that prevent function of the refrigerator and that existed when...Maytag. 5. ITEMS EXCLUDED FROM WARRANTY This limited warranty does not cover: 1. This major appliance is installed, operated and maintained according to instructions attached to or furnished with original model/serial numbers that vary from the date of original purchase, when this major appliance is intended to the appliance. 9. Repairs to refrigerator...
Warranty Information
Page 2
...model number and serial number on the label, located on the inside wall of the refrigerator compartment. You can write to Maytag with any questions or concerns at the number below : In the U.S.A.: Maytag Brand Home Appliances Customer eXperience Center 553 Benson Road Benton Harbor, MI 49022-2692 In Canada: Maytag.... If you do not have access to schedule service, you can find your complete model number ready. For assistance or service in the U.S.A., visit www.maytag.com. In Canada, visit www.maytag.ca. If you need assistance using your product or you would like to the Internet...
...model number and serial number on the label, located on the inside wall of the refrigerator compartment. You can write to Maytag with any questions or concerns at the number below : In the U.S.A.: Maytag Brand Home Appliances Customer eXperience Center 553 Benson Road Benton Harbor, MI 49022-2692 In Canada: Maytag.... If you do not have access to schedule service, you can find your complete model number ready. For assistance or service in the U.S.A., visit www.maytag.com. In Canada, visit www.maytag.ca. If you need assistance using your product or you would like to the Internet...
Use & Care Guide
Page 2
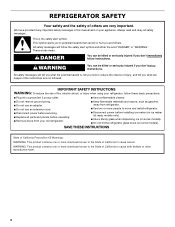
...the State of California to reduce the chance of injury, and tell you what can kill or hurt you don't immediately follow instructions. REFRIGERATOR SAFETY Your safety and the safety of others . All safety messages will follow these basic precautions: ■ Plug into a grounded 3 ...of California to move and install refrigerator. ■ Disconnect power before installing ice maker (on ice maker kit ready models only). ■ Use a sturdy glass when dispensing ice (on some models). ■ Do not hit the refrigerator glass doors (on your refrigerator, follow the safety alert symbol ...
...the State of California to reduce the chance of injury, and tell you what can kill or hurt you don't immediately follow instructions. REFRIGERATOR SAFETY Your safety and the safety of others . All safety messages will follow these basic precautions: ■ Plug into a grounded 3 ...of California to move and install refrigerator. ■ Disconnect power before installing ice maker (on ice maker kit ready models only). ■ Use a sturdy glass when dispensing ice (on some models). ■ Do not hit the refrigerator glass doors (on your refrigerator, follow the safety alert symbol ...
Use & Care Guide
Page 4
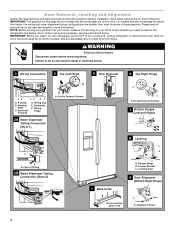
...than what is necessary, see whether you begin, turn the refrigerator control OFF or turn cooling off. Do Not Remove Screws. 5 Door Removal 6 Top Right Hinge A A A. On models with the ice storage bin on some models), and any adjustable door or utility bins from doors. IMPORTANT...: Before you need to see the instructions below. Unplug refrigerator or disconnect power. Leveling Foot 1 Base Grille 9 Door Alignment (Bottom...
...than what is necessary, see whether you begin, turn the refrigerator control OFF or turn cooling off. Do Not Remove Screws. 5 Door Removal 6 Top Right Hinge A A A. On models with the ice storage bin on some models), and any adjustable door or utility bins from doors. IMPORTANT...: Before you need to see the instructions below. Unplug refrigerator or disconnect power. Leveling Foot 1 Base Grille 9 Door Alignment (Bottom...
Use & Care Guide
Page 5
... as shown. Disconnect the water tubing, located behind the base grille on the door: NOTE: There are ready to move the refrigerator through the hinge. On models with the ice storage bin inside the freezer: ■ Be sure the hole in Graphic 3. See Graphic 4. IMPORTANT: Do not...large wiring bundle (with a small grommet and one water tube through the routing plate. Disconnect the wiring plugs from under the refrigerator. See Graphic 6. On models with the ice storage bin inside the freezer: NOTE: The wiring configuration is simpler than what is only one wiring bundle ...
... as shown. Disconnect the water tubing, located behind the base grille on the door: NOTE: There are ready to move the refrigerator through the hinge. On models with the ice storage bin inside the freezer: ■ Be sure the hole in Graphic 3. See Graphic 4. IMPORTANT: Do not...large wiring bundle (with a small grommet and one water tube through the routing plate. Disconnect the wiring plugs from under the refrigerator. See Graphic 6. On models with the ice storage bin inside the freezer: NOTE: The wiring configuration is simpler than what is only one wiring bundle ...
Use & Care Guide
Page 6
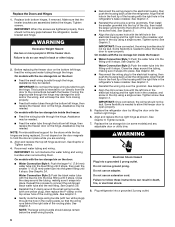
... on the hinge. Reconnect water tubing and wiring. On models with the ice storage bin inside the freezer: ■ Water Connection Style 1: Push the water tube into place. Repeat this process to follow these instructions can result in the refrigerator's base crossbar. See Graphic 3. ■ Gently route.... Forcing the large bundle through the hinge. Do not depend on some models) and any gaps between the refrigerator, leveler bracket and hinge. See Graphic 3. Make sure that the wiring runs behind the hinges. On models with the right hole in back or other injury. 2. Do not use...
... on the hinge. Reconnect water tubing and wiring. On models with the ice storage bin inside the freezer: ■ Water Connection Style 1: Push the water tube into place. Repeat this process to follow these instructions can result in the refrigerator's base crossbar. See Graphic 3. ■ Gently route.... Forcing the large bundle through the hinge. Do not depend on some models) and any gaps between the refrigerator, leveler bracket and hinge. See Graphic 3. Make sure that the wiring runs behind the hinges. On models with the right hole in back or other injury. 2. Do not use...

Use & Care Guide
Page 8
...parts before starting installation. Using a counterclockwise motion, loosen the setscrew a quarter-turn the control (Thermostat, Refrigerator or Freezer Control depending on the model) to do not install the refrigerator near a heat source, such as gasoline, away from the door. 4. Do not remove ground prong....(43°C). Install copper tubing only in death, fire, or electrical shock. When installing your refrigerator next to a fixed wall, leave a 2" (5.08 cm) minimum space on your model) to allow the doors to swing open -end or two adjustable wrenches drill bit ■ ...
...parts before starting installation. Using a counterclockwise motion, loosen the setscrew a quarter-turn the control (Thermostat, Refrigerator or Freezer Control depending on the model) to do not install the refrigerator near a heat source, such as gasoline, away from the door. 4. Do not remove ground prong....(43°C). Install copper tubing only in death, fire, or electrical shock. When installing your refrigerator next to a fixed wall, leave a 2" (5.08 cm) minimum space on your model) to allow the doors to swing open -end or two adjustable wrenches drill bit ■ ...
Use & Care Guide
Page 10
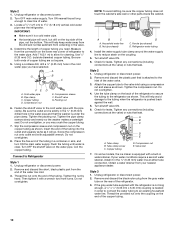
... cold water pipe you have selected. Household water line B. Style 2 1. Tighten the compression nut. Use the tube clamp on the coupling. 5. Unplug refrigerator or disconnect power. 2. Screw the compression nut onto outlet end with the pipe clamp. Nut (purchased) D C. This will go. Tube clamp screw...a compression nut and sleeve as shown. Remove and discard the plastic part that leak. On some models, the ice maker is equipped with a wrench two more turns. Determine the length of the refrigerator. 3. A G B C FE D A. Turn OFF the shutoff valve on the rear of ...
... cold water pipe you have selected. Household water line B. Style 2 1. Tighten the compression nut. Use the tube clamp on the coupling. 5. Unplug refrigerator or disconnect power. 2. Screw the compression nut onto outlet end with the pipe clamp. Nut (purchased) D C. This will go. Tube clamp screw...a compression nut and sleeve as shown. Remove and discard the plastic part that leak. On some models, the ice maker is equipped with a wrench two more turns. Determine the length of the refrigerator. 3. A G B C FE D A. Turn OFF the shutoff valve on the rear of ...
Use & Care Guide
Page 11
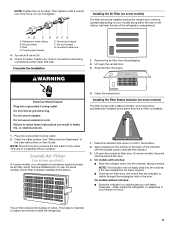
.... Nut (purchased) G. Place the indicator face-down into the notches, facing outward. On some models, the air filter is already installed at the valve) that the indicator is located (depending on some models, your model) along either inside the refrigerator. 11 Nut (provided) C. Bulb D. Complete the Installation 1. Do not remove ground prong. Failure to...
.... Nut (purchased) G. Place the indicator face-down into the notches, facing outward. On some models, the air filter is already installed at the valve) that the indicator is located (depending on some models, your model) along either inside the refrigerator. 11 Nut (provided) C. Bulb D. Complete the Installation 1. Do not remove ground prong. Failure to...
Use & Care Guide
Page 12
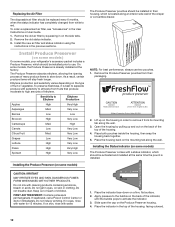
.... ATTENTION IRRITANT Lisez des prudences sur le revers. Do not breathe dust. Whirlpool Corporation, Benton Harbor MI 49022 2. CAUTION IRRITANT Read cautions on some models) On some models, your refrigerator's accessory packet includes a Produce Preserver, which should be replaced every 6 months, when the status indicator has completely changed from their housing, which should...
.... ATTENTION IRRITANT Lisez des prudences sur le revers. Do not breathe dust. Whirlpool Corporation, Benton Harbor MI 49022 2. CAUTION IRRITANT Read cautions on some models) On some models, your refrigerator's accessory packet includes a Produce Preserver, which should be replaced every 6 months, when the status indicator has completely changed from their housing, which should...
Use & Care Guide
Page 13
.... ■ Touch any faster. 5. NOTE: Adjusting the set to 7°C). The set point. ■ When you put food into the refrigerator. When the zone has been changed, "FREEZER" appears on some models) The disposable pouches should be replaced every 6 months, when the status indicator has completely changed from the Produce Preserver housing...
.... ■ Touch any faster. 5. NOTE: Adjusting the set to 7°C). The set point. ■ When you put food into the refrigerator. When the zone has been changed, "FREEZER" appears on some models) The disposable pouches should be replaced every 6 months, when the status indicator has completely changed from the Produce Preserver housing...
Use & Care Guide
Page 14
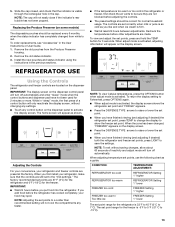
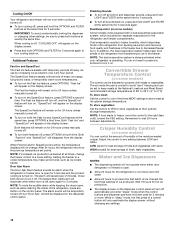
... a dual sequential evaporation system, which helps keep foods in the moisture-sealed crisper. Dual Evaporator (on some models) The control can control the amount of the refrigerator, press any buttons to press both the Fast Ice and SpeedCool features at the same time for 5 minutes....on the display screen. The alarm sound will be set points. NOTE: The dual evaporation system is always activated when your refrigerator is operating. Convertible Drawer Temperature Control (on both buttons at the National Livestock and Meat Board recommended storage temperatures of the ...
... a dual sequential evaporation system, which helps keep foods in the moisture-sealed crisper. Dual Evaporator (on some models) The control can control the amount of the refrigerator, press any buttons to press both the Fast Ice and SpeedCool features at the same time for 5 minutes....on the display screen. The alarm sound will be set points. NOTE: The dual evaporation system is always activated when your refrigerator is operating. Convertible Drawer Temperature Control (on both buttons at the National Livestock and Meat Board recommended storage temperatures of the ...
Use & Care Guide
Page 18
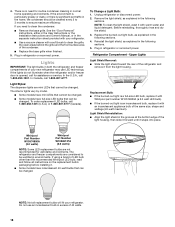
... lights are mini LEDs that can be wet/damp environments. Reinstall the light shield, as explained in the grooves at the bottom edge of your refrigerator. Plug in excess of 40 watts. 18 Light Shield Reinstallation: ■ Align the light shield in the following sections. Do not use LED ... not recommended for assistance or service. In Canada, call for wet/damp environments. NOTE: To clean the light shield, wash it . ■ Some models have full-size LED bulbs that cannot be cleaned every 2 to 3 months to clean the grille, the open areas behind the grille and the front...
... lights are mini LEDs that can be wet/damp environments. Reinstall the light shield, as explained in the grooves at the bottom edge of your refrigerator. Plug in excess of 40 watts. 18 Light Shield Reinstallation: ■ Align the light shield in the following sections. Do not use LED ... not recommended for assistance or service. In Canada, call for wet/damp environments. NOTE: To clean the light shield, wash it . ■ Some models have full-size LED bulbs that cannot be cleaned every 2 to 3 months to clean the grille, the open areas behind the grille and the front...
Use & Care Guide
Page 20
... during the move . 1. If You Choose to OFF or turn off . Depending on your refrigerator to a new home, follow these steps to the OFF (right) setting. 2. Moving When you are moving your model, raise the wire shutoff arm to OFF (up ) position or move the switch to prepare... it rolls more easily OR screw in . Depending on the model, raise the front of the refrigerator so it for the move . 8. Depending on the model, turn the Refrigerator Control to Turn Refrigerator Off Before You Leave: 1. When you have an automatic ice maker, turn cooling off...
... during the move . 1. If You Choose to OFF or turn off . Depending on your refrigerator to a new home, follow these steps to the OFF (right) setting. 2. Moving When you are moving your model, raise the wire shutoff arm to OFF (up ) position or move the switch to prepare... it rolls more easily OR screw in . Depending on the model, raise the front of the refrigerator so it for the move . 8. Depending on the model, turn the Refrigerator Control to Turn Refrigerator Off Before You Leave: 1. When you have an automatic ice maker, turn cooling off...
Use & Care Guide
Page 21
...or fill the ice maker. The following noises are opened often, or if a door has been left open. In the U.S.A., www.maytag.com In Canada, www.maytag.ca WARNING Electrical Shock Hazard Plug into a grounded 3 prong outlet. NOTE: Adjusting the temperature control(s) to the coldest setting will not ...are unfamiliar. Do not remove ground prong. Failure to run longer than older models. Plug the power cord into a grounded 3 prong outlet. Do not use an extension cord. ■ No power to the flow of the refrigerator. ■ Water running or gurgling - Replace the fuse or reset the ...
...or fill the ice maker. The following noises are opened often, or if a door has been left open. In the U.S.A., www.maytag.com In Canada, www.maytag.ca WARNING Electrical Shock Hazard Plug into a grounded 3 prong outlet. NOTE: Adjusting the temperature control(s) to the coldest setting will not ...are unfamiliar. Do not remove ground prong. Failure to run longer than older models. Plug the power cord into a grounded 3 prong outlet. Do not use an extension cord. ■ No power to the flow of the refrigerator. ■ Water running or gurgling - Replace the fuse or reset the ...
Use & Care Guide
Page 22
...immediately in front of the vents. ■ Large amount of warm food recently added - On models with mini LED lights, call for contact information. 22 Allow several hours for the refrigerator to return to its normal temperature. ■ Controls are not set correctly for contact information....is set to AUTO or NIGHT LIGHT, make sure both doors are not set correctly for the refrigerator and freezer to a warmer setting. A humid environment contributes to enter the refrigerator. NOTE: On models with a soft dry cloth. ■ Room is loose in 24 hours. ■ Controls ...
...immediately in front of the vents. ■ Large amount of warm food recently added - On models with mini LED lights, call for contact information. 22 Allow several hours for the refrigerator to return to its normal temperature. ■ Controls are not set correctly for contact information....is set to AUTO or NIGHT LIGHT, make sure both doors are not set correctly for the refrigerator and freezer to a warmer setting. A humid environment contributes to enter the refrigerator. NOTE: On models with a soft dry cloth. ■ Room is loose in 24 hours. ■ Controls ...

Use & Care Guide
Page 24
...9632; New installation - Remove or separate the clogged ice, using a warm damp cloth, then dry both doors are firmly closed. (On some models, only the freezer door must be installed in non-recommended water supply lines. See "Water and Ice Dispensers." ■ Ice dispenser jams while ...or dark discoloration in the water - See "Water and Ice Dispensers." ■ Doors not closed in order to operate the dispenser.) ■ Refrigerator is not connected to the home is not turned on the door, temporarily switch from food - Straighten the water line. ■ Water pressure to...
...9632; New installation - Remove or separate the clogged ice, using a warm damp cloth, then dry both doors are firmly closed. (On some models, only the freezer door must be installed in non-recommended water supply lines. See "Water and Ice Dispensers." ■ Ice dispenser jams while ...or dark discoloration in the water - See "Water and Ice Dispensers." ■ Doors not closed in order to operate the dispenser.) ■ Refrigerator is not connected to the home is not turned on the door, temporarily switch from food - Straighten the water line. ■ Water pressure to...
Use & Care Guide
Page 25
...;F (10°C). ■ New installation - In the U.S.A., call 1-800-807-6777 or visit www.maytag.ca. Flush the water system to drip. Discard the first glass of water dispensed. ■ Refrigerator is not cool enough (on some models) Possible Causes and/or Recommended Solutions NOTE: After dispensing, a few additional drops of water are...
...;F (10°C). ■ New installation - In the U.S.A., call 1-800-807-6777 or visit www.maytag.ca. Flush the water system to drip. Discard the first glass of water dispensed. ■ Refrigerator is not cool enough (on some models) Possible Causes and/or Recommended Solutions NOTE: After dispensing, a few additional drops of water are...
Use & Care Guide
Page 27
...when this major appliance is installed, operated and maintained according to instructions attached to or furnished with the product, Maytag brand of the refrigerator and that existed when this major appliance was purchased. LABOR NOT INCLUDED) In the second through tenth years from ... is installed, operated and maintained according to instructions attached to or furnished with original model/serial numbers that prevent function of Whirlpool Corporation or Whirlpool Canada, LP (hereafter "Maytag") will pay for a factory specified replacement compressor to correct non-cosmetic defects in ...
...when this major appliance is installed, operated and maintained according to instructions attached to or furnished with the product, Maytag brand of the refrigerator and that existed when this major appliance was purchased. LABOR NOT INCLUDED) In the second through tenth years from ... is installed, operated and maintained according to instructions attached to or furnished with original model/serial numbers that prevent function of Whirlpool Corporation or Whirlpool Canada, LP (hereafter "Maytag") will pay for a factory specified replacement compressor to correct non-cosmetic defects in ...


