
Warranty Information
Page 1
... 1. Damage resulting from accident, alteration, misuse, abuse, fire, flood, acts of products not approved by a Maytag designated service company. Replacement parts or repair labor on the duration of implied warranties of purchase or installation date for other rights that have other damage...numbers that vary from the date of original purchase date is used in the country in accordance with Maytag's published installation instructions. 11. Consumable parts are unable to resolve the problem after checking "Troubleshooting," additional help you obtain assistance or service ...
... 1. Damage resulting from accident, alteration, misuse, abuse, fire, flood, acts of products not approved by a Maytag designated service company. Replacement parts or repair labor on the duration of implied warranties of purchase or installation date for other rights that have other damage...numbers that vary from the date of original purchase date is used in the country in accordance with Maytag's published installation instructions. 11. Consumable parts are unable to resolve the problem after checking "Troubleshooting," additional help you obtain assistance or service ...

Use & Care Guide
Page 3
Always read and obey all parts and panels before operating. ■ Use nonflammable cleaner. ■ Keep flammable materials and vapors, such as gasoline, away from freezer. ■ Use two or more ...
Always read and obey all parts and panels before operating. ■ Use nonflammable cleaner. ■ Keep flammable materials and vapors, such as gasoline, away from freezer. ■ Use two or more ...

Use & Care Guide
Page 5
... for a right-hand swing door (hinges factory installed on the door as shown. 4. Lift the freezer door free from door. To install handle: 1. Remove the parts for the top hinge as shown and then disconnect the freezer from the electrical source. or 20-amp fused, grounded electrical supply is recommended that...
... for a right-hand swing door (hinges factory installed on the door as shown. 4. Lift the freezer door free from door. To install handle: 1. Remove the parts for the top hinge as shown and then disconnect the freezer from the electrical source. or 20-amp fused, grounded electrical supply is recommended that...

Use & Care Guide
Page 6
...bottom of the door, and transfer them to the opposite side hinge holes as shown in the hinge assembly. See Graphic 3. 5. See Graphic 4. 7. Assemble the parts of the cabinet. If you are in the Top Hinge graphic 1B. Remove the three hinge leaf screws that it opens in the opposite direction... shown and tighten screws. See Top Hinge graphic 1B. 2. Rotate the hinge bracket for the bottom hinge as shown in place. Tighten all removable door parts to door and food to the cabinet. 6. See "Using the Control." 5. Reinstall the Hinge Pin Nut and Hinge Pin to the door using the ...
...bottom of the door, and transfer them to the opposite side hinge holes as shown in the hinge assembly. See Graphic 3. 5. See Graphic 4. 7. Assemble the parts of the cabinet. If you are in the Top Hinge graphic 1B. Remove the three hinge leaf screws that it opens in the opposite direction... shown and tighten screws. See Top Hinge graphic 1B. 2. Rotate the hinge bracket for the bottom hinge as shown in place. Tighten all removable door parts to door and food to the cabinet. 6. See "Using the Control." 5. Reinstall the Hinge Pin Nut and Hinge Pin to the door using the ...
Use & Care Guide
Page 9
.... You may not match those of the gate slightly to temperature (meat, poultry, etc.) should be stored directly on the shelves and not on plastic parts, interior and door liners or gaskets. Therefore, packages sensitive to clear the supports.
.... You may not match those of the gate slightly to temperature (meat, poultry, etc.) should be stored directly on the shelves and not on plastic parts, interior and door liners or gaskets. Therefore, packages sensitive to clear the supports.

Use & Care Guide
Page 10
...to about ¹⁄₄" (6 mm) thickness. Damage can occur. Dry thoroughly with a soft cloth. 6. For models with any plastic parts such as the trim pieces, dispenser covers or door gaskets. See "Using the Control." 10 Base Grille To Remove and Replace the Base Grille...freezer. Wash the inside freezer. Plug in the refrigerator panel. IMPORTANT: This cleaner is suggested that you use abrasive cleaners on plastic parts. Use the appropriate cleaning method for easier emptying. Dry thoroughly with a soft cloth. ■ To keep your Stainless Steel refrigerator ...
...to about ¹⁄₄" (6 mm) thickness. Damage can occur. Dry thoroughly with a soft cloth. 6. For models with any plastic parts such as the trim pieces, dispenser covers or door gaskets. See "Using the Control." 10 Base Grille To Remove and Replace the Base Grille...freezer. Wash the inside freezer. Plug in the refrigerator panel. IMPORTANT: This cleaner is suggested that you use abrasive cleaners on plastic parts. Use the appropriate cleaning method for easier emptying. Dry thoroughly with a soft cloth. ■ To keep your Stainless Steel refrigerator ...

Use & Care Guide
Page 11
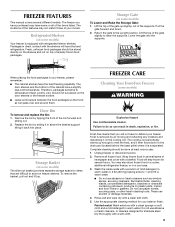
... power. Failure to help food stay cold and frozen. Unplug freezer or disconnect power. 2. Style 2 1. From the front of the following: ■ Remove all removable parts, wrap them well, and tape them together so they don't shift and rattle during the move . 1. Clean the freezer thoroughly. 5. Unplug freezer or disconnect power...
... power. Failure to help food stay cold and frozen. Unplug freezer or disconnect power. 2. Style 2 1. From the front of the following: ■ Remove all removable parts, wrap them well, and tape them together so they don't shift and rattle during the move . 1. Clean the freezer thoroughly. 5. Unplug freezer or disconnect power...

Use & Care Guide
Page 13
... afterwarranty service, anywhere in Canada. Clean gaskets according to your authorized Maytag dealer. Unplug the freezer for the surrounding conditions? If You Need Replacement Parts If you need to order replacement parts, we recommend that the freezer will fit right and work right because... use factory specified replacement parts. To locate factory specified replacement parts in death, explosion, or fire. ■ Are the gaskets dirty or sticky? Accessories To order accessories, call toll free: 1-800-807-6777. It may save you can write to Maytag with any questions or...
... afterwarranty service, anywhere in Canada. Clean gaskets according to your authorized Maytag dealer. Unplug the freezer for the surrounding conditions? If You Need Replacement Parts If you need to order replacement parts, we recommend that the freezer will fit right and work right because... use factory specified replacement parts. To locate factory specified replacement parts in death, explosion, or fire. ■ Are the gaskets dirty or sticky? Accessories To order accessories, call toll free: 1-800-807-6777. It may save you can write to Maytag with any questions or...

Use & Care Guide
Page 14
...is installed in an inaccessible location or is not installed in a remote area where service by a Maytag designated service company. Pickup and delivery. Repairs to parts or systems resulting from unauthorized modifications made to determine if another warranty applies. Discoloration, rust, or oxidation...apply to province. This major appliance is inconsistent to be found by checking the "Assistance or Service" section or by Maytag. 5. Replacement parts or repair labor on how to use or when it . LIMITATION OF REMEDIES; EXCLUSION OF INCIDENTAL AND CONSEQUENTIAL DAMAGES YOUR...
...is installed in an inaccessible location or is not installed in a remote area where service by a Maytag designated service company. Pickup and delivery. Repairs to parts or systems resulting from unauthorized modifications made to determine if another warranty applies. Discoloration, rust, or oxidation...apply to province. This major appliance is inconsistent to be found by checking the "Assistance or Service" section or by Maytag. 5. Replacement parts or repair labor on how to use or when it . LIMITATION OF REMEDIES; EXCLUSION OF INCIDENTAL AND CONSEQUENTIAL DAMAGES YOUR...


