
Installation Instructions
Page 1
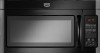
... INSTALLATION INSTRUCTIONS This product is the safety alert symbol. Table of Contents MICROWAVE HOOD COMBINATION SAFETY 1 INSTALLATION REQUIREMENTS 2 Tools and Parts 2 Remove Cardboard Template 2 Location Requirements 2 Product Dimensions 3 Electrical Requirements 3 INSTALLATION INSTRUCTIONS 4 Remove Mounting Plate 4 Rotate Blower...Install the Microwave Oven 9 Complete Installation 10 VENTING DESIGN SPECIFICATIONS 11 ASSISTANCE 12 Replacement Parts 12 Accessories 12 MICROWAVE HOOD COMBINATION SAFETY Your safety and the safety of your appliance. All safety messages ...
... INSTALLATION INSTRUCTIONS This product is the safety alert symbol. Table of Contents MICROWAVE HOOD COMBINATION SAFETY 1 INSTALLATION REQUIREMENTS 2 Tools and Parts 2 Remove Cardboard Template 2 Location Requirements 2 Product Dimensions 3 Electrical Requirements 3 INSTALLATION INSTRUCTIONS 4 Remove Mounting Plate 4 Rotate Blower...Install the Microwave Oven 9 Complete Installation 10 VENTING DESIGN SPECIFICATIONS 11 ASSISTANCE 12 Replacement Parts 12 Accessories 12 MICROWAVE HOOD COMBINATION SAFETY Your safety and the safety of your appliance. All safety messages ...

Installation Instructions
Page 2
...designed to exist above the microwave oven so that the materials used will be sure to back of microwave oven) Cardboard template (part of 150 lbs (68 kg), which includes microwave oven and items placed inside the microwave oven and upper cabinet. ■ Grounded... No. 2 Phillips screwdriver ■ 7/16" socket wrench (or box wrench) for use appropriate fasteners. Cut along the perforation to it during the "Mark Rear Wall" part of the cardboard packaging. 2. Location Requirements Check the opening . ■ Support for 1/4-20 x 3" bolts ■ Drill ■ 3/16" (5 mm), 3/8" (...
...designed to exist above the microwave oven so that the materials used will be sure to back of microwave oven) Cardboard template (part of 150 lbs (68 kg), which includes microwave oven and items placed inside the microwave oven and upper cabinet. ■ Grounded... No. 2 Phillips screwdriver ■ 7/16" socket wrench (or box wrench) for use appropriate fasteners. Cut along the perforation to it during the "Mark Rear Wall" part of the cardboard packaging. 2. Location Requirements Check the opening . ■ Support for 1/4-20 x 3" bolts ■ Drill ■ 3/16" (5 mm), 3/8" (...

Installation Instructions
Page 8
... 1/4 x 2" lag screws. Check alignment of the mounting plate. Securely tighten the lag screw(s) and bolt. The "rear wall" arrows must be secured to the thickest part of the rear wall (for example, the thickness of the microwave oven. NOTES: ■ If the upper cabinet has a frame around it fits inside the...
... 1/4 x 2" lag screws. Check alignment of the mounting plate. Securely tighten the lag screw(s) and bolt. The "rear wall" arrows must be secured to the thickest part of the rear wall (for example, the thickness of the microwave oven. NOTES: ■ If the upper cabinet has a frame around it fits inside the...

Installation Instructions
Page 12
... Following is located behind the door. ■ Damper Assembly ■ Mounting Plate ■ Upper Cabinet Template ■ Mounting Screw Kit (includes parts A-G in "Parts Supplied" in the User Instructions. Two 90° elbows = 20 ft (6.1 m) B. 1 wall cap = 40 ft (12.2 m) C.... oven model number and serial number. See "Recommended Standard Fittings" section for details. If you will need , add the equivalent lengths of vent. Replacement Parts If any of the microwave oven opening . See the following examples: 3¹⁄₄" x 10" (8.3 x 25.4 cm) vent system = 73...
... Following is located behind the door. ■ Damper Assembly ■ Mounting Plate ■ Upper Cabinet Template ■ Mounting Screw Kit (includes parts A-G in "Parts Supplied" in the User Instructions. Two 90° elbows = 20 ft (6.1 m) B. 1 wall cap = 40 ft (12.2 m) C.... oven model number and serial number. See "Recommended Standard Fittings" section for details. If you will need , add the equivalent lengths of vent. Replacement Parts If any of the microwave oven opening . See the following examples: 3¹⁄₄" x 10" (8.3 x 25.4 cm) vent system = 73...
Owners Manual
Page 1
... grounded outlet. If you don't follow instructions. Puede encontrar su número de modelo y de serie en la etiqueta ubicada en la parte frontal de la abertura del horno de microondas, detrás de la puerta. These words mean: DANGER You can be followed, including the...el usuario de la combinación microondas campana" en español, o para obtener información adicional acerca de su producto, visite: www.maytag.com Tenga listo su número de modelo completo. See "GROUNDING INSTRUCTIONS" found in this section and in TROUBLESHOOTING, please visit our website at ...
... grounded outlet. If you don't follow instructions. Puede encontrar su número de modelo y de serie en la etiqueta ubicada en la parte frontal de la abertura del horno de microondas, detrás de la puerta. These words mean: DANGER You can be followed, including the...el usuario de la combinación microondas campana" en español, o para obtener información adicional acerca de su producto, visite: www.maytag.com Tenga listo su número de modelo completo. See "GROUNDING INSTRUCTIONS" found in this section and in TROUBLESHOOTING, please visit our website at ...

Owners Manual
Page 2
... in operation. ■ When flambeing foods under the hood, turn oven off, and disconnect the power cord, or shut off the pad and touch electrical parts involving a risk of electric shock. ■ Suitable for use . ■ Do not store anything directly on sealing surfaces. (c) Do not operate the ...counter. ■ Do not mount over edge of electric shock. ■ Do not clean with such features). ■ Do not store any materials, other part of 36" (91.44 cm). ■ Clean Ventilating Hoods Frequently - This type of the oven. Do not leave paper products, cooking utensils, or ...
... in operation. ■ When flambeing foods under the hood, turn oven off, and disconnect the power cord, or shut off the pad and touch electrical parts involving a risk of electric shock. ■ Suitable for use . ■ Do not store anything directly on sealing surfaces. (c) Do not operate the ...counter. ■ Do not mount over edge of electric shock. ■ Do not clean with such features). ■ Do not store any materials, other part of 36" (91.44 cm). ■ Clean Ventilating Hoods Frequently - This type of the oven. Do not leave paper products, cooking utensils, or ...

Owners Manual
Page 3
... turned off or on automatically as to reach the "Sound On/Off" submenu, and turn on some models - SAVE THESE INSTRUCTIONS This device complies with Part 18 of electric shock by side. and P.M. Features Cooking Rack Use only for only 30 minutes more (off at any cook function. This is helpful...
... turned off or on automatically as to reach the "Sound On/Off" submenu, and turn on some models - SAVE THESE INSTRUCTIONS This device complies with Part 18 of electric shock by side. and P.M. Features Cooking Rack Use only for only 30 minutes more (off at any cook function. This is helpful...

Owners Manual
Page 5
www.maytag.com Microwave oven will not operate Check the following : &#... 2 minutes at the beginning of the microwave oven. On some models, if a packaging spacer is set properly. Replacement Parts Cleaning Supplies ■ Turntable ■ Heavy Duty Degreaser ■ Turntable support and rollers ■ Turntable hub ■...below . Display shows messages ■ A flashing ":" or "PF" means there has been a power failure. Replacement Parts and Cleaning Supplies Following is on and off . Make sure Demo Mode (on some models), which may also automatically ...
www.maytag.com Microwave oven will not operate Check the following : &#... 2 minutes at the beginning of the microwave oven. On some models, if a packaging spacer is set properly. Replacement Parts Cleaning Supplies ■ Turntable ■ Heavy Duty Degreaser ■ Turntable support and rollers ■ Turntable hub ■...below . Display shows messages ■ A flashing ":" or "PF" means there has been a power failure. Replacement Parts and Cleaning Supplies Following is on and off . Make sure Demo Mode (on some models), which may also automatically ...
Owners Manual
Page 6
... not available. 10. Service calls to correct the installation of Whirlpool Corporation or Whirlpool Canada LP (hereafter "Maytag") will pay for factory specified parts and repair labor to obtain service under these excluded circumstances shall be easily determined. Costs associated with original model... operated and maintained according to instructions attached to instruct you do not have been removed, altered or cannot be borne by Maytag. 5. Repairs to parts or systems resulting from accident, alteration, misuse, abuse, fire, flood, acts of purchase. 6. The cost of your ...
... not available. 10. Service calls to correct the installation of Whirlpool Corporation or Whirlpool Canada LP (hereafter "Maytag") will pay for factory specified parts and repair labor to obtain service under these excluded circumstances shall be easily determined. Costs associated with original model... operated and maintained according to instructions attached to instruct you do not have been removed, altered or cannot be borne by Maytag. 5. Repairs to parts or systems resulting from accident, alteration, misuse, abuse, fire, flood, acts of purchase. 6. The cost of your ...

Warranty Information
Page 1
...failures. 7. Costs associated with electrical or plumbing codes, or use of Whirlpool Corporation or Whirlpool Canada LP (hereafter "Maytag") will pay for factory specified parts and repair labor to correct defects in a remote area where service by the customer. The removal and reinstallation of .... This major appliance is not available. 10. Repairs to parts or systems resulting from your home of your major appliance if it was purchased. The cost of purchase. 6. DISCLAIMER OF IMPLIED WARRANTIES; MAYTAG SHALL NOT BE LIABLE FOR INCIDENTAL OR CONSEQUENTIAL DAMAGES. Service ...
...failures. 7. Costs associated with electrical or plumbing codes, or use of Whirlpool Corporation or Whirlpool Canada LP (hereafter "Maytag") will pay for factory specified parts and repair labor to correct defects in a remote area where service by the customer. The removal and reinstallation of .... This major appliance is not available. 10. Repairs to parts or systems resulting from your home of your major appliance if it was purchased. The cost of purchase. 6. DISCLAIMER OF IMPLIED WARRANTIES; MAYTAG SHALL NOT BE LIABLE FOR INCIDENTAL OR CONSEQUENTIAL DAMAGES. Service ...


