
Use & Care Guide
Page 1
...Number Para una versión de estas instrucciones en español, visite www.maytag.com. We have provided many important safety messages in this section and in the microwave oven. MICROWAVE HOOD COMBINATION SAFETY Your safety and the safety of your product model and serial ...properly grounded outlet. See "GROUNDING INSTRUCTIONS" found in this manual and on your new oven at www.maytag.com. Register your appliance. For future reference, please make a note of others . User Guide Microwave Hood Combination THANK YOU for example, closed glass jars are not followed.
...Number Para una versión de estas instrucciones en español, visite www.maytag.com. We have provided many important safety messages in this section and in the microwave oven. MICROWAVE HOOD COMBINATION SAFETY Your safety and the safety of your product model and serial ...properly grounded outlet. See "GROUNDING INSTRUCTIONS" found in this manual and on your new oven at www.maytag.com. Register your appliance. For future reference, please make a note of others . User Guide Microwave Hood Combination THANK YOU for example, closed glass jars are not followed.
Use & Care Guide
Page 2
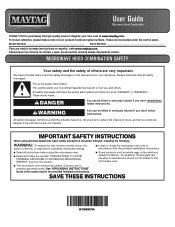
...RESULT IN VERY HOT LIQUIDS SUDDENLY BOILING OVER WHEN THE CONTAINER IS DISTURBED OR A SPOON OR OTHER UTENSIL IS INSERTED INTO THE LIQUID. I The microwave oven should be allowed to accumulate on hood or filter. I To reduce the risk of table or counter. Use extreme care when inserting a ...or vapors in operation. I Do not store anything directly on . If materials inside the oven to facilitate cooking. IMPORTANT SAFETY INSTRUCTIONS I Use the microwave oven only for its intended use as water, coffee, or tea are placed inside the oven ignite, keep oven door closed, turn the fan on...
...RESULT IN VERY HOT LIQUIDS SUDDENLY BOILING OVER WHEN THE CONTAINER IS DISTURBED OR A SPOON OR OTHER UTENSIL IS INSERTED INTO THE LIQUID. I The microwave oven should be allowed to accumulate on hood or filter. I To reduce the risk of table or counter. Use extreme care when inserting a ...or vapors in operation. I Do not store anything directly on . If materials inside the oven to facilitate cooking. IMPORTANT SAFETY INSTRUCTIONS I Use the microwave oven only for its intended use as water, coffee, or tea are placed inside the oven ignite, keep oven door closed, turn the fan on...
Use & Care Guide
Page 3
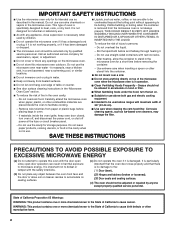
... current. Recommended: ■■ A time-delay fuse or time-delay circuit breaker. ■■ A separate circuit serving only this microwave oven. To cancel timer, touch Kitchen Timer control while the Kitchen Timer countdown is active in standby mode, touch the Kitchen Timer control,... Requirements WARNING Electrical Shock Hazard Plug into an outlet that is properly installed and grounded. Observe all cord connected appliances: The microwave oven must be turned off at any time using the control without having a grounding wire with a fuse or circuit breaker....
... current. Recommended: ■■ A time-delay fuse or time-delay circuit breaker. ■■ A separate circuit serving only this microwave oven. To cancel timer, touch Kitchen Timer control while the Kitchen Timer countdown is active in standby mode, touch the Kitchen Timer control,... Requirements WARNING Electrical Shock Hazard Plug into an outlet that is properly installed and grounded. Observe all cord connected appliances: The microwave oven must be turned off at any time using the control without having a grounding wire with a fuse or circuit breaker....

Use & Care Guide
Page 4
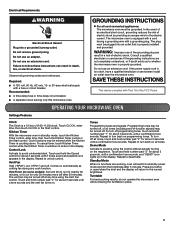
...front of cook time at least 1" (2.5 cm) apart. Preset Defrosting Unwrap food. Clean monthly. To avoid damage to the microwave oven caused by arcing due to 367 g) each, then touch START control. Popcorn Touch POPCORN. Remove two screws on some ...slotted area - Preset Reheating Touch REHEAT, enter number code of food item, enter quantity, then touch the Start control. Cookware and Dinnerware Microwave-Safe ■■ Browning dish (Follow manufacturer recommendations.) ■■ Ceramic glass, glass ■■ China, earthenware (Follow manufacturer...
...front of cook time at least 1" (2.5 cm) apart. Preset Defrosting Unwrap food. Clean monthly. To avoid damage to the microwave oven caused by arcing due to 367 g) each, then touch START control. Popcorn Touch POPCORN. Remove two screws on some ...slotted area - Preset Reheating Touch REHEAT, enter number code of food item, enter quantity, then touch the Start control. Cookware and Dinnerware Microwave-Safe ■■ Browning dish (Follow manufacturer recommendations.) ■■ Ceramic glass, glass ■■ China, earthenware (Follow manufacturer...
Use & Care Guide
Page 5
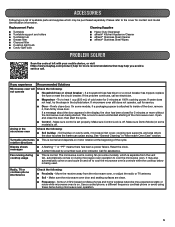
... ■■ affresh® Stainless Steel Wipes PROBLEM SOLVER Scan the code at left with your mobile device, or visit https://www.maytag.com/product_help for contact and model identification information. On some models, if a packaging spacer is attached to inside of available parts and supplies... or a circuit breaker has tripped, replace the fuse or reset the circuit breaker. If water does not heat, try the steps in the microwave oven Check the following: ■■ Soil buildup - Make sure Control Lock is set properly. Some 2.4 GHz-based cordless phones and home...
... ■■ affresh® Stainless Steel Wipes PROBLEM SOLVER Scan the code at left with your mobile device, or visit https://www.maytag.com/product_help for contact and model identification information. On some models, if a packaging spacer is attached to inside of available parts and supplies... or a circuit breaker has tripped, replace the fuse or reset the circuit breaker. If water does not heat, try the steps in the microwave oven Check the following: ■■ Soil buildup - Make sure Control Lock is set properly. Some 2.4 GHz-based cordless phones and home...
Use & Care Guide
Page 6
... and Broken Welds Only) YOUR SOLE AND EXCLUSIVE REMEDY UNDER THIS LIMITED WARRANTY SHALL BE PRODUCT REPAIR AS PROVIDED HEREIN. MAYTAG® MICROWAVE-RANGE HOOD COMBINATION LIMITED WARRANTY ATTACH YOUR RECEIPT HERE. PROOF OF PURCHASE IS REQUIRED TO OBTAIN WARRANTY SERVICE. Please take a few ...minutes to Maytag within 30 days. 10. All warranty service is reported to review the Troubleshooting or Problem Solver section of...
... and Broken Welds Only) YOUR SOLE AND EXCLUSIVE REMEDY UNDER THIS LIMITED WARRANTY SHALL BE PRODUCT REPAIR AS PROVIDED HEREIN. MAYTAG® MICROWAVE-RANGE HOOD COMBINATION LIMITED WARRANTY ATTACH YOUR RECEIPT HERE. PROOF OF PURCHASE IS REQUIRED TO OBTAIN WARRANTY SERVICE. Please take a few ...minutes to Maytag within 30 days. 10. All warranty service is reported to review the Troubleshooting or Problem Solver section of...
Dimension Guide
Page 1
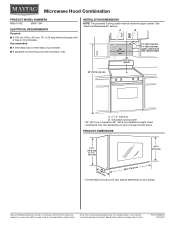
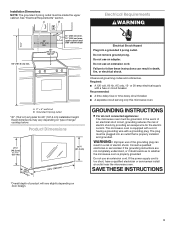
...height. Ref. Recommended: ■■ A time-delay fuse or time-delay circuit breaker. ■■ A separate circuit serving only this microwave oven. See "Electrical Requirements" section. Grounded 3 prong outlet * 30" (76.2 cm) is typical for planning purposes only. Because Whirlpool ...Corporation includes a continuous commitment to improve our products, we reserve the right to change materials and specifications without notice. Microwave Hood Combination PRODUCT MODEL NUMBERS MMV1174D MMV1174F ELECTRICAL REQUIREMENTS Required: ■■ A 120 volt, 60 Hz, AC only...
...height. Ref. Recommended: ■■ A time-delay fuse or time-delay circuit breaker. ■■ A separate circuit serving only this microwave oven. See "Electrical Requirements" section. Grounded 3 prong outlet * 30" (76.2 cm) is typical for planning purposes only. Because Whirlpool ...Corporation includes a continuous commitment to improve our products, we reserve the right to change materials and specifications without notice. Microwave Hood Combination PRODUCT MODEL NUMBERS MMV1174D MMV1174F ELECTRICAL REQUIREMENTS Required: ■■ A 120 volt, 60 Hz, AC only...
Installation Guide
Page 1
..." section for use above electric or gas cooking products up to and including 36" (91.4 cm) wide. Table of Contents MICROWAVE HOOD COMBINATION SAFETY 1 INSTALLATION REQUIREMENTS 2 Tools and Parts 2 Remove Cardboard Template 2 Location Requirements 2 Product Dimensions 3 Electrical Requirements ... follow instructions. This symbol alerts you and others are not followed. Always read and obey all safety messages. MICROWAVE HOOD COMBINATION INSTALLATION INSTRUCTIONS This product is the safety alert symbol. These installation instructions cover different models. W10823831A The...
..." section for use above electric or gas cooking products up to and including 36" (91.4 cm) wide. Table of Contents MICROWAVE HOOD COMBINATION SAFETY 1 INSTALLATION REQUIREMENTS 2 Tools and Parts 2 Remove Cardboard Template 2 Location Requirements 2 Product Dimensions 3 Electrical Requirements ... follow instructions. This symbol alerts you and others are not followed. Always read and obey all safety messages. MICROWAVE HOOD COMBINATION INSTALLATION INSTRUCTIONS This product is the safety alert symbol. These installation instructions cover different models. W10823831A The...
Installation Guide
Page 2
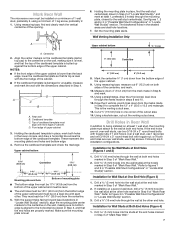
... one 2" x 4" (50.8 x 101.6 mm) wood wall stud and minimum C\," (10 mm) thickness drywall or plaster/lath within cabinet opening where the microwave oven will not discolor, delaminate or sustain other types of the cardboard packaging. 2. C\zn" toggle nuts (2) E. Z\v" x 2" lag screws (2) F. Remove ... template to the side and refer to use as a rear wall template. 1. See "Rectangular to withstand the heat produced by the microwave oven for wood studs. See User Instructions.) NOTE: Depending on reordering, see "Replacement Parts" section. See "Electrical Requirements" section. ...
... one 2" x 4" (50.8 x 101.6 mm) wood wall stud and minimum C\," (10 mm) thickness drywall or plaster/lath within cabinet opening where the microwave oven will not discolor, delaminate or sustain other types of the cardboard packaging. 2. C\zn" toggle nuts (2) E. Z\v" x 2" lag screws (2) F. Remove ... template to the side and refer to use as a rear wall template. 1. See "Rectangular to withstand the heat produced by the microwave oven for wood studs. See User Instructions.) NOTE: Depending on reordering, see "Replacement Parts" section. See "Electrical Requirements" section. ...
Installation Guide
Page 3
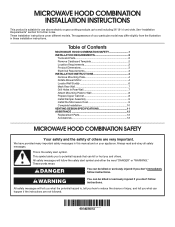
...14" (35.6 cm) max. Recommended: ■■ A time-delay fuse or time-delay circuit breaker. ■■ A separate circuit serving only this microwave oven. Product Dimensions 17¹⁄₈" (43.5 cm) (0.5 cm) 16¹⁄₄" (41.3 cm) (42.15U6c³p⁄m₄t"o)* 29.... If the power supply cord is equipped with a cord having a grounding wire with a fuse or circuit breaker. Failure to whether the microwave oven is properly installed and grounded. GROUNDING INSTRUCTIONS I For all governing codes and ordinances. Grounded 3 prong outlet *30" (76.2 cm)...
...14" (35.6 cm) max. Recommended: ■■ A time-delay fuse or time-delay circuit breaker. ■■ A separate circuit serving only this microwave oven. Product Dimensions 17¹⁄₈" (43.5 cm) (0.5 cm) 16¹⁄₄" (41.3 cm) (42.15U6c³p⁄m₄t"o)* 29.... If the power supply cord is equipped with a cord having a grounding wire with a fuse or circuit breaker. Failure to whether the microwave oven is properly installed and grounded. GROUNDING INSTRUCTIONS I For all governing codes and ordinances. Grounded 3 prong outlet *30" (76.2 cm)...
Installation Guide
Page 4
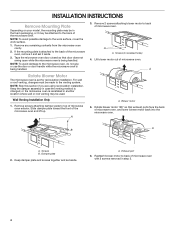
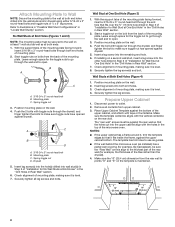
... another location where wall or roof venting may be used. Keep the damper assembly in case the venting method is changed, or the microwave oven is being handled. Blower motor 5. Screws B. Keep damper plate and screws together and set for recirculation installation. Screws (in recessed... NOTE: Skip this section if you are using recirculation installation. Remove screws attaching damper plate to back of microwave oven, and lower blower motor back into the microwave oven. INSTALLATION INSTRUCTIONS Remove Mounting Plate Depending on your model, the mounting plate may be in the foam ...
... another location where wall or roof venting may be used. Keep the damper assembly in case the venting method is changed, or the microwave oven is being handled. Blower motor 5. Screws B. Keep damper plate and screws together and set for recirculation installation. Screws (in recessed... NOTE: Skip this section if you are using recirculation installation. Remove screws attaching damper plate to back of microwave oven, and lower blower motor back into the microwave oven. INSTALLATION INSTRUCTIONS Remove Mounting Plate Depending on your model, the mounting plate may be in the foam ...
Installation Guide
Page 5
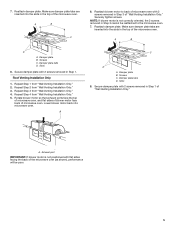
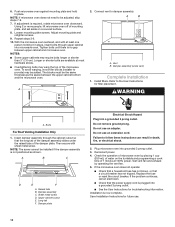
... Only." A B D A. Repeat Step 4 from "Wall Venting Installation Only." 4. Lower blower motor back into the slots in Step 3 of the microwave oven. Damper plate tabs D. Repeat Step 3 from "Wall Venting Installation Only." 5. Screws C. Damper plate tabs D. Repeat Step 2 from "Wall Venting... Installation Only." 2. Reattach damper plate. Reattach blower motor to the microwave oven. 7. Roof Venting Installation Only 1. Screws C. Slots 8. Make sure damper plate tabs are inserted into the slots in Step 1 of the...
... Only." A B D A. Repeat Step 4 from "Wall Venting Installation Only." 4. Lower blower motor back into the slots in Step 3 of the microwave oven. Damper plate tabs D. Repeat Step 3 from "Wall Venting Installation Only." 5. Screws C. Damper plate tabs D. Repeat Step 2 from "Wall Venting... Installation Only." 2. Reattach damper plate. Reattach blower motor to the microwave oven. 7. Roof Venting Installation Only 1. Screws C. Slots 8. Make sure damper plate tabs are inserted into the slots in Step 1 of the...
Installation Guide
Page 6
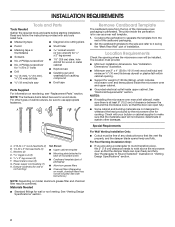
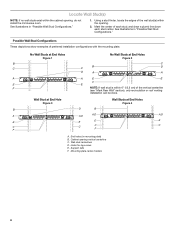
... Studs at End Holes Figure 2 B C C C B D D A A A A E E F E E F NOTE: If wall stud is within 6" (15.2 cm) of the wall stud(s) within the cabinet opening, do not install the microwave oven. Wall stud centerlines D. Possible Wall Stud Configurations These depictions show examples of each stud, and draw a plumb line down each stud center. Cabinet opening...
... Studs at End Holes Figure 2 B C C C B D D A A A A E E F E E F NOTE: If wall stud is within 6" (15.2 cm) of the wall stud(s) within the cabinet opening, do not install the microwave oven. Wall stud centerlines D. Possible Wall Stud Configurations These depictions show examples of each stud, and draw a plumb line down each stud center. Cabinet opening...
Installation Guide
Page 7
... the centerline. 5. D. or if both end holes. Drill a C\zn" (5 mm) hole into the studs at both end holes are 3 installation configurations. Mark Rear Wall The microwave oven must each other. Installation for Wall Stud at the other end hole. Cut a C\v" (19 mm) hole in Step 3 of "Mark Rear Wall." 7 Align the...
... the centerline. 5. D. or if both end holes. Drill a C\zn" (5 mm) hole into the studs at both end holes are 3 installation configurations. Mark Rear Wall The microwave oven must each other. Installation for Wall Stud at the other end hole. Cut a C\v" (19 mm) hole in Step 3 of "Mark Rear Wall." 7 Align the...
Installation Guide
Page 8
... bolts to the thickest part of the rear wall (for No Wall Studs at One End Hole" in the "Drill Holes in Step 2 of the microwave oven. Securely tighten the lag screw(s) and bolt. Securely tighten the lag screws. NOTES: ■■ If the upper cabinet has a frame around it, trim.... 6. Prepare Upper Cabinet 1. Place Upper Cabinet Template against drywall. 5. The template has trim lines to use as guides. ■■ If the wall behind the microwave oven (as at One End Hole (Figure 3) 1.
... bolts to the thickest part of the rear wall (for No Wall Studs at One End Hole" in the "Drill Holes in Step 2 of the microwave oven. Securely tighten the lag screw(s) and bolt. Securely tighten the lag screws. NOTES: ■■ If the upper cabinet has a frame around it, trim.... 6. Prepare Upper Cabinet 1. Place Upper Cabinet Template against drywall. 5. The template has trim lines to use as guides. ■■ If the wall behind the microwave oven (as at One End Hole (Figure 3) 1.
Installation Guide
Page 9
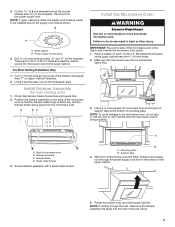
...bushing 6. Drill C\," (10 mm) holes at points "D" and "E" on the template. For Roof Venting Installation Only 7. IMPORTANT: The control side of microwave oven still tilted, thread power supply cord through the wall, make sure the damper assembly fits easily into the vent in the wall cutout. 9 Damper... blade D. With front of the microwave oven is for the power supply cord. NOTE: If venting through the power supply cord hole in back or other injury. Install Damper ...
...bushing 6. Drill C\," (10 mm) holes at points "D" and "E" on the template. For Roof Venting Installation Only 7. IMPORTANT: The control side of microwave oven still tilted, thread power supply cord through the wall, make sure the damper assembly fits easily into the vent in the wall cutout. 9 Damper... blade D. With front of the microwave oven is for the power supply cord. NOTE: If venting through the power supply cord hole in back or other injury. Install Damper ...
Installation Guide
Page 10
...Installation 1. NOTE: The screw cannot be adjusted, skip steps 7-9. 7. Sheet metal screw D. Upper cabinet cutout E. Long tab F. Plug microwave oven into a grounded 3 prong outlet. Adjust mounting plate and retighten screws. 9. NOTES: ■■ Some upper cabinets may be...damper assembly through upper cabinet into a grounded 3 prong outlet. ■■ See the User Instructions for filter placement. Check the operation of microwave oven by operating the vent fan. 5. A B C D E F A. Damper assembly (under the raised tabs of mounting plate, and ...
...Installation 1. NOTE: The screw cannot be adjusted, skip steps 7-9. 7. Sheet metal screw D. Upper cabinet cutout E. Long tab F. Plug microwave oven into a grounded 3 prong outlet. Adjust mounting plate and retighten screws. 9. NOTES: ■■ Some upper cabinets may be...damper assembly through upper cabinet into a grounded 3 prong outlet. ■■ See the User Instructions for filter placement. Check the operation of microwave oven by operating the vent fan. 5. A B C D E F A. Damper assembly (under the raised tabs of mounting plate, and ...
Installation Guide
Page 11
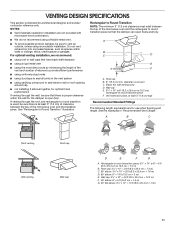
...; using uniformly sized vents ■■ using the most direct route by minimizing the length of the vent and number of the microwave oven and the transition piece. VENTING DESIGN SPECIFICATIONS This section is intended for the damper to open freely and fully. For optimal venting...round transition is used, be sure there is at least 3" (7.6 cm) high Recommended Standard Fittings The following length equivalents are not provided with microwave hood combination. ■■ We do not recommend using a flexible metal vent. ■■ To avoid possible product damage, be sure ...
...; using uniformly sized vents ■■ using the most direct route by minimizing the length of the vent and number of the microwave oven and the transition piece. VENTING DESIGN SPECIFICATIONS This section is intended for the damper to open freely and fully. For optimal venting...round transition is used, be sure there is at least 3" (7.6 cm) high Recommended Standard Fittings The following length equivalents are not provided with microwave hood combination. ■■ We do not recommend using a flexible metal vent. ■■ To avoid possible product damage, be sure ...
Installation Guide
Page 12
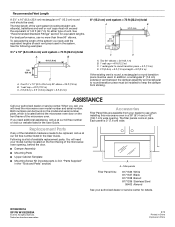
...Panel Kits: 8171336 White 8171337 Black 8171338 Biscuit 8171339 Stainless Steel 99403 Almond See your authorized dealer or service center. The total length of the microwave oven. See the following examples: 3¹⁄₄" x 10" (8.3 x 25.4 cm) vent system = 73 ft (22.2 m) ... your model number located on the model and serial number plate, which is 3" (7.6 cm) wide. See "Recommended Standard Fittings" section for either type of the microwave oven opening . One 3¹⁄₄" x 10" (8.3 x 25.4 cm) 90° elbow = 25 ft (7.6 m) B. 1 wall cap = 40 ft (12.2 m) C....
...Panel Kits: 8171336 White 8171337 Black 8171338 Biscuit 8171339 Stainless Steel 99403 Almond See your authorized dealer or service center. The total length of the microwave oven. See the following examples: 3¹⁄₄" x 10" (8.3 x 25.4 cm) vent system = 73 ft (22.2 m) ... your model number located on the model and serial number plate, which is 3" (7.6 cm) wide. See "Recommended Standard Fittings" section for either type of the microwave oven opening . One 3¹⁄₄" x 10" (8.3 x 25.4 cm) 90° elbow = 25 ft (7.6 m) B. 1 wall cap = 40 ft (12.2 m) C....

Warranty Information
Page 1
...SERVICE. Please have the following components to correct non-cosmetic defects in materials or workmanship in remote locations where an authorized Maytag servicer is reported to or furnished with published user, operator or installation instructions. 2. All warranty service is installed, ...INCIDENTAL AND CONSEQUENTIAL DAMAGES YOUR SOLE AND EXCLUSIVE REMEDY UNDER THIS LIMITED WARRANTY SHALL BE PRODUCT REPAIR AS PROVIDED HEREIN. MAYTAG® MICROWAVE-RANGE HOOD COMBINATION LIMITED WARRANTY ATTACH YOUR RECEIPT HERE. SECOND THROUGH TENTH YEAR LIMITED WARRANTY (CERTAIN COMPONENT PARTS ONLY ...
...SERVICE. Please have the following components to correct non-cosmetic defects in materials or workmanship in remote locations where an authorized Maytag servicer is reported to or furnished with published user, operator or installation instructions. 2. All warranty service is installed, ...INCIDENTAL AND CONSEQUENTIAL DAMAGES YOUR SOLE AND EXCLUSIVE REMEDY UNDER THIS LIMITED WARRANTY SHALL BE PRODUCT REPAIR AS PROVIDED HEREIN. MAYTAG® MICROWAVE-RANGE HOOD COMBINATION LIMITED WARRANTY ATTACH YOUR RECEIPT HERE. SECOND THROUGH TENTH YEAR LIMITED WARRANTY (CERTAIN COMPONENT PARTS ONLY ...


