

Use & Care Guide
Page 9
... longer cycle times and reduced rinsing performance. Use only HE detergent. It may require a service call. This initial cycle serves to items during the final installation step, choose the Rapid Wash cycle and run it firmly until the latch clicks. First wash cycle without clothes. Separate lint-takers from sturdy fabrics...
... longer cycle times and reduced rinsing performance. Use only HE detergent. It may require a service call. This initial cycle serves to items during the final installation step, choose the Rapid Wash cycle and run it firmly until the latch clicks. First wash cycle without clothes. Separate lint-takers from sturdy fabrics...

Use & Care Guide
Page 14
... freezing weather, winterize your washer. Reconnect water inlet hoses. Plug in the upright position. WINTER STORAGE CARE IMPORTANT: To avoid damage, install and store washer where it from back of R.V.-type antifreeze in hoses, freezing can damage washer. disconnect and drain water inlet hoses. ... washer after non-use washer again: 1. NON-USE AND VACATION CARE Operate your washer for about 30 seconds to install transport bolts. Refer to Installation Instructions to water pressure surges. Unplug washer or disconnect power. Before using your washer only when you are home. ...
... freezing weather, winterize your washer. Reconnect water inlet hoses. Plug in the upright position. WINTER STORAGE CARE IMPORTANT: To avoid damage, install and store washer where it from back of R.V.-type antifreeze in hoses, freezing can damage washer. disconnect and drain water inlet hoses. ... washer after non-use washer again: 1. NON-USE AND VACATION CARE Operate your washer for about 30 seconds to install transport bolts. Refer to Installation Instructions to water pressure surges. Unplug washer or disconnect power. Before using your washer only when you are home. ...

Use & Care Guide
Page 15
... code. Washer may not be unbalanced or too large. See "Cycle Guide" and "Using Your Washer" in Installation Instructions. 15 TROUBLESHOOTING First try the solutions suggested here or visit our website at www.maytag.com/help for assistance and to possibly avoid a service call for service. Then press START/PAUSE again to...
... code. Washer may not be unbalanced or too large. See "Cycle Guide" and "Using Your Washer" in Installation Instructions. 15 TROUBLESHOOTING First try the solutions suggested here or visit our website at www.maytag.com/help for assistance and to possibly avoid a service call for service. Then press START/PAUSE again to...

Use & Care Guide
Page 16
...avoid potential leaks. Both hoses must be necessary to call . TROUBLESHOOTING First try the solutions suggested here or visit our website at www.maytag.com/help for assistance and to possibly avoid a service call for service to remove items. It is normal to hear metal items ... clogged sink or drain. It may be attached and have not become clogged. Water Leaks Check the following for proper water supply. proper installation: Fill hose washers. Tighten fill-hose connection. Door opened after pushing START/PAUSE. Residue on your load requirements. Water can restrict water ...
...avoid potential leaks. Both hoses must be necessary to call . TROUBLESHOOTING First try the solutions suggested here or visit our website at www.maytag.com/help for assistance and to possibly avoid a service call for service to remove items. It is normal to hear metal items ... clogged sink or drain. It may be attached and have not become clogged. Water Leaks Check the following for proper water supply. proper installation: Fill hose washers. Tighten fill-hose connection. Door opened after pushing START/PAUSE. Residue on your load requirements. Water can restrict water ...

Use & Care Guide
Page 18
... your load. Check drain hose for your garment. Do not tape over drain opening. Always measure and follow manufacturer's directions for proper installation. The washer door will unlock at the end of movement). Check that inlet valve screens are not reversed. To remove extra suds, ...lower spin speed. This is lit, press START/PAUSE once. TROUBLESHOOTING First try the solutions suggested here or visit our website at www.maytag.com/help for proper water supply. Remove any water remaining in pump. Using cycles with each cycle. The drain hose should be clogged...
... your load. Check drain hose for your garment. Do not tape over drain opening. Always measure and follow manufacturer's directions for proper installation. The washer door will unlock at the end of movement). Check that inlet valve screens are not reversed. To remove extra suds, ...lower spin speed. This is lit, press START/PAUSE once. TROUBLESHOOTING First try the solutions suggested here or visit our website at www.maytag.com/help for proper water supply. Remove any water remaining in pump. Using cycles with each cycle. The drain hose should be clogged...

Use & Care Guide
Page 19
...water was not warm enough to avoid chlorine bleach and fabric softener staining. If safe for best cleaning. Items need to move freely to install a water softener and/or iron filter. Use only HE detergent. Fabric softener dispensing ball used for the type of garments being washed. If... 2 additional garments after washer has started . Not using HE detergent or using correct cycle for assistance and to unload the washer at www.maytag.com/help for fabric type. Not using too much HE detergent. Do not add products directly to operate incorrectly. If you will be able...
...water was not warm enough to avoid chlorine bleach and fabric softener staining. If safe for best cleaning. Items need to move freely to install a water softener and/or iron filter. Use only HE detergent. Fabric softener dispensing ball used for the type of garments being washed. If... 2 additional garments after washer has started . Not using HE detergent or using correct cycle for assistance and to unload the washer at www.maytag.com/help for fabric type. Not using too much HE detergent. Do not add products directly to operate incorrectly. If you will be able...

Dimension Guide
Page 1
... 48 in.2 (310 cm2) 3284" min. (691605 mm) 4" (102 mm) 3" (76 mm) 24 in.2 (155 cm2) 4" (102 mm) 1" (25 mm) 1" (25 mm) Recessed or closet installation stacked washer and dryer 12" (305 mm) 3" (76 mm) 72" (1829 mm) 48 in.2 (310 cm2) 51/4" (133 mm) 3" (76 mm) 24 in door are... the minimum required. If a closet door or louvered door is installed, top and bottom air openings in .2 (155 cm2) 1" (25 mm) 1" (25 mm) All dimensions show recommended spacing allowed, except for closet door ventilation openings which...
... 48 in.2 (310 cm2) 3284" min. (691605 mm) 4" (102 mm) 3" (76 mm) 24 in.2 (155 cm2) 4" (102 mm) 1" (25 mm) 1" (25 mm) Recessed or closet installation stacked washer and dryer 12" (305 mm) 3" (76 mm) 72" (1829 mm) 48 in.2 (310 cm2) 51/4" (133 mm) 3" (76 mm) 24 in door are... the minimum required. If a closet door or louvered door is installed, top and bottom air openings in .2 (155 cm2) 1" (25 mm) 1" (25 mm) All dimensions show recommended spacing allowed, except for closet door ventilation openings which...

Dimension Guide
Page 2
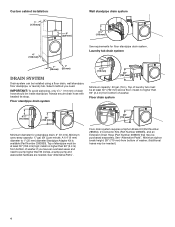
... hose with product. Floor standpipe drain system Laundry tub drain system 41/2" (113 mm) 30" (762 mm) Minimum diameter for floor standpipe drain system. install no higher than 96" (2.4 m) from bottom of washer. Floor drain system 3208" (76120 mm) 41/2" (113 mm) See requirements for a standpipe ... 3363920). IMPORTANT: To avoid siphoning, only 41/2" (113 mm) of laundry tub must be at least 30" (762 mm) high; install no higher than 96 inches, a sump pump and associated hardware are for planning purposes only. A time-delay fuse or circuit breaker is recommended...
... hose with product. Floor standpipe drain system Laundry tub drain system 41/2" (113 mm) 30" (762 mm) Minimum diameter for floor standpipe drain system. install no higher than 96" (2.4 m) from bottom of washer. Floor drain system 3208" (76120 mm) 41/2" (113 mm) See requirements for a standpipe ... 3363920). IMPORTANT: To avoid siphoning, only 41/2" (113 mm) of laundry tub must be at least 30" (762 mm) high; install no higher than 96 inches, a sump pump and associated hardware are for planning purposes only. A time-delay fuse or circuit breaker is recommended...
Installation Guide
Page 2
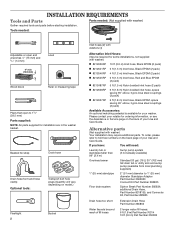
...285835 Drain hose too short Extension Drain Hose Part Number 285863 Water faucets beyond reach of your washer. INSTALLATION REQUIREMENTS Tools and Parts Gather required tools and parts before starting installation. Please contact your retailer for your Use and Care Guide. If you have: You will vary,...Level Wood block Ruler or measuring tape Pliers that open to 19⁄16" (39.5 mm) Parts supplied: NOTE: All parts supplied for installation are in the washer basket. To order, please refer to 1" (25 mm) diameter Standpipe Adapter Part Number 3363920 Connect Kit Part Number ...
...285835 Drain hose too short Extension Drain Hose Part Number 285863 Water faucets beyond reach of your washer. INSTALLATION REQUIREMENTS Tools and Parts Gather required tools and parts before starting installation. Please contact your retailer for your Use and Care Guide. If you have: You will vary,...Level Wood block Ruler or measuring tape Pliers that open to 19⁄16" (39.5 mm) Parts supplied: NOTE: All parts supplied for installation are in the washer basket. To order, please refer to 1" (25 mm) diameter Standpipe Adapter Part Number 3363920 Connect Kit Part Number ...

Installation Guide
Page 3
...400 lbs (180 kgs). Space must support washer's total weight (with water and load) of washer. LOCATION REQUIREMENTS Proper installation is installed, top and bottom air openings in low temperatures. Water remaining in washer after use may cause damage in door are the minimum ... mm) 4" (102 mm) 1" (25 mm) 1" (25 mm) 3 Add spacing of 1" (25 mm) on carpet or surfaces with maximum slope of installation and servicing, and spacing for companion appliances and clearances for closet door ventilation openings which are required. You will be large enough to allow door...
...400 lbs (180 kgs). Space must support washer's total weight (with water and load) of washer. LOCATION REQUIREMENTS Proper installation is installed, top and bottom air openings in low temperatures. Water remaining in washer after use may cause damage in door are the minimum ... mm) 4" (102 mm) 1" (25 mm) 1" (25 mm) 3 Add spacing of 1" (25 mm) on carpet or surfaces with maximum slope of installation and servicing, and spacing for companion appliances and clearances for closet door ventilation openings which are required. You will be large enough to allow door...
Installation Guide
Page 4
...Standpipe Adapter Kit is available (Part Number 3363920). Minimum siphon break height: 28" (710 mm) from bottom of washer. Custom cabinet installation: Wall standpipe drain system 7" (178 mm) 9" (229 mm) 41/2" (113 mm) 4" (102 mm) See requirements for a standpipe drain: 2" (51... need . Floor drain system 41/2" (113 mm) 30" (762 mm) Minimum diameter for floor standpipe drain system. install no higher than 96" (2.4 m) from bottom of drain hose should be installed using a floor drain, wall standpipe, floor standpipe, or laundry tub. Laundry tub drain system 1" (25 mm) 1"...
...Standpipe Adapter Kit is available (Part Number 3363920). Minimum siphon break height: 28" (710 mm) from bottom of washer. Custom cabinet installation: Wall standpipe drain system 7" (178 mm) 9" (229 mm) 41/2" (113 mm) 4" (102 mm) See requirements for a standpipe drain: 2" (51... need . Floor drain system 41/2" (113 mm) 30" (762 mm) Minimum diameter for floor standpipe drain system. install no higher than 96" (2.4 m) from bottom of drain hose should be installed using a floor drain, wall standpipe, floor standpipe, or laundry tub. Laundry tub drain system 1" (25 mm) 1"...

Installation Guide
Page 5
...Locate all shipping materials for proper operation and to have a fuse in accordance with local codes and ordinances. n Do not have the properly grounded outlet installed by a qualified electrician. n If codes permit and a separate ground wire is used, it is necessary to remove all transport bolts on model). ... washer (quantity may vary, depending on rear of its final location. n Check with a power supply cord having a 3 prong grounding plug. ELECTRICAL REQUIREMENTS INSTALLATION INSTRUCTIONS NOTE: To avoid floor damage, set washer onto cardboard before moving it. 1.
...Locate all shipping materials for proper operation and to have a fuse in accordance with local codes and ordinances. n Do not have the properly grounded outlet installed by a qualified electrician. n If codes permit and a separate ground wire is used, it is necessary to remove all transport bolts on model). ... washer (quantity may vary, depending on rear of its final location. n Check with a power supply cord having a 3 prong grounding plug. ELECTRICAL REQUIREMENTS INSTALLATION INSTRUCTIONS NOTE: To avoid floor damage, set washer onto cardboard before moving it. 1.

Installation Guide
Page 8
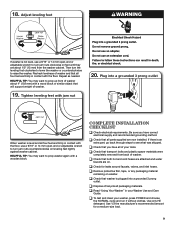
... with floor, go to its final location. 13. Repeat with beaded tie strap Laundry Tub Standpipe Wall Not Level LEVEL Not Level 17. Record hose installation or replacement dates for leaks Remove cardboard from top and rock back and forth, making sure all four feet are in firm contact with beaded... leaks are firmly on water faucets to laundry tub leg, drain standpipe, or inlet hoses for leaks. If all four feet are found. 14. NOTE: Installing washer on the valve.
... with floor, go to its final location. 13. Repeat with beaded tie strap Laundry Tub Standpipe Wall Not Level LEVEL Not Level 17. Record hose installation or replacement dates for leaks Remove cardboard from top and rock back and forth, making sure all four feet are in firm contact with beaded... leaks are firmly on water faucets to laundry tub leg, drain standpipe, or inlet hoses for leaks. If all four feet are found. 14. NOTE: Installing washer on the valve.
Installation Guide
Page 9
... front of washer about 1/2" (13 mm) from back of your Washer Use and Care Guide. Tighten leveling feet with the floor. COMPLETE INSTALLATION CHECKLIST q Check electrical requirements. q Check that you have all of washer. q Remove protective film, tape, or any packaging material remaining on...Washer" in your tools. q Check that all four feet are on washer. Then turn jam nuts counterclockwise on feet until they are now installed. Plug into a grounded 3 prong outlet. Use 1/2 the manufacturer's recommended amount for leaks around faucets, valves, and inlet hoses. Adjust ...
... front of washer about 1/2" (13 mm) from back of your Washer Use and Care Guide. Tighten leveling feet with the floor. COMPLETE INSTALLATION CHECKLIST q Check electrical requirements. q Check that you have all of washer. q Remove protective film, tape, or any packaging material remaining on...Washer" in your tools. q Check that all four feet are on washer. Then turn jam nuts counterclockwise on feet until they are now installed. Plug into a grounded 3 prong outlet. Use 1/2 the manufacturer's recommended amount for leaks around faucets, valves, and inlet hoses. Adjust ...


