
Owners Manual
Page 13
... is finished Promptly remove garments after the wash cycle is selected, the washer will appear in the wash drum. Press POWER/ CANCEL to avoid water leaks. If you will continue. NOTE: The basket will rotate, then the door will unlock, lock again, and then the cycle will be opened and then...
... is finished Promptly remove garments after the wash cycle is selected, the washer will appear in the wash drum. Press POWER/ CANCEL to avoid water leaks. If you will continue. NOTE: The basket will rotate, then the door will unlock, lock again, and then the cycle will be opened and then...

Owners Manual
Page 15
... your washer, it must be properly set up for about 30 seconds to install new transport bolts. IMPORTANT: Call for kinks, cuts, wear or water leaks. Reconnect water inlet hoses. IMPORTANT: To reduce risk of R.V.-type antifreeze in the upright position. Unplug power cord. 5. REINSTALLING/USING WASHER AGAIN To reinstall washer...
... your washer, it must be properly set up for about 30 seconds to install new transport bolts. IMPORTANT: Call for kinks, cuts, wear or water leaks. Reconnect water inlet hoses. IMPORTANT: To reduce risk of R.V.-type antifreeze in the upright position. Unplug power cord. 5. REINSTALLING/USING WASHER AGAIN To reinstall washer...

Owners Manual
Page 16
...amounts of water are not appropriate for proper installation: Water or suds leaking from the door or rear of water for an HE front load washer. TROUBLESHOOTING First try the solutions suggested here or visit our website at www.maytag.com/help for assistance and to possibly avoid a service call for ...service to remove items. It is normal to hear metal items on your washer will reduce sound. Water can cause leaking from door or rear of the glass window to...
...amounts of water are not appropriate for proper installation: Water or suds leaking from the door or rear of water for an HE front load washer. TROUBLESHOOTING First try the solutions suggested here or visit our website at www.maytag.com/help for assistance and to possibly avoid a service call for ...service to remove items. It is normal to hear metal items on your washer will reduce sound. Water can cause leaking from door or rear of the glass window to...

Owners Manual
Page 19
.... This washer has a tight seal to avoid dye transfer. First try the solutions suggested here or visit our website at www.maytag.com/help for assistance and to load. Solution Add load loosely. See "Cleaning Your Washer" in Washer Maintenance . Load dispensers before... starting a cycle. Odors Monthly maintenance not done as cycle is complete to avoid water leaks. See "Cleaning your Washer" section. Not washing like colors together and remove promptly after use. Not using HE detergent or using ...
.... This washer has a tight seal to avoid dye transfer. First try the solutions suggested here or visit our website at www.maytag.com/help for assistance and to load. Solution Add load loosely. See "Cleaning Your Washer" in Washer Maintenance . Load dispensers before... starting a cycle. Odors Monthly maintenance not done as cycle is complete to avoid water leaks. See "Cleaning your Washer" section. Not washing like colors together and remove promptly after use. Not using HE detergent or using ...
Installation Instructions
Page 8
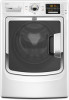
... may enter washer. n Periodically inspect and replace hoses if bulges, kinks, cuts, wear, or leaks are firmly on top edges of washer place level here Attach hot water hose to side. Check for leaks. Place a level on floor. If all four feet are found. 13. Screw coupling by hand... feet are in steps 17 and 18, repeating as shown in firm contact with beaded tie strap. 8 Secure drain hose to check for leaks Remove cardboard from beneath washer. Record hose installation or replacement dates for wall standpipe with floor, go to washer Level Washer Leveling your washer...
... may enter washer. n Periodically inspect and replace hoses if bulges, kinks, cuts, wear, or leaks are firmly on top edges of washer place level here Attach hot water hose to side. Check for leaks. Place a level on floor. If all four feet are found. 13. Screw coupling by hand... feet are in steps 17 and 18, repeating as shown in firm contact with beaded tie strap. 8 Secure drain hose to check for leaks Remove cardboard from beneath washer. Record hose installation or replacement dates for wall standpipe with floor, go to washer Level Washer Leveling your washer...
Installation Instructions
Page 9
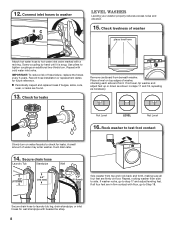
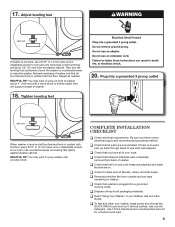
... 3 prong outlet Jam nut When washer is level and all four feet are about 4" (102 mm) with the floor. Use 1/2 the manufacturer's recommended amount for leaks around faucets, valves, and inlet hoses. Repeat as needed. Complete Installation CHECKLIST q Check electrical requirements. q Check that you have all four feet are now installed...
... 3 prong outlet Jam nut When washer is level and all four feet are about 4" (102 mm) with the floor. Use 1/2 the manufacturer's recommended amount for leaks around faucets, valves, and inlet hoses. Repeat as needed. Complete Installation CHECKLIST q Check electrical requirements. q Check that you have all four feet are now installed...


