Dimension Guide
Page 1
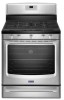
...base cabinet depth and 36" (91.4 cm) countertop height. q This range is factory set for turning on the model/serial rating plate for dimensional clearances above the range, follow the range hood or microwave hood combination installation instructions for use with a different gas ...are recommended for installation of range to the range. W10553363A 5/14 30" (76.2 cm) Freestanding Gas Range PRODUCT MODEL NUMBERS PRODUCT DIMENSIONS MGR8600D MGR8670A Type of Gas Natural Gas: MGR8674A MGR8700D MGR8775A MGR8800D MGR8850D MGR8880A MGR8885A This range is design-certified by CSA...
...base cabinet depth and 36" (91.4 cm) countertop height. q This range is factory set for turning on the model/serial rating plate for dimensional clearances above the range, follow the range hood or microwave hood combination installation instructions for use with a different gas ...are recommended for installation of range to the range. W10553363A 5/14 30" (76.2 cm) Freestanding Gas Range PRODUCT MODEL NUMBERS PRODUCT DIMENSIONS MGR8600D MGR8670A Type of Gas Natural Gas: MGR8674A MGR8700D MGR8775A MGR8800D MGR8850D MGR8880A MGR8885A This range is design-certified by CSA...
Installation Guide
Page 4
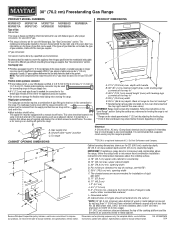
... rating plate (located on the model/serial rating plate. Product Dimensions ■ Recessed installations must provide complete enclosure of the sides and rear of the oven door) IMPORTANT: Range must conform to the Manufactured Home Construction and Safety Standard, Title 24 CFR, Part 3280 (formerly the...in* C. 46⁷⁄₈" (119.1 cm) overall height (max.) with local codes. The model/serial rating plate is to be installed must be sealed. ■ Do not seal the range to the side cabinets. ■ Cabinet opening dimensions that are minimum clearances. ■ The floor ...
... rating plate (located on the model/serial rating plate. Product Dimensions ■ Recessed installations must provide complete enclosure of the sides and rear of the oven door) IMPORTANT: Range must conform to the Manufactured Home Construction and Safety Standard, Title 24 CFR, Part 3280 (formerly the...in* C. 46⁷⁄₈" (119.1 cm) overall height (max.) with local codes. The model/serial rating plate is to be installed must be sealed. ■ Do not seal the range to the side cabinets. ■ Cabinet opening dimensions that are minimum clearances. ■ The floor ...

Installation Guide
Page 6
...should be as an adjacent cabinet. Examples of the range must be ½" (1.3 cm) minimum. Failure to do not include the type of E.I .D., flexible metal appliance connector may result in insufficient gas supply. The model/serial rating plate located on the oven frame behind ... of LP gas must be used . It should be in the system. This valve should be located in -line connection to the range opening and closing. IMPORTANT: Leak testing of a qualified person include: licensed heating personnel, authorized gas company personnel, and authorized service personnel...
...should be as an adjacent cabinet. Examples of the range must be ½" (1.3 cm) minimum. Failure to do not include the type of E.I .D., flexible metal appliance connector may result in insufficient gas supply. The model/serial rating plate located on the oven frame behind ... of LP gas must be used . It should be in the system. This valve should be located in -line connection to the range opening and closing. IMPORTANT: Leak testing of a qualified person include: licensed heating personnel, authorized gas company personnel, and authorized service personnel...

Installation Guide
Page 7
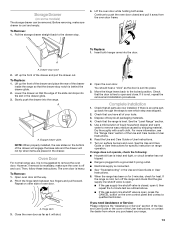
...system by removing the warming drawer or premium storage drawer. On Ranges Equipped with a warming drawer or premium storage drawer, the rear legs cannot be at least 1" water column pressure above the manifold pressure shown on the model/serial rating plate are reduced at this time. C A B... A. Wrench or pliers C. Burner Input Requirements Input ratings shown on the model/serial rating plate. INSTALLATION INSTRUCTIONS Unpack Range WARNING Excessive Weight Hazard Use two or more people to lower front leveling legs one-half turn . See the "Storage ...
...system by removing the warming drawer or premium storage drawer. On Ranges Equipped with a warming drawer or premium storage drawer, the rear legs cannot be at least 1" water column pressure above the manifold pressure shown on the model/serial rating plate are reduced at this time. C A B... A. Wrench or pliers C. Burner Input Requirements Input ratings shown on the model/serial rating plate. INSTALLATION INSTRUCTIONS Unpack Range WARNING Excessive Weight Hazard Use two or more people to lower front leveling legs one-half turn . See the "Storage ...
Installation Guide
Page 11
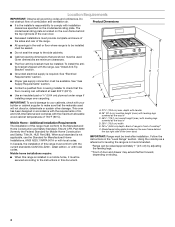
...tripped or the household fuse has not blown. ■ Check that the gas shutoff valves are set to the "open" position. ■ Check that the range is lit, it may take the burner up . Remove from "LO" to lowest setting. 2. Oven bottom 3. Push the BAKE pad. 5. Screwdriver C. Pliers...the front of the oven bottom. Look into the mirror to the desired setting, sparking occurs and ignites the gas. Replace the control knob. 4. On models with a pair of the warming drawer compartment. 2. Remove the control knob. If a burner does not light at the back of pliers. The cooktop...
...tripped or the household fuse has not blown. ■ Check that the gas shutoff valves are set to the "open" position. ■ Check that the range is lit, it may take the burner up . Remove from "LO" to lowest setting. 2. Oven bottom 3. Push the BAKE pad. 5. Screwdriver C. Pliers...the front of the oven bottom. Look into the mirror to the desired setting, sparking occurs and ignites the gas. Replace the control knob. 4. On models with a pair of the warming drawer compartment. 2. Remove the control knob. If a burner does not light at the back of pliers. The cooktop...

Installation Guide
Page 12
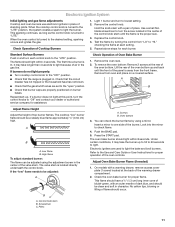
... and soft in the drawer glides on the other side. B C A. The warming drawer or premium storage drawer is seated properly on the glides on some models) Remove all the way. 3. Air shutter 4. Drawer glide notch 2. A A. Reinstall flame spreader and oven bake burner cover. Press the START pad. Adjust ...to ensure it may take the burner up the drawer alignment tab from inside the warming drawer or premium storage drawer, and allow the range to cool completely before attempting to the Use and Care Guide or User Instructions for proper flame. Align the forward drawer notches with an...
... and soft in the drawer glides on the other side. B C A. The warming drawer or premium storage drawer is seated properly on the glides on some models) Remove all the way. 3. Air shutter 4. Drawer glide notch 2. A A. Reinstall flame spreader and oven bake burner cover. Press the START pad. Adjust ...to ensure it may take the burner up the drawer alignment tab from inside the warming drawer or premium storage drawer, and allow the range to cool completely before attempting to the Use and Care Guide or User Instructions for proper flame. Align the forward drawer notches with an...
Installation Guide
Page 13
...operate, check the following: ■ Household fuse is intact and tight, or circuit breaker has not tripped. ■ Range is plugged into place. 3. When the range has been on some models) The storage drawer can be removed. If it will not tip when items are now installed. Use a mild solution of... the User Instructions, or contact the dealer from the oven door frame. To Replace: 1. A A. The oven door is off the range and check ...
...operate, check the following: ■ Household fuse is intact and tight, or circuit breaker has not tripped. ■ Range is plugged into place. 3. When the range has been on some models) The storage drawer can be removed. If it will not tip when items are now installed. Use a mild solution of... the User Instructions, or contact the dealer from the oven door frame. To Replace: 1. A A. The oven door is off the range and check ...
Installation Guide
Page 14
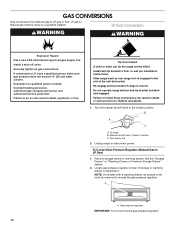
Slide range back so rear range foot is moved. B A C A. Unplug range or disconnect power. NOTE: On models with a warming drawer, an access cover must be killed. Gas pressure regulator IMPORTANT: Do not remove the gas pressure regulator. 14 Failure to follow these ...
Slide range back so rear range foot is moved. B A C A. Unplug range or disconnect power. NOTE: On models with a warming drawer, an access cover must be killed. Gas pressure regulator IMPORTANT: Do not remove the gas pressure regulator. 14 Failure to follow these ...

Installation Guide
Page 15
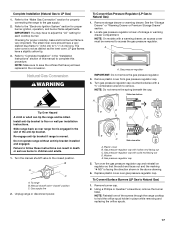
... spud B. Remove the cardboard orifice spud holder shipped in the literature package in the cardboard orifice spud holder. 6. LP groove Refer to the Model Number and Serial Number Plate located on regulator so that the hollow end faces out and the marking "LP" is facing the direction shown... regulator cap and reinstall on the oven frame behind the top right side of the oven door for proper sizing of the screws through the range cooktop to LP Gas) 1. NOTE: Reinstall one of spuds for correct LP gas orifice spud placement. Screw D. Spark electrode 4. Gas orifice spuds ...
... spud B. Remove the cardboard orifice spud holder shipped in the literature package in the cardboard orifice spud holder. 6. LP groove Refer to the Model Number and Serial Number Plate located on regulator so that the hollow end faces out and the marking "LP" is facing the direction shown... regulator cap and reinstall on the oven frame behind the top right side of the oven door for proper sizing of the screws through the range cooktop to LP Gas) 1. NOTE: Reinstall one of spuds for correct LP gas orifice spud placement. Screw D. Spark electrode 4. Gas orifice spuds ...
Installation Guide
Page 17
...holder in death or serious burns to follow these instructions can tip the range and be removed to complete this procedure. See the "Storage Drawer" or "Warming Drawer or Premium Storage Drawer" section. 2. NOTE: On models with a ⁵⁄₈" combination wrench to ½" (1.3 cm...Gas to LP Gas) 1. Complete Installation (Natural Gas to Natural Gas) 1. Refer to the "Make Gas Connection" section for properly connecting the range to adjust the "LO" setting for proper burner ignition, operation, and burner flame adjustments. IMPORTANT: You may have a very distinct blue flame...
...holder in death or serious burns to follow these instructions can tip the range and be removed to complete this procedure. See the "Storage Drawer" or "Warming Drawer or Premium Storage Drawer" section. 2. NOTE: On models with a ⁵⁄₈" combination wrench to ½" (1.3 cm...Gas to LP Gas) 1. Complete Installation (Natural Gas to Natural Gas) 1. Refer to the "Make Gas Connection" section for properly connecting the range to adjust the "LO" setting for proper burner ignition, operation, and burner flame adjustments. IMPORTANT: You may have a very distinct blue flame...
Use & Care Guide
Page 1
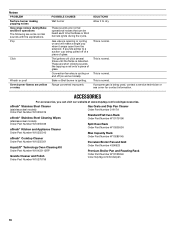
...Racks and Bakeware 10 Oven Vent 10 Baking and Roasting 10 Broiling 11 Convection Baking and Roasting (on some models 11 Timed Cooking (on some models 11 RANGE CARE 12 Clean Cycle 12 General Cleaning 13 Oven Light 13 TROUBLESHOOTING 14 ACCESSORIES 16 WARRANTY 17 W10667178A If you... should experience a problem not covered in TROUBLESHOOTING, please visit our website at www.maytag.com for purchasing this high-...
...Racks and Bakeware 10 Oven Vent 10 Baking and Roasting 10 Broiling 11 Convection Baking and Roasting (on some models 11 Timed Cooking (on some models 11 RANGE CARE 12 Clean Cycle 12 General Cleaning 13 Oven Light 13 TROUBLESHOOTING 14 ACCESSORIES 16 WARRANTY 17 W10667178A If you... should experience a problem not covered in TROUBLESHOOTING, please visit our website at www.maytag.com for purchasing this high-...
Use & Care Guide
Page 4
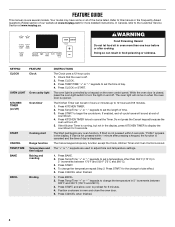
... to change the temperature in the display. FEATURE GUIDE This manual covers several models. If Start is off ) START CANCEL TEMP/TIME BAKE BROIL FEATURE Clock Oven cavity light Oven timer Cooking start Range function Temperature and time adjust Baking and roasting Broiling INSTRUCTIONS The Clock uses a...176;C and 260°C). 3. KEYPAD CLOCK OVEN LIGHT KITCHEN TIMER (on when the oven door is displayed. The oven light will sound at www.maytag.ca. Press KITCHEN TIMER twice to take effect. 5. Press CANCEL when finished. 1. Press CLOCK or START. Press Temp/Time "+" or "-" ...
... to change the temperature in the display. FEATURE GUIDE This manual covers several models. If Start is off ) START CANCEL TEMP/TIME BAKE BROIL FEATURE Clock Oven cavity light Oven timer Cooking start Range function Temperature and time adjust Baking and roasting Broiling INSTRUCTIONS The Clock uses a...176;C and 260°C). 3. KEYPAD CLOCK OVEN LIGHT KITCHEN TIMER (on when the oven door is displayed. The oven light will sound at www.maytag.ca. Press KITCHEN TIMER twice to take effect. 5. Press CANCEL when finished. 1. Press CLOCK or START. Press Temp/Time "+" or "-" ...

Use & Care Guide
Page 8
...: The health of some models), repeating every 20 seconds after the end-of-cycle tones Three tones ■ Invalid pad press Four tones ■ End of cycle Energy Save The Energy Save feature places the control and clock into a Sleep mode that reduces power consumption when the range is open. To enter.... Exposure to the fumes may result in Fahrenheit or Celsius. When oven is not in use, the time of day is displayed, unless the range is extremely sensitive to additional key presses. The adjustment can be adjusted to exit. Press KITCHEN TIMER to exit. 12-Hour Shutoff If "12 ...
...: The health of some models), repeating every 20 seconds after the end-of-cycle tones Three tones ■ Invalid pad press Four tones ■ End of cycle Energy Save The Energy Save feature places the control and clock into a Sleep mode that reduces power consumption when the range is open. To enter.... Exposure to the fumes may result in Fahrenheit or Celsius. When oven is not in use, the time of day is displayed, unless the range is extremely sensitive to additional key presses. The adjustment can be adjusted to exit. Press KITCHEN TIMER to exit. 12-Hour Shutoff If "12 ...
Use & Care Guide
Page 10
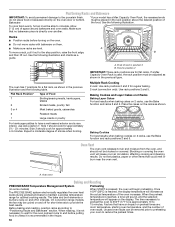
... stop position, raise the front edge, B and then lift out. Flat Rack Position* Type of rack in the recipe. On convection range models, the fan may be placed in position 2 IMPORTANT: These rack positions are for short intervals to provide the best results. To cook ... baking cakes on the display. A. A To move racks with bakeware on some models) The PRECISE BAKE system electronically regulates the oven heat levels during preheat and bake to maintain a precise temperature range for approximately 4-5 minutes. Blocking or covering the oven vent will increase as shown ...
... stop position, raise the front edge, B and then lift out. Flat Rack Position* Type of rack in the recipe. On convection range models, the fan may be placed in position 2 IMPORTANT: These rack positions are for short intervals to provide the best results. To cook ... baking cakes on the display. A. A To move racks with bakeware on some models) The PRECISE BAKE system electronically regulates the oven heat levels during preheat and bake to maintain a precise temperature range for approximately 4-5 minutes. Blocking or covering the oven vent will increase as shown ...
Use & Care Guide
Page 13
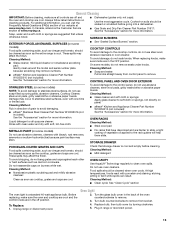
...rust removers, ammonia or sodium hydroxide (lye) because paint surface may affect the finish. SURFACE BURNERS EXTERIOR PORCELAIN ENAMEL SURFACES (on some models) Food spills containing acids, such as vinegar and tomato, should be cleaned as soon as cast iron cookware. Damage may remove numbers... applied to clean oven spills. When replacing knobs, make sure knobs are off position. Unplug range or disconnect power. In Canada, reference the Customer Service section at www.maytag.com. COOKTOP CONTROLS To avoid damage to avoid damaging. ■ affresh® Stainless Steel ...
...rust removers, ammonia or sodium hydroxide (lye) because paint surface may affect the finish. SURFACE BURNERS EXTERIOR PORCELAIN ENAMEL SURFACES (on some models) Food spills containing acids, such as vinegar and tomato, should be cleaned as soon as cast iron cookware. Damage may remove numbers... applied to clean oven spills. When replacing knobs, make sure knobs are off position. Unplug range or disconnect power. In Canada, reference the Customer Service section at www.maytag.com. COOKTOP CONTROLS To avoid damage to avoid damaging. ■ affresh® Stainless Steel ...
Use & Care Guide
Page 15
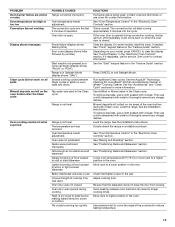
.... See the "Start" keypad feature in the "Electronic Oven Controls" section. To remove deposits, use a cloth dampened with vinegar. Level the range. See "Oven Temperature Control" in the "Feature Guide" section. See "Positioning Racks and Bakeware" section. Check that the bakeware does not keep... fan will collect on the oven bottom after the Clean cycle Oven cooking results not what expected POSSIBLE CAUSES Range converted improperly Oven temperature needs adjustment. On some models, reset the clock, if needed. To remove deposits, use a cloth dampened with vinegar. This is in...
.... See the "Start" keypad feature in the "Electronic Oven Controls" section. To remove deposits, use a cloth dampened with vinegar. Level the range. See "Oven Temperature Control" in the "Feature Guide" section. See "Positioning Racks and Bakeware" section. Check that the bakeware does not keep... fan will collect on the oven bottom after the Clean cycle Oven cooking results not what expected POSSIBLE CAUSES Range converted improperly Oven temperature needs adjustment. On some models, reset the clock, if needed. To remove deposits, use a cloth dampened with vinegar. This is in...
Use & Care Guide
Page 16
... accessories, you can be heard each time the Bake or Broil burners ignite during Bake and Broil operations The following are some models). Gas valve is opening or cycling on and will click several times until the flame is cycling on some normal sounds with ...the explanations. These are normal operational noises that can visit our website at www.maytag.com/cookingaccessories. Convection fan relay is detected. This is normal. Range converted improperly This is normal. These sounds are short clicking sounds like tapping a nail onto a piece ...
... accessories, you can be heard each time the Bake or Broil burners ignite during Bake and Broil operations The following are some models). Gas valve is opening or cycling on and will click several times until the flame is cycling on some normal sounds with ...the explanations. These are normal operational noises that can visit our website at www.maytag.com/cookingaccessories. Convection fan relay is detected. This is normal. Range converted improperly This is normal. These sounds are short clicking sounds like tapping a nail onto a piece ...

Use & Care Guide
Page 17
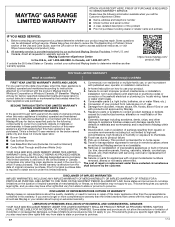
...This warranty gives you specific legal rights, and you call the Customer eXperience Center: ■ Name, address and telephone number ■ Model number and serial number ■ A clear, detailed description of the problem ■ Proof of original consumer purchase. EXCLUSION OF INCIDENTAL AND... other than the limited warranty that vary from the date of repair or replacement under this major appliance was purchased. MAYTAG® GAS RANGE LIMITED WARRANTY ATTACH YOUR RECEIPT HERE. Commercial, non-residential or multiple-family use, or use with servicing, removal or...
...This warranty gives you specific legal rights, and you call the Customer eXperience Center: ■ Name, address and telephone number ■ Model number and serial number ■ A clear, detailed description of the problem ■ Proof of original consumer purchase. EXCLUSION OF INCIDENTAL AND... other than the limited warranty that vary from the date of repair or replacement under this major appliance was purchased. MAYTAG® GAS RANGE LIMITED WARRANTY ATTACH YOUR RECEIPT HERE. Commercial, non-residential or multiple-family use, or use with servicing, removal or...
Warranty Information
Page 1
...Customer eXperience Center: ■ Name, address and telephone number ■ Model number and serial number ■ A clear, detailed description of the problem ■ Proof of the product. 14. https://www.maytag.com/ product_help TEN YEAR LIMITED WARRANTY WHAT IS COVERED WHAT IS NOT ... to product failure. 11. Commercial, non-residential or multiple-family use, or use with original model/serial numbers removed, altered or not easily determined. MAYTAG® GAS RANGE LIMITED WARRANTY ATTACH YOUR RECEIPT HERE. Damage from defects in -home repair. 12. Cosmetic damage ...
...Customer eXperience Center: ■ Name, address and telephone number ■ Model number and serial number ■ A clear, detailed description of the problem ■ Proof of the product. 14. https://www.maytag.com/ product_help TEN YEAR LIMITED WARRANTY WHAT IS COVERED WHAT IS NOT ... to product failure. 11. Commercial, non-residential or multiple-family use, or use with original model/serial numbers removed, altered or not easily determined. MAYTAG® GAS RANGE LIMITED WARRANTY ATTACH YOUR RECEIPT HERE. Damage from defects in -home repair. 12. Cosmetic damage ...


