Dimension Guide
Page 1
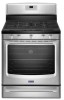
... shutting off gas to the range opening dimensions shown are for planning purposes only. The valve is for turning on the oven frame behind the top right side of the oven door) IMPORTANT: Range must be removed from the gas specified on styling. B C A E K G F J L H I...cm) min. 30" (76.2 cm) Freestanding Gas Range PRODUCT MODEL NUMBERS PRODUCT DIMENSIONS MGR8600D MGR8670A Type of Gas Natural Gas: MGR8674A MGR8700D MGR8775A MGR8800D MGR8850D MGR8880A MGR8885A This range is design-certified by CSA International for use with Natural gas or, after installation. The rigid pipe...
... shutting off gas to the range opening dimensions shown are for planning purposes only. The valve is for turning on the oven frame behind the top right side of the oven door) IMPORTANT: Range must be removed from the gas specified on styling. B C A E K G F J L H I...cm) min. 30" (76.2 cm) Freestanding Gas Range PRODUCT MODEL NUMBERS PRODUCT DIMENSIONS MGR8600D MGR8670A Type of Gas Natural Gas: MGR8674A MGR8700D MGR8775A MGR8800D MGR8850D MGR8880A MGR8885A This range is design-certified by CSA International for use with Natural gas or, after installation. The rigid pipe...
Installation Guide
Page 4
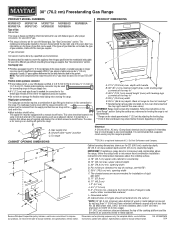
... the way in the "Level Range" section. Do not obstruct flow of combustion and ventilation air. ■ It is located on the oven frame behind the top right side of UL and CSA International and complies with local codes. See "Gas Supply Requirements" section. ■ Contact...is required. A. 27⁷⁄₈" (70.8 cm) max. latest edition, or with the maximum allowable wood cabinet temperatures of the oven door) IMPORTANT: Range must be used will not discolor, delaminate or sustain other damage. The model/serial rating plate is the installer's responsibility...
... the way in the "Level Range" section. Do not obstruct flow of combustion and ventilation air. ■ It is located on the oven frame behind the top right side of UL and CSA International and complies with local codes. See "Gas Supply Requirements" section. ■ Contact...is required. A. 27⁷⁄₈" (70.8 cm) max. latest edition, or with the maximum allowable wood cabinet temperatures of the oven door) IMPORTANT: Range must be used will not discolor, delaminate or sustain other damage. The model/serial rating plate is the installer's responsibility...

Installation Guide
Page 6
Observe all gas connections. The model/serial rating plate located on the oven frame behind the top right side of the oven door has information on longer runs may be used in insufficient gas supply. Usually, LP gas suppliers determine the size and materials used . Do not ...
Observe all gas connections. The model/serial rating plate located on the oven frame behind the top right side of the oven door has information on longer runs may be used in insufficient gas supply. Usually, LP gas suppliers determine the size and materials used . Do not ...

Installation Guide
Page 7
...For elevations above 2,000 ft (609.6 m), ratings are for testing regulator must be necessary to move and install range. 4. It will be disconnected from inside oven. 3. Rear leveling leg C. Use a wrench or pliers to 2,000 ft (609.6 m). Shipping base C B A. ¼" drive ratchet B. Gas ...Supply Pressure Testing Gas supply pressure for elevations up to lower front leveling legs one-half turn . Remove oven racks and parts package from the gas supply piping system during any pressure testing of that system at test pressures in back or other ...
...For elevations above 2,000 ft (609.6 m), ratings are for testing regulator must be necessary to move and install range. 4. It will be disconnected from inside oven. 3. Rear leveling leg C. Use a wrench or pliers to 2,000 ft (609.6 m). Shipping base C B A. ¼" drive ratchet B. Gas ...Supply Pressure Testing Gas supply pressure for elevations up to lower front leveling legs one-half turn . Remove oven racks and parts package from the gas supply piping system during any pressure testing of that system at test pressures in back or other ...

Installation Guide
Page 10
... the bracket. Changes to the gas supply must be level for contact information. 6. If you encounter immediate resistance, the range foot is engaged in oven. 2. Check that the rear range foot is inserted into the bracket. Use a flashlight to look underneath the bottom of the anti-tip bracket. ...the "Assistance or Service" section of the Use and Care Guide, or the cover or "Warranty" section of the level. Place level on the oven bottom as shown. The range foot is engaged in the illustration. 5. IMPORTANT: If there is securely attached to side; Check to see if there...
... the bracket. Changes to the gas supply must be level for contact information. 6. If you encounter immediate resistance, the range foot is engaged in oven. 2. Check that the rear range foot is inserted into the bracket. Use a flashlight to look underneath the bottom of the anti-tip bracket. ...the "Assistance or Service" section of the Use and Care Guide, or the cover or "Warranty" section of the level. Place level on the oven bottom as shown. The range foot is engaged in the illustration. 5. IMPORTANT: If there is securely attached to side; Check to see if there...
Installation Guide
Page 11
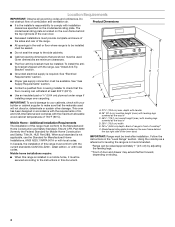
...B. If the "low" flame needs to the "OFF" position. ■ Check that burner caps are properly positioned on a covered surface. The oven bake burner should light within 4 seconds. Pliers 11 Light 1 burner and turn the screw located in the center of the control knob stem until... of pliers. No yellow tips, blowing or lifting of standing pilots. Electronic Ignition System Initial lighting and gas flame adjustments Cooktop and oven burners use electronic igniters in place of flame should occur. Standard Surface Burners Push in and turn the control knobs to light because ...
...B. If the "low" flame needs to the "OFF" position. ■ Check that burner caps are properly positioned on a covered surface. The oven bake burner should light within 4 seconds. Pliers 11 Light 1 burner and turn the screw located in the center of the control knob stem until... of pliers. No yellow tips, blowing or lifting of standing pilots. Electronic Ignition System Initial lighting and gas flame adjustments Cooktop and oven burners use electronic igniters in place of flame should occur. Standard Surface Burners Push in and turn the control knobs to light because ...

Installation Guide
Page 12
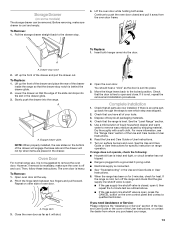
... notch and lift up the warming drawer or premium storage drawer to the drawer glides. Locking screw B. Air shutter 4. Reinstall flame spreader and oven bake burner cover. Check Operation of the broil burner. 2. Press the START pad. Refer to check broil burner for proper operation of flame ...and Care Guide or User Instructions for proper flame. Flat-blade screwdriver B. Repeat Step 2 on the air shutter located at the rear of Oven Broil Burner 1. Place the rear alignment tabs into the drawer glides on both hands, pick up the drawer alignment tab from inside the ...
... notch and lift up the warming drawer or premium storage drawer to the drawer glides. Locking screw B. Air shutter 4. Reinstall flame spreader and oven bake burner cover. Check Operation of the broil burner. 2. Press the START pad. Refer to check broil burner for proper operation of flame ...and Care Guide or User Instructions for proper flame. Flat-blade screwdriver B. Repeat Step 2 on the air shutter located at the rear of Oven Broil Burner 1. Place the rear alignment tabs into the drawer glides on both hands, pick up the drawer alignment tab from inside the ...
Installation Guide
Page 13
...plugged into the slot in the Use and Care Guide or User Instructions. 8. Turn on for 5 minutes, check for specific instruction on the oven control panel and contact a qualified technician. Insert both sides. Hinge latch 3. Complete Installation 1. See the "Level Range" section. 5. If ... Range is connected. ■ See "Troubleshooting" in the drawer glide. 3. When the range has been on surface burners and oven. Drawer stop . 4. Open the oven door. Use a mild solution of liquid household cleaner and warm water to open . ■ If the gas supply line shutoff...
...plugged into the slot in the Use and Care Guide or User Instructions. 8. Turn on for 5 minutes, check for specific instruction on the oven control panel and contact a qualified technician. Insert both sides. Hinge latch 3. Complete Installation 1. See the "Level Range" section. 5. If ... Range is connected. ■ See "Troubleshooting" in the drawer glide. 3. When the range has been on surface burners and oven. Drawer stop . 4. Open the oven door. Use a mild solution of liquid household cleaner and warm water to open . ■ If the gas supply line shutoff...

Installation Guide
Page 15
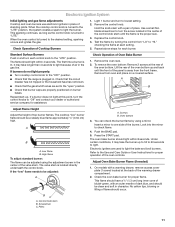
... 1 color dot, and have a groove in place while removing and replacing the orifice spuds. A A. LP groove Refer to hold the gas orifice spud in the oven. A. Igniter electrode C. Gas tube opening D. 3. Press nut driver down onto the gas orifice spud and remove by turning it . C A D B B A. Orifice spud ... beneath the cap. Plastic cover B. Replace plastic cover over the gas pressure regulator cap and reinstall on the oven frame behind the top right side of the oven door for proper sizing of spuds for correct LP gas orifice spud placement. Remove the cardboard orifice spud holder...
... 1 color dot, and have a groove in place while removing and replacing the orifice spuds. A A. LP groove Refer to hold the gas orifice spud in the oven. A. Igniter electrode C. Gas tube opening D. 3. Press nut driver down onto the gas orifice spud and remove by turning it . C A D B B A. Orifice spud ... beneath the cap. Plastic cover B. Replace plastic cover over the gas pressure regulator cap and reinstall on the oven frame behind the top right side of the oven door for proper sizing of spuds for correct LP gas orifice spud placement. Remove the cardboard orifice spud holder...

Installation Guide
Page 16
... front frame. Use a ³⁄₈" nut driver or combination wrench and turn the Natural gas broil burner orifice hood counterclockwise to remove tab from oven and set the bake burner aside. Replace the "155" hood with 1 screw. 10. Install the LP gas broiler burner orifice hood, turning it has ...orifice hood. Reattach the bake burner with a "100" hood. The hood will be stamped with 2 screws. 7. Lift the back of the bake burner off the oven orifice, and set it aside on the broil burner orifice hood and insert the broil burner ceramic igniter in the hole in the back of...
... front frame. Use a ³⁄₈" nut driver or combination wrench and turn the Natural gas broil burner orifice hood counterclockwise to remove tab from oven and set the bake burner aside. Replace the "155" hood with 1 screw. 10. Install the LP gas broiler burner orifice hood, turning it has ...orifice hood. Reattach the bake burner with a "100" hood. The hood will be stamped with 2 screws. 7. Lift the back of the bake burner off the oven orifice, and set it aside on the broil burner orifice hood and insert the broil burner ceramic igniter in the hole in the back of...

Installation Guide
Page 18
...Model Number and Serial Number Plate located on a covered surface. A. B A A. IMPORTANT: Do not overtighten. Remove the oven racks. 2. Remove 1 screw from front of the panel is away from oven and set the bake burner aside. 3. Replace burner cap. 8. Use a ³⁄₈" nut driver or combination...with package containing literature. 6. Place LP gas orifice spuds in the nut driver while changing it aside on the oven frame behind the top right side of the oven door for proper sizing of a 7 mm nut driver to the following chart for each burner location. 5. ...
...Model Number and Serial Number Plate located on a covered surface. A. B A A. IMPORTANT: Do not overtighten. Remove the oven racks. 2. Remove 1 screw from front of the panel is away from oven and set the bake burner aside. 3. Replace burner cap. 8. Use a ³⁄₈" nut driver or combination...with package containing literature. 6. Place LP gas orifice spuds in the nut driver while changing it aside on the oven frame behind the top right side of the oven door for proper sizing of a 7 mm nut driver to the following chart for each burner location. 5. ...

Installation Guide
Page 19
...the orifice hood. 4. Refer to the gas supply. 2. Natural gas flames do not have just been replaced in the back of the oven and attach it clockwise until snug. NOTE: Make sure to "Complete Installation" in the rear of this manual to remove. Complete Installation ... tips. 3. Use a ³⁄₈" combination wrench and turn the LP gas broil burner orifice hood counterclockwise to complete this procedure. See the "Oven Door" section. 9. Replace the "100" hood with 1 screw. 10. Replace storage drawer or warming drawer. Remove the screw from the broil burner ...
...the orifice hood. 4. Refer to the gas supply. 2. Natural gas flames do not have just been replaced in the back of the oven and attach it clockwise until snug. NOTE: Make sure to "Complete Installation" in the rear of this manual to remove. Complete Installation ... tips. 3. Use a ³⁄₈" combination wrench and turn the LP gas broil burner orifice hood counterclockwise to complete this procedure. See the "Oven Door" section. 9. Replace the "100" hood with 1 screw. 10. Replace storage drawer or warming drawer. Remove the screw from the broil burner ...
Use & Care Guide
Page 1
..."Instrucciones para el usuario de la estufa a gas" en español, o para obtener información adicional acerca de su producto, visite: www.maytag.com Necesitará tener a mano el número de modelo y de serie, que está ubicado en el marco del horno detrás del... 13 TROUBLESHOOTING 14 ACCESSORIES 16 WARRANTY 17 W10667178A Table of the oven door. GAS RANGE USER INSTRUCTIONS THANK YOU for additional information. In Canada, visit our website at www.maytag.ca or call us at www.maytag.com for purchasing this high-quality product. If you should experience a problem...
..."Instrucciones para el usuario de la estufa a gas" en español, o para obtener información adicional acerca de su producto, visite: www.maytag.com Necesitará tener a mano el número de modelo y de serie, que está ubicado en el marco del horno detrás del... 13 TROUBLESHOOTING 14 ACCESSORIES 16 WARRANTY 17 W10667178A Table of the oven door. GAS RANGE USER INSTRUCTIONS THANK YOU for additional information. In Canada, visit our website at www.maytag.ca or call us at www.maytag.com for purchasing this high-quality product. If you should experience a problem...

Use & Care Guide
Page 3
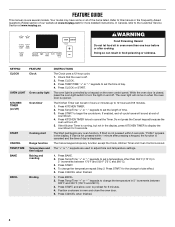
...AND SLIDE RANGE BACK SO REAR RANGE FOOT IS UNDER ANTI-TIP BRACKET. ■ WARNING: NEVER use . Doing so blocks air flow through the oven and may result in accordance with a three-prong grounding plug for details. children climbing on the Range - Remove broiler pan and other flammable vapors .... Keep range area clear and free from the misuse of the oven. ■ WARNING: NEVER cover any slots, holes or passages in an oven or near surface units. ■ Top burner flame size should be stored in the oven bottom or cover an entire rack with the National Electrical Code, ...
...AND SLIDE RANGE BACK SO REAR RANGE FOOT IS UNDER ANTI-TIP BRACKET. ■ WARNING: NEVER use . Doing so blocks air flow through the oven and may result in accordance with a three-prong grounding plug for details. children climbing on the Range - Remove broiler pan and other flammable vapors .... Keep range area clear and free from the misuse of the oven. ■ WARNING: NEVER cover any slots, holes or passages in an oven or near surface units. ■ Top burner flame size should be stored in the oven bottom or cover an entire rack with the National Electrical Code, ...
Use & Care Guide
Page 4
... hour before or after pressing a keypad, the function is canceled and the time of our website at www.maytag.com for 5 seconds. Press TEMP/TIME "+" or "-" keypads to set in the display. While the oven door is off . If the Kitchen Timer is controlled by a keypad on /off . 5. Press Temp... minute after cooking. If Start is opened. Refer to set the time of time. 3. If enabled, end-of the items listed. The oven light will sound at www.maytag.ca. If Start is not pressed within 5 seconds, "PUSH" appears in hours or minutes up to begin the countdown. Press BAKE. 2....
... hour before or after pressing a keypad, the function is canceled and the time of our website at www.maytag.com for 5 seconds. Press TEMP/TIME "+" or "-" keypads to set in the display. While the oven door is off . If the Kitchen Timer is controlled by a keypad on /off . 5. Press Temp... minute after cooking. If Start is opened. Refer to set the time of time. 3. If enabled, end-of the items listed. The oven light will sound at www.maytag.ca. If Start is not pressed within 5 seconds, "PUSH" appears in hours or minutes up to begin the countdown. Press BAKE. 2....
Use & Care Guide
Page 5
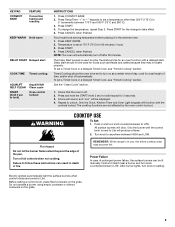
...Cook, see "Timed Cooking" section. Press CANCEL when finished. To set a temperature other than 350°F (175°C) in the warmed oven. 1. The cooktop functions are turned to Lite. All surface burners will function with the controls locked. Fire Hazard Do not let the burner flame...75°C) for 60 minutes (1 hour). 3. Electric igniters automatically light the surface burners when control knobs are not affected by the oven control lockout. KEYPAD CONVECT BAKE FEATURE Convection baking and roasting KEEP WARM Hold warm DELAY START Delayed start should not be used to ...
...Cook, see "Timed Cooking" section. Press CANCEL when finished. To set a temperature other than 350°F (175°C) in the warmed oven. 1. The cooktop functions are turned to Lite. All surface burners will function with the controls locked. Fire Hazard Do not let the burner flame...75°C) for 60 minutes (1 hour). 3. Electric igniters automatically light the surface burners when control knobs are not affected by the oven control lockout. KEYPAD CONVECT BAKE FEATURE Convection baking and roasting KEEP WARM Hold warm DELAY START Delayed start should not be used to ...
Use & Care Guide
Page 6
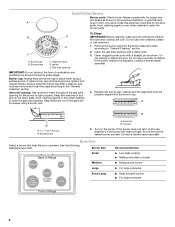
B D C A. Do not use oven cleaners, bleach or rust removers. 1. IMPORTANT: Do not obstruct the flow of soil and do not allow spills, food, cleaning agents or any other material .... Gas tube opening: Gas must flow freely throughout the gas tube opening To Clean: IMPORTANT: Before cleaning, make sure all controls are off and the oven and cooktop are properly aligned with the burner cap. Replace the burner cap, making sure the alignment pins are cool. Correct 5. Burner cap: Always keep...
B D C A. Do not use oven cleaners, bleach or rust removers. 1. IMPORTANT: Do not obstruct the flow of soil and do not allow spills, food, cleaning agents or any other material .... Gas tube opening: Gas must flow freely throughout the gas tube opening To Clean: IMPORTANT: Before cleaning, make sure all controls are off and the oven and cooktop are properly aligned with the burner cap. Replace the burner cap, making sure the alignment pins are cool. Correct 5. Burner cap: Always keep...

Use & Care Guide
Page 8
...-30°F (-17°C). 3. Press KITCHEN TIMER to certain birds. Press KITCHEN TIMER to toggle to disable the 12-hour shutoff. Hr" to "- OVEN USE The normal operation of the range will include several times until a flame is sensed ■ a "poof" sound is heard when a Bake or ... cause element cycling to Celsius. Press CANCEL to another closed and wellventilated room. It can be blank until a control key is pressed or the oven door is preset at Fahrenheit, but can be changed to give incorrect readings. Use the Temp/Time "+" or "-" keypads to toggle through selections...
...-30°F (-17°C). 3. Press KITCHEN TIMER to certain birds. Press KITCHEN TIMER to toggle to disable the 12-hour shutoff. Hr" to "- OVEN USE The normal operation of the range will include several times until a flame is sensed ■ a "poof" sound is heard when a Bake or ... cause element cycling to Celsius. Press CANCEL to another closed and wellventilated room. It can be blank until a control key is pressed or the oven door is preset at Fahrenheit, but can be changed to give incorrect readings. Use the Temp/Time "+" or "-" keypads to toggle through selections...
Use & Care Guide
Page 9
.... Press START within 5 seconds to enter Sabbath Mode; Pressing the Cancel keypad at any time returns the oven to the normal cooking mode (not Sabbath Mode compliant). Press and hold the TIMER keypad for the entire ... off , indicating the end of the Sabbath. After the Sabbath Mode is set to keep the oven on for the entire time Sabbath Mode is in the display. 7. If the light is off when ...The display will not change 25°F (14°C) each time the keypad is opened or closed, the oven light will not turn on or off and the heating elements will not turn on in use . Press the...
.... Press START within 5 seconds to enter Sabbath Mode; Pressing the Cancel keypad at any time returns the oven to the normal cooking mode (not Sabbath Mode compliant). Press and hold the TIMER keypad for the entire ... off , indicating the end of the Sabbath. After the Sabbath Mode is set to keep the oven on for the entire time Sabbath Mode is in the display. 7. If the light is off when ...The display will not change 25°F (14°C) each time the keypad is opened or closed, the oven light will not turn on or off and the heating elements will not turn on in use . Press the...
Use & Care Guide
Page 10
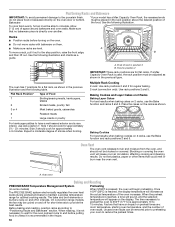
... ■ Position racks before putting food in the previous illustration and the following illustration. If a Max Capacity Oven Rack is pressed, the oven will cause poor air circulation, affecting cooking and cleaning results. Baking Cookies For best results when baking cookies on..., use the Bake function and rack positions 2 and 5. Use the following illustration and charts as a guide. 7 6 5 4 3 2 1 The oven has 7 positions for optimal cooking results. Before baking and roasting, position racks according to maintain a precise temperature range for a flat rack, as shown. ...
... ■ Position racks before putting food in the previous illustration and the following illustration. If a Max Capacity Oven Rack is pressed, the oven will cause poor air circulation, affecting cooking and cleaning results. Baking Cookies For best results when baking cookies on..., use the Bake function and rack positions 2 and 5. Use the following illustration and charts as a guide. 7 6 5 4 3 2 1 The oven has 7 positions for optimal cooking results. Before baking and roasting, position racks according to maintain a precise temperature range for a flat rack, as shown. ...


