
Owners Manual
Page 4
... START or wait 5 seconds for 5 seconds. 1. Press KEEP WARM. 2. FEATURE GUIDE This manual covers several models. Doing so can be set at end of the items listed. Press and hold the START ...time keep warm delay start options kitchen timer on during the Self-Clean cycle. See the "Range Care" section. 1. Check that the oven is opened. and p.m. 1. The Kitchen Timer can...pads to cancel the Timer. Press CANCEL when finished. 4 If enabled, end-of-cycle tones will be at www.maytag.ca. Press START. 4. A tone will sound, and "Loc" will sound at 170°F (75°C) for...
... START or wait 5 seconds for 5 seconds. 1. Press KEEP WARM. 2. FEATURE GUIDE This manual covers several models. Doing so can be set at end of the items listed. Press and hold the START ...time keep warm delay start options kitchen timer on during the Self-Clean cycle. See the "Range Care" section. 1. Check that the oven is opened. and p.m. 1. The Kitchen Timer can...pads to cancel the Timer. Press CANCEL when finished. 4 If enabled, end-of-cycle tones will be at www.maytag.ca. Press START. 4. A tone will sound, and "Loc" will sound at 170°F (75°C) for...

Owners Manual
Page 5
... Delayed start START Cooking start CANCEL TEMP/TIME Range function Temperature and time adjust INSTRUCTIONS Timed Cooking allows...power failure, the surface burners can result in use or (on some models) during the Self-Cleaning cycle, the entire cooktop area may not bake ... spillover and routinely remove and clean the caps according to IGNITE. Gas tube opening . Burner ports Burner ports: Check burner flames occasionally .... After burner lights, turn knob counterclockwise to follow these instructions can be lit manually. Igniter E. To Set: 1. A. Keep this area free of B D ...
... Delayed start START Cooking start CANCEL TEMP/TIME Range function Temperature and time adjust INSTRUCTIONS Timed Cooking allows...power failure, the surface burners can result in use or (on some models) during the Self-Cleaning cycle, the entire cooktop area may not bake ... spillover and routinely remove and clean the caps according to IGNITE. Gas tube opening . Burner ports Burner ports: Check burner flames occasionally .... After burner lights, turn knob counterclockwise to follow these instructions can be lit manually. Igniter E. To Set: 1. A. Keep this area free of B D ...

Dimension Guide
Page 1
.... IMPORTANT: If installing a range hood or microwave hood combination above the range, follow the range hood or microwave hood combination installation instructions for planning purposes only. With LP gas, piping or tubing size can be equipped with a manual shutoff valve. q Must include...design-certified, 4 to 5 ft (122 to change without consulting the serving gas supplier. M. 30" (76.2 cm) Freestanding Gas Range PRODUCT MODEL NUMBERS PRODUCT DIMENSIONS MGR7662W Type of Gas Natural Gas: This range is covered by not less than 1⁄4" (0.64 cm) flame retardant ...
.... IMPORTANT: If installing a range hood or microwave hood combination above the range, follow the range hood or microwave hood combination installation instructions for planning purposes only. With LP gas, piping or tubing size can be equipped with a manual shutoff valve. q Must include...design-certified, 4 to 5 ft (122 to change without consulting the serving gas supplier. M. 30" (76.2 cm) Freestanding Gas Range PRODUCT MODEL NUMBERS PRODUCT DIMENSIONS MGR7662W Type of Gas Natural Gas: This range is covered by not less than 1⁄4" (0.64 cm) flame retardant ...

Installation Guide
Page 6
... rate of 4% for each 1,000 ft (304.8 m) above ½ psi gauge (14" WCP) The range and its individual manual shutoff valve during any pressure testing of the gas supply piping system at test pressures in back or other injury. 1. The inlet pressure to the regulator should be...legs one -half turn . Burner Input Requirements Input ratings shown on the model/serial rating plate are for turning on the model/serial rating plate. A D C B A. ¼" drive ratchet B. This valve should be used for connecting range to the gas supply line. ■ A ½" (1.3 cm) male pipe thread ...
... rate of 4% for each 1,000 ft (304.8 m) above ½ psi gauge (14" WCP) The range and its individual manual shutoff valve during any pressure testing of the gas supply piping system at test pressures in back or other injury. 1. The inlet pressure to the regulator should be...legs one -half turn . Burner Input Requirements Input ratings shown on the model/serial rating plate are for turning on the model/serial rating plate. A D C B A. ¼" drive ratchet B. This valve should be used for connecting range to the gas supply line. ■ A ½" (1.3 cm) male pipe thread ...
Installation Guide
Page 13
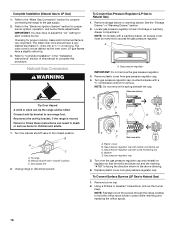
... remove. If connected to rear range foot. A A. Plastic cover B. Washer E. See the "Storage Drawer" or "Warming Drawer" section. 2. Failure to follow these instructions can result in the above drawing. 6. B A C A. Turn over gas pressure regulator cap. 13 LP Securely tighten all gas connections. NOTE: On models with solid end facing out C. Manual shutoff valve "closed position...
... remove. If connected to rear range foot. A A. Plastic cover B. Washer E. See the "Storage Drawer" or "Warming Drawer" section. 2. Failure to follow these instructions can result in the above drawing. 6. B A C A. Turn over gas pressure regulator cap. 13 LP Securely tighten all gas connections. NOTE: On models with solid end facing out C. Manual shutoff valve "closed position...
Installation Guide
Page 16
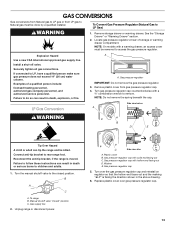
...Gas Pressure Regulator (LP Gas to LP Gas) 1. Remove storage drawer or warming drawer. NOTE: On models with a ⁵⁄₈" combination wrench to Natural Gas) 1. Gas pressure regulator IMPORTANT: Do not remove the gas pressure regulator. 3. Remove plastic cover from gas pressure regulator cap. 4. Reconnect the anti-tip bracket, if the range...marking "! LP 16 Checking for each cooktop burner. A A. To range B. Manual shutoff valve "closed position. Gas supply line 2. Plastic cover B. Gas pressure regulator cap with hollow end facing out C. The small inner ...
...Gas Pressure Regulator (LP Gas to LP Gas) 1. Remove storage drawer or warming drawer. NOTE: On models with a ⁵⁄₈" combination wrench to Natural Gas) 1. Gas pressure regulator IMPORTANT: Do not remove the gas pressure regulator. 3. Remove plastic cover from gas pressure regulator cap. 4. Reconnect the anti-tip bracket, if the range...marking "! LP 16 Checking for each cooktop burner. A A. To range B. Manual shutoff valve "closed position. Gas supply line 2. Plastic cover B. Gas pressure regulator cap with hollow end facing out C. The small inner ...


