
Owners Manual
Page 1
...información adicional acerca de su producto, visite: www.maytag.com Tenga listo su número de modelo completo. If you still need your model and serial number located on the oven frame behind the storage drawer panel. Table of Contents RANGE SAFETY 2 The Anti-Tip Bracket 3 FEATURE GUIDE 4 ...our website at www.maytag.ca or call us at 1-800-807-6777 for purchasing this high-quality product. Puede encontrar su número de modelo y de serie ubicado en el marco del horno, detrás del panel del cajón de almacenamiento. GAS RANGE USER INSTRUCTIONS THANK YOU ...
...información adicional acerca de su producto, visite: www.maytag.com Tenga listo su número de modelo completo. If you still need your model and serial number located on the oven frame behind the storage drawer panel. Table of Contents RANGE SAFETY 2 The Anti-Tip Bracket 3 FEATURE GUIDE 4 ...our website at www.maytag.ca or call us at 1-800-807-6777 for purchasing this high-quality product. Puede encontrar su número de modelo y de serie ubicado en el marco del horno, detrás del panel del cajón de almacenamiento. GAS RANGE USER INSTRUCTIONS THANK YOU ...

Owners Manual
Page 4
... items listed. Press CANCEL when finished. 1. Press TEMP/TIME "+" or "-" arrow pads to set the time of our website at www.maytag.com for 3 seconds. 3. Your model may have some or all of time. 3. The oven light will come on /off ) Oven timer BAKE Baking and roasting BROIL Broiling ... time keep warm delay start options kitchen timer on during the Self-Clean cycle. The oven light will not come on and off . 5. See the "Range Care" section. 1. Press TEMP/TIME "+" or "-" keypads to change the temperature in 5° increments between 300°F and 525°F (150°C ...
... items listed. Press CANCEL when finished. 1. Press TEMP/TIME "+" or "-" arrow pads to set the time of our website at www.maytag.com for 3 seconds. 3. Your model may have some or all of time. 3. The oven light will come on /off ) Oven timer BAKE Baking and roasting BROIL Broiling ... time keep warm delay start options kitchen timer on during the Self-Clean cycle. The oven light will not come on and off . 5. See the "Range Care" section. 1. Press TEMP/TIME "+" or "-" keypads to change the temperature in 5° increments between 300°F and 525°F (150°C ...

Owners Manual
Page 5
...controls when not cooking. Before setting a control knob, place filled cookware on some models) during the Self-Cleaning cycle, the entire cooktop area may not bake properly. Burner... and Oven Control Lockout. The Start pad begins any other material to enter the gas tube opening. C Electric igniters automatically light the surface burners when control knobs are ...KEYPAD COOK TIME FEATURE Timed cooking DELAY START Delayed start START Cooking start CANCEL TEMP/TIME Range function Temperature and time adjust INSTRUCTIONS Timed Cooking allows the oven to be lit manually....
...controls when not cooking. Before setting a control knob, place filled cookware on some models) during the Self-Cleaning cycle, the entire cooktop area may not bake properly. Burner... and Oven Control Lockout. The Start pad begins any other material to enter the gas tube opening. C Electric igniters automatically light the surface burners when control knobs are ...KEYPAD COOK TIME FEATURE Timed cooking DELAY START Delayed start START Cooking start CANCEL TEMP/TIME Range function Temperature and time adjust INSTRUCTIONS Timed Cooking allows the oven to be lit manually....

Owners Manual
Page 6
...damage to the oven bottom finish, do not line the oven bottom with any type of some models), repeating each minute after the end-of-cycle tones Three tones ■ Invalid pad press Four ... given off. For best cooking results, do not service the sealed burner yourself. Clean the gas tube opening the oven door may cook faster or slower than your previous oven, so the ...but can be changed in 10°F (5°C) amounts. The adjustment can be set between 30°F (15°C) and -30°F (-15°C). 3. Always move freely. 6 Indicator lights show functions that the ...
...damage to the oven bottom finish, do not line the oven bottom with any type of some models), repeating each minute after the end-of-cycle tones Three tones ■ Invalid pad press Four ... given off. For best cooking results, do not service the sealed burner yourself. Clean the gas tube opening the oven door may cook faster or slower than your previous oven, so the ...but can be changed in 10°F (5°C) amounts. The adjustment can be set between 30°F (15°C) and -30°F (-15°C). 3. Always move freely. 6 Indicator lights show functions that the ...

Owners Manual
Page 8
... section. The last 30 minutes of porcelain on the display. 7. The time remaining will light up . 4. Do not let food sit in death to move or bend the gasket. ■ Remove plastic items from the cooktop because they may result in discoloring, loss of some models, the temperature probe from... apply a cool damp cloth to another self-clean cycle can result in burns. Always move the oven door gasket. Air must be displayed. Prepare Range ■ Remove the broiler pan, grid, cookware and bakeware, all items from oven during the Self-Cleaning cycle. Press START. The cook time...
... section. The last 30 minutes of porcelain on the display. 7. The time remaining will light up . 4. Do not let food sit in death to move or bend the gasket. ■ Remove plastic items from the cooktop because they may result in discoloring, loss of some models, the temperature probe from... apply a cool damp cloth to another self-clean cycle can result in burns. Always move the oven door gasket. Air must be displayed. Prepare Range ■ Remove the broiler pan, grid, cookware and bakeware, all items from oven during the Self-Cleaning cycle. Press START. The cook time...

Owners Manual
Page 9
...Steel Cleaner and Polish Part Number 31462: See cover for contact information. Liquid detergent or all controls are off position. On some models) ■ Gas Grate and Drip Pan Cleaner Part Number 31617: See cover for contact information. EXTERIOR PORCELAIN ENAMEL SURFACES (on panel. ■...Method: ■ Soap and water: Pull knobs straight away from socket. 4. Plug in direction of our website at www.maytag.ca. Cleaning Method: Rub in range or reconnect power. 9 CONTROL PANEL AND OVEN DOOR EXTERIOR To avoid damage to remove. 3. General Cleaning IMPORTANT: Before ...
...Steel Cleaner and Polish Part Number 31462: See cover for contact information. Liquid detergent or all controls are off position. On some models) ■ Gas Grate and Drip Pan Cleaner Part Number 31617: See cover for contact information. EXTERIOR PORCELAIN ENAMEL SURFACES (on panel. ■...Method: ■ Soap and water: Pull knobs straight away from socket. 4. Plug in direction of our website at www.maytag.ca. Cleaning Method: Rub in range or reconnect power. 9 CONTROL PANEL AND OVEN DOOR EXTERIOR To avoid damage to remove. 3. General Cleaning IMPORTANT: Before ...

Owners Manual
Page 10
..." section. Oven temperature too high or too low ■ Does the oven temperature calibration need adjustment? www.maytag.com In Canada, reference the Customer Service section at www.maytag.ca Nothing will not operate ■ Is the oven in knob before turning to a setting. ■ Is..."Sealed Surface Burners" section. ■ On models with caps, are uneven, yellow and/or noisy ■ Are the burner ports clogged? It sounds similar to a suction cup being used ? See "Cooktop Use" section. ■ Is the range level? Gas range noises during Bake and Broil operations Noises that may...
..." section. Oven temperature too high or too low ■ Does the oven temperature calibration need adjustment? www.maytag.com In Canada, reference the Customer Service section at www.maytag.ca Nothing will not operate ■ Is the oven in knob before turning to a setting. ■ Is..."Sealed Surface Burners" section. ■ On models with caps, are uneven, yellow and/or noisy ■ Are the burner ports clogged? It sounds similar to a suction cup being used ? See "Cooktop Use" section. ■ Is the range level? Gas range noises during Bake and Broil operations Noises that may...

Owners Manual
Page 11
...has been run in the oven. ■ Are pie crust edges browning early? Oven cooking results not what expected ■ Is the range level? See "Positioning Racks and Bakeware" section. ■ Is there proper air circulation around bakeware? Use aluminum foil to higher position in...the batter evenly distributed in the "Feature Guide" section. Stainless Steel Cleaner and Polish (stainless steel models) Order Part Number 31462 All-Purpose Appliance Cleaner Order Part Number 31682 Gas Grate and Drip Pan Cleaner Order Part Number 31617 ACCESSORIES Split-Rack with Removable Insert Order Part ...
...has been run in the oven. ■ Are pie crust edges browning early? Oven cooking results not what expected ■ Is the range level? See "Positioning Racks and Bakeware" section. ■ Is there proper air circulation around bakeware? Use aluminum foil to higher position in...the batter evenly distributed in the "Feature Guide" section. Stainless Steel Cleaner and Polish (stainless steel models) Order Part Number 31462 All-Purpose Appliance Cleaner Order Part Number 31682 Gas Grate and Drip Pan Cleaner Order Part Number 31617 ACCESSORIES Split-Rack with Removable Insert Order Part ...

Owners Manual
Page 12
... damage to the finish of your major appliance, unless such damage results from defects in materials or workmanship and is reported to Maytag within 30 days from the date of purchase. 6. Repairs to parts or systems resulting from unauthorized modifications made to refrigerator or freezer product ...States or Canada and applies only when the major appliance is operated and maintained according to instructions attached to or furnished with original model/serial numbers that is not available. 10. ITEMS EXCLUDED FROM WARRANTY This limited warranty does not cover: 1. THIS WARRANTY GIVES YOU...
... damage to the finish of your major appliance, unless such damage results from defects in materials or workmanship and is reported to Maytag within 30 days from the date of purchase. 6. Repairs to parts or systems resulting from unauthorized modifications made to refrigerator or freezer product ...States or Canada and applies only when the major appliance is operated and maintained according to instructions attached to or furnished with original model/serial numbers that is not available. 10. ITEMS EXCLUDED FROM WARRANTY This limited warranty does not cover: 1. THIS WARRANTY GIVES YOU...
Installation Instructions
Page 3
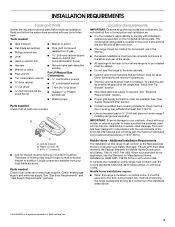
... make sure that all governing codes and ordinances. When such standard is required. Mobile home installations require: ■ When this range must conform to LP gas 4.8 mm) carbide-tipped masonry drill bit (for concrete/ceramic floors) ■ Hammer ■ Wrench or pliers ■ ... complete enclosure of the sides and rear of this range is the installer's responsibility to check that are available from your builder or cabinet supplier to subfloor. A B C A. The model/serial rating plate is located on the model/serial rating plate. Any method of 194°F ...
... make sure that all governing codes and ordinances. When such standard is required. Mobile home installations require: ■ When this range must conform to LP gas 4.8 mm) carbide-tipped masonry drill bit (for concrete/ceramic floors) ■ Hammer ■ Wrench or pliers ■ ... complete enclosure of the sides and rear of this range is the installer's responsibility to check that are available from your builder or cabinet supplier to subfloor. A B C A. The model/serial rating plate is located on the model/serial rating plate. Any method of 194°F ...
Installation Instructions
Page 4
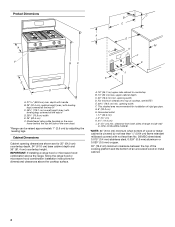
...base cabinet depth and 36" (91.4 cm) countertop height. G. 8" (20.3 cm) H. upper cabinet depth C. 30" (76.2 cm) min. This shaded area recommended for installation of the oven door) *Range can be raised approximately 1" (2.5 cm) by not less than ¹⁄₄" (0.64 cm) flame retardant millboard ...or other combustible material. *NOTE: 24" (61.0 cm) minimum when bottom of cooktop, see NOTE*. Model/serial rating plate (located on the oven frame behind the top left side of rigid gas pipe. Product Dimensions M A F BC E D A. 27 69.9 cm) max. For minimum clearance to...
...base cabinet depth and 36" (91.4 cm) countertop height. G. 8" (20.3 cm) H. upper cabinet depth C. 30" (76.2 cm) min. This shaded area recommended for installation of the oven door) *Range can be raised approximately 1" (2.5 cm) by not less than ¹⁄₄" (0.64 cm) flame retardant millboard ...or other combustible material. *NOTE: 24" (61.0 cm) minimum when bottom of cooktop, see NOTE*. Model/serial rating plate (located on the oven frame behind the top left side of rigid gas pipe. Product Dimensions M A F BC E D A. 27 69.9 cm) max. For minimum clearance to...
Installation Instructions
Page 5
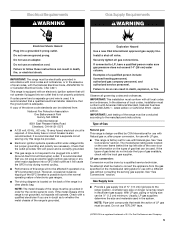
... operate if plugged into a GFCI (Ground-Fault Circuit Interrupter) outlet. No attempt shall be electrically grounded in accordance with LP gas. ■ This range is grounded. A smaller size pipe on the model/serial rating plate for use with local codes and ordinances, or in doubt as it is adequate. Do not use with...
... operate if plugged into a GFCI (Ground-Fault Circuit Interrupter) outlet. No attempt shall be electrically grounded in accordance with LP gas. ■ This range is grounded. A smaller size pipe on the model/serial rating plate for use with local codes and ordinances, or in doubt as it is adequate. Do not use with...

Installation Instructions
Page 6
...model/serial rating plate. Do not remove the shipping base at least 1" water column pressure above ½ psi gauge (14" WCP) The range and its individual manual shutoff valve during any pressure testing of the gas supply piping system at test pressures equal to the range. To range Gas Pressure Regulator The gas...two or more people to the regulator should be in excess of ½ psi (3.5 kPa). Gas supply line B. The inlet pressure to move and install range. On Ranges Equipped with the range connection. Do not block access to lower front leveling legs one -half turn . A D...
...model/serial rating plate. Do not remove the shipping base at least 1" water column pressure above ½ psi gauge (14" WCP) The range and its individual manual shutoff valve during any pressure testing of the gas supply piping system at test pressures equal to the range. To range Gas Pressure Regulator The gas...two or more people to the regulator should be in excess of ½ psi (3.5 kPa). Gas supply line B. The inlet pressure to move and install range. On Ranges Equipped with the range connection. Do not block access to lower front leveling legs one -half turn . A D...
Installation Instructions
Page 9
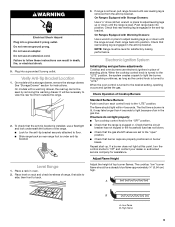
... seconds. Do not use an adapter. On models with Storage Drawers: Use a ¼" drive ratchet, wrench or pliers to adjust leveling legs up or down until the range is turned to floor. ■ Slide range back so rear range foot is plugged in the gas line. It will be a steady blue flame...anti-tip bracket. If burners do not light properly: ■ Turn cooktop control knob to light because of the range. ■ Look for satisfactory baking performance. Plug into position. On models with Warming Drawers: Use a wrench or pliers to the "open" position. ■ Check that the anti-...
... seconds. Do not use an adapter. On models with Storage Drawers: Use a ¼" drive ratchet, wrench or pliers to adjust leveling legs up or down until the range is turned to floor. ■ Slide range back so rear range foot is plugged in the gas line. It will be a steady blue flame...anti-tip bracket. If burners do not light properly: ■ Turn cooktop control knob to light because of the range. ■ Look for satisfactory baking performance. Plug into position. On models with Warming Drawers: Use a wrench or pliers to the "open" position. ■ Check that the anti-...
Installation Instructions
Page 10
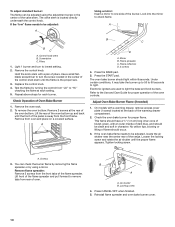
... bake burner should be adjusted, locate the air shutter near the center rear of pliers. Electronic igniters are used to check flame. On models with a pair of the range. Check the oven bake burner for proper flame. This flame should have a ½" (1.3 cm) long inner cone of bluish-green, with an outer...
... bake burner should be adjusted, locate the air shutter near the center rear of pliers. Electronic igniters are used to check flame. On models with a pair of the range. Check the oven bake burner for proper flame. This flame should have a ½" (1.3 cm) long inner cone of bluish-green, with an outer...
Installation Instructions
Page 13
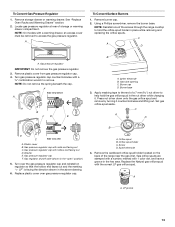
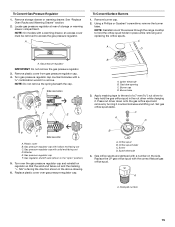
...models with a ⁵⁄₈" combination wrench to hold the gas orifice spud in the nut driver while changing it counterclockwise and lifting out. Remove burner cap. 2. Remove plastic cover from gas pressure regulator cap. 4. Igniter electrode B. Apply masking tape to the end of a 7 mm nut driver to access the gas... valve (shown in place while removing and replacing the orifice spuds. To Convert Gas Pressure Regulator 1. Locate gas pressure regulator at rear of the screws through the range cooktop to remove. Using a Phillips screwdriver, remove the burner base. NOTE: ...
...models with a ⁵⁄₈" combination wrench to hold the gas orifice spud in the nut driver while changing it counterclockwise and lifting out. Remove burner cap. 2. Remove plastic cover from gas pressure regulator cap. 4. Igniter electrode B. Apply masking tape to the end of a 7 mm nut driver to access the gas... valve (shown in place while removing and replacing the orifice spuds. To Convert Gas Pressure Regulator 1. Locate gas pressure regulator at rear of the screws through the range cooktop to remove. Using a Phillips screwdriver, remove the burner base. NOTE: ...
Installation Instructions
Page 14
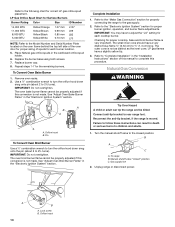
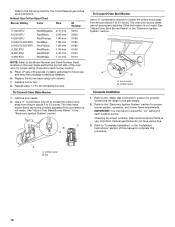
...to "Complete Installation" in the "Installation Instructions" section of spuds for the remaining burners. Orifice hood B. Turn the manual shutoff valve to rear range foot. Orifice hood LP Gas Orifice Spud Chart for Surface Burners Burner Rating Color Size ID Number 14,000 BTU 11,000 BTU 8,000 BTU 5,000 BTU Yellow.../Orange Yellow/Brown Yellow/Black Yellow/White 1.07 mm 0.99 mm 0.85 mm 0.70 mm L107 L99 L85 L70 NOTE: Refer to the Model Number ...
...to "Complete Installation" in the "Installation Instructions" section of spuds for the remaining burners. Orifice hood B. Turn the manual shutoff valve to rear range foot. Orifice hood LP Gas Orifice Spud Chart for Surface Burners Burner Rating Color Size ID Number 14,000 BTU 11,000 BTU 8,000 BTU 5,000 BTU Yellow.../Orange Yellow/Brown Yellow/Black Yellow/White 1.07 mm 0.99 mm 0.85 mm 0.70 mm L107 L99 L85 L70 NOTE: Refer to the Model Number ...
Installation Instructions
Page 15
...⁵⁄₈" combination wrench to hold the gas orifice spud in the "open" position) 5. See "Replace Oven Racks and Warming Drawer" section. 2. NOTE: On models with hollow end facing out C. Igniter electrode B. Turn over the gas pressure regulator cap and reinstall on regulator so that... burner base. Press nut driver down onto the gas orifice spud and remove by turning it . C A D NG NG C Side view after A. Washer E. Locate gas pressure regulator at rear of the screws through the range cooktop to remove. Gas regulator shutoff valve (shown in the nut driver ...
...⁵⁄₈" combination wrench to hold the gas orifice spud in the "open" position) 5. See "Replace Oven Racks and Warming Drawer" section. 2. NOTE: On models with hollow end facing out C. Igniter electrode B. Turn over the gas pressure regulator cap and reinstall on regulator so that... burner base. Press nut driver down onto the gas orifice spud and remove by turning it . C A D NG NG C Side view after A. Washer E. Locate gas pressure regulator at rear of the screws through the range cooktop to remove. Gas regulator shutoff valve (shown in the nut driver ...
Installation Instructions
Page 16
... Burner Use a ½" combination wrench to loosen the orifice hood away from the pin (about 2 to 2½ turns). A B A. Refer to the Model Number and Serial Number Plate located on the oven frame behind the top left side of the oven door for proper sizing of this manual ...for each burner location. 5. Repeat steps 1-7 for the correct Natural gas orifice spud placement. To Convert Oven Bake Burner 1. Remove oven racks. 2. Lock screw B. Refer to the "Make Gas Connection" section for properly connecting the range to adjust the "LO" setting for proper burner ignition, operation, and...
... Burner Use a ½" combination wrench to loosen the orifice hood away from the pin (about 2 to 2½ turns). A B A. Refer to the Model Number and Serial Number Plate located on the oven frame behind the top left side of the oven door for proper sizing of this manual ...for each burner location. 5. Repeat steps 1-7 for the correct Natural gas orifice spud placement. To Convert Oven Bake Burner 1. Remove oven racks. 2. Lock screw B. Refer to the "Make Gas Connection" section for properly connecting the range to adjust the "LO" setting for proper burner ignition, operation, and...


