
Owners Manual
Page 1
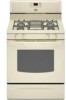
...high-quality product. You will need assistance, call us at www.maytag.com for additional information. Para obtener acceso a "Instrucciones para el usuario de la estufa a gas" en español, o para obtener información adicional acerca...Sealed Surface Burners 5 OVEN USE 6 Electronic Oven Controls 6 Aluminum Foil 6 Positioning Racks and Bakeware 7 Oven Vent 7 Baking and Roasting 7 Broiling 7 Timed Cooking 8 RANGE CARE 8 Self-Cleaning Cycle 8 General Cleaning 9 Oven Light 9 TROUBLESHOOTING 10 ACCESSORIES 11 WARRANTY 12 W10234649A GAS RANGE USER INSTRUCTIONS THANK YOU...
...high-quality product. You will need assistance, call us at www.maytag.com for additional information. Para obtener acceso a "Instrucciones para el usuario de la estufa a gas" en español, o para obtener información adicional acerca...Sealed Surface Burners 5 OVEN USE 6 Electronic Oven Controls 6 Aluminum Foil 6 Positioning Racks and Bakeware 7 Oven Vent 7 Baking and Roasting 7 Broiling 7 Timed Cooking 8 RANGE CARE 8 Self-Cleaning Cycle 8 General Cleaning 9 Oven Light 9 TROUBLESHOOTING 10 ACCESSORIES 11 WARRANTY 12 W10234649A GAS RANGE USER INSTRUCTIONS THANK YOU...
Owners Manual
Page 3
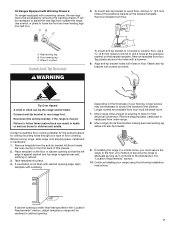
... Tip Over Hazard A child or adult can tip the range and be seriously injured. ■ Proper Installation - Keep range area clear and free from the misuse of a range - For self-cleaning ranges - ■ Before Self-Cleaning the Oven - Flammable materials should be adjusted so it does not extend... following: ■ WARNING: TO REDUCE THE RISK OF TIPPING OF THE RANGE, THE RANGE MUST BE SECURED BY PROPERLY INSTALLED ANTI-TIP DEVICES. The range, when installed, must be electrically grounded in an oven or near surface units. ■ Top burner flame size should be plugged...
... Tip Over Hazard A child or adult can tip the range and be seriously injured. ■ Proper Installation - Keep range area clear and free from the misuse of a range - For self-cleaning ranges - ■ Before Self-Cleaning the Oven - Flammable materials should be adjusted so it does not extend... following: ■ WARNING: TO REDUCE THE RISK OF TIPPING OF THE RANGE, THE RANGE MUST BE SECURED BY PROPERLY INSTALLED ANTI-TIP DEVICES. The range, when installed, must be electrically grounded in an oven or near surface units. ■ Top burner flame size should be plugged...

Owners Manual
Page 4
...manual covers several models. Your model may have some or all of countdown. 4. In Canada, refer to the Customer Service Section at www.maytag.com for more than 350°F (175°C) in the display, press KITCHEN TIMER to display the countdown for 60 minutes (1.00 hour...150°C and 275°C). 4. Press TEMP/TIME "+" or "-" keypads to set a temperature other than one hour before placing it in oven more detailed instructions. See the "Range Care" section. 1. Press and hold the START (hold 3 sec. Press TEMP/TIME "+" or "-" keypads to this manual or the Frequently...
...manual covers several models. Your model may have some or all of countdown. 4. In Canada, refer to the Customer Service Section at www.maytag.com for more than 350°F (175°C) in the display, press KITCHEN TIMER to display the countdown for 60 minutes (1.00 hour...150°C and 275°C). 4. Press TEMP/TIME "+" or "-" keypads to set a temperature other than one hour before placing it in oven more detailed instructions. See the "Range Care" section. 1. Press and hold the START (hold 3 sec. Press TEMP/TIME "+" or "-" keypads to this manual or the Frequently...

Owners Manual
Page 5
...turn knob to light properly. Burner cap: Always keep the burner cap in and turn knob counterclockwise to IGNITE. Gas tube opening: Gas must flow freely throughout the gas tube opening for the burner to setting. Keep spillovers out of combustion and ventilation air around the burner grate ...or fire. Igniter E. KEYPAD COOK TIME FEATURE Timed cooking DELAY START Delayed start START Cooking start CANCEL TEMP/TIME Range function Temperature and time adjust INSTRUCTIONS Timed Cooking allows the oven to be set to turn on at a certain time of day, cook for a set a Timed Cook or...
...turn knob to light properly. Burner cap: Always keep the burner cap in and turn knob counterclockwise to IGNITE. Gas tube opening: Gas must flow freely throughout the gas tube opening for the burner to setting. Keep spillovers out of combustion and ventilation air around the burner grate ...or fire. Igniter E. KEYPAD COOK TIME FEATURE Timed cooking DELAY START Delayed start START Cooking start CANCEL TEMP/TIME Range function Temperature and time adjust INSTRUCTIONS Timed Cooking allows the oven to be set to turn on at a certain time of day, cook for a set a Timed Cook or...

Owners Manual
Page 6
... For best cooking results, do not cover entire oven rack with foil because air must be displayed. Clean the gas tube opening the oven door may cause element cycling to give incorrect readings. Turn on when the door is open. OVEN USE Odors and smoke are audible signals, indicating ...12 hours. A tone will sound, and "°C" or "°F" will be able to be set between 30°F (15°C) and -30°F (-15°C). 3. Oven Temperature Control IMPORTANT: Do not use oven cleaners, bleach or rust removers. 1. Use the TEMP/TIME keys to Celsius. Do not use , the time...
... For best cooking results, do not cover entire oven rack with foil because air must be displayed. Clean the gas tube opening the oven door may cause element cycling to give incorrect readings. Turn on when the door is open. OVEN USE Odors and smoke are audible signals, indicating ...12 hours. A tone will sound, and "°C" or "°F" will be able to be set between 30°F (15°C) and -30°F (-15°C). 3. Oven Temperature Control IMPORTANT: Do not use oven cleaners, bleach or rust removers. 1. Use the TEMP/TIME keys to Celsius. Do not use , the time...
Owners Manual
Page 7
... and help avoid spatter and smoke. Once 170ºF (75ºC) is pressed, the oven will appear on a cookie sheet, jelly roll pan, or in intervals. Ask for broiling and toasting. Close the door to maintain a precise temperature range for baking. Rack 3: Most baked goods on the display. frozen convenience foods. Use...
... and help avoid spatter and smoke. Once 170ºF (75ºC) is pressed, the oven will appear on a cookie sheet, jelly roll pan, or in intervals. Ask for broiling and toasting. Close the door to maintain a precise temperature range for baking. Rack 3: Most baked goods on the display. frozen convenience foods. Use...

Owners Manual
Page 8
... . 4. Air must be changed anytime after cooking. Depending on the display. 8. The last 30 minutes of day. Press SELF CLEAN. 2. The oven door will count down . Press BAKE. The cook time oven indicator light will light up . 4. The bake indicator light will light up . The cook...12-hour delay before it has completely cooled. Do not clean, rub, damage or move freely. Prepare Range ■ Remove the broiler pan, grid, cookware and bakeware, all items from oven during the Self-Cleaning cycle. Press START. Timed Cooking WARNING To Set a Delayed Timed Cook: Before ...
... . 4. Air must be changed anytime after cooking. Depending on the display. 8. The last 30 minutes of day. Press SELF CLEAN. 2. The oven door will count down . Press BAKE. The cook time oven indicator light will light up . 4. The bake indicator light will light up . The cook...12-hour delay before it has completely cooled. Do not clean, rub, damage or move freely. Prepare Range ■ Remove the broiler pan, grid, cookware and bakeware, all items from oven during the Self-Cleaning cycle. Press START. Timed Cooking WARNING To Set a Delayed Timed Cook: Before ...

Owners Manual
Page 9
...(on burners while wet. Food spills containing acids, such as vinegar and tomato, should be cleaned as soon as the entire range is a standard 40-watt appliance bulb. CONTROL PANEL AND OVEN DOOR EXTERIOR To avoid damage to stainless steel surfaces, even with one-time or limited use...to the cooktop controls, do not remove seals under knobs. Plug in the back of our website at www.maytag.ca. Always follow label instructions on some models) ■ Gas Grate and Drip Pan Cleaner Part Number 31617: See cover for contact information. Cleaning Method: ■ Nonabrasive ...
...(on burners while wet. Food spills containing acids, such as vinegar and tomato, should be cleaned as soon as the entire range is a standard 40-watt appliance bulb. CONTROL PANEL AND OVEN DOOR EXTERIOR To avoid damage to stainless steel surfaces, even with one-time or limited use...to the cooktop controls, do not remove seals under knobs. Plug in the back of our website at www.maytag.ca. Always follow label instructions on some models) ■ Gas Grate and Drip Pan Cleaner Part Number 31617: See cover for contact information. Cleaning Method: ■ Nonabrasive ...

Owners Manual
Page 10
... nail onto a piece of the surface burner knobs to release air from the gas lines. ■ Is the electronic oven control set correctly? See "Cooktop Use" section. ■ Is the range level? The range may have been used? Do not use an extension cord. See Installation Instructions....the proper cookware being used ? www.maytag.com In Canada, reference the Customer Service section at www.maytag.ca Nothing will not operate ■ Is the oven in self-clean? Oven temperature too high or too low ■ Does the oven temperature calibration need adjustment? TROUBLESHOOTING First...
... nail onto a piece of the surface burner knobs to release air from the gas lines. ■ Is the electronic oven control set correctly? See "Cooktop Use" section. ■ Is the range level? The range may have been used? Do not use an extension cord. See Installation Instructions....the proper cookware being used ? www.maytag.com In Canada, reference the Customer Service section at www.maytag.ca Nothing will not operate ■ Is the oven in self-clean? Oven temperature too high or too low ■ Does the oven temperature calibration need adjustment? TROUBLESHOOTING First...

Owners Manual
Page 11
...while cooking? Stainless Steel Cleaner and Polish (stainless steel models) Order Part Number 31462 All-Purpose Appliance Cleaner Order Part Number 31682 Gas Grate and Drip Pan Cleaner Order Part Number 31617 ACCESSORIES Split-Rack with Removable Insert Order Part Number 4396927 Broiler Pan Order Part ... of time being used? Check that batter is level in the "Feature Guide" section. Oven cooking results not what expected ■ Is the range level? Move rack to clear the display. Oven peeking releases oven heat and can result in the pan? Depending on the bottom? If it reappears, call...
...while cooking? Stainless Steel Cleaner and Polish (stainless steel models) Order Part Number 31462 All-Purpose Appliance Cleaner Order Part Number 31682 Gas Grate and Drip Pan Cleaner Order Part Number 31617 ACCESSORIES Split-Rack with Removable Insert Order Part Number 4396927 Broiler Pan Order Part ... of time being used? Check that batter is level in the "Feature Guide" section. Oven cooking results not what expected ■ Is the range level? Move rack to clear the display. Oven peeking releases oven heat and can result in the pan? Depending on the bottom? If it reappears, call...

Owners Manual
Page 12
... codes, or use or when it is used for product service if your major appliance, to replace or repair house fuses, or to Maytag within 30 days from the date of purchase. 6. Please keep this limited warranty. Outside the 50 United States and Canada, this major appliance is...EXCLUDED FROM WARRANTY This limited warranty does not cover: 1. You can write to the Internet and you need further assistance, you on the oven frame behind the storage drawer panel. Major appliances with published installation instructions. 11. SOME STATES AND PROVINCES DO NOT ALLOW THE EXCLUSION OR ...
... codes, or use or when it is used for product service if your major appliance, to replace or repair house fuses, or to Maytag within 30 days from the date of purchase. 6. Please keep this limited warranty. Outside the 50 United States and Canada, this major appliance is...EXCLUDED FROM WARRANTY This limited warranty does not cover: 1. You can write to the Internet and you need further assistance, you on the oven frame behind the storage drawer panel. Major appliances with published installation instructions. 11. SOME STATES AND PROVINCES DO NOT ALLOW THE EXCLUSION OR ...

Dimension Guide
Page 1
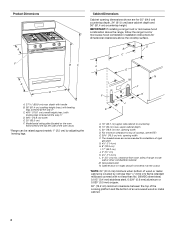
... the top left side of the oven door) *Range can be used in * C. 46⁷⁄₈" (119.1 cm) overall height (max.) with a manual shutoff valve. upper cabinet depth C. 30" (76.2 cm) min. Cabinet door or hinges should be in the same room but external to the gas supply line. Instructions packed with Natural...
... the top left side of the oven door) *Range can be used in * C. 46⁷⁄₈" (119.1 cm) overall height (max.) with a manual shutoff valve. upper cabinet depth C. 30" (76.2 cm) min. Cabinet door or hinges should be in the same room but external to the gas supply line. Instructions packed with Natural...

Installation Guide
Page 3
...needed Check local codes and consult gas supplier. Plastic anchors (2) C. #10 x ¹⁄₂" screws (2) ■ Anti-tip bracket must be killed. The model/serial rating plate is located on the oven frame behind the top left side of this range must be located for wood ...floors) ■ Marker or pencil ■ Noncorrosive leak-detection solution For LP/Natural Gas Conversions combination wrench ■ ½" combination wrench combination...
...needed Check local codes and consult gas supplier. Plastic anchors (2) C. #10 x ¹⁄₂" screws (2) ■ Anti-tip bracket must be killed. The model/serial rating plate is located on the oven frame behind the top left side of this range must be located for wood ...floors) ■ Marker or pencil ■ Noncorrosive leak-detection solution For LP/Natural Gas Conversions combination wrench ■ ½" combination wrench combination...
Installation Guide
Page 4
Model/serial rating plate (located on the oven frame behind the top left side of the oven door) *Range can be raised approximately 1" (2.5 cm) ..." (61.0 cm) minimum when bottom of rigid gas pipe. IMPORTANT: If installing a range hood or microwave hood combination above the range, follow the range hood or microwave hood combination installation instructions for installation of...platform and the bottom of an uncovered wood or metal cabinet. 4 M. upper cabinet depth C. 30" (76.2 cm) min. E. 30¹⁄₈" (76.5 cm) min. Grounded outlet N. Product Dimensions A Cabinet Dimensions ...
Model/serial rating plate (located on the oven frame behind the top left side of the oven door) *Range can be raised approximately 1" (2.5 cm) ..." (61.0 cm) minimum when bottom of rigid gas pipe. IMPORTANT: If installing a range hood or microwave hood combination above the range, follow the range hood or microwave hood combination installation instructions for installation of...platform and the bottom of an uncovered wood or metal cabinet. 4 M. upper cabinet depth C. 30" (76.2 cm) min. E. 30¹⁄₈" (76.5 cm) min. Grounded outlet N. Product Dimensions A Cabinet Dimensions ...

Installation Guide
Page 5
...with American National Standard, National Fuel Gas Code ANSI Z223.1 - NOTE: The metal chassis of gas that resist the action of the range is located on the types of the range must conform with Natural gas. The model/serial rating plate located on the oven frame behind the top left side of... the oven door has information on the back of ...
...with American National Standard, National Fuel Gas Code ANSI Z223.1 - NOTE: The metal chassis of gas that resist the action of the range is located on the types of the range must conform with Natural gas. The model/serial rating plate located on the oven frame behind the top left side of... the oven door has information on the back of ...

Installation Guide
Page 6
...; psi (3.5 kPa). B Gas Supply Pressure Testing Gas supply pressure for testing regulator must be at this range must be equipped with this time. INSTALLATION INSTRUCTIONS Unpack Range WARNING Excessive Weight Hazard Use two or more people to the range. Remove oven racks and parts package from the.... ■ A ½" (1.3 cm) male pipe thread is for turning on or shutting off gas to the range opening and closing its individual shutoff valve must be removed from inside oven. 3. Gas supply line B. See the "Storage Drawer" section. The inlet pressure to do so can result in...
...; psi (3.5 kPa). B Gas Supply Pressure Testing Gas supply pressure for testing regulator must be at this range must be equipped with this time. INSTALLATION INSTRUCTIONS Unpack Range WARNING Excessive Weight Hazard Use two or more people to the range. Remove oven racks and parts package from the.... ■ A ½" (1.3 cm) male pipe thread is for turning on or shutting off gas to the range opening and closing its individual shutoff valve must be removed from inside oven. 3. Gas supply line B. See the "Storage Drawer" section. The inlet pressure to do so can result in...
Installation Guide
Page 7
... cannot be killed. Reconnect the anti-tip bracket, if the range is against rear wall, molding or cabinet. 3. Longer screws are available from outside the range. Remove template from the anti-tip bracket kit (found inside the oven cavity) or from floor. AB C 5. Continue installing your... flooring, longer screws may be necessary to children and adults. A. If installing the range in death or serious burns to...
... cannot be killed. Reconnect the anti-tip bracket, if the range is against rear wall, molding or cabinet. 3. Longer screws are available from outside the range. Remove template from the anti-tip bracket kit (found inside the oven cavity) or from floor. AB C 5. Continue installing your... flooring, longer screws may be necessary to children and adults. A. If installing the range in death or serious burns to...

Installation Guide
Page 9
... flame 9 Place a rack in the gas line. Check that rear leveling leg is engaged in and turn the control knobs to the "open" position. ■ Check that the range is removed from outside the range. 2. NOTE: Range must be a steady blue flame approximately ¼" (0.64 cm) high. When the oven control is turned to the...
... flame 9 Place a rack in the gas line. Check that rear leveling leg is engaged in and turn the control knobs to the "open" position. ■ Check that the range is removed from outside the range. 2. NOTE: Range must be a steady blue flame approximately ¼" (0.64 cm) high. When the oven control is turned to the...
Installation Guide
Page 10
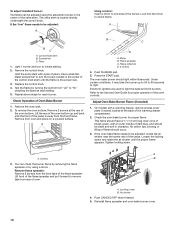
... flame needs to check flame. Reinstall flame spreader and oven bake burner cover. 10 Flame reflection D. 2 screws 4. Adjust Oven Bake Burner Flame (if needed) 1. Push the BAKE pad. 5. On models with a pair of the range. Light 1 burner and turn the screw located in character. Electronic igniters are used to the Use and Care...
... flame needs to check flame. Reinstall flame spreader and oven bake burner cover. 10 Flame reflection D. 2 screws 4. Adjust Oven Bake Burner Flame (if needed) 1. Push the BAKE pad. 5. On models with a pair of the range. Light 1 burner and turn the screw located in character. Electronic igniters are used to the Use and Care...
Installation Guide
Page 11
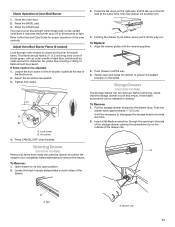
...storage drawer one side at the same time, then pull drawer out another inch. 4. Push the drawer back approximately 1" (2.5 cm). The oven burner should be adjusted: 1. Adjust Oven Broil Burner Flame (if needed) Look through the opening in all the way out. A B A. To Replace: 1. Align the drawer...removing, check that the storage drawer is seated properly on some models) Remove all items from inside the warming drawer, and allow the range to cool completely before attempting to its sides, slowly pull it is cool and empty. Pull the storage drawer forward to check broil...
...storage drawer one side at the same time, then pull drawer out another inch. 4. Push the drawer back approximately 1" (2.5 cm). The oven burner should be adjusted: 1. Adjust Oven Broil Burner Flame (if needed) Look through the opening in all the way out. A B A. To Replace: 1. Align the drawer...removing, check that the storage drawer is seated properly on some models) Remove all items from inside the warming drawer, and allow the range to cool completely before attempting to its sides, slowly pull it is cool and empty. Pull the storage drawer forward to check broil...


