Installation Instructions
Page 3
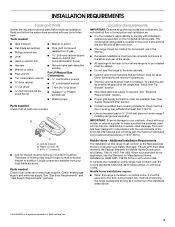
...specified on the oven frame behind the top left side of the oven door. ■ The range should be located for wood floors) ■ Noncorrosive leak-detection solution For LP/Natural Gas Conversions ■ ½" combination wrench combination wrench ■ 7 mm nut driver ■ Quadrex... ■ Do not seal the range to the standards listed above. †® QUADREX is located on the model/serial rating plate. Tools needed Check local codes and consult gas supplier. In Canada, the installation of NLW Holdings, Inc. 3 The model/serial rating plate is a registered ...
...specified on the oven frame behind the top left side of the oven door. ■ The range should be located for wood floors) ■ Noncorrosive leak-detection solution For LP/Natural Gas Conversions ■ ½" combination wrench combination wrench ■ 7 mm nut driver ■ Quadrex... ■ Do not seal the range to the standards listed above. †® QUADREX is located on the model/serial rating plate. Tools needed Check local codes and consult gas supplier. In Canada, the installation of NLW Holdings, Inc. 3 The model/serial rating plate is a registered ...
Installation Instructions
Page 4
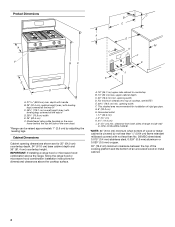
... *Range can be raised approximately 1" (2.5 cm) by not less than ¹⁄₄" (0.64 cm) flame retardant millboard covered with leveling legs screwed all the way in* C. 46⁷⁄₈" (119.1 cm) overall height (max.) with not less than No. 28 MSG sheet steel, 0.015" (0.4 mm) stainless steel...24" (61.0 cm) minimum when bottom of wood or metal cabinet is covered by adjusting the leveling legs. Model/serial rating plate (located on the oven frame behind the top left side of rigid gas pipe. upper cabinet depth C. 30" (76.2 cm) min. E. 30¹⁄₈" (76.5 cm)...
... *Range can be raised approximately 1" (2.5 cm) by not less than ¹⁄₄" (0.64 cm) flame retardant millboard covered with leveling legs screwed all the way in* C. 46⁷⁄₈" (119.1 cm) overall height (max.) with not less than No. 28 MSG sheet steel, 0.015" (0.4 mm) stainless steel...24" (61.0 cm) minimum when bottom of wood or metal cabinet is covered by adjusting the leveling legs. Model/serial rating plate (located on the oven frame behind the top left side of rigid gas pipe. upper cabinet depth C. 30" (76.2 cm) min. E. 30¹⁄₈" (76.5 cm)...
Installation Instructions
Page 5
... Check that you are necessary. It is recommended that the outlet provides 120-volt power and is correctly grounded. ■ This gas range is not required to whether the metal chassis of E.I. However, occasional nuisance tripping of local codes, installation must conform with a ... has information on the model/serial rating plate for use with American National Standard, National Fuel Gas Code ANSI Z223.1 - See "Gas Conversions" section. The model/serial rating plate located on the oven frame behind the top left side of Gas Natural gas: This range is design-certified by ...
... Check that you are necessary. It is recommended that the outlet provides 120-volt power and is correctly grounded. ■ This gas range is not required to whether the metal chassis of E.I. However, occasional nuisance tripping of local codes, installation must conform with a ... has information on the model/serial rating plate for use with American National Standard, National Fuel Gas Code ANSI Z223.1 - See "Gas Conversions" section. The model/serial rating plate located on the oven frame behind the top left side of Gas Natural gas: This range is design-certified by ...

Installation Instructions
Page 6
... or damage the flexible metal tubing when moving the range. Do not remove the shipping base at test pressures equal to or less than ½ psi (3.5 kPa). Gas supply line B. Burner Input Requirements Input ratings shown on the model/serial rating plate are reduced at least 1" water column... the rear leveling legs one -half turn . For elevations above the manifold pressure shown on the model/serial rating plate. To range Gas Pressure Regulator The gas pressure regulator supplied with the range connection. Front leveling leg All strains must be in excess of the inlet to obtain an in...
... or damage the flexible metal tubing when moving the range. Do not remove the shipping base at test pressures equal to or less than ½ psi (3.5 kPa). Gas supply line B. Burner Input Requirements Input ratings shown on the model/serial rating plate are reduced at least 1" water column... the rear leveling legs one -half turn . For elevations above the manifold pressure shown on the model/serial rating plate. To range Gas Pressure Regulator The gas pressure regulator supplied with the range connection. Front leveling leg All strains must be in excess of the inlet to obtain an in...
Installation Instructions
Page 9
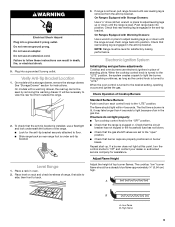
.... ■ Check that the gas shutoff valves are properly positioned on rack and check levelness of air in oven. 2. Low flame B. Do not use an extension cord. If range is not level, pull range forward until the range is level. On models with a warming drawer, the ...rear leg cannot be a steady blue flame approximately ¼" (0.64 cm) high. Electronic Ignition System Initial lighting and gas flame adjustments Cooktop and oven burners...
.... ■ Check that the gas shutoff valves are properly positioned on rack and check levelness of air in oven. 2. Low flame B. Do not use an extension cord. If range is not level, pull range forward until the range is level. On models with a warming drawer, the ...rear leg cannot be a steady blue flame approximately ¼" (0.64 cm) high. Electronic Ignition System Initial lighting and gas flame adjustments Cooktop and oven burners...
Installation Instructions
Page 10
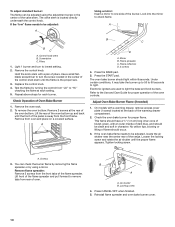
... tips, blowing or lifting of oven. Locking screw 4. To remove the oven bottom: Remove 2 screws at the back of the oven bottom. On models with a pair of the range. If the "low" flame needs to be adjusted: A Using a mirror: Insert a mirror to "HI," checking the flame at each burner. Screwdriver C. Remove flame...
... tips, blowing or lifting of oven. Locking screw 4. To remove the oven bottom: Remove 2 screws at the back of the oven bottom. On models with a pair of the range. If the "low" flame needs to be adjusted: A Using a mirror: Insert a mirror to "HI," checking the flame at each burner. Screwdriver C. Remove flame...
Installation Instructions
Page 13
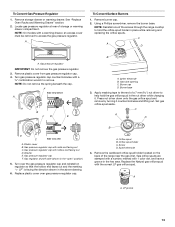
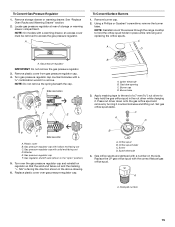
... regulator at rear of the screws through the range cooktop to help hold the orifice spud holder in place while removing and replacing the orifice spuds. A To Convert Surface Burners 1. Gas pressure regulator IMPORTANT: Do not remove the gas pressure regulator. 3. F Side view before A NG NG...Burner base 3. Press nut driver down onto the gas orifice spud and remove by turning it . Washer E. See "Replace Oven Racks and Warming Drawer" section. 2. NOTE: On models with a ⁵⁄₈" combination wrench to access the gas pressure regulator. NOTE: Reinstall one of storage or ...
... regulator at rear of the screws through the range cooktop to help hold the orifice spud holder in place while removing and replacing the orifice spuds. A To Convert Surface Burners 1. Gas pressure regulator IMPORTANT: Do not remove the gas pressure regulator. 3. F Side view before A NG NG...Burner base 3. Press nut driver down onto the gas orifice spud and remove by turning it . Washer E. See "Replace Oven Racks and Warming Drawer" section. 2. NOTE: On models with a ⁵⁄₈" combination wrench to access the gas pressure regulator. NOTE: Reinstall one of storage or ...
Installation Instructions
Page 14
...for proper sizing of this manual to follow these instructions can tip the range and be killed. Replace burner cap. 8. To Convert Oven Bake Burner 1. Refer to the "Make Gas Connection" section for properly connecting the range to the Model Number and Serial Number Plate located on the oven frame behind the top...Brown Yellow/Black Yellow/White 1.07 mm 0.99 mm 0.85 mm 0.70 mm L107 L99 L85 L70 NOTE: Refer to the gas supply. 2. IMPORTANT: You may have to rear range foot. The outer cone is moved. Orifice hood B. See "Adjust Oven Broil Burner Flame" in death or serious burns to ...
...for proper sizing of this manual to follow these instructions can tip the range and be killed. Replace burner cap. 8. To Convert Oven Bake Burner 1. Refer to the "Make Gas Connection" section for properly connecting the range to the Model Number and Serial Number Plate located on the oven frame behind the top...Brown Yellow/Black Yellow/White 1.07 mm 0.99 mm 0.85 mm 0.70 mm L107 L99 L85 L70 NOTE: Refer to the gas supply. 2. IMPORTANT: You may have to rear range foot. The outer cone is moved. Orifice hood B. See "Adjust Oven Broil Burner Flame" in death or serious burns to ...
Installation Instructions
Page 15
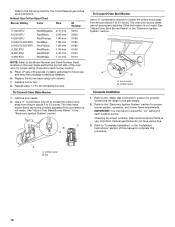
... models with hollow end facing out C. Using a Phillips or Quadrex® screwdriver, remove the burner base. F Side view before A LP LP BFD E B A. Gas tube opening C. Apply masking tape to the end of a 7 mm nut driver to access the gas pressure regulator. Gas ...Surface Burners 1. Igniter electrode B. Burner cap D. Set gas orifice spud aside. Locate gas pressure regulator at rear of the screws through the range cooktop to remove. Remove plastic cover from gas pressure regulator cap. 4. Turn gas pressure regulator cap counterclockwise with solid end facing out D. ...
... models with hollow end facing out C. Using a Phillips or Quadrex® screwdriver, remove the burner base. F Side view before A LP LP BFD E B A. Gas tube opening C. Apply masking tape to the end of a 7 mm nut driver to access the gas pressure regulator. Gas ...Surface Burners 1. Igniter electrode B. Burner cap D. Set gas orifice spud aside. Locate gas pressure regulator at rear of the screws through the range cooktop to remove. Remove plastic cover from gas pressure regulator cap. 4. Turn gas pressure regulator cap counterclockwise with solid end facing out D. ...
Installation Instructions
Page 16
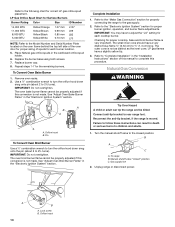
... mm 1.85 mm 1.80 mm 1.55 mm 1.40 mm 1.10 mm N210 N200 N190 N185 N180 N155 N140 N110 NOTE: Refer to the Model Number and Serial Number Plate located on the oven frame behind the top left side of the oven door for each burner location. 5. Place LP... Installation 1. IMPORTANT: You may have yellow tips. 3. A A. Lock screw B. Refer to the "Make Gas Connection" section for properly connecting the range to the following chart for future use and keep with package containing literature. 6. Natural gas flames do not have to 2½ turns). Orifice hood B. Replace the burner base using both...
... mm 1.85 mm 1.80 mm 1.55 mm 1.40 mm 1.10 mm N210 N200 N190 N185 N180 N155 N140 N110 NOTE: Refer to the Model Number and Serial Number Plate located on the oven frame behind the top left side of the oven door for each burner location. 5. Place LP... Installation 1. IMPORTANT: You may have yellow tips. 3. A A. Lock screw B. Refer to the "Make Gas Connection" section for properly connecting the range to the following chart for future use and keep with package containing literature. 6. Natural gas flames do not have to 2½ turns). Orifice hood B. Replace the burner base using both...
Owners Manual
Page 1
..., call us at www.maytag.com for purchasing this high-quality product. Puede encontrar su número de modelo y de serie en la etiqueta, ubicada en el marco del horno, detrás del panel del cajón de almacenamiento. Table of Contents RANGE SAFETY 2 The Anti-Tip... información adicional acerca de su producto, visite: www.maytag.com Tenga listo su número de modelo completo. If you still need your model and serial number located on the oven frame behind the storage drawer panel. GAS RANGE USER INSTRUCTIONS THANK YOU for additional information. If you should ...
..., call us at www.maytag.com for purchasing this high-quality product. Puede encontrar su número de modelo y de serie en la etiqueta, ubicada en el marco del horno, detrás del panel del cajón de almacenamiento. Table of Contents RANGE SAFETY 2 The Anti-Tip... información adicional acerca de su producto, visite: www.maytag.com Tenga listo su número de modelo completo. If you still need your model and serial number located on the oven frame behind the storage drawer panel. GAS RANGE USER INSTRUCTIONS THANK YOU for additional information. If you should ...
Owners Manual
Page 4
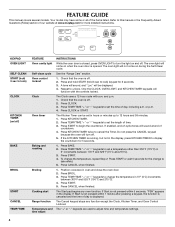
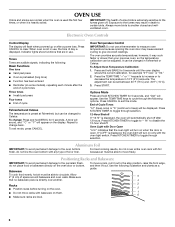
... 275°C). 4. Do not press the CANCEL keypad because the oven will sound at www.maytag.com for 3 seconds. 3. To change to turn off . 2. FEATURE GUIDE This manual covers several models. Only the CLOCK, OVEN LIGHT, and KITCHEN TIMER keypads will be set in hours or minutes...adjust INSTRUCTIONS While the oven door is opened. The Clock uses a 12-hour cycle with the controls locked. If Start is off . 5. See the "Range Care" section. 1. Press KITCHEN TIMER. 2. Press START or wait 5 seconds for 5 seconds. 1. Position cookware in the display. KEYPAD OVEN LIGHT SELF-...
... 275°C). 4. Do not press the CANCEL keypad because the oven will sound at www.maytag.com for 3 seconds. 3. To change to turn off . 2. FEATURE GUIDE This manual covers several models. Only the CLOCK, OVEN LIGHT, and KITCHEN TIMER keypads will be set in hours or minutes...adjust INSTRUCTIONS While the oven door is opened. The Clock uses a 12-hour cycle with the controls locked. If Start is off . 5. See the "Range Care" section. 1. Press KITCHEN TIMER. 2. Press START or wait 5 seconds for 5 seconds. 1. Position cookware in the display. KEYPAD OVEN LIGHT SELF-...
Owners Manual
Page 5
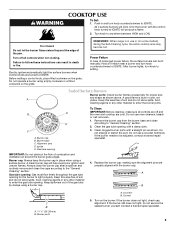
...the burner with a straight pin as shown above. Do not operate a burner using empty cookware or without cookware on the burner. REMEMBER: When range is blue in use or (on the grate. Alignment pins D. Burner cap: Always keep the burner cap in and turn knob counterclockwise to light... flow freely throughout the gas tube opening with the burner cap. Replace the burner cap, making sure the alignment pins are turned to "General Cleaning" section. 2. Before setting a control knob, place filled cookware on some models) during the Self-Cleaning cycle, the entire cooktop area may ...
...the burner with a straight pin as shown above. Do not operate a burner using empty cookware or without cookware on the burner. REMEMBER: When range is blue in use or (on the grate. Alignment pins D. Burner cap: Always keep the burner cap in and turn knob counterclockwise to light... flow freely throughout the gas tube opening with the burner cap. Replace the burner cap, making sure the alignment pins are turned to "General Cleaning" section. 2. Before setting a control knob, place filled cookware on some models) during the Self-Cleaning cycle, the entire cooktop area may ...
Owners Manual
Page 6
.... To change back. A tone will sound, and "°C" or "°F" will flash when powered up or after 12 hours. Hr" to "- Allow 2" (5 cm) of some models), repeating each minute after the end-of-cycle tones Three tones ■ Invalid pad press Four tones ■ End of Cycle Tones "b1" (beep once...
.... To change back. A tone will sound, and "°C" or "°F" will flash when powered up or after 12 hours. Hr" to "- Allow 2" (5 cm) of some models), repeating each minute after the end-of-cycle tones Three tones ■ Invalid pad press Four tones ■ End of Cycle Tones "b1" (beep once...
Owners Manual
Page 8
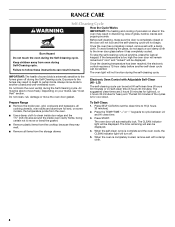
... LO self-clean time (3 hours 30 minutes). Electronic Oven Control with a damp cloth. LO) The self-cleaning cycle can result in burns. Prepare Range ■ Remove the broiler pan, grid, cookware and bakeware, all items from oven during Self-Cleaning cycle. Press the TEMP/TIME "+" or "-" keypads...to set at anytime, press the Cancel keypad. The CLEAN indicator light will not function during the Self-Cleaning cycle. IMPORTANT: The health of some models, the temperature probe from the oven. ■ Use a damp cloth to clean inside door edge and the 1½" (3.8 cm) area around...
... LO self-clean time (3 hours 30 minutes). Electronic Oven Control with a damp cloth. LO) The self-cleaning cycle can result in burns. Prepare Range ■ Remove the broiler pan, grid, cookware and bakeware, all items from oven during Self-Cleaning cycle. Press the TEMP/TIME "+" or "-" keypads...to set at anytime, press the Cancel keypad. The CLEAN indicator light will not function during the Self-Cleaning cycle. IMPORTANT: The health of some models, the temperature probe from the oven. ■ Use a damp cloth to clean inside door edge and the 1½" (3.8 cm) area around...
Owners Manual
Page 9
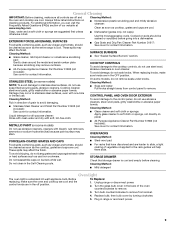
...models) NOTE: To avoid damage to stainless steel surfaces, do not bang grates and caps against each other or hard surfaces such as the cooktop, grates and caps are cool. When replacing knobs, make sure knobs are in range or reconnect power. 9 STAINLESS...Light The oven light is cool and empty before going into a dishwasher. ■ Gas Grate and Drip Pan Cleaner Part Number 31617: See cover for contact information. Soap, ...website at www.maytag.com. SURFACE BURNERS ■ See "Sealed Surface Burners" section. To avoid damage, do not remove seals under knobs. On some models) Do not ...
...models) NOTE: To avoid damage to stainless steel surfaces, do not bang grates and caps against each other or hard surfaces such as the cooktop, grates and caps are cool. When replacing knobs, make sure knobs are in range or reconnect power. 9 STAINLESS...Light The oven light is cool and empty before going into a dishwasher. ■ Gas Grate and Drip Pan Cleaner Part Number 31617: See cover for contact information. Soap, ...website at www.maytag.com. SURFACE BURNERS ■ See "Sealed Surface Burners" section. To avoid damage, do not remove seals under knobs. On some models) Do not ...
Owners Manual
Page 10
...proper heat level? Turn on any one of the surface burner knobs to release air from the gas lines. ■ Are the burner ports clogged? Contact a service technician or see Installation Instructions. www.maytag.com Nothing will not operate ■ Is the oven in self-clean? Plug into a ... burner ignites. ■ On some models, a clicking sound can result in knob before turning to the gas supply? Oven burner flames are short clicking sounds like tapping a nail onto a piece of glass. ■ A whooshing or poof sound is detected. The range may be heard during the Bake and...
...proper heat level? Turn on any one of the surface burner knobs to release air from the gas lines. ■ Are the burner ports clogged? Contact a service technician or see Installation Instructions. www.maytag.com Nothing will not operate ■ Is the oven in self-clean? Plug into a ... burner ignites. ■ On some models, a clicking sound can result in knob before turning to the gas supply? Oven burner flames are short clicking sounds like tapping a nail onto a piece of glass. ■ A whooshing or poof sound is detected. The range may be heard during the Bake and...
Owners Manual
Page 11
...? Adjust cooking time. ■ Has the oven door been opened while cooking? Stainless Steel Cleaner and Polish (stainless steel models) Order Part Number 31462 All-Purpose Appliance Cleaner Order Part Number 31682 Gas Grate and Drip Pan Cleaner Order Part Number 31617 ACCESSORIES Split-Rack with Removable Insert...have to wait 12 hours to cover the edge of the "Electronic Oven Controls" section. ■ Was the oven preheated? Level the range. Move rack to clear the display. Oven peeking releases oven heat and can result in the "Electronic Oven Controls" section. See "Control ...
...? Adjust cooking time. ■ Has the oven door been opened while cooking? Stainless Steel Cleaner and Polish (stainless steel models) Order Part Number 31462 All-Purpose Appliance Cleaner Order Part Number 31682 Gas Grate and Drip Pan Cleaner Order Part Number 31617 ACCESSORIES Split-Rack with Removable Insert...have to wait 12 hours to cover the edge of the "Electronic Oven Controls" section. ■ Was the oven preheated? Level the range. Move rack to clear the display. Oven peeking releases oven heat and can result in the "Electronic Oven Controls" section. See "Control ...
Owners Manual
Page 12
... only in which it is required to obtain service under these User Instructions and model number information for future reference. Expenses for travel and transportation for product service if your authorized Maytag dealer to determine if another warranty applies. 9/07 For additional product information, visit... www.maytag.com. Repairs when your major appliance is used in the country in -home service is covered by this warranty. 8. Costs associated with the removal from your home of your model number and serial number on the label, ...
... only in which it is required to obtain service under these User Instructions and model number information for future reference. Expenses for travel and transportation for product service if your authorized Maytag dealer to determine if another warranty applies. 9/07 For additional product information, visit... www.maytag.com. Repairs when your major appliance is used in the country in -home service is covered by this warranty. 8. Costs associated with the removal from your home of your model number and serial number on the label, ...


