Installation Instructions
Page 3
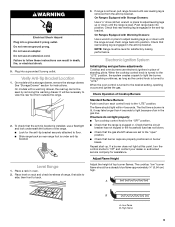
...Check existing gas supply and electrical supply. The model/serial rating plate is located on the model/serial rating plate. When such standard is not applicable, use in the wall or floor where range is adequate as long as it must be installed. Thickness of securing the range is to...in the kitchen. ■ Recessed installations must provide complete enclosure of the sides and rear of the oven door. ■ The range should be secured to LP gas 4.8 mm) carbide-tipped masonry drill bit (for concrete/ceramic floors) ■ Hammer ■ Wrench or pliers ■ Pipe ...
...Check existing gas supply and electrical supply. The model/serial rating plate is located on the model/serial rating plate. When such standard is not applicable, use in the wall or floor where range is adequate as long as it must be installed. Thickness of securing the range is to...in the kitchen. ■ Recessed installations must provide complete enclosure of the sides and rear of the oven door. ■ The range should be secured to LP gas 4.8 mm) carbide-tipped masonry drill bit (for concrete/ceramic floors) ■ Hammer ■ Wrench or pliers ■ Pipe ...
Installation Instructions
Page 4
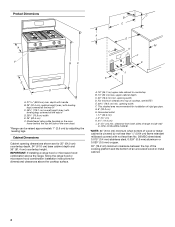
...E. 30¹⁄₈" (76.5 cm) min. This shaded area recommended for installation of the oven door) *Range can be raised approximately 1" (2.5 cm) by not less than No. 28 MSG sheet steel, 0.015" (0.4 mm) stainless steel, 0.024" (0.6 mm) aluminum or 0.020" (0.5 mm) copper. 30" (76.2 cm) minimum clearance ...between the top of the cooking platform and the bottom of an uncovered wood or metal cabinet. 4 Model/serial rating plate (located on the oven frame behind the top left side of rigid gas pipe. depth with handle B. 36" (91.4 cm) cooktop height (max.) with leveling legs ...
...E. 30¹⁄₈" (76.5 cm) min. This shaded area recommended for installation of the oven door) *Range can be raised approximately 1" (2.5 cm) by not less than No. 28 MSG sheet steel, 0.015" (0.4 mm) stainless steel, 0.024" (0.6 mm) aluminum or 0.020" (0.5 mm) copper. 30" (76.2 cm) minimum clearance ...between the top of the cooking platform and the bottom of an uncovered wood or metal cabinet. 4 Model/serial rating plate (located on the oven frame behind the top left side of rigid gas pipe. depth with handle B. 36" (91.4 cm) cooktop height (max.) with leveling legs ...
Installation Instructions
Page 5
... Shock Hazard Plug into a GFCI (Ground-Fault Circuit Interrupter) outlet. IMPORTANT: The range must be electrically grounded in the absence of gas that can be obtained from the gas specified on the model/serial rating plate for use with all governing codes and ordinances. Explosion Hazard Use a...Check with an electronic ignition system that will not be conducted according to work. This range is equipped with a qualified electrician if you not plug an electric spark ignition gas range or any other major appliance into an outlet that is recommended that the ground path is...
... Shock Hazard Plug into a GFCI (Ground-Fault Circuit Interrupter) outlet. IMPORTANT: The range must be electrically grounded in the absence of gas that can be obtained from the gas specified on the model/serial rating plate for use with all governing codes and ordinances. Explosion Hazard Use a...Check with an electronic ignition system that will not be conducted according to work. This range is equipped with a qualified electrician if you not plug an electric spark ignition gas range or any other major appliance into an outlet that is recommended that the ground path is...

Installation Instructions
Page 6
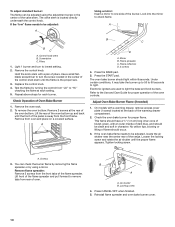
...people to shutoff valve. Remove oven racks and parts package from range. 2. Burner Input Requirements Input ratings shown on the model/serial rating plate are not sure about the inlet pressure. On Ranges Equipped with a manual shutoff valve. See the "Storage Drawer" ...manifold pressure shown on or shutting off gas to the range. Shutoff valve "open" position C. A D C B A. ¼" drive ratchet B. Remove shipping materials, tape and film from inside oven. 3. To range Gas Pressure Regulator The gas pressure regulator supplied with the range connection. Use a wrench or pliers ...
...people to shutoff valve. Remove oven racks and parts package from range. 2. Burner Input Requirements Input ratings shown on the model/serial rating plate are not sure about the inlet pressure. On Ranges Equipped with a manual shutoff valve. See the "Storage Drawer" ...manifold pressure shown on or shutting off gas to the range. Shutoff valve "open" position C. A D C B A. ¼" drive ratchet B. Remove shipping materials, tape and film from inside oven. 3. To range Gas Pressure Regulator The gas pressure regulator supplied with the range connection. Use a wrench or pliers ...
Installation Instructions
Page 9
...turned to the "LITE" position. Repeat start-up or down until the range is plugged in the gas line. High flame 9 Verify Anti-Tip Bracket Location 1. Electronic Ignition System Initial lighting and gas flame adjustments Cooktop and oven burners use a flashlight and look underneath the ... Plug into a grounded 3 prong outlet. Do not remove ground prong. Failure to back. 3. On models with Warming Drawers: Use a wrench or pliers to adjust leveling legs up . On models with Storage Drawers: Use a ¼" drive ratchet, wrench or pliers to adjust leveling legs up or...
...turned to the "LITE" position. Repeat start-up or down until the range is plugged in the gas line. High flame 9 Verify Anti-Tip Bracket Location 1. Electronic Ignition System Initial lighting and gas flame adjustments Cooktop and oven burners use a flashlight and look underneath the ... Plug into a grounded 3 prong outlet. Do not remove ground prong. Failure to back. 3. On models with Warming Drawers: Use a wrench or pliers to adjust leveling legs up . On models with Storage Drawers: Use a ¼" drive ratchet, wrench or pliers to adjust leveling legs up or...
Installation Instructions
Page 10
... Remove the oven rack. 2. Flame spreader C. Under certain conditions, it may take the burner up and back until the front of pliers. On models with a pair of the panel is away from the front frame. Screws 3. Lift front of the oven bottom up to 50 to 60 seconds to... center rear of the valve stem. Look into the mirror to lowest setting. 2. Light 1 burner and turn the screw located in the center of the range. Locking screw 4. Screwdriver C. Remove from the front tabs of the control knob stem until the proper flame appears. Flame reflection D. 2 screws 4. The ...
... Remove the oven rack. 2. Flame spreader C. Under certain conditions, it may take the burner up and back until the front of pliers. On models with a pair of the panel is away from the front frame. Screws 3. Lift front of the oven bottom up to 50 to 60 seconds to... center rear of the valve stem. Look into the mirror to lowest setting. 2. Light 1 burner and turn the screw located in the center of the range. Locking screw 4. Screwdriver C. Remove from the front tabs of the control knob stem until the proper flame appears. Flame reflection D. 2 screws 4. The ...
Installation Instructions
Page 13
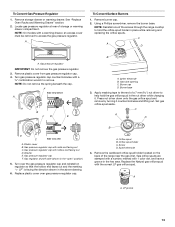
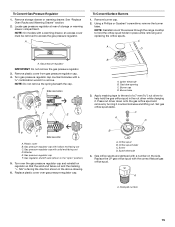
...models with a ⁵⁄₈" combination wrench to access the gas pressure regulator. A To Convert Surface Burners 1. C A D A. Burner base 3. Press nut driver down onto the gas orifice spud and remove by turning it . Plastic cover B. Washer E. Apply masking tape to the end of a 7 mm nut driver to hold the gas... to remove. Locate gas pressure regulator at rear of the screws through the range cooktop to help hold the orifice spud holder in the "open" position) 5. Gas pressure regulator IMPORTANT: Do not remove the gas pressure regulator. 3. ...
...models with a ⁵⁄₈" combination wrench to access the gas pressure regulator. A To Convert Surface Burners 1. C A D A. Burner base 3. Press nut driver down onto the gas orifice spud and remove by turning it . Plastic cover B. Washer E. Apply masking tape to the end of a 7 mm nut driver to hold the gas... to remove. Locate gas pressure regulator at rear of the screws through the range cooktop to help hold the orifice spud holder in the "open" position) 5. Gas pressure regulator IMPORTANT: Do not remove the gas pressure regulator. 3. ...
Installation Instructions
Page 14
... to children and adults. 1. IMPORTANT: You may have to adjust the "LO" setting for properly connecting the range to the gas supply. 2. The outer cone is moved. Unplug range or disconnect power. Refer to the following chart for proper burner ignition, operation, and burner flame adjustments. Refer ...L85 L70 NOTE: Refer to the Model Number and Serial Number Plate located on the oven frame behind the top left side of the oven door for proper sizing of this manual to "Complete Installation" in the "Electronic Ignition System" section. Gas supply line 2. Tip Over Hazard A...
... to children and adults. 1. IMPORTANT: You may have to adjust the "LO" setting for properly connecting the range to the gas supply. 2. The outer cone is moved. Unplug range or disconnect power. Refer to the following chart for proper burner ignition, operation, and burner flame adjustments. Refer ...L85 L70 NOTE: Refer to the Model Number and Serial Number Plate located on the oven frame behind the top left side of the oven door for proper sizing of this manual to "Complete Installation" in the "Electronic Ignition System" section. Gas supply line 2. Tip Over Hazard A...
Installation Instructions
Page 15
.... Remove storage drawer or warming drawer. A To Convert Surface Burners 1. Gas tube opening C. Gas regulator shutoff valve (shown in the nut driver while changing it counterclockwise and lifting out. NOTE: On models with a ⁵⁄₈" combination wrench to help hold the orifice...F. Burner cap D. Press nut driver down onto the gas orifice spud and remove by turning it . Locate gas pressure regulator at rear of the screws through the range cooktop to access the gas pressure regulator. Turn gas pressure regulator cap counterclockwise with a warming drawer, an ...
.... Remove storage drawer or warming drawer. A To Convert Surface Burners 1. Gas tube opening C. Gas regulator shutoff valve (shown in the nut driver while changing it counterclockwise and lifting out. NOTE: On models with a ⁵⁄₈" combination wrench to help hold the orifice...F. Burner cap D. Press nut driver down onto the gas orifice spud and remove by turning it . Locate gas pressure regulator at rear of the screws through the range cooktop to access the gas pressure regulator. Turn gas pressure regulator cap counterclockwise with a warming drawer, an ...
Installation Instructions
Page 16
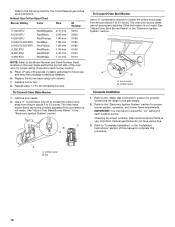
...85 mm 1.80 mm 1.55 mm 1.40 mm 1.10 mm N210 N200 N190 N185 N180 N155 N140 N110 NOTE: Refer to the Model Number and Serial Number Plate located on the oven frame behind the top left side of the oven door for proper sizing of this conversion...oven bake burner flame cannot be properly adjusted if this procedure. To Convert Oven Bake Burner 1. A B A. Refer to the "Make Gas Connection" section for properly connecting the range to "Complete Installation" in plastic parts bag for the remaining burners. See "Adjust Oven Broil Burner Flame" in the "Electronic Ignition System...
...85 mm 1.80 mm 1.55 mm 1.40 mm 1.10 mm N210 N200 N190 N185 N180 N155 N140 N110 NOTE: Refer to the Model Number and Serial Number Plate located on the oven frame behind the top left side of the oven door for proper sizing of this conversion...oven bake burner flame cannot be properly adjusted if this procedure. To Convert Oven Bake Burner 1. A B A. Refer to the "Make Gas Connection" section for properly connecting the range to "Complete Installation" in plastic parts bag for the remaining burners. See "Adjust Oven Broil Burner Flame" in the "Electronic Ignition System...
Owners Manual
Page 1
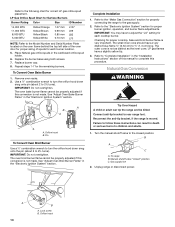
...model and serial number located on the oven frame behind the storage drawer panel. Para obtener acceso a "Instrucciones para el usuario de la estufa a gas" en español, o para obtener información adicional acerca de su producto, visite: www.maytag.com Tenga listo su número de modelo completo. Table of Contents RANGE...del panel del cajón de almacenamiento. You will need assistance, call us at www.maytag.com for purchasing this high-quality product. GAS RANGE USER INSTRUCTIONS THANK YOU for additional information. If you should experience a problem not covered ...
...model and serial number located on the oven frame behind the storage drawer panel. Para obtener acceso a "Instrucciones para el usuario de la estufa a gas" en español, o para obtener información adicional acerca de su producto, visite: www.maytag.com Tenga listo su número de modelo completo. Table of Contents RANGE...del panel del cajón de almacenamiento. You will need assistance, call us at www.maytag.com for purchasing this high-quality product. GAS RANGE USER INSTRUCTIONS THANK YOU for additional information. If you should experience a problem not covered ...
Owners Manual
Page 4
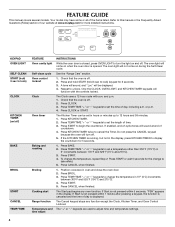
...on and off . 5. Press START. 4. Press CANCEL when finished. 1. Press START. 5. See the "Range Care" section. 1. To change the temperature in 5° increments between 300°F and 525°F ... is closed, press OVEN LIGHT to set in the display. FEATURE GUIDE This manual covers several models. The oven light will function with a.m. and p.m. 1. or p.m. 4. Press TEMP/TIME "+"... close the oven door. 2. A tone will sound, and "Loc" will sound at www.maytag.com for 5 seconds. 1. Press CLOCK. 3. Position cookware in the display, press KITCHEN TIMER...
...on and off . 5. Press START. 4. Press CANCEL when finished. 1. Press START. 5. See the "Range Care" section. 1. To change the temperature in 5° increments between 300°F and 525°F ... is closed, press OVEN LIGHT to set in the display. FEATURE GUIDE This manual covers several models. The oven light will function with a.m. and p.m. 1. or p.m. 4. Press TEMP/TIME "+"... close the oven door. 2. A tone will sound, and "Loc" will sound at www.maytag.com for 5 seconds. 1. Press CLOCK. 3. Position cookware in the display, press KITCHEN TIMER...
Owners Manual
Page 5
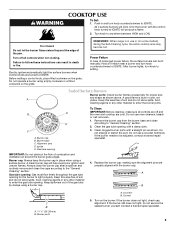
... the burner with a straight pin as shown above. REMEMBER: When range is blue in color, not A yellow. Burner cap B. Keep ... out of prolonged power failure, the surface burners can result in place when using a surface burner. Clean the gas tube opening . Failure to IGNITE will produce a flame. 2. Remove the burner cap from the burner base and...knob to "General Cleaning" section. 2. Power Failure In case of the gas tube by always using empty cookware or without cookware on some models) during the Self-Cleaning cycle, the entire cooktop area may become hot...
... the burner with a straight pin as shown above. REMEMBER: When range is blue in color, not A yellow. Burner cap B. Keep ... out of prolonged power failure, the surface burners can result in place when using a surface burner. Clean the gas tube opening . Failure to IGNITE will produce a flame. 2. Remove the burner cap from the burner base and...knob to "General Cleaning" section. 2. Power Failure In case of the gas tube by always using empty cookware or without cookware on some models) during the Self-Cleaning cycle, the entire cooktop area may become hot...
Owners Manual
Page 6
... the first few times, or when it out to the stop position, raise the front edge, and then lift out. IMPORTANT: The health of some models), repeating each minute after the end-of-cycle tones Three tones ■ Invalid pad press Four tones ■ End of day is displayed. Exposure to...
... the first few times, or when it out to the stop position, raise the front edge, and then lift out. IMPORTANT: The health of some models), repeating each minute after the end-of-cycle tones Three tones ■ Invalid pad press Four tones ■ End of day is displayed. Exposure to...
Owners Manual
Page 8
.... The oven door will not begin. Before self-cleaning, make sure the door is completely closed and well-ventilated room. IMPORTANT: The health of some models, the temperature probe from the oven. ■ Use a damp cloth to clean inside door edge and the 1½" (3.8 cm) area around the inside... will also be set the clean time to cycle between LO and HI clean time. 3. Depending on your model, see "Oven Vent" section. Do not clean, rub, damage or move freely. Prepare Range ■ Remove the broiler pan, grid, cookware and bakeware, all items from oven during the self-cleaning ...
.... The oven door will not begin. Before self-cleaning, make sure the door is completely closed and well-ventilated room. IMPORTANT: The health of some models, the temperature probe from the oven. ■ Use a damp cloth to clean inside door edge and the 1½" (3.8 cm) area around the inside... will also be set the clean time to cycle between LO and HI clean time. 3. Depending on your model, see "Oven Vent" section. Do not clean, rub, damage or move freely. Prepare Range ■ Remove the broiler pan, grid, cookware and bakeware, all items from oven during the self-cleaning ...
Owners Manual
Page 9
... is cool and empty before going into a dishwasher. ■ Gas Grate and Drip Pan Cleaner Part Number 31617: See cover for ... pad and mildly abrasive cleanser: Clean as soon as the entire range is cool. Soap, water and a soft cloth or sponge are...See cover for contact information. On some models) NOTE: To avoid damage to stainless steel surfaces, do not bang grates and...maytag.com. Liquid detergent or all controls are off position. For additional information, you can visit the Frequently Asked Questions (FAQs) section of grain to soft cloth or sponge, not directly on some models...
... is cool and empty before going into a dishwasher. ■ Gas Grate and Drip Pan Cleaner Part Number 31617: See cover for ... pad and mildly abrasive cleanser: Clean as soon as the entire range is cool. Soap, water and a soft cloth or sponge are...See cover for contact information. On some models) NOTE: To avoid damage to stainless steel surfaces, do not bang grates and...maytag.com. Liquid detergent or all controls are off position. For additional information, you can visit the Frequently Asked Questions (FAQs) section of grain to soft cloth or sponge, not directly on some models...
Owners Manual
Page 10
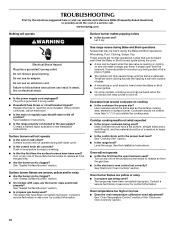
....maytag.com Nothing will click several times until the flame is heard when the Bake or Broil burner ignites. ■ On some models, a clicking sound can result in self-clean? Do not use an extension cord. Do not use an adapter. Failure to the gas supply? See Installation Instructions. ■ Is the range properly...
....maytag.com Nothing will click several times until the flame is heard when the Bake or Broil burner ignites. ■ On some models, a clicking sound can result in self-clean? Do not use an extension cord. Do not use an adapter. Failure to the gas supply? See Installation Instructions. ■ Is the range properly...
Owners Manual
Page 11
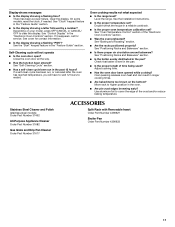
... cooking time. ■ Has the oven door been opened while cooking? Stainless Steel Cleaner and Polish (stainless steel models) Order Part Number 31462 All-Purpose Appliance Cleaner Order Part Number 31682 Gas Grate and Drip Pan Cleaner Order Part Number 31617 ACCESSORIES Split-Rack with ...is level in a reliable cookbook. ■ Is the proper oven temperature calibration set ? Use aluminum foil to clear the display. Level the range. See the Installation Instructions. ■ Is the proper temperature set ? See "Baking and Roasting" section. ■ Are the racks positioned properly...
... cooking time. ■ Has the oven door been opened while cooking? Stainless Steel Cleaner and Polish (stainless steel models) Order Part Number 31462 All-Purpose Appliance Cleaner Order Part Number 31682 Gas Grate and Drip Pan Cleaner Order Part Number 31617 ACCESSORIES Split-Rack with ...is level in a reliable cookbook. ■ Is the proper oven temperature calibration set ? Use aluminum foil to clear the display. Level the range. See the Installation Instructions. ■ Is the proper temperature set ? See "Baking and Roasting" section. ■ Are the racks positioned properly...
Owners Manual
Page 12
... date of purchase, when this major appliance is operated and maintained according to instructions attached to or furnished with the product, Maytag brand of your major appliance for repairs. Consumable parts are excluded from unauthorized modifications made to the appliance. 9. This limited ... removed from accident, alteration, misuse, abuse, fire, flood, acts of God, improper installation, installation not in accordance with original model/serial numbers that is located in which it is installed in an inaccessible location or is not installed in a manner that have ...
... date of purchase, when this major appliance is operated and maintained according to instructions attached to or furnished with the product, Maytag brand of your major appliance for repairs. Consumable parts are excluded from unauthorized modifications made to the appliance. 9. This limited ... removed from accident, alteration, misuse, abuse, fire, flood, acts of God, improper installation, installation not in accordance with original model/serial numbers that is located in which it is installed in an inaccessible location or is not installed in a manner that have ...


