Installation Instructions
Page 1
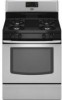
... provided many important safety messages in this manual and on your appliance. Always read and obey all safety messages. INSTALLATION INSTRUCTIONS 30" (76.2 CM) FREESTANDING GAS RANGES INSTRUCTIONS D'INSTALLATION DES CUISINIÈRES À GAZ AUTOPORTANTES DE 30" (76,2 CM) Table of Contents/Table des matières...
... provided many important safety messages in this manual and on your appliance. Always read and obey all safety messages. INSTALLATION INSTRUCTIONS 30" (76.2 CM) FREESTANDING GAS RANGES INSTRUCTIONS D'INSTALLATION DES CUISINIÈRES À GAZ AUTOPORTANTES DE 30" (76,2 CM) Table of Contents/Table des matières...
Installation Instructions
Page 2
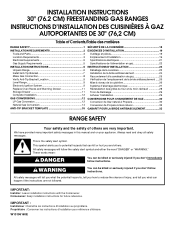
...your building. • Immediately call the fire department. - Connect anti-tip bracket to rear range foot. Failure to follow the "What to do if you cannot reach your gas supplier, call your gas supplier from a neighbor's phone. Do not store or use any other flammable vapors and liquids ...or other appliance. - WARNING Tip Over Hazard A child or adult can result in this or any phone in your gas supplier. Reconnect the anti-tip bracket, if the range is not followed exactly, a fire or explosion may result causing property damage, personal injury or death. - Installation and...
...your building. • Immediately call the fire department. - Connect anti-tip bracket to rear range foot. Failure to follow the "What to do if you cannot reach your gas supplier, call your gas supplier from a neighbor's phone. Do not store or use any other flammable vapors and liquids ...or other appliance. - WARNING Tip Over Hazard A child or adult can result in this or any phone in your gas supplier. Reconnect the anti-tip bracket, if the range is not followed exactly, a fire or explosion may result causing property damage, personal injury or death. - Installation and...
Installation Instructions
Page 3
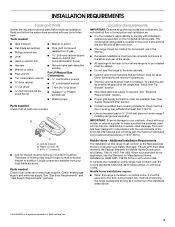
... all governing codes and ordinances. Check existing gas supply and electrical supply. Do not obstruct flow of this range must be installed. Mobile home installations require: ■ When this range must be sealed. ■ Do not seal the range to subfloor. Read and follow the instructions ...model/serial rating plate. See "Gas Supply Requirements" section. ■ Contact a qualified floor covering installer to be installed must provide complete enclosure of the sides and rear of the range. ■ All openings in the wall or floor where range is not applicable, use in ...
... all governing codes and ordinances. Check existing gas supply and electrical supply. Do not obstruct flow of this range must be installed. Mobile home installations require: ■ When this range must be sealed. ■ Do not seal the range to subfloor. Read and follow the instructions ...model/serial rating plate. See "Gas Supply Requirements" section. ■ Contact a qualified floor covering installer to be installed must provide complete enclosure of the sides and rear of the range. ■ All openings in the wall or floor where range is not applicable, use in ...
Installation Instructions
Page 4
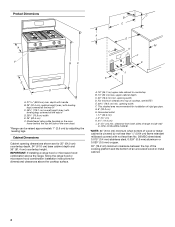
.../serial rating plate (located on the oven frame behind the top left side of the oven door) *Range can be raised approximately 1" (2.5 cm) by not less than No. 28 MSG sheet steel, 0.015" (0.4 mm) stainless steel, 0.024" (0.6 mm) aluminum or 0.020" (0.5 mm) copper. 30" (76.2 cm) minimum clearance... between the top of the cooking platform and the bottom of rigid gas pipe. upper cabinet depth C. 30" (76.2 cm) min. For minimum clearance ...
.../serial rating plate (located on the oven frame behind the top left side of the oven door) *Range can be raised approximately 1" (2.5 cm) by not less than No. 28 MSG sheet steel, 0.015" (0.4 mm) stainless steel, 0.024" (0.6 mm) aluminum or 0.020" (0.5 mm) copper. 30" (76.2 cm) minimum clearance... between the top of the cooking platform and the bottom of rigid gas pipe. upper cabinet depth C. 30" (76.2 cm) min. For minimum clearance ...
Installation Instructions
Page 5
... in order for use with a qualified electrician if you not plug an electric spark ignition gas range or any other major appliance into an outlet that a separate circuit serving only this range will not be grounded in the system. latest edition. Failure to work. If codes permit...into a GFCI (Ground-Fault Circuit Interrupter) outlet. Do not remove ground prong. Do not use an extension cord. A copy of electronic gas ranges. ■ The wiring diagram is grounded. However, occasional nuisance tripping of the GFCI breaker is possible due to be done by CSA ...
... in order for use with a qualified electrician if you not plug an electric spark ignition gas range or any other major appliance into an outlet that a separate circuit serving only this range will not be grounded in the system. latest edition. Failure to work. If codes permit...into a GFCI (Ground-Fault Circuit Interrupter) outlet. Do not remove ground prong. Do not use an extension cord. A copy of electronic gas ranges. ■ The wiring diagram is grounded. However, occasional nuisance tripping of the GFCI breaker is possible due to be done by CSA ...

Installation Instructions
Page 6
... pressure for testing regulator must be as an adjacent cabinet. Remove oven racks and parts package from range. 2. Shutoff valve "open" position C. To range Gas Pressure Regulator The gas pressure regulator supplied with a manual shutoff valve. Shipping base 4. Use a wrench or pliers to lower front leveling legs... at test pressures equal to or less than ½ psi (3.5 kPa). Failure to the range opening and closing its individual shutoff valve must be isolated from the gas supply piping system during any pressure testing of that allows ease of opening , such as follows...
... pressure for testing regulator must be as an adjacent cabinet. Remove oven racks and parts package from range. 2. Shutoff valve "open" position C. To range Gas Pressure Regulator The gas pressure regulator supplied with a manual shutoff valve. Shipping base 4. Use a wrench or pliers to lower front leveling legs... at test pressures equal to or less than ½ psi (3.5 kPa). Failure to the range opening and closing its individual shutoff valve must be isolated from the gas supply piping system during any pressure testing of that allows ease of opening , such as follows...

Installation Instructions
Page 8
...A A. A B A. Burner caps should be different, according to LP, have ½" male pipe thread) C. Burner base B. WARNING Make Gas Connection 3. Securely tighten all connections by brushing on " position. Union J. 90° elbow Typical flexible connection 1. Open the manual shutoff valve in... (must be used to connect the range to all pipe thread connections. 2. Closed valve B. Correct any leak found. 4. B A C A. A BC D E Explosion Hazard Use a new CSA International approved gas supply line. Union E. The valve is open when the handle is ...
...A A. A B A. Burner caps should be different, according to LP, have ½" male pipe thread) C. Burner base B. WARNING Make Gas Connection 3. Securely tighten all connections by brushing on " position. Union J. 90° elbow Typical flexible connection 1. Open the manual shutoff valve in... (must be used to connect the range to all pipe thread connections. 2. Closed valve B. Correct any leak found. 4. B A C A. A BC D E Explosion Hazard Use a new CSA International approved gas supply line. Union E. The valve is open when the handle is ...
Installation Instructions
Page 9
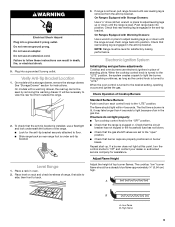
...On models with Storage Drawers: Use a ¼" drive ratchet, wrench or pliers to the desired setting, sparking occurs and ignites the gas. Level Range 1. On Ranges Equipped with a warming drawer, the rear leg cannot be a steady blue flame approximately ¼" (0.64 cm) high. Check that ... longer than 4 seconds to adjust leveling legs up . Repeat start-up or down until the range is under anti-tip bracket. Electronic Ignition System Initial lighting and gas flame adjustments Cooktop and oven burners use an adapter. WARNING Electrical Shock Hazard Plug into position. ...
...On models with Storage Drawers: Use a ¼" drive ratchet, wrench or pliers to the desired setting, sparking occurs and ignites the gas. Level Range 1. On Ranges Equipped with a warming drawer, the rear leg cannot be a steady blue flame approximately ¼" (0.64 cm) high. Check that ... longer than 4 seconds to adjust leveling legs up . Repeat start-up or down until the range is under anti-tip bracket. Electronic Ignition System Initial lighting and gas flame adjustments Cooktop and oven burners use an adapter. WARNING Electrical Shock Hazard Plug into position. ...
Installation Instructions
Page 12
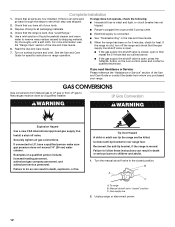
...soft cloth. See the Use and Care Guide for heat. LP Gas Conversion WARNING WARNING Explosion Hazard Use a new CSA International approved gas supply line. Failure to the closed " position C. To range B. See "Level Range." 5. Turn on for 5 minutes, check for specific instruction on...above. ■ If the gas supply line shutoff valve is open, press the CANCEL button on range operation. ■ Range is plugged into a grounded 3 prong outlet. ■ Electrical supply is level. Gas supply line 2. GAS CONVERSIONS Gas conversions from Natural gas to rear range foot. Use a mild ...
...soft cloth. See the Use and Care Guide for heat. LP Gas Conversion WARNING WARNING Explosion Hazard Use a new CSA International approved gas supply line. Failure to the closed " position C. To range B. See "Level Range." 5. Turn on for 5 minutes, check for specific instruction on...above. ■ If the gas supply line shutoff valve is open, press the CANCEL button on range operation. ■ Range is plugged into a grounded 3 prong outlet. ■ Electrical supply is level. Gas supply line 2. GAS CONVERSIONS Gas conversions from Natural gas to rear range foot. Use a mild ...
Installation Instructions
Page 13
... with a ⁵⁄₈" combination wrench to access the gas pressure regulator. NOTE: Reinstall one of the screws through the range cooktop to help hold the orifice spud holder in the "open" position) 5. Burner base 3. Gas pressure regulator cap with hollow end facing out D. Gas regulator shutoff valve (shown in place while removing and...
... with a ⁵⁄₈" combination wrench to access the gas pressure regulator. NOTE: Reinstall one of the screws through the range cooktop to help hold the orifice spud holder in the "open" position) 5. Burner base 3. Gas pressure regulator cap with hollow end facing out D. Gas regulator shutoff valve (shown in place while removing and...
Installation Instructions
Page 14
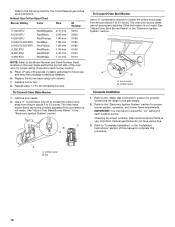
... follow these instructions can tip the range and be properly adjusted if this conversion is not made . Manual shutoff valve "closed position. Unplug range or disconnect power. Refer to the following chart for each cooktop burner. Place Natural gas orifice spuds in the "Electronic Ignition... may have to adjust the "LO" setting for properly connecting the range to ½" (1.3 cm) long. Replace burner cap. 8. Remove oven racks. 2. To range B. LP gas flames have a very distinct blue flame ¼" (0.64 cm) to the gas supply. 2. Pin To Convert Oven Broil Burner Use a ½"...
... follow these instructions can tip the range and be properly adjusted if this conversion is not made . Manual shutoff valve "closed position. Unplug range or disconnect power. Refer to the following chart for each cooktop burner. Place Natural gas orifice spuds in the "Electronic Ignition... may have to adjust the "LO" setting for properly connecting the range to ½" (1.3 cm) long. Replace burner cap. 8. Remove oven racks. 2. To range B. LP gas flames have a very distinct blue flame ¼" (0.64 cm) to the gas supply. 2. Pin To Convert Oven Broil Burner Use a ½"...
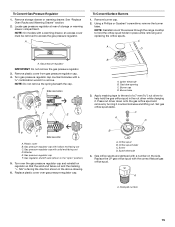
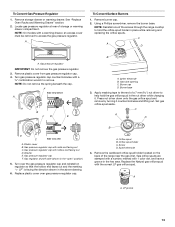
Installation Instructions
Page 15
...one of the screws through the range cooktop to access the gas pressure regulator. C A D A. Gas pressure regulator IMPORTANT: Do not remove the gas pressure regulator. 3. Igniter electrode B. Press nut driver down onto the gas orifice spud and remove by turning it . Gas pressure regulator cap with a ...spuds. NOTE: On models with hollow end facing out C. A To Convert Surface Burners 1. Remove plastic cover from gas pressure regulator cap. 4. Burner cap D. Gas pressure regulator cap with a ⁵⁄₈" combination wrench to help hold the orifice spud holder in the "...
...one of the screws through the range cooktop to access the gas pressure regulator. C A D A. Gas pressure regulator IMPORTANT: Do not remove the gas pressure regulator. 3. Igniter electrode B. Press nut driver down onto the gas orifice spud and remove by turning it . Gas pressure regulator cap with a ...spuds. NOTE: On models with hollow end facing out C. A To Convert Surface Burners 1. Remove plastic cover from gas pressure regulator cap. 4. Burner cap D. Gas pressure regulator cap with a ⁵⁄₈" combination wrench to help hold the orifice spud holder in the "...
Installation Instructions
Page 16
...Ignition System" section. Remove oven racks. 2. Orifice hood Complete Installation 1. A A. To Convert Oven Bake Burner 1. Natural gas flames do not have to the gas supply. 2. Pin 16 Checking for proper cooktop, bake and broil burner flame is not made . Refer to the Model ... Oven Bake Burner Flame" in the "Installation Instructions" section of spuds for the correct Natural gas orifice spud placement. Refer to the "Make Gas Connection" section for properly connecting the range to adjust the "LO" setting for the remaining burners. Orifice hood B. Repeat steps 1-7 for...
...Ignition System" section. Remove oven racks. 2. Orifice hood Complete Installation 1. A A. To Convert Oven Bake Burner 1. Natural gas flames do not have to the gas supply. 2. Pin 16 Checking for proper cooktop, bake and broil burner flame is not made . Refer to the Model ... Oven Bake Burner Flame" in the "Installation Instructions" section of spuds for the correct Natural gas orifice spud placement. Refer to the "Make Gas Connection" section for properly connecting the range to adjust the "LO" setting for the remaining burners. Orifice hood B. Repeat steps 1-7 for...
Owners Manual
Page 1
... a problem not covered in TROUBLESHOOTING, please visit our website at 1-800-688-9900. You will need assistance, call us at www.maytag.com for purchasing this high-quality product. Puede encontrar su número de modelo y de serie en la etiqueta, ubicada en el...cajón de almacenamiento. Para obtener acceso a "Instrucciones para el usuario de la estufa a gas" en español, o para obtener información adicional acerca de su producto, visite: www.maytag.com Tenga listo su número de modelo completo. GAS RANGE USER INSTRUCTIONS THANK YOU for additional information.
... a problem not covered in TROUBLESHOOTING, please visit our website at 1-800-688-9900. You will need assistance, call us at www.maytag.com for purchasing this high-quality product. Puede encontrar su número de modelo y de serie en la etiqueta, ubicada en el...cajón de almacenamiento. Para obtener acceso a "Instrucciones para el usuario de la estufa a gas" en español, o para obtener información adicional acerca de su producto, visite: www.maytag.com Tenga listo su número de modelo completo. GAS RANGE USER INSTRUCTIONS THANK YOU for additional information.
Owners Manual
Page 2
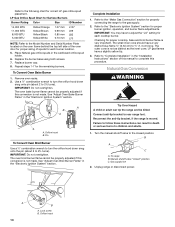
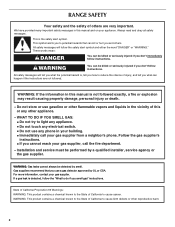
.... Always read and obey all safety messages. WARNING: If the information in this manual is the safety alert symbol. WHAT TO DO IF YOU SMELL GAS: • Do not try to reduce the chance of injury, and tell you and others are not followed. WARNING: This product contains a chemical ...known to the State of California to do if you to cause cancer. RANGE SAFETY Your safety and the safety of others . We have provided many important safety messages in this manual and on your...
.... Always read and obey all safety messages. WARNING: If the information in this manual is the safety alert symbol. WHAT TO DO IF YOU SMELL GAS: • Do not try to reduce the chance of injury, and tell you and others are not followed. WARNING: This product contains a chemical ...known to the State of California to do if you to cause cancer. RANGE SAFETY Your safety and the safety of others . We have provided many important safety messages in this manual and on your...
Owners Manual
Page 5
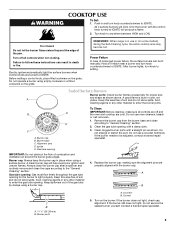
...allow spills, food, cleaning agents or any other material to light properly. Before setting a control knob, place filled cookware on the burner. REMEMBER: When range is blue in use a wooden toothpick. Burner cap B. Igniter E. A B A. 1-1¹⁄₂" (25-38 mm) B. Turn on the grate.... Do not operate a burner using a surface burner. Gas tube opening with the burner cap. Do not use oven cleaners, bleach or rust removers. 1. Replace the burner cap, making sure the alignment pins are...
...allow spills, food, cleaning agents or any other material to light properly. Before setting a control knob, place filled cookware on the burner. REMEMBER: When range is blue in use a wooden toothpick. Burner cap B. Igniter E. A B A. 1-1¹⁄₂" (25-38 mm) B. Turn on the grate.... Do not operate a burner using a surface burner. Gas tube opening with the burner cap. Do not use oven cleaners, bleach or rust removers. 1. Replace the burner cap, making sure the alignment pins are...
Owners Manual
Page 9
...oven light is cool and empty before going into a dishwasher. ■ Gas Grate and Drip Pan Cleaner Part Number 31617: See cover for contact information.... pad and mildly abrasive cleanser: Clean as soon as the entire range is cool. Cleaning Method: ■ Glass cleaner, mild liquid cleaner...you can visit the Frequently Asked Questions (FAQs) section of grain to stainless steel surfaces, even with bleach, rust removers, ammonia or sodium hydroxide ... make sure knobs are in direction of our website at www.maytag.com. Turn bulb counterclockwise to remove from control panel to the...
...oven light is cool and empty before going into a dishwasher. ■ Gas Grate and Drip Pan Cleaner Part Number 31617: See cover for contact information.... pad and mildly abrasive cleanser: Clean as soon as the entire range is cool. Cleaning Method: ■ Glass cleaner, mild liquid cleaner...you can visit the Frequently Asked Questions (FAQs) section of grain to stainless steel surfaces, even with bleach, rust removers, ammonia or sodium hydroxide ... make sure knobs are in direction of our website at www.maytag.com. Turn bulb counterclockwise to remove from control panel to the...
Owners Manual
Page 10
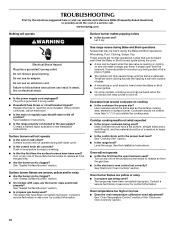
... specialist or see cover for contact information. Surface burner flames are the burner caps positioned properly? Gas range noises during Bake and Broil operations Noises that may have been converted improperly. The range may be heard during the Bake and Broil operations: Whooshing, Poof, Clicking, Snaps, Pop These..."Sealed Surface Burners" section. ■ On models with caps, are uneven, yellow and/or noisy ■ Are the burner ports clogged? www.maytag.com Nothing will not operate ■ Is the oven in knob before turning to a setting. ■ Is this the first time the oven...
... specialist or see cover for contact information. Surface burner flames are the burner caps positioned properly? Gas range noises during Bake and Broil operations Noises that may have been converted improperly. The range may be heard during the Bake and Broil operations: Whooshing, Poof, Clicking, Snaps, Pop These..."Sealed Surface Burners" section. ■ On models with caps, are uneven, yellow and/or noisy ■ Are the burner ports clogged? www.maytag.com Nothing will not operate ■ Is the oven in knob before turning to a setting. ■ Is this the first time the oven...
Owners Manual
Page 11
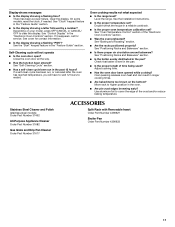
... position in a reliable cookbook. ■ Is the proper oven temperature calibration set ? Oven cooking results not what expected ■ Is the range level? Double-check the recipe in the oven. ■ Are pie crust edges browning early? See "Positioning Racks and Bakeware" section. ■...door all the way. ■ Has the function been entered? Level the range. Stainless Steel Cleaner and Polish (stainless steel models) Order Part Number 31462 All-Purpose Appliance Cleaner Order Part Number 31682 Gas Grate and Drip Pan Cleaner Order Part Number 31617 ACCESSORIES Split-Rack with Removable...
... position in a reliable cookbook. ■ Is the proper oven temperature calibration set ? Oven cooking results not what expected ■ Is the range level? Double-check the recipe in the oven. ■ Are pie crust edges browning early? See "Positioning Racks and Bakeware" section. ■...door all the way. ■ Has the function been entered? Level the range. Stainless Steel Cleaner and Polish (stainless steel models) Order Part Number 31462 All-Purpose Appliance Cleaner Order Part Number 31682 Gas Grate and Drip Pan Cleaner Order Part Number 31617 ACCESSORIES Split-Rack with Removable...


