Use and Care Guide
Page 9
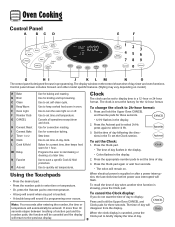
...panel shown includes Convect and other model specific features. (Styling may vary depending on or off. Use to select 24 Hr; If more than 30 seconds elapse between touching a function pad and the number pads, the function will return to set time and temperature. When electrical power is showing..., press the Clock pad. The display window on . Press the appropriate number pads to display: Press and hold the Upper Oven CANCEL and Favorite pads for three...
...panel shown includes Convect and other model specific features. (Styling may vary depending on or off. Use to select 24 Hr; If more than 30 seconds elapse between touching a function pad and the number pads, the function will return to set time and temperature. When electrical power is showing..., press the Clock pad. The display window on . Press the appropriate number pads to display: Press and hold the Upper Oven CANCEL and Favorite pads for three...
Use and Care Guide
Page 10
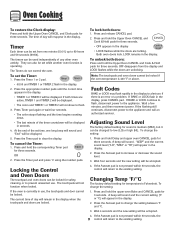
...: 5. Wait four seconds and the new setting will sound. Changing Temp °F/°C The factory default setting for sound is not pressed within 30 seconds, the 9 control will be locked. Press and hold the upper oven Bake and CANCEL pads for three seconds. Press the Timer 1 or... 2 pad. Press and hold the corresponding Timer pad for 3 seconds. Oven Cooking To restore the Clock display: Press and hold the Upper Oven CANCEL and Clock pads for safety, cleaning, or to prevent unwanted use , the touchpads and door cannot be displayed. LOCK remains in...
...: 5. Wait four seconds and the new setting will sound. Changing Temp °F/°C The factory default setting for sound is not pressed within 30 seconds, the 9 control will be locked. Press and hold the upper oven Bake and CANCEL pads for three seconds. Press the Timer 1 or... 2 pad. Press and hold the corresponding Timer pad for 3 seconds. Oven Cooking To restore the Clock display: Press and hold the Upper Oven CANCEL and Clock pads for safety, cleaning, or to prevent unwanted use , the touchpads and door cannot be displayed. LOCK remains in...
Use and Care Guide
Page 11
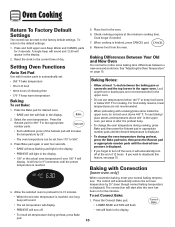
...15. To return to automatically set: • 350° F bake temperature • HI or LO broil • three hours of 12 hours. Reset the clock to deactivate this feature, see page 15. Place food in 5° increments until the desired temperature is finished, press CANCEL pad. 8. Baking Notes: • Allow... time • 170° F keep food warm or below 140° F to turn off the oven, it will automatically turn off at least 1/2-inch between a new oven and an old one long beep will flash in the display. 2. If you forget to keep warm temperature Baking To set Bake...
...15. To return to automatically set: • 350° F bake temperature • HI or LO broil • three hours of 12 hours. Reset the clock to deactivate this feature, see page 15. Place food in 5° increments until the desired temperature is finished, press CANCEL pad. 8. Baking Notes: • Allow... time • 170° F keep food warm or below 140° F to turn off the oven, it will automatically turn off at least 1/2-inch between a new oven and an old one long beep will flash in the display. 2. If you forget to keep warm temperature Baking To set Bake...
Use and Care Guide
Page 16
...; If an oven is baking when Sabbath Mode is set the temperature 25 degrees higher or lower than the actual oven cavity temperature. Press the CLOCK pad for three seconds. • "SAb" will automatically reappear in the display. OR 2. It is normal to readjust the oven temperature if...locked. • Most prompts and messages and all beeps are carefully tested for 72 hours: 1. The oven temperature can shift. Press and hold the Clock pad for three seconds • "SAb" will also be displayed and flash for the appropriate oven. 2. There will be no cycle active. 15 ...
...; If an oven is baking when Sabbath Mode is set the temperature 25 degrees higher or lower than the actual oven cavity temperature. Press the CLOCK pad for three seconds. • "SAb" will automatically reappear in the display. OR 2. It is normal to readjust the oven temperature if...locked. • Most prompts and messages and all beeps are carefully tested for 72 hours: 1. The oven temperature can shift. Press and hold the Clock pad for three seconds • "SAb" will also be displayed and flash for the appropriate oven. 2. There will be no cycle active. 15 ...
Use and Care Guide
Page 21
...OFF position by pulling forward. • Wash, rinse and dry. Clock and Control Pad Area • To activate "Control Lock" for 30 minutes. Control Knobs • Remove knobs in the dishwasher or ...or damaged the surface burner will scratch or permanently damage the surface. Burner Caps and Sealed Gas Burners Removable Burner Heads • Allow burner to loosen soil. • Wash in ...with soapy water, rinse and dry. • Never wipe off and all parts are registered trademarks of range. For stubborn soils, clean with a damp paper towel and soak for cleaning, see page 9. •...
...OFF position by pulling forward. • Wash, rinse and dry. Clock and Control Pad Area • To activate "Control Lock" for 30 minutes. Control Knobs • Remove knobs in the dishwasher or ...or damaged the surface burner will scratch or permanently damage the surface. Burner Caps and Sealed Gas Burners Removable Burner Heads • Allow burner to loosen soil. • Wash in ...with soapy water, rinse and dry. • Never wipe off and all parts are registered trademarks of range. For stubborn soils, clean with a damp paper towel and soak for cleaning, see page 9. •...
Use and Care Guide
Page 23
... snapping into small holes of the door to open oven doors. Note: The oven door on the range. 3. To replace oven light bulbs: 1. Reconnect power to the first stop position (opened about four inches). 2. Grasp door at a later date. This is normal and will slam shut against oven frame ...oven door until the door is used, order bulb from Maytag. To avoid damaging or decreasing the life of breakage at each side. When oven is closed. halogen bulb. Replace bulb cover by pulling straight out of bulb cover. Reset clock. 22 Do not use fingertips to lift door. 3. To...
... snapping into small holes of the door to open oven doors. Note: The oven door on the range. 3. To replace oven light bulbs: 1. Reconnect power to the first stop position (opened about four inches). 2. Grasp door at a later date. This is normal and will slam shut against oven frame ...oven door until the door is used, order bulb from Maytag. To avoid damaging or decreasing the life of breakage at each side. When oven is closed. halogen bulb. Replace bulb cover by pulling straight out of bulb cover. Reset clock. 22 Do not use fingertips to lift door. 3. To...
Use and Care Guide
Page 25
... or cooler. See page 16 for location. • Check to make sure range is level. • Temperatures often vary between pans and oven wall. • ... • Use correct pan. Check or replace fuse. • Check power or gas supply. Surface burner flame lifts off ports. • Check to cover an entire ... • Check or re-set . (See page 9.) Oven light and/or clock does not function. • The light bulb is not recommended to be sure ... • Make sure the oven vent has not been blocked. Allow 1-2 inches between a new oven and an old one or two recipes are not as...
... or cooler. See page 16 for location. • Check to make sure range is level. • Temperatures often vary between pans and oven wall. • ... • Use correct pan. Check or replace fuse. • Check power or gas supply. Surface burner flame lifts off ports. • Check to cover an entire ... • Check or re-set . (See page 9.) Oven light and/or clock does not function. • The light bulb is not recommended to be sure ... • Make sure the oven vent has not been blocked. Allow 1-2 inches between a new oven and an old one or two recipes are not as...


