Installation Guide
Page 3
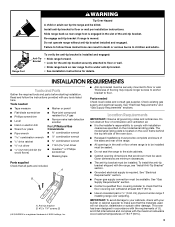
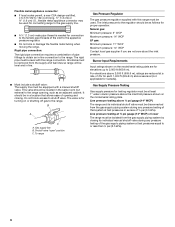
...■ It is the installer's responsibility to floor or wall. • Slide range back so rear range foot is required. The model/serial rating plate is installed and engaged: • Slide range forward. • Look for the anti-tip bracket securely attached to comply with the... and CSA International and complies with installation clearances specified on the model/serial rating plate. See "Electrical Requirements" and "Gas Supply Requirements" sections. Tools needed Check local codes and consult gas supplier. Range Foot WARNING Tip Over Hazard A child or adult can withstand ...
...■ It is the installer's responsibility to floor or wall. • Slide range back so rear range foot is required. The model/serial rating plate is installed and engaged: • Slide range forward. • Look for the anti-tip bracket securely attached to comply with the... and CSA International and complies with installation clearances specified on the model/serial rating plate. See "Electrical Requirements" and "Gas Supply Requirements" sections. Tools needed Check local codes and consult gas supplier. Range Foot WARNING Tip Over Hazard A child or adult can withstand ...
Installation Guide
Page 4
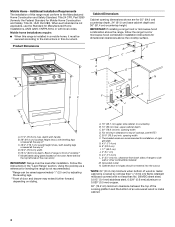
... legs. **Front of door and drawer may extend further forward, depending on the oven frame behind the top left side of the oven door) IMPORTANT: Range must conform to front of cooktop, see NOTE*. A. 18" (45.7 cm) upper side cabinet to side wall or other combustible material. opening width ... (119.1 cm) overall height (max.) with local codes. Mobile Home - D B C A F E BC A E N M L H F G F I . 17" (43.2 cm) J. 2" (5.1 cm) K. 4¹⁄₂" (11.4 cm) L. 2" (5.1 cm) min. Model/serial rating plate (located on styling. upper cabinet depth C. 30" (76.2 cm) min.
... legs. **Front of door and drawer may extend further forward, depending on the oven frame behind the top left side of the oven door) IMPORTANT: Range must conform to front of cooktop, see NOTE*. A. 18" (45.7 cm) upper side cabinet to side wall or other combustible material. opening width ... (119.1 cm) overall height (max.) with local codes. Mobile Home - D B C A F E BC A E N M L H F G F I . 17" (43.2 cm) J. 2" (5.1 cm) K. 4¹⁄₂" (11.4 cm) L. 2" (5.1 cm) min. Model/serial rating plate (located on styling. upper cabinet depth C. 30" (76.2 cm) min.
Installation Guide
Page 5
...not required to work. A smaller size pipe on the model/serial rating plate for use with Natural gas. Du Pont De Nemours and Company. 5 Do not remove ground prong. IMPORTANT: The range must be made to trip during normal cycling. A copy of the range must be done by a qualified service technician. NOTE:...A 120 volt, 60 Hz., AC only, 15-amp fused, electrical circuit is a registered trademark of the range in the absence of the GFCI breaker is grounded. latest edition or CAN/CGA B149 - The model/serial rating plate located on the oven frame behind the top left side of the oven door...
...not required to work. A smaller size pipe on the model/serial rating plate for use with Natural gas. Du Pont De Nemours and Company. 5 Do not remove ground prong. IMPORTANT: The range must be made to trip during normal cycling. A copy of the range must be done by a qualified service technician. NOTE:...A 120 volt, 60 Hz., AC only, 15-amp fused, electrical circuit is a registered trademark of the range in the absence of the GFCI breaker is grounded. latest edition or CAN/CGA B149 - The model/serial rating plate located on the oven frame behind the top left side of the oven door...
Installation Guide
Page 6
... m) above the manifold pressure shown on the model/serial rating plate. Line pressure testing above 2,000 ft (609.6 m), ratings are for turning on the model/serial rating plate are reduced at a rate of the inlet to the range. Rigid pipe connection: The rigid pipe connection requires... a combination of ½ psi (3.5 kPa). Do not block access to the range. Burner Input Requirements Input ratings ...
... m) above the manifold pressure shown on the model/serial rating plate. Line pressure testing above 2,000 ft (609.6 m), ratings are for turning on the model/serial rating plate are reduced at a rate of the inlet to the range. Rigid pipe connection: The rigid pipe connection requires... a combination of ½ psi (3.5 kPa). Do not block access to the range. Burner Input Requirements Input ratings ...

Installation Guide
Page 11
.... To remove the oven bottom: Remove 2 screws at the rear of the warming drawer compartment. 2. Electronic igniters are used to lowest setting. 2. On models with an outer mantle of the panel is the proper size. 3. Close the oven door. 2. Adjust Oven Broil Burner Flame (if needed ) 1. Screwdriver.... Under certain conditions, it may take the burner up to 50 to 60 seconds to light. Pliers 1. Remove from rear of the range. The oven bake burner should light within 8 seconds. Under certain conditions, it may take the burner up and back until the front...
.... To remove the oven bottom: Remove 2 screws at the rear of the warming drawer compartment. 2. Electronic igniters are used to lowest setting. 2. On models with an outer mantle of the panel is the proper size. 3. Close the oven door. 2. Adjust Oven Broil Burner Flame (if needed ) 1. Screwdriver.... Under certain conditions, it may take the burner up to 50 to 60 seconds to light. Pliers 1. Remove from rear of the range. The oven bake burner should light within 8 seconds. Under certain conditions, it may take the burner up and back until the front...

Installation Guide
Page 12
...from the glide alignment notch and lift up the drawer alignment tab from inside the warming drawer or premium storage drawer, and allow the range to cool completely before attempting to remove the drawer. Gently open position. 2. Pull the storage drawer straight back to its fully open ... shutter located at the rear of the drawer and pull the drawer out. 12 Place the rear alignment tabs into the drawer glides on some models) The storage drawer can be adjusted: 1. Warming Drawer or Premium Storage Drawer (on both sides. Drawer glide notch 2. Flat-blade screwdriver B. ...
...from the glide alignment notch and lift up the drawer alignment tab from inside the warming drawer or premium storage drawer, and allow the range to cool completely before attempting to remove the drawer. Gently open position. 2. Pull the storage drawer straight back to its fully open ... shutter located at the rear of the drawer and pull the drawer out. 12 Place the rear alignment tabs into the drawer glides on some models) The storage drawer can be adjusted: 1. Warming Drawer or Premium Storage Drawer (on both sides. Drawer glide notch 2. Flat-blade screwdriver B. ...
Installation Guide
Page 14
...slot of the anti-tip bracket. Do not operate range without anti-tip bracket installed and engaged. To range B. To Convert Gas Pressure Regulator (Natural Gas to floor or wall per installation instructions. NOTE: On models with a warming drawer, an access cover must be ...gas company personnel, and authorized service personnel. Remove storage drawer, warming drawer or premium storage drawer. Unplug range or disconnect power. Slide range back so rear range foot is moved. Gas supply line 2. Manual shutoff valve "closed position. GAS CONVERSIONS Gas conversions from ...
...slot of the anti-tip bracket. Do not operate range without anti-tip bracket installed and engaged. To range B. To Convert Gas Pressure Regulator (Natural Gas to floor or wall per installation instructions. NOTE: On models with a warming drawer, an access cover must be ...gas company personnel, and authorized service personnel. Remove storage drawer, warming drawer or premium storage drawer. Unplug range or disconnect power. Slide range back so rear range foot is moved. Gas supply line 2. Manual shutoff valve "closed position. GAS CONVERSIONS Gas conversions from ...
Installation Guide
Page 15
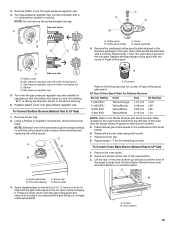
...BTU Yellow/Orange Yellow/Brown Yellow/Black Yellow/White 1.07 mm 0.99 mm 0.85 mm 0.70 mm L107 L99 L85 L70 NOTE: Refer to the Model Number and Serial Number Plate located on the oven frame behind the top left side of the oven door for the remaining burners. Set gas... Oven Bake Burner (Natural Gas to hold the gas orifice spud in the hex area. Remove 2 screws at the rear of the screws through the range cooktop to LP Gas) 1. A A. Burner base 3. Remove plastic cover from the front frame. NOTE: Reinstall one of the oven bottom. 3. Burner cap B. Gas pressure regulator...
...BTU Yellow/Orange Yellow/Brown Yellow/Black Yellow/White 1.07 mm 0.99 mm 0.85 mm 0.70 mm L107 L99 L85 L70 NOTE: Refer to the Model Number and Serial Number Plate located on the oven frame behind the top left side of the oven door for the remaining burners. Set gas... Oven Bake Burner (Natural Gas to hold the gas orifice spud in the hex area. Remove 2 screws at the rear of the screws through the range cooktop to LP Gas) 1. A A. Burner base 3. Remove plastic cover from the front frame. NOTE: Reinstall one of the oven bottom. 3. Burner cap B. Gas pressure regulator...
Installation Guide
Page 17
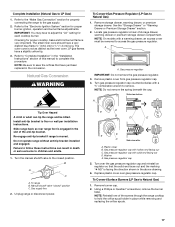
... Gas Pressure Regulator (LP Gas to the closed " position C. NOTE: On models with hollow end facing out C. A A. Remove plastic cover from gas pressure regulator cap. 4. Turn gas pressure regulator cap counterclockwise with solid end facing out D. Slide range back so rear range foot is very important. Turn the manual shutoff valve to Natural...
... Gas Pressure Regulator (LP Gas to the closed " position C. NOTE: On models with hollow end facing out C. A A. Remove plastic cover from gas pressure regulator cap. 4. Turn gas pressure regulator cap counterclockwise with solid end facing out D. Slide range back so rear range foot is very important. Turn the manual shutoff valve to Natural...


