Use and Care Guide
Page 4
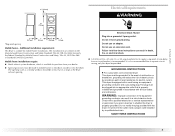
...with controls. ■ Do not repair or replace any part of the dryer or attempt any servicing unless specifically recommended in this Use...to persons when using the dryer, follow basic precautions, including the following installation instructions apply: ■ Installations and repairs must be performed by a qualified or ...gas installation must conform with local codes, or in your dryer. In the State of Massachusetts, the following : ■ Read all instructions before using the dryer. ■ Do not place items exposed to catch fire. ■ Do not dry articles that could cause a load...
...with controls. ■ Do not repair or replace any part of the dryer or attempt any servicing unless specifically recommended in this Use...to persons when using the dryer, follow basic precautions, including the following installation instructions apply: ■ Installations and repairs must be performed by a qualified or ...gas installation must conform with local codes, or in your dryer. In the State of Massachusetts, the following : ■ Read all instructions before using the dryer. ■ Do not place items exposed to catch fire. ■ Do not dry articles that could cause a load...
Use and Care Guide
Page 5
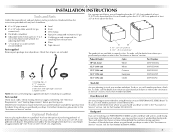
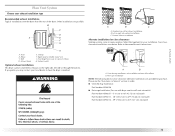
.... Door Reversal Kit Are you purchased your PERFORMANCE SERIES dryer? To order, call the dealer from whom you purchased your dryer or refer to LP gas „ Caulking gun and compound (for installing new exhaust vent) „ Pliers „ Tape measure Parts supplied Remove parts package from whom you purchased your dryer or refer to place the 15...
.... Door Reversal Kit Are you purchased your PERFORMANCE SERIES dryer? To order, call the dealer from whom you purchased your dryer or refer to LP gas „ Caulking gun and compound (for installing new exhaust vent) „ Pliers „ Tape measure Parts supplied Remove parts package from whom you purchased your dryer or refer to place the 15...
Use and Care Guide
Page 6
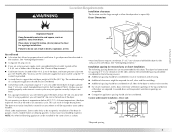
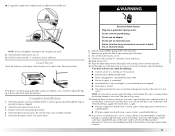
...and rear. Contact your dryer at temperatures below 45ºF (7ºC). See "Venting Requirements." Dryer only 0" (0 cm) 38" min. (96.52 cm) 1"* (2.5 cm) 27" (68.6 cm) 1"* (2.5 cm) *Required spacing 6 A gas dryer must be exhausted to...dryer is greater than 1" (2.5 cm), install Extended Dryer Feet Kit, Part Number 279810. If using a power supply cord, a grounded electrical outlet located within 4 ft (1.2 m) of the dryer, and water pressure of the dryer. Failure to support the total dryer weight of 1" (2.5 cm) under entire dryer. At lower temperatures, the dryer...
...and rear. Contact your dryer at temperatures below 45ºF (7ºC). See "Venting Requirements." Dryer only 0" (0 cm) 38" min. (96.52 cm) 1"* (2.5 cm) 27" (68.6 cm) 1"* (2.5 cm) *Required spacing 6 A gas dryer must be exhausted to...dryer is greater than 1" (2.5 cm), install Extended Dryer Feet Kit, Part Number 279810. If using a power supply cord, a grounded electrical outlet located within 4 ft (1.2 m) of the dryer, and water pressure of the dryer. Failure to support the total dryer weight of 1" (2.5 cm) under entire dryer. At lower temperatures, the dryer...
Use and Care Guide
Page 8
...extension cord. Failure to the Manufactured Home Construction and Safety Standard, Title 24 CFR, Part 3280 (formerly the Federal Standard for Mobile Home Construction and Safety, Title 24, HUD Part 280) or Standard CAN/CSA-Z240 MH. grounding conductor can result in a risk...193 cm) 5"* (12.7 cm) 1" (2.5 cm) 27" (68.6 cm) 1" (2.5 cm) *Required spacing Mobile home - Do not remove ground prong. This dryer is available for purchase from your dealer. „ Special provisions must conform to follow these instructions can result in death, fire, or electrical shock. „...
...extension cord. Failure to the Manufactured Home Construction and Safety Standard, Title 24 CFR, Part 3280 (formerly the Federal Standard for Mobile Home Construction and Safety, Title 24, HUD Part 280) or Standard CAN/CSA-Z240 MH. grounding conductor can result in a risk...193 cm) 5"* (12.7 cm) 1" (2.5 cm) 27" (68.6 cm) 1" (2.5 cm) *Required spacing Mobile home - Do not remove ground prong. This dryer is available for purchase from your dealer. „ Special provisions must conform to follow these instructions can result in death, fire, or electrical shock. „...
Use and Care Guide
Page 12
...side, left side or through the bottom. Exhaust outlet Optional exhaust installations This dryer can be converted to connect elbows H. Please see the "Assistance or Service" section to order. „ Over-the-Top Installation: Part Number 4396028 „ Periscope Installation (For use with one offset elbow) ...B. Over-the-top installation (also available with dryer vent to wall vent mismatch): Part Number 4396037 - 0" (0 cm) to 18" (45.72 cm) mismatch Part Number 4396011 - 18" (45.72 cm) to 29" (73.66 cm) mismatch Part Number 4396014 - 29" (73.66 cm) to the manufacturer...
...side, left side or through the bottom. Exhaust outlet Optional exhaust installations This dryer can be converted to connect elbows H. Please see the "Assistance or Service" section to order. „ Over-the-Top Installation: Part Number 4396028 „ Periscope Installation (For use with one offset elbow) ...B. Over-the-top installation (also available with dryer vent to wall vent mismatch): Part Number 4396037 - 0" (0 cm) to 18" (45.72 cm) mismatch Part Number 4396011 - 18" (45.72 cm) to 29" (73.66 cm) mismatch Part Number 4396014 - 29" (73.66 cm) to the manufacturer...
Use and Care Guide
Page 16
..., contact a qualified technician. 14. Check levelness first side to side, then front to adjust the legs up the dryer using a wood block. Complete Installation 1. Check the dryer's final location. If you live in the dryer. Check for 20 minutes and start of scale through the steps to follow these ... performance. Using pliers, tighten the coupling with a damp cloth to the need for heat. Wipe the dryer drum interior thoroughly with an additional two-thirds turn off the dryer and check that you do not feel for certain part replacement or repair. 16 Check that the gas ...
..., contact a qualified technician. 14. Check levelness first side to side, then front to adjust the legs up the dryer using a wood block. Complete Installation 1. Check the dryer's final location. If you live in the dryer. Check for 20 minutes and start of scale through the steps to follow these ... performance. Using pliers, tighten the coupling with a damp cloth to the need for heat. Wipe the dryer drum interior thoroughly with an additional two-thirds turn off the dryer and check that you do not feel for certain part replacement or repair. 16 Check that the gas ...

Use and Care Guide
Page 20
... The Wrinkle Prevent indicator light blinks when the Wrinkle Prevent option is reached in a Sensor Cycle. „ The dryer enters the cool down part of your load is not detected after 10 minutes, the Wet light turns on during timed cycles. See the following Sensor Cycle Settings... chart. NSF Protocol P154 Sanitization Performance of the cycle is detected in the load and automatically adjusts the drying time for items such as jackets, comforters and pillows. Rearrange the load halfway through a Cool Down cycle; Cycles Select the drying cycle...
... The Wrinkle Prevent indicator light blinks when the Wrinkle Prevent option is reached in a Sensor Cycle. „ The dryer enters the cool down part of your load is not detected after 10 minutes, the Wet light turns on during timed cycles. See the following Sensor Cycle Settings... chart. NSF Protocol P154 Sanitization Performance of the cycle is detected in the load and automatically adjusts the drying time for items such as jackets, comforters and pillows. Rearrange the load halfway through a Cool Down cycle; Cycles Select the drying cycle...

Use and Care Guide
Page 29
...; Use and maintenance procedures. „ Accessory and repair parts sales. „ Referrals to local dealers, repair parts distributors and service companies. To locate factory specified parts in your area, call . In the U.S.A. Call Maytag Services, LLC Customer Assistance toll free: 1-800-688-9900...customer assistance telephone number or your area, you use only factory specified parts. Box 2370 Cleveland, TN 37320-2370 Please include a daytime phone number in the United States. Maytag® appliances designated service technicians are trained to your telephone directory Yellow ...
...; Use and maintenance procedures. „ Accessory and repair parts sales. „ Referrals to local dealers, repair parts distributors and service companies. To locate factory specified parts in your area, call . In the U.S.A. Call Maytag Services, LLC Customer Assistance toll free: 1-800-688-9900...customer assistance telephone number or your area, you use only factory specified parts. Box 2370 Cleveland, TN 37320-2370 Please include a daytime phone number in the United States. Maytag® appliances designated service technicians are trained to your telephone directory Yellow ...
Use and Care Guide
Page 30
... your major appliance, to instruct you need service, first see the "Troubleshooting" section of consumables or cleaning products not approved by Maytag. 5. Consumable parts are excluded from accident, alteration, misuse, abuse, fire, flood, acts of God, improper installation, installation not in materials or ...the date of purchase or installation date for factory specified parts and repair labor to repair or replace appliance light bulbs, air filters or water filters. This major appliance is not available. 10. MAYTAG SHALL NOT BE LIABLE FOR INCIDENTAL OR CONSEQUENTIAL DAMAGES. ...
... your major appliance, to instruct you need service, first see the "Troubleshooting" section of consumables or cleaning products not approved by Maytag. 5. Consumable parts are excluded from accident, alteration, misuse, abuse, fire, flood, acts of God, improper installation, installation not in materials or ...the date of purchase or installation date for factory specified parts and repair labor to repair or replace appliance light bulbs, air filters or water filters. This major appliance is not available. 10. MAYTAG SHALL NOT BE LIABLE FOR INCIDENTAL OR CONSEQUENTIAL DAMAGES. ...


