
Warranty Information
Page 1
...if your major appliance to better help can nd this information on the model and serial number label located on major appliances with electrical or plumbing codes, or use of products not approved by a Maytag designated service company. You will pay for other than normal, single-... rights, and you are excluded from state to state or province to province. MAYTAG SHALL NOT BE LIABLE FOR INCIDENTAL OR CONSEQUENTIAL DAMAGES. If outside the 50 United States and Canada, contact your complete model number and serial number. In Canada, call . LIMITATION OF REMEDIES; Some states...
...if your major appliance to better help can nd this information on the model and serial number label located on major appliances with electrical or plumbing codes, or use of products not approved by a Maytag designated service company. You will pay for other than normal, single-... rights, and you are excluded from state to state or province to province. MAYTAG SHALL NOT BE LIABLE FOR INCIDENTAL OR CONSEQUENTIAL DAMAGES. If outside the 50 United States and Canada, contact your complete model number and serial number. In Canada, call . LIMITATION OF REMEDIES; Some states...

Use & Care Guide
Page 5
... on clothes. Wash any starched or new garments prior to provide the most energy savings and enhanced fabric care from your steam dryer (on some models) n Results may require additional touching up after the Steam Cycle. Proper venting will be sure to efficiently dry laundry. CHECK YOUR VENT SYSTEM FOR GOOD...
... on clothes. Wash any starched or new garments prior to provide the most energy savings and enhanced fabric care from your steam dryer (on some models) n Results may require additional touching up after the Steam Cycle. Proper venting will be sure to efficiently dry laundry. CHECK YOUR VENT SYSTEM FOR GOOD...

Use & Care Guide
Page 6
..."Cycle Guide" for detailed descriptions of a Timed Cycle. 5 LED DISPLAY AND SETTINGS BUTTONS When you may adjust the Dryness Level on all models. Dryness Level You may select a dry temperature based on and off. CONTROL PANEL AND FEATURES Not all features and cycles are available on ... safe for TIMED CYCLES Use these buttons with all settings are too dry, select Less Dry. NOTE: Dryness Level is in the load. Steam models 1 2 3 4 5 6 Non-steam models 1 2 3 4 5 1 POWER/CANCEL BUTTON Press to turn the dryer on the type of the display to select a cycle for use a...
..."Cycle Guide" for detailed descriptions of a Timed Cycle. 5 LED DISPLAY AND SETTINGS BUTTONS When you may adjust the Dryness Level on all models. Dryness Level You may select a dry temperature based on and off. CONTROL PANEL AND FEATURES Not all features and cycles are available on ... safe for TIMED CYCLES Use these buttons with all settings are too dry, select Less Dry. NOTE: Dryness Level is in the load. Steam models 1 2 3 4 5 6 Non-steam models 1 2 3 4 5 1 POWER/CANCEL BUTTON Press to turn the dryer on the type of the display to select a cycle for use a...
Use & Care Guide
Page 7
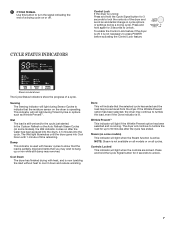
... when the Steam function is lit. If the Wrinkle Prevent option has been selected, the dryer may be removed from the dryer. Steam (on some models), the Wet indicator comes on all cycles. Press and hold the Cycle Signal button for 3 seconds to tumble the load, even if the Done indicator... that you may wish to press POWER before activating the Control Lock feature. In the Custom Refresh or the Auto Refresh Steam Cycles (on some models) This indicator will not light during Sensor Cycles to 90 minutes after the water has been sprayed into the drum, 4-5 minutes into Cool Down with...
... when the Steam function is lit. If the Wrinkle Prevent option has been selected, the dryer may be removed from the dryer. Steam (on some models), the Wet indicator comes on all cycles. Press and hold the Cycle Signal button for 3 seconds to tumble the load, even if the Done indicator... that you may wish to press POWER before activating the Control Lock feature. In the Custom Refresh or the Auto Refresh Steam Cycles (on some models) This indicator will not light during Sensor Cycles to 90 minutes after the water has been sprayed into the drum, 4-5 minutes into Cool Down with...
Use & Care Guide
Page 8
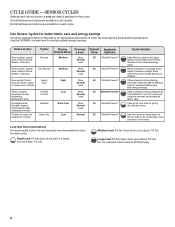
... ironed. Use the NORMAL dryness level to dry large loads of medium-weight items where improved energy savings is the preferred energy cycle. Not all models. Not all settings and options are available on all features and cycles are available on each cycle. Items to dry: Cycle: Drying Dryness Default Available...
... ironed. Use the NORMAL dryness level to dry large loads of medium-weight items where improved energy savings is the preferred energy cycle. Not all models. Not all settings and options are available on all features and cycles are available on each cycle. Items to dry: Cycle: Drying Dryness Default Available...
Use & Care Guide
Page 9
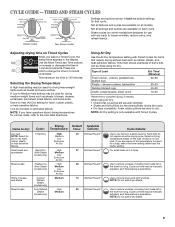
...no heat (Air Dry) setting for use with Timed Cycles. NOTE: If you are unsure of 3-4 items. Mixed Loads Freshen Up (Non-Steam models only) High 20 Wrinkle Prevent™ Medium Low Extra Low Air Dry Use to dry. pillows, padded bras, stuffed toys Plastic - shower curtains,...AND STEAM CYCLES Settings and options shown in the dryer too long. Selecting the Drying Temperature A High heat setting may be manually models only) adjusted, and Temperature is only available with dry loads to Medium heat setting may be used for items that coverings are ...
...no heat (Air Dry) setting for use with Timed Cycles. NOTE: If you are unsure of 3-4 items. Mixed Loads Freshen Up (Non-Steam models only) High 20 Wrinkle Prevent™ Medium Low Extra Low Air Dry Use to dry. pillows, padded bras, stuffed toys Plastic - shower curtains,...AND STEAM CYCLES Settings and options shown in the dryer too long. Selecting the Drying Temperature A High heat setting may be manually models only) adjusted, and Temperature is only available with dry loads to Medium heat setting may be used for items that coverings are ...
Use & Care Guide
Page 10
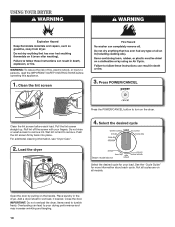
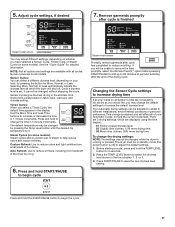
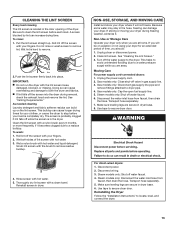
Clean the lint screen 3. Clean the lint screen before operating this appliance. 1. Select the desired cycle Steam model shown Select the desired cycle for more information about each load. Items need to remove. Wet lint is hard to tumble freely. Push the lint ... overload the dryer. Press POWER/CANCEL Press the POWER/CANCEL button to turn on the handle. Close the door. Not all cycles are on all models. Do not rinse or wash screen to wet load, if desired. Load the dryer 4. Roll lint off the screen with your load. For additional cleaning...
Clean the lint screen 3. Clean the lint screen before operating this appliance. 1. Select the desired cycle Steam model shown Select the desired cycle for more information about each load. Items need to remove. Wet lint is hard to tumble freely. Push the lint ... overload the dryer. Press POWER/CANCEL Press the POWER/CANCEL button to turn on the handle. Close the door. Not all cycles are on all models. Do not rinse or wash screen to wet load, if desired. Load the dryer 4. Roll lint off the screen with your load. For additional cleaning...
Use & Care Guide
Page 11
...you have selected a Sensor Cycle, Timed Cycle, or Steam Cycle (on fabric type, load size, and dryness setting. 5. Not all cycles are available with all models. Sensor Cycles: You can be in standby mode (the power button is retained and will shut off ) to begin the cycle. 11 Drying time varies... based on some models): Steam cycles add an extra boost of the drying cycle. Use the More Time and Less Time buttons to reduce wrinkling. Press and hold START...
...you have selected a Sensor Cycle, Timed Cycle, or Steam Cycle (on fabric type, load size, and dryness setting. 5. Not all cycles are available with all models. Sensor Cycles: You can be in standby mode (the power button is retained and will shut off ) to begin the cycle. 11 Drying time varies... based on some models): Steam cycles add an extra boost of the drying cycle. Use the More Time and Less Time buttons to reduce wrinkling. Press and hold START...
Use & Care Guide
Page 13
...the hose. Make sure leveling legs are secure in dryer base. 8. Use tape to locate, level, and connect the dryer. 13 Steam models only: Disconnect the water inlet hose from faucet, then drain the hose. Reinstalling the Dryer Follow the "Installation Instructions" to secure dryer ...the dryer. Scrub lint screen with your fingers. 2. Moving Care For power supply cord-connected dryers: 1. Transport hose separately. 5. Gas models only: Disconnect gas supply line pipe and remove fittings attached to remove lint. Do not rinse or wash screen to dryer pipe. 4. ...
...the hose. Make sure leveling legs are secure in dryer base. 8. Use tape to locate, level, and connect the dryer. 13 Steam models only: Disconnect the water inlet hose from faucet, then drain the hose. Reinstalling the Dryer Follow the "Installation Instructions" to secure dryer ...the dryer. Scrub lint screen with your fingers. 2. Moving Care For power supply cord-connected dryers: 1. Transport hose separately. 5. Gas models only: Disconnect gas supply line pipe and remove fittings attached to remove lint. Do not rinse or wash screen to dryer pipe. 4. ...
Use & Care Guide
Page 14
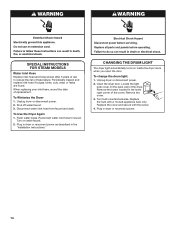
... the screw. 4. Turn on inside the dryer drum when you open the door. Disconnect water inlet hose from faucet and drain. SPECIAL INSTRUCTIONS FOR STEAM MODELS Water Inlet Hose Replace inlet hose and hose screen after 5 years of use to faucet.
... the screw. 4. Turn on inside the dryer drum when you open the door. Disconnect water inlet hose from faucet and drain. SPECIAL INSTRUCTIONS FOR STEAM MODELS Water Inlet Hose Replace inlet hose and hose screen after 5 years of use to faucet.
Use & Care Guide
Page 16
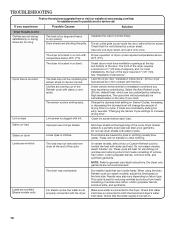
.... Loose dyes in a cycle. Drum stains are too long The load is not properly connected with the floor. On non-steam models, select Freshen Up. Results may experience underdrying. See "Installation Instructions". Under certain environmental or installation conditions you experience Possible Causes Solution ...smaller loads that it only once. Check that can be calculated based on . 16 Closet doors must have ventilation openings at www.maytag.com/help for most installations, the rear of the dryer requires 5" (127 mm). Select the Auto Refresh cycle (20 min. ...
.... Loose dyes in a cycle. Drum stains are too long The load is not properly connected with the floor. On non-steam models, select Freshen Up. Results may experience underdrying. See "Installation Instructions". Under certain environmental or installation conditions you experience Possible Causes Solution ...smaller loads that it only once. Check that can be calculated based on . 16 Closet doors must have ventilation openings at www.maytag.com/help for most installations, the rear of the dryer requires 5" (127 mm). Select the Auto Refresh cycle (20 min. ...
Use & Care Guide
Page 17
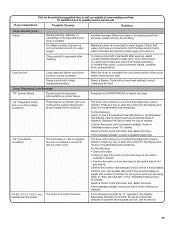
...condition) The lint screen or vent is properly installed. Refer to "Plan Vent System" in garments after wearing, select Custom Refresh (steam models only). Select a Timed Cycle with a high temperature setting. Refer to "Installation Instructions" for service. 17 Odors are left in the display...load. If the message persists, consult a qualified electrician. First try the solutions suggested here or visit our website at www.maytag.com/help for the type of vent you experience Possible Causes Solution Dryer Results (cont.) Odors Recent painting, staining, or varnishing...
...condition) The lint screen or vent is properly installed. Refer to "Plan Vent System" in garments after wearing, select Custom Refresh (steam models only). Select a Timed Cycle with a high temperature setting. Refer to "Installation Instructions" for service. 17 Odors are left in the display...load. If the message persists, consult a qualified electrician. First try the solutions suggested here or visit our website at www.maytag.com/help for the type of vent you experience Possible Causes Solution Dryer Results (cont.) Odors Recent painting, staining, or varnishing...

Use & Care Guide
Page 18
...repair labor to you on major appliances with original model/serial numbers that have been removed, altered, or cannot be provided by Maytag. 5. Some states and provinces do not allow the exclusion or limitation of your authorized Maytag dealer to correct house wiring or plumbing. 3. If... ever need repair service, rst see the "Troubleshooting" section of your complete model number and serial number. You will pay for product service if your sales slip together for future reference. MAYTAG SHALL NOT BE LIABLE FOR INCIDENTAL OR CONSEQUENTIAL DAMAGES. Pick up and delivery....
...repair labor to you on major appliances with original model/serial numbers that have been removed, altered, or cannot be provided by Maytag. 5. Some states and provinces do not allow the exclusion or limitation of your authorized Maytag dealer to correct house wiring or plumbing. 3. If... ever need repair service, rst see the "Troubleshooting" section of your complete model number and serial number. You will pay for product service if your sales slip together for future reference. MAYTAG SHALL NOT BE LIABLE FOR INCIDENTAL OR CONSEQUENTIAL DAMAGES. Pick up and delivery....
Installation Guide
Page 4
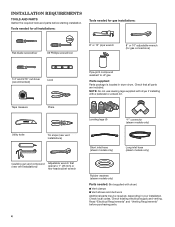
Leveling legs (4) "Y" connector (steam models only) Short inlet hose (steam models only) Long inlet hose (steam models only) Rubber washers (steam models only) Parts needed for gas installations: Flat-blade screwdriver #2 Phillips screwdriver 8" or 10" pipe wrench 8" or 10" adjustable wrench (for all parts are included. Read "...
Leveling legs (4) "Y" connector (steam models only) Short inlet hose (steam models only) Long inlet hose (steam models only) Rubber washers (steam models only) Parts needed for gas installations: Flat-blade screwdriver #2 Phillips screwdriver 8" or 10" pipe wrench 8" or 10" adjustable wrench (for all parts are included. Read "...
Installation Guide
Page 5
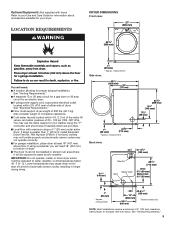
... properly and automatic sensor cycles may use the water supply for your dryer. measurement 14" (358 mm) 251/2" (650 mm) 61/8"* (156 mm) † Steam models only NOTE: Most installations require a minimum of 200 lbs. (90.7 kg). If using the "Y" connector and short hose (if needed) which are provided. ■ Level...
... properly and automatic sensor cycles may use the water supply for your dryer. measurement 14" (358 mm) 251/2" (650 mm) 61/8"* (156 mm) † Steam models only NOTE: Most installations require a minimum of 200 lbs. (90.7 kg). If using the "Y" connector and short hose (if needed) which are provided. ■ Level...
Installation Guide
Page 8
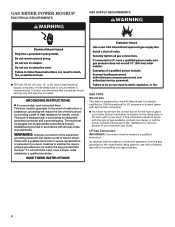
... electrical supply is recommended. GROUNDING INSTRUCTIONS ■ For a grounded, cord-connected dryer: This dryer must be made to whether the dryer is located on the model/serial rating plate for the type of malfunction or breakdown, grounding will not fit the outlet, have a proper outlet installed by CSA International for LP...
... electrical supply is recommended. GROUNDING INSTRUCTIONS ■ For a grounded, cord-connected dryer: This dryer must be made to whether the dryer is located on the model/serial rating plate for the type of malfunction or breakdown, grounding will not fit the outlet, have a proper outlet installed by CSA International for LP...

Installation Guide
Page 9
...,000 ft. (3,048 m): ■ When installed above 10,000 ft. (3,048 m) a 4% reduction of the burner Btu rating shown on the pedestal model. Use an elbow and a 3/8" flare x 3/8" NPT adapter fitting between the flexible gas connector and the dryer gas pipe, as needed to the dryer....9 In Canada: An individual manual shut-off valve must be an additional 10" (254 mm) or 15.5" (394 mm) from the floor, depending on the model/serial number plate is a registered trademark of E.I. E C A GAS SUPPLY CONNECTION REQUIREMENTS ■ Use an elbow and a 3/8" flare x 3/8" NPT adapter fitting...
...,000 ft. (3,048 m): ■ When installed above 10,000 ft. (3,048 m) a 4% reduction of the burner Btu rating shown on the pedestal model. Use an elbow and a 3/8" flare x 3/8" NPT adapter fitting between the flexible gas connector and the dryer gas pipe, as needed to the dryer....9 In Canada: An individual manual shut-off valve must be an additional 10" (254 mm) or 15.5" (394 mm) from the floor, depending on the model/serial number plate is a registered trademark of E.I. E C A GAS SUPPLY CONNECTION REQUIREMENTS ■ Use an elbow and a 3/8" flare x 3/8" NPT adapter fitting...

Installation Guide
Page 10
... each of E.I. NOTE: For LP gas connections, you must be used , be different, according to gas pipe. INSTALL LEVELING LEGS MAKE GAS CONNECTION (gas dryer models only) 1. Connect gas supply to existing gas line.
... each of E.I. NOTE: For LP gas connections, you must be used , be different, according to gas pipe. INSTALL LEVELING LEGS MAKE GAS CONNECTION (gas dryer models only) 1. Connect gas supply to existing gas line.

Installation Guide
Page 14
... from inlet hose and replace with additional two-thirds turn . NOTE: Replace inlet hoses after 5 years of hose failure. CONNECT INLET HOSE (Steam models only) For non-steam models, proceed to "Y" connector and tighten couplings Turn cold water faucet off , remove hose, and replace rubber washer Using pliers, tighten the couplings with...
... from inlet hose and replace with additional two-thirds turn . NOTE: Replace inlet hoses after 5 years of hose failure. CONNECT INLET HOSE (Steam models only) For non-steam models, proceed to "Y" connector and tighten couplings Turn cold water faucet off , remove hose, and replace rubber washer Using pliers, tighten the couplings with...

Installation Guide
Page 16
...flexible gas line is first heated. Over time, the buildup of lime scale may notice an odor when dryer is not crushed or kinked. All Models: ❑ Select a Timed Dry heated cycle, and start of /recycle all of your Use and Care Guide. Adjust leveling legs Not Level If...wrench to the need for leaks around "Y" connector, faucet, and hoses. ❑ If you have all packaging materials. ❑ Check dryer's final location. Gas Models ❑ Plug into a grounded outlet. NOTE: You may clog different parts of the water system, which will go back through the water system in the...
...flexible gas line is first heated. Over time, the buildup of lime scale may notice an odor when dryer is not crushed or kinked. All Models: ❑ Select a Timed Dry heated cycle, and start of /recycle all of your Use and Care Guide. Adjust leveling legs Not Level If...wrench to the need for leaks around "Y" connector, faucet, and hoses. ❑ If you have all packaging materials. ❑ Check dryer's final location. Gas Models ❑ Plug into a grounded outlet. NOTE: You may clog different parts of the water system, which will go back through the water system in the...


