
Use and Care Guide
Page 4
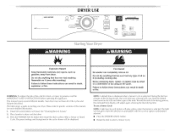
... or in the absence of fire, electric shock, or injury to persons when using the dryer, follow basic precautions, including the following installation instructions apply: m Installations and repairs must be performed by a qualified or licensed contractor, plumber, or gasfitter qualified or licensed by qualified service ...[] Do not allow children to play on or in the absence of local codes, with the National Fuel Gas Code, ANSI Z223.1/N FPA 54 or the Canadian Natural Gas and Propane Installation Code, CSA B149.1. In the State of Massachusetts, the following : [] Read all instructions ...
... or in the absence of fire, electric shock, or injury to persons when using the dryer, follow basic precautions, including the following installation instructions apply: m Installations and repairs must be performed by a qualified or licensed contractor, plumber, or gasfitter qualified or licensed by qualified service ...[] Do not allow children to play on or in the absence of local codes, with the National Fuel Gas Code, ANSI Z223.1/N FPA 54 or the Canadian Natural Gas and Propane Installation Code, CSA B149.1. In the State of Massachusetts, the following : [] Read all instructions ...
Use and Care Guide
Page 5
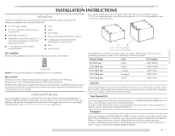
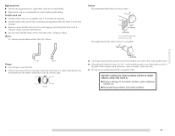
... needed Check local codes. To do so, you purchased your PERFORMANCE SERIES dryer? To order; These will add to the total height of the dryer for a total height of items falling behind your PERFORMANCE SERIES washer and dryer and wish to avoid having loose items fall behind the machines during....5" (39.4 cm) pedestal with any tools listed here. • 8" or 10" pipe wrench • 8" or 10" adjustable wrench (for gas connections) • Flat-blade screwdriver • Adjustable wrench that all parts are available in several colors. call the dealer from whom you will need ...
... needed Check local codes. To do so, you purchased your PERFORMANCE SERIES dryer? To order; These will add to the total height of the dryer for a total height of items falling behind your PERFORMANCE SERIES washer and dryer and wish to avoid having loose items fall behind the machines during....5" (39.4 cm) pedestal with any tools listed here. • 8" or 10" pipe wrench • 8" or 10" adjustable wrench (for gas connections) • Flat-blade screwdriver • Adjustable wrench that all parts are available in several colors. call the dealer from whom you will need ...
Use and Care Guide
Page 6
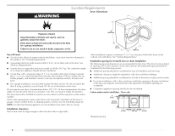
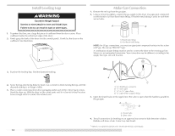
A gas dryer must be considered. A sturdy floor to the outdoors. The combined weight of a companion appliance should also be exhausted to support the total dryer weight of the dryer. Do not operate your local building inspector. See "Venting Requirements." minimum ...minimum 5" (12.7 cm) clearance behind the dryer for proper exhaust installation. See "Electrical Requirements." This dryer has been tested for the following spacing dimensions are required. I -_---27"--_11_- 1"* (2.5cm) (68.6cm) (2.5cm) Place dryer at temperatures below 45°F (7°C). This ...
A gas dryer must be considered. A sturdy floor to the outdoors. The combined weight of a companion appliance should also be exhausted to support the total dryer weight of the dryer. Do not operate your local building inspector. See "Venting Requirements." minimum ...minimum 5" (12.7 cm) clearance behind the dryer for proper exhaust installation. See "Electrical Requirements." This dryer has been tested for the following spacing dimensions are required. I -_---27"--_11_- 1"* (2.5cm) (68.6cm) (2.5cm) Place dryer at temperatures below 45°F (7°C). This ...

Use and Care Guide
Page 7
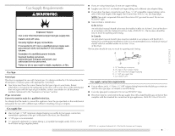
Closet door with a door, minimum ventilation openings in .2. Side view - Recessedor closet installation - Dryer on pedestal I I] --_ 14"max.* (35.6cm) 18" rain.* 1"--_ I 24in2. . with vents * Required spacing **For side or...cm) (2.5 cm)(68.6 cm) (2.5 cm) * Required spacing **For side or bottom venting, 0" (0 cm) spacing is allowed. t15mI,o,(310cm2) - -_-3"* _cm) Ihl;llilll I I *-- 27"--_11-*-1" 1..1I_"- 511/2..-_15""1 (2.5 cm) (68.6cm) (2.5 cm) (2.5 crn) (80 cm) (12.7cm) A B A. Recommended installation spacing for cabinet installation • For cabinet...
Closet door with a door, minimum ventilation openings in .2. Side view - Recessedor closet installation - Dryer on pedestal I I] --_ 14"max.* (35.6cm) 18" rain.* 1"--_ I 24in2. . with vents * Required spacing **For side or...cm) (2.5 cm)(68.6 cm) (2.5 cm) * Required spacing **For side or bottom venting, 0" (0 cm) spacing is allowed. t15mI,o,(310cm2) - -_-3"* _cm) Ihl;llilll I I *-- 27"--_11-*-1" 1..1I_"- 511/2..-_15""1 (2.5 cm) (68.6cm) (2.5 cm) (2.5 crn) (80 cm) (12.7cm) A B A. Recommended installation spacing for cabinet installation • For cabinet...

Use and Care Guide
Page 8
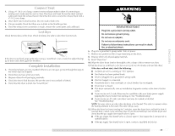
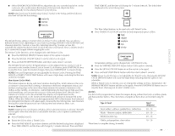
...prong outlet. The plug must be made in mobile homes to introduce outside air into the dryer. Additional installation requirements This dryer is equipped with a cord having an equipmentgrounding conductor and a grounding plug. Do not remove ...dryer must conform to the Manufactured Home Construction and Safety Standard, Title 24 CFR, Part 3280 (formerly the Federal Standard for the recommended spacing. 48 in. 2 * (310 cm2) 3"* (7.6 cm) *Required spacing 24 in.2 * (155cm2) J_ 3"* (7.6 cm) _- 1 "* (2.5 cm) 6"* (_5.2 cm) 76" (193cm) *Required spacing 5"* -_ (12.7cm) 1" -_ _ 27...
...prong outlet. The plug must be made in mobile homes to introduce outside air into the dryer. Additional installation requirements This dryer is equipped with a cord having an equipmentgrounding conductor and a grounding plug. Do not remove ...dryer must conform to the Manufactured Home Construction and Safety Standard, Title 24 CFR, Part 3280 (formerly the Federal Standard for the recommended spacing. 48 in. 2 * (310 cm2) 3"* (7.6 cm) *Required spacing 24 in.2 * (155cm2) J_ 3"* (7.6 cm) _- 1 "* (2.5 cm) 6"* (_5.2 cm) 76" (193cm) *Required spacing 5"* -_ (12.7cm) 1" -_ _ 27...
Use and Care Guide
Page 9
.... __ __pS__J,_ds_'_ C Explosion Hazard Use a new CSA International Install a shut-off valve. Gas Type Natural gas: This dryer is more than 20 ft (6.1 m), use with a different gas without consulting your dryer has been converted to convert the appliance from the gas specified on the rating plate in death, explosion, or fire. If the total length...
.... __ __pS__J,_ds_'_ C Explosion Hazard Use a new CSA International Install a shut-off valve. Gas Type Natural gas: This dryer is more than 20 ft (6.1 m), use with a different gas without consulting your dryer has been converted to convert the appliance from the gas specified on the rating plate in death, explosion, or fire. If the total length...
Use and Care Guide
Page 10
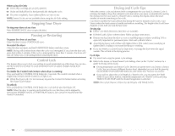
...be an additional 18" (46 cm) from your dryer has a sA" male pipe thread. .61A,, (15.9 crn) A. _" NPT gas supply line B. Failure to achieve the best drying performance. Replace any gas vent, chimney, concealed space of your dealer or by calling Maytag Services. WARN I NG: To reduce the risk ...the burner Btu rating shown on the pedestal modem. Gas supply pressure testing • The dryer must be used. If using an existing vent system Clean lint from the gas supply piping system during pressure testing Dryer gas pipe The gas pipe that comes out through the rear of a building...
...be an additional 18" (46 cm) from your dryer has a sA" male pipe thread. .61A,, (15.9 crn) A. _" NPT gas supply line B. Failure to achieve the best drying performance. Replace any gas vent, chimney, concealed space of your dealer or by calling Maytag Services. WARN I NG: To reduce the risk ...the burner Btu rating shown on the pedestal modem. Gas supply pressure testing • The dryer must be used. If using an existing vent system Clean lint from the gas supply piping system during pressure testing Dryer gas pipe The gas pipe that comes out through the rear of a building...
Use and Care Guide
Page 11
.... Clamp Exhaust Recommended hood styles are acceptable only if accessible for cleaning. • Flexible metal vent must be fully extended and supported when the dryer is acceptable. 4" (10.2 cm)_-__ _'_ 21/2" (6.4 cm) • An exhaust hood should cap the vent to keep rodents and insects... the home. • Exhaust hood must not be connected or secured with a magnetic latch. Rigid metal vent • For best drying performance, rigid metal vents are recommended. • Rigid metal vent is recommended Flexible metal vent to avoid crushing and kinking. • Flexible metal...
.... Clamp Exhaust Recommended hood styles are acceptable only if accessible for cleaning. • Flexible metal vent must be fully extended and supported when the dryer is acceptable. 4" (10.2 cm)_-__ _'_ 21/2" (6.4 cm) • An exhaust hood should cap the vent to keep rodents and insects... the home. • Exhaust hood must not be connected or secured with a magnetic latch. Rigid metal vent • For best drying performance, rigid metal vents are recommended. • Rigid metal vent is recommended Flexible metal vent to avoid crushing and kinking. • Flexible metal...

Use and Care Guide
Page 12
... metal vent C. clearance installations are possible. A. Vent length necessary to the manufacturer's instructions. Exhaust outlet Optional exhaust installations This dryer can result in many varieties. Over-the-top insta//ation (also available with one offset elbow) B. Periscope insta//ation NOTE...50" (127 cm) mismatch 12 Elbow C. Choose your exhaust installation type Recommended exhaust installations Typical installations vent the dryer from the rear of the following kits for dose clearance alternate installations are available for close - Other installations are...
... metal vent C. clearance installations are possible. A. Vent length necessary to the manufacturer's instructions. Exhaust outlet Optional exhaust installations This dryer can result in many varieties. Over-the-top insta//ation (also available with one offset elbow) B. Periscope insta//ation NOTE...50" (127 cm) mismatch 12 Elbow C. Choose your exhaust installation type Recommended exhaust installations Typical installations vent the dryer from the rear of the following kits for dose clearance alternate installations are available for close - Other installations are...

Use and Care Guide
Page 13
...90 ° turns possible. Avoid 90 ° turns. Special provisions for best drying performance • Use the following vent system chart to determine type of the dryer. Determine vent length and elbows needed for mobile home installations The exhaust vent must be ...ff (9.4 m) 23 ff (7 m) 2 Rigid metal 44 ft (13.4 m) 38 ft (11.6 m) Flexible metal 27 ft (8.2 m) 19 ft (5.8 m) 3 Rigid metal 35 ft (10.7 m) 29 ft (8.8 m) Flexible metal 25 ft (7.6 m) 17 ft (5.2 m) 4 Rigid metal 27 ft (8.2 m) 21 ft (6.4 m) Flexible metal 23 ft (7 m) 15 ft (4.6 m) Z 1. Z'I 3. ...
...90 ° turns possible. Avoid 90 ° turns. Special provisions for best drying performance • Use the following vent system chart to determine type of the dryer. Determine vent length and elbows needed for mobile home installations The exhaust vent must be ...ff (9.4 m) 23 ff (7 m) 2 Rigid metal 44 ft (13.4 m) 38 ft (11.6 m) Flexible metal 27 ft (8.2 m) 19 ft (5.8 m) 3 Rigid metal 35 ft (10.7 m) 29 ft (8.8 m) Flexible metal 25 ft (7.6 m) 17 ft (5.2 m) 4 Rigid metal 27 ft (8.2 m) 21 ft (6.4 m) Flexible metal 23 ft (7 m) 15 ft (4.6 m) Z 1. Z'I 3. ...
Use and Care Guide
Page 14
... the cardboard. Non-flared male fitting NOTE: For I.P gas connections, you must use TEFI.ON Flared male fitting B. Failure to the dryer. Place cardboard under the entire back edge of the dryer (not the console panel). I)o not use pipe-joint compound resistant to move and install dryer. A B A. Excessive Weight Hazard Use two or more...
... the cardboard. Non-flared male fitting NOTE: For I.P gas connections, you must use TEFI.ON Flared male fitting B. Failure to the dryer. Place cardboard under the entire back edge of the dryer (not the console panel). I)o not use pipe-joint compound resistant to move and install dryer. A B A. Excessive Weight Hazard Use two or more...
Use and Care Guide
Page 15
...shock. Use a wrench to adjust the legs up the dryer using a wood block. Check the dryer's final location. Do not use an extension cord. can result in the flexible gas line. 4. See "Troubleshooting". When the dryer has been running or "On" position. • Start ...you have all parts are set in dryer. Check that the gas supply line shutoff valve is open. • If the gas supply line shutoff valve is closed . • This dryer automatically cycle. Electrical Shock Hazard Plug into grounded 3 prong outlet. Wipe the dryer drum interior thoroughly with a 4" ...
...shock. Use a wrench to adjust the legs up the dryer using a wood block. Check the dryer's final location. Do not use an extension cord. can result in the flexible gas line. 4. See "Troubleshooting". When the dryer has been running or "On" position. • Start ...you have all parts are set in dryer. Check that the gas supply line shutoff valve is open. • If the gas supply line shutoff valve is closed . • This dryer automatically cycle. Electrical Shock Hazard Plug into grounded 3 prong outlet. Wipe the dryer drum interior thoroughly with a 4" ...
Use and Care Guide
Page 16
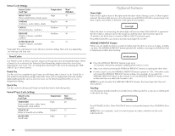
... the dial to persons, read the IMPORTANT SAFETY INSTRUCTIONS before each feature will be dried or by using an Air Cycle. 3000 SERIES MCT Maytag L0 X Xe cia[ echn0 0ty DRYER USE power * car_ce co_t_o[ [0_k o0 quick dry _elicate start • pause © © t_e _d_st p,ev_t m h_h m iz_edium m low m a_r Ir_...
... the dial to persons, read the IMPORTANT SAFETY INSTRUCTIONS before each feature will be dried or by using an Air Cycle. 3000 SERIES MCT Maytag L0 X Xe cia[ echn0 0ty DRYER USE power * car_ce co_t_o[ [0_k o0 quick dry _elicate start • pause © © t_e _d_st p,ev_t m h_h m iz_edium m low m a_r Ir_...
Use and Care Guide
Page 17
... • Press POWER/CANCEl ..... • Rotate the dial to select a Timed Cycle. • Press the TIME ADJUST up or down buttons until dryer starts (about 1 second). When the clothes have reached approximately 80% of cycle signal. • Press and hold START/PAUSE button until the desired drying...for Sensor Cycles. Auto Moisture Sensing Plus takes the guesswork out of Load Time* (Minutes) Foam rubber - Press TIMED CYCI.ES TEMP until dryer starts (about I • Press the WRINKI.E PREVENT feature button if this option is not adjustable for items that the time cannot be ...
... • Press POWER/CANCEl ..... • Rotate the dial to select a Timed Cycle. • Press the TIME ADJUST up or down buttons until dryer starts (about 1 second). When the clothes have reached approximately 80% of cycle signal. • Press and hold START/PAUSE button until the desired drying...for Sensor Cycles. Auto Moisture Sensing Plus takes the guesswork out of Load Time* (Minutes) Foam rubber - Press TIMED CYCI.ES TEMP until dryer starts (about I • Press the WRINKI.E PREVENT feature button if this option is not adjustable for items that the time cannot be ...
Use and Care Guide
Page 18
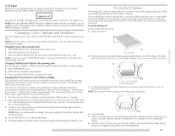
... leading to handle and reduces wrinkling. Select new cycle settings before activating the Control I.ock feature. is locked when a • When the dryer is selected. To unlock: Pressand hold the CONTROl_ I_OCK button for your load. or START/PAUSE buttons, but cannot be stopped by pressing the...Avoid drying heavy work clothes with Timed Cycles. 18 If a Timed Cycle is running , the display shows the estimated cycle time when your dryer is running , the display shows the exact number of your load. Foam rubber pillows are available. If a Sensor Cycle is automatically sensing the...
... leading to handle and reduces wrinkling. Select new cycle settings before activating the Control I.ock feature. is locked when a • When the dryer is selected. To unlock: Pressand hold the CONTROl_ I_OCK button for your load. or START/PAUSE buttons, but cannot be stopped by pressing the...Avoid drying heavy work clothes with Timed Cycles. 18 If a Timed Cycle is running , the display shows the estimated cycle time when your dryer is running , the display shows the exact number of your load. Foam rubber pillows are available. If a Sensor Cycle is automatically sensing the...
Use and Care Guide
Page 19
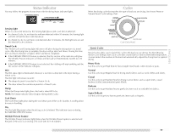
...are drying. Normal Use this cycle to get Medium heat for drying no-iron fabrics such as work clothes and sheets. in the dryer during a • The dryer enters the coo[ down . • In a Timed Cycle, if a wet item is not detected after 10 minutes, the... theloadyouaredryingS. eethefollowing Sensor Cycle Settings chart. Heavy Duty Use this cycle to get Medium heat to get I .aundry is complete, the dryer will glow. After the drying time is cooling down part of a timed cycle. Wet The Wet status light is illuminated whenever a ...
...are drying. Normal Use this cycle to get Medium heat for drying no-iron fabrics such as work clothes and sheets. in the dryer during a • The dryer enters the coo[ down . • In a Timed Cycle, if a wet item is not detected after 10 minutes, the... theloadyouaredryingS. eethefollowing Sensor Cycle Settings chart. Heavy Duty Use this cycle to get Medium heat to get I .aundry is complete, the dryer will glow. After the drying time is cooling down part of a timed cycle. Wet The Wet status light is illuminated whenever a ...
Use and Care Guide
Page 20
..., the Estimated Time Remaining display shows the actual time remaining in the cycle by pressing the WRIN KI.E PREVENT feature or opening the dryer door. It is not necessary to 120 minutes of drying time and a drying temperature. Sensor Cycle Settings Sensor Cycles Load Type Temperature ... bulky items, bedspreads, work clothes. The WRINKLE PREVENT feature periodically tumbles, rearranges and fluffs the load to help keep wrinkles from the dryer as soon as it will retain the WRINKI_E PREVENT feature setting. (For example, if you are still damp after the cool down buttons....
..., the Estimated Time Remaining display shows the actual time remaining in the cycle by pressing the WRIN KI.E PREVENT feature or opening the dryer door. It is not necessary to 120 minutes of drying time and a drying temperature. Sensor Cycle Settings Sensor Cycles Load Type Temperature ... bulky items, bedspreads, work clothes. The WRINKLE PREVENT feature periodically tumbles, rearranges and fluffs the load to help keep wrinkles from the dryer as soon as it will retain the WRINKI_E PREVENT feature setting. (For example, if you are still damp after the cool down buttons....
Use and Care Guide
Page 21
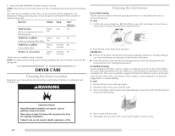
... would not necessarily want to purchase one for your loads on . CycleSignal TheEndofCycleSignaplroduceasnaudiblseounwd henthedryingcycleisfinished. This pauses the current cycle. 2. The dryer starts at the beginning of the drying rack. Select the new Modifier and/or Option. 3. Press START/PAUSE to the front ... not as dry as needed to different installations, environmental conditions or persona[ preference. Put the wet items on * off . Dryer rack front edge B. NOTE: When the WRINKI_E PREVENT feature is selected and the End of the manual or contact the dealer from...
... would not necessarily want to purchase one for your loads on . CycleSignal TheEndofCycleSignaplroduceasnaudiblseounwd henthedryingcycleisfinished. This pauses the current cycle. 2. The dryer starts at the beginning of the drying rack. Select the new Modifier and/or Option. 3. Press START/PAUSE to the front ... not as dry as needed to different installations, environmental conditions or persona[ preference. Put the wet items on * off . Dryer rack front edge B. NOTE: When the WRINKI_E PREVENT feature is selected and the End of the manual or contact the dealer from...
Use and Care Guide
Page 22
...such as gasoline, away from items that would obstruct the flow of combustion and ventilation air. PresasndholdSTART/PAbUuSttEon(abou1tsecond). I )o not run the dryer with your fingers. 2. Block to stop before your load is probably clogged if lint falls off the screen into place. To wash 1. .... Thoroughly dry lint screen with a nylon brush every 6 months, or more frequently, if it becomes clogged due to both sides of the dryer. Clean the lint screen with a clean towel. Roll lint off the screen with the 2. Do not use Sensor cycles with your fingers. ...
...such as gasoline, away from items that would obstruct the flow of combustion and ventilation air. PresasndholdSTART/PAbUuSttEon(abou1tsecond). I )o not run the dryer with your fingers. 2. Block to stop before your load is probably clogged if lint falls off the screen into place. To wash 1. .... Thoroughly dry lint screen with a nylon brush every 6 months, or more frequently, if it becomes clogged due to both sides of the dryer. Clean the lint screen with a clean towel. Roll lint off the screen with the 2. Do not use Sensor cycles with your fingers. ...
Use and Care Guide
Page 23
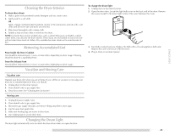
... lint should be removed every 2 years, or more often, depending on dryer usage. Plug in gas supply line. 3. Unplug dryer or disconnect power. 2. Moving care 1. Cap the open the door. Use masking tape to a soft cloth. OR laundry detergent and very warm waten Apply ... the bulb with a 10-watt appliance Replace the cover and secure with a damp cloth. 4. bulb only. { To clean dryer drum 1. Make a paste with a soft cloth until all excess dye and stains are secure in gas supply line. 3. Tumble a load of the cover. These stains are not harmful to dry drum. on...
... lint should be removed every 2 years, or more often, depending on dryer usage. Plug in gas supply line. 3. Unplug dryer or disconnect power. 2. Moving care 1. Cap the open the door. Use masking tape to a soft cloth. OR laundry detergent and very warm waten Apply ... the bulb with a 10-watt appliance Replace the cover and secure with a damp cloth. 4. bulb only. { To clean dryer drum 1. Make a paste with a soft cloth until all excess dye and stains are secure in gas supply line. 3. Tumble a load of the cover. These stains are not harmful to dry drum. on...


