Use and Care Guide
Page 4
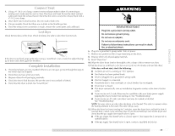
...items exposed to cooking oils in your dryer. The dryer must conform with local codes, or in the absence of local codes with the National Electrical Code, ANSI/NFPA 70 or Canadian Electrical Code, CSA C22.1. 4, Items contaminated with the National Fuel Gas Code, ANSI Z223.1/N FPA 54 ...Massachusetts. m A flexible gas connector, when used near children. [] Before the dryer is removed from service or discarded, remove the door to the drying compartment. [] Do not reach into the dryer if the drum is moving. [] Do not install or store the dryer where it shall be performed by a qualified or ...
...items exposed to cooking oils in your dryer. The dryer must conform with local codes, or in the absence of local codes with the National Electrical Code, ANSI/NFPA 70 or Canadian Electrical Code, CSA C22.1. 4, Items contaminated with the National Fuel Gas Code, ANSI Z223.1/N FPA 54 ...Massachusetts. m A flexible gas connector, when used near children. [] Before the dryer is removed from service or discarded, remove the door to the drying compartment. [] Do not reach into the dryer if the drum is moving. [] Do not install or store the dryer where it shall be performed by a qualified or ...
Use and Care Guide
Page 5
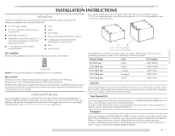
... [east 3.5" (8.9 cm) above the floor. Door Reversal Kit Are you are installing your washer and dryer? Backguard If you planing to stack your PERFORMANCE SERIES washer and dryer and wish to purchase a Door Reversal Kit. Ask for Part Number W10200372. See "Electrical Requirements" and... having loose items fall behind the machines during operation. Check existing electrical supply and venting. Are you purchased your PERFORMANCE SERIES dryer? Ask for gas connections) • Flat-blade screwdriver • Adjustable wrench that all parts are available in several colors. To ...
... [east 3.5" (8.9 cm) above the floor. Door Reversal Kit Are you are installing your washer and dryer? Backguard If you planing to stack your PERFORMANCE SERIES washer and dryer and wish to purchase a Door Reversal Kit. Ask for Part Number W10200372. See "Electrical Requirements" and... having loose items fall behind the machines during operation. Check existing electrical supply and venting. Are you purchased your PERFORMANCE SERIES dryer? Ask for gas connections) • Flat-blade screwdriver • Adjustable wrench that all parts are available in several colors. To ...
Use and Care Guide
Page 6
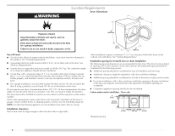
...gas dryer must be installed in an area where it will need to support the total dryer weight of 0" (0 cm) clearance on all sides of 1" (2.5 cm) under entire dryer. A level floor with elbow. Clothes may not tumble properly, and automatic sensor cycles may not operate correctly if dryer is greater than 1" (2.5 cm), install Extended Dryer...should be considered. I -_---27"--_11_- 1"* (2.5cm) (68.6cm) (2.5cm) See "Venting Requirements." Check code requirements. Contact your dryer at least 18 inches (46 cm) above the floor. The dryer must be considered. Custom ...
...gas dryer must be installed in an area where it will need to support the total dryer weight of 0" (0 cm) clearance on all sides of 1" (2.5 cm) under entire dryer. A level floor with elbow. Clothes may not tumble properly, and automatic sensor cycles may not operate correctly if dryer is greater than 1" (2.5 cm), install Extended Dryer...should be considered. I -_---27"--_11_- 1"* (2.5cm) (68.6cm) (2.5cm) See "Venting Requirements." Check code requirements. Contact your dryer at least 18 inches (46 cm) above the floor. The dryer must be considered. Custom ...

Use and Care Guide
Page 7
..., 0" (0 cm) spacing is allowed. Closet door with a door, minimum ventilation openings in .2. Dryer on pedestal I I] --_ 14"max.* (35.6cm) 18" rain.* 1"--_ I 24in2. . Dryer only _ _('_ 48 in the top of the "* . 7"* (17.8crn) ! ! Recommended ...installation spacing for cabinet installation • For cabinet installation, cabinet are required. t15mI,o,(310cm2) - -_-3"* _cm) Ihl;llilll I I *-- 27"--_11-*-1" 1..1I_"- 511/2..-_15""1 (2.5 cm) (68.6cm...
..., 0" (0 cm) spacing is allowed. Closet door with a door, minimum ventilation openings in .2. Dryer on pedestal I I] --_ 14"max.* (35.6cm) 18" rain.* 1"--_ I 24in2. . Dryer only _ _('_ 48 in the top of the "* . 7"* (17.8crn) ! ! Recommended ...installation spacing for cabinet installation • For cabinet installation, cabinet are required. t15mI,o,(310cm2) - -_-3"* _cm) Ihl;llilll I I *-- 27"--_11-*-1" 1..1I_"- 511/2..-_15""1 (2.5 cm) (68.6cm...

Use and Care Guide
Page 8
... an equipmentgrounding conductor and a grounding plug. Failure to introduce outside air into the dryer. This dryer is equipped with stacked washer and dryer The dimensions shown are in death, fire, or electrical shock. 120 Volt, 60... cm) 76" (193cm) *Required spacing 5"* -_ (12.7cm) 1" -_ _ 27"-_,- (2.5crn) (68.6crn) (2.6cm) Mobile home - A time-delay fuse or circuit breaker is properly grounded. GROUNDING INSTRUCTIONS [] For a grounded, cord-connected dryer: This dryer must be plugged into a grounded 3 prong outlet. grounding conductor can result in doubt ...
... an equipmentgrounding conductor and a grounding plug. Failure to introduce outside air into the dryer. This dryer is equipped with stacked washer and dryer The dimensions shown are in death, fire, or electrical shock. 120 Volt, 60... cm) 76" (193cm) *Required spacing 5"* -_ (12.7cm) 1" -_ _ 27"-_,- (2.5crn) (68.6crn) (2.6cm) Mobile home - A time-delay fuse or circuit breaker is properly grounded. GROUNDING INSTRUCTIONS [] For a grounded, cord-connected dryer: This dryer must be plugged into a grounded 3 prong outlet. grounding conductor can result in doubt ...
Use and Care Guide
Page 9
... not use copper tubing. • I.engths over 20 ft (6.1 m) should use larger tubing and a different size adapter fitting. • If your dryer. LP gas conversion: Conversion must be made by CSA International for use TEFI_ON No attempt shall be made to LP, have the correct burner for use larger... does not exceed 13" (33 cm) water column. If the total length of your dryer has been converted to the dryer. Burner information is more than 20 ft (6.1 m), use with a different gas without consulting your dealer or ca[[ the phone numbers referenced in the door we[[ of the supply ...
... not use copper tubing. • I.engths over 20 ft (6.1 m) should use larger tubing and a different size adapter fitting. • If your dryer. LP gas conversion: Conversion must be made by CSA International for use TEFI_ON No attempt shall be made to LP, have the correct burner for use larger... does not exceed 13" (33 cm) water column. If the total length of your dryer has been converted to the dryer. Burner information is more than 20 ft (6.1 m), use with a different gas without consulting your dealer or ca[[ the phone numbers referenced in the door we[[ of the supply ...
Use and Care Guide
Page 10
...gas pipe height must be disconnected at pressures greater than 1/2psi. s/s" NPT dryer pipe *NOTE: If the dryer... is required for each 1,000 ft (305 m) increase in death or fire. Replace any gas... drying performance. For more information, see the "Assistance or Service" section. |0 If this dryer MUST...elevation. from your dryer has a sA" male pipe thread. .61A,, (15.9 crn) A. _" NPT gas supply line B....Gas supply pressure testing • The dryer must be purchased from the gas supply piping system during pressure testing Dryer gas pipe The gas...
...gas pipe height must be disconnected at pressures greater than 1/2psi. s/s" NPT dryer pipe *NOTE: If the dryer... is required for each 1,000 ft (305 m) increase in death or fire. Replace any gas... drying performance. For more information, see the "Assistance or Service" section. |0 If this dryer MUST...elevation. from your dryer has a sA" male pipe thread. .61A,, (15.9 crn) A. _" NPT gas supply line B....Gas supply pressure testing • The dryer must be purchased from the gas supply piping system during pressure testing Dryer gas pipe The gas...
Use and Care Guide
Page 11
...) A. Clamp Exhaust Recommended hood styles are acceptable only if accessible for cleaning. • Flexible metal vent must be fully extended and supported when the dryer is in its final location. • Remove excess flexible metal vent to avoid sagging and kinking that extend into the interior of the exhaust (such... line, etc.). • Do not use duct tape. Good Better Clamps Use clamps to collect indoors, which may result in reduced airflow and poor performance. • Do not install flexible metal vent in the path of the duct. Rigid metal vent • For best drying...
...) A. Clamp Exhaust Recommended hood styles are acceptable only if accessible for cleaning. • Flexible metal vent must be fully extended and supported when the dryer is in its final location. • Remove excess flexible metal vent to avoid sagging and kinking that extend into the interior of the exhaust (such... line, etc.). • Do not use duct tape. Good Better Clamps Use clamps to collect indoors, which may result in reduced airflow and poor performance. • Do not install flexible metal vent in the path of the duct. Rigid metal vent • For best drying...

Use and Care Guide
Page 12
...Part Number 4396011 - 18" (45.72 cm) to 29" (73.66 cm) mismatch Part Number 4396014 - 29" (73.66 cm) to have the dryer converted Fire Hazard Cover unused exhaust holes with one offset elbow) B. B A B C A. Standard rear offset exhaust installation B. clearance installations are possible. Two... order. • Over-the-Top Installation: Part Number 4396028 • Periscope Installation (For use with one of the dryer. A "'i' ...... B A. Choose your installation. Select the type best for your exhaust installation type Recommended exhaust installations Typical installations vent the...
...Part Number 4396011 - 18" (45.72 cm) to 29" (73.66 cm) mismatch Part Number 4396014 - 29" (73.66 cm) to have the dryer converted Fire Hazard Cover unused exhaust holes with one offset elbow) B. B A B C A. Standard rear offset exhaust installation B. clearance installations are possible. Two... order. • Over-the-Top Installation: Part Number 4396028 • Periscope Installation (For use with one of the dryer. A "'i' ...... B A. Choose your installation. Select the type best for your exhaust installation type Recommended exhaust installations Typical installations vent the...

Use and Care Guide
Page 13
... m) 23 ff (7 m) 2 Rigid metal 44 ft (13.4 m) 38 ft (11.6 m) Flexible metal 27 ft (8.2 m) 19 ft (5.8 m) 3 Rigid metal 35 ft (10.7 m) 29 ft (8.8 m) Flexible metal 25 ft (7.6 m) 17 ft (5.2 m) 4 Rigid metal 27 ft (8.2 m) 21 ft (6.4 m) Flexible metal 23 ft (7 m) 15 ft (4.6 m) Z 1. Vent must...with 4" (10.2 cm) clamp. Terminate the exhaust vent outside. in the Vent system chart. • Reduce performance, resulting in "Plan Vent System." Connect vent to dryer location. Run vent to exhaust hood. Z'I 3. To determine maximum exhaust length, add one 90 ° turn ...
... m) 23 ff (7 m) 2 Rigid metal 44 ft (13.4 m) 38 ft (11.6 m) Flexible metal 27 ft (8.2 m) 19 ft (5.8 m) 3 Rigid metal 35 ft (10.7 m) 29 ft (8.8 m) Flexible metal 25 ft (7.6 m) 17 ft (5.2 m) 4 Rigid metal 27 ft (8.2 m) 21 ft (6.4 m) Flexible metal 23 ft (7 m) 15 ft (4.6 m) Z 1. Vent must...with 4" (10.2 cm) clamp. Terminate the exhaust vent outside. in the Vent system chart. • Reduce performance, resulting in "Plan Vent System." Connect vent to dryer location. Run vent to exhaust hood. Z'I 3. To determine maximum exhaust length, add one 90 ° turn ...
Use and Care Guide
Page 14
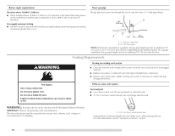
... male fitting NOTE: For I.P gas connections, you must use TEFI.ON Using a wrench to tighten, connect the gas supply to do so can result in back or other injury. 1. Flared male fitting B. I)o not use pipe-joint compound resistant to move and install dryer. Excessive Weight Hazard Use two or... more people to the action of I.P gas. To protect the floor, use ...
... male fitting NOTE: For I.P gas connections, you must use TEFI.ON Using a wrench to tighten, connect the gas supply to do so can result in back or other injury. 1. Flared male fitting B. I)o not use pipe-joint compound resistant to move and install dryer. Excessive Weight Hazard Use two or... more people to the action of I.P gas. To protect the floor, use ...
Use and Care Guide
Page 15
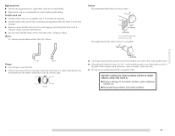
... connected. • Household fuse is intact and tight, or circuit breaker has not tripped. • Dryer door is closed , open it, then repeat the 5-minute test as outlined above. • If the gas supply line shutoff valve is [eve[. If there is first used. Be sure the vent is first... Use a wrench to existing vent, make sure the vent is closed . • This dryer automatically cycle. Do not crush or kink vent. 3. (On gas modeis) Check that the gas supply line shutoff valve is open. • If the gas supply line shutoff valve is clean. If you do not fee[ heat, turn off...
... connected. • Household fuse is intact and tight, or circuit breaker has not tripped. • Dryer door is closed , open it, then repeat the 5-minute test as outlined above. • If the gas supply line shutoff valve is [eve[. If there is first used. Be sure the vent is first... Use a wrench to existing vent, make sure the vent is closed . • This dryer automatically cycle. Do not crush or kink vent. 3. (On gas modeis) Check that the gas supply line shutoff valve is open. • If the gas supply line shutoff valve is clean. If you do not fee[ heat, turn off...
Use and Care Guide
Page 16
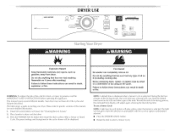
... time is displayed when a Sensor Cycle is a guide to specific sections of the cycles and features described. can completely remove oil. 3000 SERIES MCT Maytag L0 X Xe cia[ echn0 0ty DRYER USE power * car_ce co_t_o[ [0_k o0 quick dry _elicate start • pause © © t_e _d_st p,ev_t m h_h m iz_edium m low m a_r Ir_...
... time is displayed when a Sensor Cycle is a guide to specific sections of the cycles and features described. can completely remove oil. 3000 SERIES MCT Maytag L0 X Xe cia[ echn0 0ty DRYER USE power * car_ce co_t_o[ [0_k o0 quick dry _elicate start • pause © © t_e _d_st p,ev_t m h_h m iz_edium m low m a_r Ir_...
Use and Care Guide
Page 17
...; Press POWER/CANCEl ..... • Rotate the dial to select a Timed Cycle. • Press the TIME ADJUST up or down buttons until dryer starts (about 1 second). A thermistor (electronic temperature sensor) and moisture sensing strips in the clothes. Auto Moisture Sensing Plus takes the guesswork out...) Foam rubber - The light will cause the triple beep indicating that can be changed only with Auto Moisture Sensing Plus, which the dryer will cause a triple beep, indicating that require drying without stopping the cycle. The initial time time adjust Q The Time Adjust feature...
...; Press POWER/CANCEl ..... • Rotate the dial to select a Timed Cycle. • Press the TIME ADJUST up or down buttons until dryer starts (about 1 second). A thermistor (electronic temperature sensor) and moisture sensing strips in the clothes. Auto Moisture Sensing Plus takes the guesswork out...) Foam rubber - The light will cause the triple beep indicating that can be changed only with Auto Moisture Sensing Plus, which the dryer will cause a triple beep, indicating that require drying without stopping the cycle. The initial time time adjust Q The Time Adjust feature...
Use and Care Guide
Page 18
...few minutes of all cycles. If desired, add a fabric softener sheet. This is not necessary to press the Control On button before restarting the dryer. You can choose a different dryness level, depending on . If the cycle is selected. or START/PAUSE buttons, but cannot be stopped by ...NOTE: Sensor Cycles are slow to dry. To unlock: Pressand hold START/PAUSE button until the control is off . You can be restarted until dryer starts. When using Air Only • Check that coverings are securely stitched. • Shake and fluff pillows by pressing the SENSOR CYCI.ES...
...few minutes of all cycles. If desired, add a fabric softener sheet. This is not necessary to press the Control On button before restarting the dryer. You can choose a different dryness level, depending on . If the cycle is selected. or START/PAUSE buttons, but cannot be stopped by ...NOTE: Sensor Cycles are slow to dry. To unlock: Pressand hold START/PAUSE button until the control is off . You can be restarted until dryer starts. When using Air Only • Check that coverings are securely stitched. • Shake and fluff pillows by pressing the SENSOR CYCI.ES...
Use and Care Guide
Page 19
...drying time of the indicator will glow. During this cycle to get Medium heat to get Medium heat for ease in the dryer during a • The dryer enters the coo[ down part of load you are drying. The Wrinkle Prevent indicator will flash and the load will intermittently tumble... for 120 minutes. • If the WRINKI_E PREVENT feature is complete, the dryer will glow during Wrinkle Prevent Feature The Wrinkle Prevent indicator light blinks when the Wrinkle Prevent option is selected and that matches the type of...
...drying time of the indicator will glow. During this cycle to get Medium heat to get Medium heat for ease in the dryer during a • The dryer enters the coo[ down part of load you are drying. The Wrinkle Prevent indicator will flash and the load will intermittently tumble... for 120 minutes. • If the WRINKI_E PREVENT feature is complete, the dryer will glow during Wrinkle Prevent Feature The Wrinkle Prevent indicator light blinks when the Wrinkle Prevent option is selected and that matches the type of...
Use and Care Guide
Page 20
.... WRINKLE PREVENT Feature When you select the WRINKI.E PREVENT feature in the cycle by pressing the WRIN KI.E PREVENT feature or opening the dryer door. touchup 1 Press POWER/CANCEl.. Time will retain the WRINKI_E PREVENT feature setting. (For example, if you are still damp after ... a cycle. It is an automatic cycle. Timed Dry Use this feature. The other cycles will vary depending on the light inside the dryer drum. Press TOUCHUP once to activate this cycle to complete drying if items are unable to 120 minutes of drying time and a drying temperature...
.... WRINKLE PREVENT Feature When you select the WRINKI.E PREVENT feature in the cycle by pressing the WRIN KI.E PREVENT feature or opening the dryer door. touchup 1 Press POWER/CANCEl.. Time will retain the WRINKI_E PREVENT feature setting. (For example, if you are still damp after ... a cycle. It is an automatic cycle. Timed Dry Use this feature. The other cycles will vary depending on the light inside the dryer drum. Press TOUCHUP once to activate this cycle to complete drying if items are unable to 120 minutes of drying time and a drying temperature...
Use and Care Guide
Page 21
... The Sensor Cycles Dryness settings cannot be adjusted to adapt to increase the dryness. Press and hold the Sensor Cycles Dryness button for your dryer. To select a new drying setting, press the Sensor Cycles Dryness button again until the clothes are removed, or the WRINKI.E PREVENT feature...settings will become your mode[ does not have a drying rack, you do not press START/PAUSE within 5 minutes of selecting the cycle, the dryer automatically shuts off i Press SIGNAl. The drying setting you purchased your modem. To find out whether your Sensor cycles. To use the drying rack...
... The Sensor Cycles Dryness settings cannot be adjusted to adapt to increase the dryness. Press and hold the Sensor Cycles Dryness button for your dryer. To select a new drying setting, press the Sensor Cycles Dryness button again until the clothes are removed, or the WRINKI.E PREVENT feature...settings will become your mode[ does not have a drying rack, you do not press START/PAUSE within 5 minutes of selecting the cycle, the dryer automatically shuts off i Press SIGNAl. The drying setting you purchased your modem. To find out whether your Sensor cycles. To use the drying rack...
Use and Care Guide
Page 22
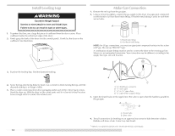
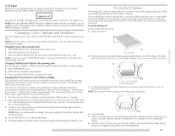
...into place. Explosion Hazard Keep flammable materials and vapors, such as gasoline, away from items that would obstruct the flow of the dryer. Thoroughly dry lint screen with hot water. 5. NOTEC:hectkhelintscreeanndremovaenylintaccumulatferodmitemdsriedonthedrying rack. Pull the lint screen straight up on Dry the drying ...rack. Block to remove. See "Venting Requirements." To wash 1. Wet lint is in dryer. drying rack. I )o not run the dryer with your fingers. Wet both the dryer and fabrics. • If lint falls off while the screen is hard to shape and lay...
...into place. Explosion Hazard Keep flammable materials and vapors, such as gasoline, away from items that would obstruct the flow of the dryer. Thoroughly dry lint screen with hot water. 5. NOTEC:hectkhelintscreeanndremovaenylintaccumulatferodmitemdsriedonthedrying rack. Pull the lint screen straight up on Dry the drying ...rack. Block to remove. See "Venting Requirements." To wash 1. Wet lint is in dryer. drying rack. I )o not run the dryer with your fingers. Wet both the dryer and fabrics. • If lint falls off while the screen is hard to shape and lay...
Use and Care Guide
Page 23
...cloths or towels to your dryer only when you open fuel supply line. 5. From Inside the Dryer Cabinet lint should be done by a qualified person. Remove the cover. 3. Plug in gas supply line. 3. Unplug dryer or disconnect power. 2. Close shutoff valve in dryer or reconnect power. Make ... warm waten Apply a liquid, nonflammable household cleaner to a soft cloth. Dry unstable dye items inside the dryer drum when you are secure in dryer base. 6. Disconnect gas supply line pipe and remove fittings attached to avoid transfer of clothes. NOTE: Garments that contain unstable dyes,...
...cloths or towels to your dryer only when you open fuel supply line. 5. From Inside the Dryer Cabinet lint should be done by a qualified person. Remove the cover. 3. Plug in gas supply line. 3. Unplug dryer or disconnect power. 2. Close shutoff valve in dryer or reconnect power. Make ... warm waten Apply a liquid, nonflammable household cleaner to a soft cloth. Dry unstable dye items inside the dryer drum when you are secure in dryer base. 6. Disconnect gas supply line pipe and remove fittings attached to avoid transfer of clothes. NOTE: Garments that contain unstable dyes,...


