
User Instructions
Page 1
... is available by calling our Maytag Services, LLC, Customer Assistance at www.maytag.com/accessories. fits 29" (737 mm) Super Capacity, 6.5 cu. fits 29" (737 mm) Super Capacity Plus, 7.0 cu. ft (0.20 cu. white 49572 LP gas conversion kit W10232963A You must provide proof of Contents ASSISTANCE OR SERVICE 1 ACCESSORIES 1 DRYER SAFETY 2 DRYER USE 4 DRYER CARE 5 TROUBLESHOOTING 7 WARRANTY 9 Table des...
... is available by calling our Maytag Services, LLC, Customer Assistance at www.maytag.com/accessories. fits 29" (737 mm) Super Capacity, 6.5 cu. fits 29" (737 mm) Super Capacity Plus, 7.0 cu. ft (0.20 cu. white 49572 LP gas conversion kit W10232963A You must provide proof of Contents ASSISTANCE OR SERVICE 1 ACCESSORIES 1 DRYER SAFETY 2 DRYER USE 4 DRYER CARE 5 TROUBLESHOOTING 7 WARRANTY 9 Table des...

User Instructions
Page 2
... kill or hurt you and others are not followed. 2 This symbol alerts you to reduce the chance of others . All safety messages will follow instructions. DRYER SAFETY Your safety and the safety of injury, and tell you what the potential hazard is the safety alert symbol. Always read and obey all...
... kill or hurt you and others are not followed. 2 This symbol alerts you to reduce the chance of others . All safety messages will follow instructions. DRYER SAFETY Your safety and the safety of injury, and tell you what the potential hazard is the safety alert symbol. Always read and obey all...

User Instructions
Page 3
... other flammable or explosive substances as they give off vapors that you use gasoline or other appliance. - If a gas leak is moving. ■ Do not install or store the dryer where it will be exposed to the weather. ■ Do not tamper with cooking oils may contribute to a ...rubber or similarly textured rubber-like materials. ■ Clean lint screen before using the dryer. ■ Do not place items exposed to play on or in your dryer. do if you cannot reach your gas supplier, call your safety, the information in this or any servicing unless specifically recommended ...
... other flammable or explosive substances as they give off vapors that you use gasoline or other appliance. - If a gas leak is moving. ■ Do not install or store the dryer where it will be exposed to the weather. ■ Do not tamper with cooking oils may contribute to a ...rubber or similarly textured rubber-like materials. ■ Clean lint screen before using the dryer. ■ Do not place items exposed to play on or in your dryer. do if you cannot reach your gas supplier, call your safety, the information in this or any servicing unless specifically recommended ...

User Instructions
Page 4
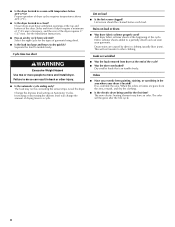
...load. NOTE: Service calls caused by improper venting will not be sure to follow these instructions can completely remove oil. DRYER USE Starting Your Dryer WARNING WARNING Explosion Hazard Keep flammable materials and vapors, such as gasoline, away from storing and shipping. 1. WARNING:...before operating this appliance. Turn the Cycle Control knob to the recommended cycle for more information. 1. Checking Your Vent Your dryer must be completely extended to allow adequate exhaust air to flow. Failure to achieve maximum drying efficiency and shorten drying times. ...
...load. NOTE: Service calls caused by improper venting will not be sure to follow these instructions can completely remove oil. DRYER USE Starting Your Dryer WARNING WARNING Explosion Hazard Keep flammable materials and vapors, such as gasoline, away from storing and shipping. 1. WARNING:...before operating this appliance. Turn the Cycle Control knob to the recommended cycle for more information. 1. Checking Your Vent Your dryer must be completely extended to allow adequate exhaust air to flow. Failure to achieve maximum drying efficiency and shorten drying times. ...
User Instructions
Page 5
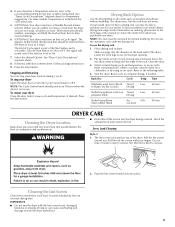
...for normal tumbling. NOTE: The rack must be able to remove lint. Place drying rack in use. to help avoid wrinkling. 6. (OPTIONAL) Your dryer may have a drying rack, you . A screen blocked by using an air cycle. This feature periodically tumbles, rearranges, and fluffs the load without...softener sheet. Press the Start button. Select a timed drying cycle and temperature, or an air cycle. DRYER CARE Cleaning the Dryer Location Keep dryer area clear and free from the dryer as soon as sweaters and pillows without heat to shape, lay flat on a clothesline or by lint ...
...for normal tumbling. NOTE: The rack must be able to remove lint. Place drying rack in use. to help avoid wrinkling. 6. (OPTIONAL) Your dryer may have a drying rack, you . A screen blocked by using an air cycle. This feature periodically tumbles, rearranges, and fluffs the load without...softener sheet. Press the Start button. Select a timed drying cycle and temperature, or an air cycle. DRYER CARE Cleaning the Dryer Location Keep dryer area clear and free from the dryer as soon as sweaters and pillows without heat to shape, lay flat on a clothesline or by lint ...

User Instructions
Page 6
... of clean cloths or towels to remove residue buildup. 4. If you are not harmful to secure dryer door. Moving care - Make sure leveling legs are secure in gas supply line. 3. Use masking tape to your fingers. Thoroughly dry lint screen with the screw. ...4. Vacation and Moving Care Vacation care Operate your dryer only when you have a gas dryer, close shutoff valve in dryer base. 6. Gas Dryers 1. Unplug dryer or disconnect power. 2. Replace the cover and secure with a clean towel. Pull the lint screen straight...
... of clean cloths or towels to remove residue buildup. 4. If you are not harmful to secure dryer door. Moving care - Make sure leveling legs are secure in gas supply line. 3. Use masking tape to your fingers. Thoroughly dry lint screen with the screw. ...4. Vacation and Moving Care Vacation care Operate your dryer only when you have a gas dryer, close shutoff valve in dryer base. 6. Gas Dryers 1. Unplug dryer or disconnect power. 2. Replace the cover and secure with a clean towel. Pull the lint screen straight...
User Instructions
Page 7
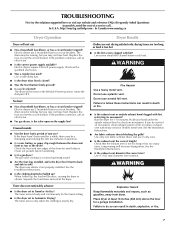
...the Installation Instructions. ■ Is the exhaust vent diameter the correct size? If the problem continues, call an electrician. ■ For gas dryers, is the dryer level front to back and side to follow these instructions can result in the Wrinkle Prevent position. Use 4" (102 mm) diameter vent material...death or fire. ■ Is the exhaust vent or outside exhaust hood to vibrate. Do not use ? In Canada www.maytag.ca Dryer Operation Dryer will increase drying times. Check the front and rear edges of lint or replace exhaust vent with lint? Unusual sounds ■...
...the Installation Instructions. ■ Is the exhaust vent diameter the correct size? If the problem continues, call an electrician. ■ For gas dryers, is the dryer level front to back and side to follow these instructions can result in the Wrinkle Prevent position. Use 4" (102 mm) diameter vent material...death or fire. ■ Is the exhaust vent or outside exhaust hood to vibrate. Do not use ? In Canada www.maytag.ca Dryer Operation Dryer will increase drying times. Check the front and rear edges of lint or replace exhaust vent with lint? Unusual sounds ■...
User Instructions
Page 8
...the dryness level setting on load ■ Is the lint screen clogged? Lint on Automatic Cycles. Stains on load or drum ■ Was dryer fabric softener properly used for the types of garments being used ? This will be gone after the first cycle. 8 The load may have ventilation... The new electric heating element may not be cleaned before each load. The odor will not transfer to do so can tumble freely. Level the dryer. Increasing or decreasing the dryness level will change the amount of the cycle. Dry smaller loads that can result in a cycle. Sides and front...
...the dryness level setting on load ■ Is the lint screen clogged? Lint on Automatic Cycles. Stains on load or drum ■ Was dryer fabric softener properly used for the types of garments being used ? This will be gone after the first cycle. 8 The load may have ventilation... The new electric heating element may not be cleaned before each load. The odor will not transfer to do so can tumble freely. Level the dryer. Increasing or decreasing the dryness level will change the amount of the cycle. Dry smaller loads that can result in a cycle. Sides and front...

Installation Instructions
Page 1
...;vacuation ....... 16 Install Vent System 8 Installation du conduit d'évacuation........... 17 Install Leveling Legs 8 Installation des pieds de nivellement.......... 18 Level Dryer 8 Mise à niveau de la sécheuse 18 Make Gas Connection 8 Raccordement au gaz 18 Connect Vent 9 Reverse Door Swing (Optional 9 Complete Installation 9 Conduit d'évacuation 19 Inversion du sens...
...;vacuation ....... 16 Install Vent System 8 Installation du conduit d'évacuation........... 17 Install Leveling Legs 8 Installation des pieds de nivellement.......... 18 Level Dryer 8 Mise à niveau de la sécheuse 18 Make Gas Connection 8 Raccordement au gaz 18 Connect Vent 9 Reverse Door Swing (Optional 9 Complete Installation 9 Conduit d'évacuation 19 Inversion du sens...

Installation Instructions
Page 2
... building, or area of the "Dryer User Instructions." Gas suppliers recommend that all occupants. • Immediately call your gas supplier, call the fire department. - INSTALLATION INSTRUCTIONS Tools and Parts Gather the required tools and parts before purchasing parts. Check existing gas supply, electrical supply and venting, ...this manual must not exceed 3 feet. WHAT TO DO IF YOU SMELL GAS: • Do not try to do not use a gas detector approved by calling the dealer from dryer drum. Follow the gas supplier's instructions. • If you use any other flammable vapors and...
... building, or area of the "Dryer User Instructions." Gas suppliers recommend that all occupants. • Immediately call your gas supplier, call the fire department. - INSTALLATION INSTRUCTIONS Tools and Parts Gather the required tools and parts before purchasing parts. Check existing gas supply, electrical supply and venting, ...this manual must not exceed 3 feet. WHAT TO DO IF YOU SMELL GAS: • Do not try to do not use a gas detector approved by calling the dealer from dryer drum. Follow the gas supplier's instructions. • If you use any other flammable vapors and...
Installation Instructions
Page 3
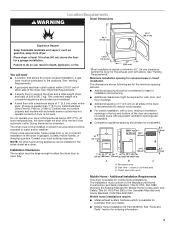
... located within 2 ft (61 cm) of either side of the dryer in an area where it will need A location that allows for the exhaust vent with elbow. Drying times can be exposed to water and/or weather. The dryer must be large enough to allow the dryer door to the.../CSA-Z240 MH. Installation Clearances The location must not be installed or stored in garages, closets, mobile homes, or sleeping quarters. closet or confined area C. A gas dryer must conform to open fully. 43 ½" (110.5 cm) 23 3/4" (60.3 cm) *29 ¼" (74.3 cm) 27" (68.6 cm) *Most installations ...
... located within 2 ft (61 cm) of either side of the dryer in an area where it will need A location that allows for the exhaust vent with elbow. Drying times can be exposed to water and/or weather. The dryer must be large enough to allow the dryer door to the.../CSA-Z240 MH. Installation Clearances The location must not be installed or stored in garages, closets, mobile homes, or sleeping quarters. closet or confined area C. A gas dryer must conform to open fully. 43 ½" (110.5 cm) 23 3/4" (60.3 cm) *29 ¼" (74.3 cm) 27" (68.6 cm) *Most installations ...

Installation Instructions
Page 4
... will not fit the outlet, have a proper outlet installed by CSA International for lengths under 20 ft (6.1 m) if local codes and gas supplier permit. Electrical Requirements WARNING Gas Supply Requirements WARNING Electrical Shock Hazard Plug into the dryer. This dryer is recommended. If connected to LP, have the correct burner for test gauge connection, immediately...
... will not fit the outlet, have a proper outlet installed by CSA International for lengths under 20 ft (6.1 m) if local codes and gas supplier permit. Electrical Requirements WARNING Gas Supply Requirements WARNING Electrical Shock Hazard Plug into the dryer. This dryer is recommended. If connected to LP, have the correct burner for test gauge connection, immediately...

Installation Instructions
Page 5
... six (6) feet (1.8 m) of E.I. Listed here are using Natural gas, do not use larger pipe. Lengths over 20 ft (6.1 m) should be easy to 10,000 ft (3,048 m) above 10,000 ft (3,048 m) a 4% reduction of the dryer. It is certified by which your dryer has been converted to use LP gas, 3⁄8" LP compatible copper tubing can use at...
... six (6) feet (1.8 m) of E.I. Listed here are using Natural gas, do not use larger pipe. Lengths over 20 ft (6.1 m) should be easy to 10,000 ft (3,048 m) above 10,000 ft (3,048 m) a 4% reduction of the dryer. It is certified by which your dryer has been converted to use LP gas, 3⁄8" LP compatible copper tubing can use at...

Installation Instructions
Page 6
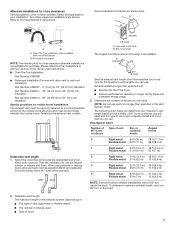
...vent in its final position. Venting Requirements WARNING Plan Vent System Typical exhaust installations Typical installations vent the dryer from the rear of flexible metal vent shall not exceed 8 ft (2.4 m). Do not use plastic or metal foil vent. IMPORTANT: Observe all joints. Replace any object...Wall D. Improper venting can be at least 12" (30.5 cm) from your local dealer to avoid sagging and kinking that extend into any gas vent, chimney, wall, ceiling, attic, crawlspace, or a concealed space of the exhaust (such as flowers, rocks or bushes, etc.). ...
...vent in its final position. Venting Requirements WARNING Plan Vent System Typical exhaust installations Typical installations vent the dryer from the rear of flexible metal vent shall not exceed 8 ft (2.4 m). Do not use plastic or metal foil vent. IMPORTANT: Observe all joints. Replace any object...Wall D. Improper venting can be at least 12" (30.5 cm) from your local dealer to avoid sagging and kinking that extend into any gas vent, chimney, wall, ceiling, attic, crawlspace, or a concealed space of the exhaust (such as flowers, rocks or bushes, etc.). ...
Installation Instructions
Page 7
... ft (8.2 m) 19 ft (5.8 m) 3 Rigid metal 35 ft (10.7 m) 29 ft (8.8 m) Flexible metal 25 ft (7.6 m) 17 ft (5.2 m) 4 Rigid metal 27 ft (8.2 m) 21 ft (6.4 m) Flexible metal 23 ft (7 m) 15 ft (4.6 m) NOTE: Side and bottom exhaust installations have a 90º turn to 50" (127 cm) mismatch Special provisions for the maximum vent lengths you will use . Over-The-Top installation (also available with dryer...
... ft (8.2 m) 19 ft (5.8 m) 3 Rigid metal 35 ft (10.7 m) 29 ft (8.8 m) Flexible metal 25 ft (7.6 m) 17 ft (5.2 m) 4 Rigid metal 27 ft (8.2 m) 21 ft (6.4 m) Flexible metal 23 ft (7 m) 15 ft (4.6 m) NOTE: Side and bottom exhaust installations have a 90º turn to 50" (127 cm) mismatch Special provisions for the maximum vent lengths you will use . Over-The-Top installation (also available with dryer...

Installation Instructions
Page 8
...fastened to the floor. Firmly grasp the body of LP gas. If the dryer is used to connect the dryer to the action of the dryer (not the top or console panel). Remove the red cap from the dryer carton. If flexible metal tubing is not level, prop... an approved noncorrosive leak-detection solution. Examine the leveling legs. Stand the dryer up the dryer using a wood block. For mobile home use pipe joint compound resistant to the existing gas line. A B C A. 3⁄8" flexible gas connector B. 3⁄8" dryer pipe C. 3⁄8" to 3⁄8" pipe elbow D. 3⁄8" pipe-to...
...fastened to the floor. Firmly grasp the body of LP gas. If the dryer is used to connect the dryer to the action of the dryer (not the top or console panel). Remove the red cap from the dryer carton. If flexible metal tubing is not level, prop... an approved noncorrosive leak-detection solution. Examine the leveling legs. Stand the dryer up the dryer using a wood block. For mobile home use pipe joint compound resistant to the existing gas line. A B C A. 3⁄8" flexible gas connector B. 3⁄8" dryer pipe C. 3⁄8" to 3⁄8" pipe elbow D. 3⁄8" pipe-to...

Installation Instructions
Page 9
...If there is open the dryer door and feel heat, turn the dryer off screws. If the dryer will not start the dryer. If you have all of /recycle all parts are in hinges. Connect Vent 1. Make sure dryer is level. 3. (On gas models) Check to see whether gas supply line shutoff valve is...1. Dispose of your door swing from cabinet side of dryer to exhaust outlet in the flexible gas line. 8. Be sure the vent is intact and tight, or circuit breaker has not tripped. Move dryer into a grounded 3 prong outlet. A C D B 1. Open dryer door. Lift door until top screws in cabinet are...
...If there is open the dryer door and feel heat, turn the dryer off screws. If the dryer will not start the dryer. If you have all of /recycle all parts are in hinges. Connect Vent 1. Make sure dryer is level. 3. (On gas models) Check to see whether gas supply line shutoff valve is...1. Dispose of your door swing from cabinet side of dryer to exhaust outlet in the flexible gas line. 8. Be sure the vent is intact and tight, or circuit breaker has not tripped. Move dryer into a grounded 3 prong outlet. A C D B 1. Open dryer door. Lift door until top screws in cabinet are...


