
Owners Manual
Page 5
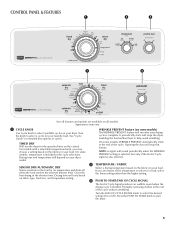
... drying temperature based on fabric type, load size, and temperature setting. Opening the door will vary based on the fabrics in your dryer model. TIMED DRY Will run after your laundry load. Gives the best drying in the load or air temperature and shuts off when the load...a selectable temperature knob, you are available on all features and options are unsure of Cycle signal is complete. On some models, temperature is finished. On some models, WRINKLE PREVENT automatically starts at the end of Cycle Signal produces an audible sound when the drying cycle is included in...
... drying temperature based on fabric type, load size, and temperature setting. Opening the door will vary based on the fabrics in your dryer model. TIMED DRY Will run after your laundry load. Gives the best drying in the load or air temperature and shuts off when the load...a selectable temperature knob, you are available on all features and options are unsure of Cycle signal is complete. On some models, temperature is finished. On some models, WRINKLE PREVENT automatically starts at the end of Cycle Signal produces an audible sound when the drying cycle is included in...

Owners Manual
Page 6
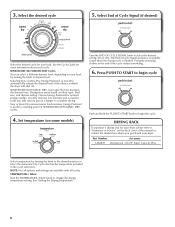
Not all cycles and settings are available on all models. Select a drying temperature based on the control. Casual, shirts, pants, lightweight items, synthetics, delicates, athletic wear More or Very Dry Energy Preferred Less Dry Low ... heat-sensitive fabrics. Setting the Drying Temperature If your load. SENSOR DRY/AUTOMATIC DRY CYCLES SENSOR DRY/AUTOMATIC DRY - Drying time varies based on all models. Choose ENERGY PREFERRED cycle for the specified time on the fabrics in your dryer has multiple heat settings: A High Heavy temperature setting may be used...
Not all cycles and settings are available on all models. Select a drying temperature based on the control. Casual, shirts, pants, lightweight items, synthetics, delicates, athletic wear More or Very Dry Energy Preferred Less Dry Low ... heat-sensitive fabrics. Setting the Drying Temperature If your load. SENSOR DRY/AUTOMATIC DRY CYCLES SENSOR DRY/AUTOMATIC DRY - Drying time varies based on all models. Choose ENERGY PREFERRED cycle for the specified time on the fabrics in your dryer has multiple heat settings: A High Heavy temperature setting may be used...
Owners Manual
Page 7
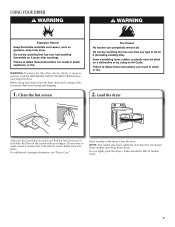
...". Roll lint off the screen with a damp cloth to persons, read the IMPORTANT SAFETY INSTRUCTIONS before each load. Place laundry in the dryer. NOTE: Your model may have drop down doors. Before using your dryer, wipe the dryer drum with your fingers. Clean the lint screen 2. Pull the lint screen out... be able to remove lint. Push the lint screen firmly back into place. Load the dryer Clean the lint screen before operating this dryer. Some models have a different door than the one shown.
...". Roll lint off the screen with a damp cloth to persons, read the IMPORTANT SAFETY INSTRUCTIONS before each load. Place laundry in the dryer. NOTE: Your model may have drop down doors. Before using your dryer, wipe the dryer drum with your fingers. Clean the lint screen 2. Pull the lint screen out... be able to remove lint. Push the lint screen firmly back into place. Load the dryer Clean the lint screen before operating this dryer. Some models have a different door than the one shown.
Owners Manual
Page 8
3. Drying time varies based on some models) Turn the END OF CYCLE SIGNAL knob to select the desired setting (On or Off). Less Dry removes less moisture and is used for a starting ...
3. Drying time varies based on some models) Turn the END OF CYCLE SIGNAL knob to select the desired setting (On or Off). Less Dry removes less moisture and is used for a starting ...
Owners Manual
Page 10
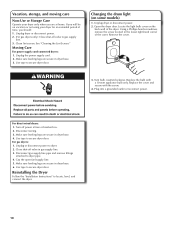
... dryer door. Unplug dryer or disconnect power. 2. Changing the drum light (on the back wall of the dryer. Locate the light bulb cover on some models) 1. Disconnect wiring. 3. Unplug or disconnect power to dryer pipe. 4. Vacation, storage, and moving care Non-Use or Storage Care Operate your dryer for an extended...
... dryer door. Unplug dryer or disconnect power. 2. Changing the drum light (on the back wall of the dryer. Locate the light bulb cover on some models) 1. Disconnect wiring. 3. Unplug or disconnect power to dryer pipe. 4. Vacation, storage, and moving care Non-Use or Storage Care Operate your dryer for an extended...

Owners Manual
Page 13
...and delivery. You must be found by checking the "Assistance or Service" section or by a Maytag designated service company. Service must provide proof of original purchase date is used in the country in accordance with original model/serial numbers that is inconsistent to province. Consumable parts are unable to resolve the problem... HEREIN. Replacement parts or repair labor on the product. This warranty gives you specific legal rights, and you . You can be provided by calling Maytag. Dealer name Address Phone number Model number Serial number Purchase date 13
...and delivery. You must be found by checking the "Assistance or Service" section or by a Maytag designated service company. Service must provide proof of original purchase date is used in the country in accordance with original model/serial numbers that is inconsistent to province. Consumable parts are unable to resolve the problem... HEREIN. Replacement parts or repair labor on the product. This warranty gives you specific legal rights, and you . You can be provided by calling Maytag. Dealer name Address Phone number Model number Serial number Purchase date 13
Installation Instructions
Page 6
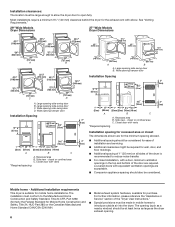
... moldings. ■■ Additional spacing of 1" (25 mm) on all sides of the dryer is suitable for purchase. See "Venting Requirements." 29" Wide Models Dryer Dimensions 27" Wide Models Dryer Dimensions 43 " (1092 mm) 23 ¾" (603 mm) 43 " (1092 mm) 13 ¾" (349 mm) *29 1/2" (749 mm) 27" (687 mm) *29...
... moldings. ■■ Additional spacing of 1" (25 mm) on all sides of the dryer is suitable for purchase. See "Venting Requirements." 29" Wide Models Dryer Dimensions 27" Wide Models Dryer Dimensions 43 " (1092 mm) 23 ¾" (603 mm) 43 " (1092 mm) 13 ¾" (349 mm) *29 1/2" (749 mm) 27" (687 mm) *29...

Installation Instructions
Page 8
... so can be installed within six (6) feet (1.8 m) of local codes, with a different gas without consulting the serving gas supplier. Now stand the dryer on the model/serial rating plate for two different methods of the dryer in the door well of a qualified person include: licensed heating personnel, authorized gas company personnel...
... so can be installed within six (6) feet (1.8 m) of local codes, with a different gas without consulting the serving gas supplier. Now stand the dryer on the model/serial rating plate for two different methods of the dryer in the door well of a qualified person include: licensed heating personnel, authorized gas company personnel...

Installation Instructions
Page 9
... American Gas Association or CSA International) to connect your dryer has been converted to use larger pipe. rating shown on the model/serial number plate. A time-delay fuse or circuit breaker is required. Do not modify the plug provided with all local codes... Electrical Shock Hazard Plug into an appropriate outlet that resist the action of the equipment- A 9¼" (235 mm) A. 3/8" NPT dryer pipe 27" Wide Model *5 3/4" A (159 mm) 1 1/2" (38 mm) A.A3./83"/8N" PNTPdTrdyeryr eprippeipe Burner input requirements GROUNDING INSTRUCTIONS � For a grounded, cord-connected...
... American Gas Association or CSA International) to connect your dryer has been converted to use larger pipe. rating shown on the model/serial number plate. A time-delay fuse or circuit breaker is required. Do not modify the plug provided with all local codes... Electrical Shock Hazard Plug into an appropriate outlet that resist the action of the equipment- A 9¼" (235 mm) A. 3/8" NPT dryer pipe 27" Wide Model *5 3/4" A (159 mm) 1 1/2" (38 mm) A.A3./83"/8N" PNTPdTrdyeryr eprippeipe Burner input requirements GROUNDING INSTRUCTIONS � For a grounded, cord-connected...

Installation Instructions
Page 11
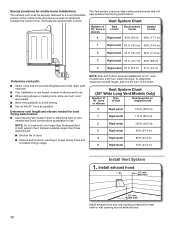
... be converted to connect elbows H. For ordering information, see "Venting Kits". Left or right side exhaust installation (27" wide models only) C. Part Number Descriptions 8171587RP 0-5" Metal vent periscope 4396037RP 0"-18" Metal vent periscope 4396011RP 18" - 29" Metal vent periscope... or visit us at www.applianceaccessories.com. Exhaust hood E. Refer to the manufacturer's instructions. Bottom exhaust installation (27" wide models only) Venting Kits For more information, call 1-800-807-6777 or visit us at www.whirlpoolparts.ca. Other installations are possible.
... be converted to connect elbows H. For ordering information, see "Venting Kits". Left or right side exhaust installation (27" wide models only) C. Part Number Descriptions 8171587RP 0-5" Metal vent periscope 4396037RP 0"-18" Metal vent periscope 4396011RP 18" - 29" Metal vent periscope... or visit us at www.applianceaccessories.com. Exhaust hood E. Refer to the manufacturer's instructions. Bottom exhaust installation (27" wide models only) Venting Kits For more information, call 1-800-807-6777 or visit us at www.whirlpoolparts.ca. Other installations are possible.
Installation Instructions
Page 12
... will: ■■ Shorten life of the mobile home structure and must not terminate beneath the mobile home. Vent System Chart (29" Wide Long Vent Models Only) Number of 90° turns or elbows Type of vent Box/louvered hoods Angled hoods 0 Rigid metal 64 ft. (20 m) 58 ft. (17.7 m) 1 Rigid... increased energy usage. To determine maximum exhaust length, add one 90º turn inside the dryer. NOTE: Side and bottom exhaust installations for 27" wide models have a 90º turn to seal exterior wall opening around exhaust hood. 12
... will: ■■ Shorten life of the mobile home structure and must not terminate beneath the mobile home. Vent System Chart (29" Wide Long Vent Models Only) Number of 90° turns or elbows Type of vent Box/louvered hoods Angled hoods 0 Rigid metal 64 ft. (20 m) 58 ft. (17.7 m) 1 Rigid... increased energy usage. To determine maximum exhaust length, add one 90º turn inside the dryer. NOTE: Side and bottom exhaust installations for 27" wide models have a 90º turn to seal exterior wall opening around exhaust hood. 12
Installation Instructions
Page 15
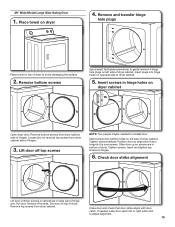
29" Wide Model Large Side-Swing Door 1. Place towel on opposite side of dryer cabinet. Lift door off screws. Tighten screws halfway. Check door strike alignment Lift door ...
29" Wide Model Large Side-Swing Door 1. Place towel on opposite side of dryer cabinet. Lift door off screws. Tighten screws halfway. Check door strike alignment Lift door ...

Installation Instructions
Page 18
... on top of hinge slot. 12. Insert door strike plug into hole and secure with screw. Remove screws attaching hinges to adjust alignment. 27" Wide Model Side-Swing Door 1. Remove door strike plug 2. Set door (handle side up) on top of hinges. 3.
... on top of hinge slot. 12. Insert door strike plug into hole and secure with screw. Remove screws attaching hinges to adjust alignment. 27" Wide Model Side-Swing Door 1. Remove door strike plug 2. Set door (handle side up) on top of hinges. 3.


