Owners Manual
Page 8
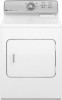
... a hanger to begin the cycle. Energy Preferred is used for a starting point for loads you purchased your load, by turning the knob to dryness level. Part Number Accessory 3406839 Drying rack - See "Setting the Drying Temperature". 8 3. Less Dry removes less moisture and is used for SENSOR DRY/AUTOMATIC DRY cycles. 4. Promptly...
... a hanger to begin the cycle. Energy Preferred is used for a starting point for loads you purchased your load, by turning the knob to dryness level. Part Number Accessory 3406839 Drying rack - See "Setting the Drying Temperature". 8 3. Less Dry removes less moisture and is used for SENSOR DRY/AUTOMATIC DRY cycles. 4. Promptly...

Owners Manual
Page 13
... in an inaccessible location or is not installed in accordance with Maytag published installation instructions. 10. Replacement parts or repair labor if this major appliance is used in a remote area where service by a Maytag designated service company. Service calls to obtain service under this limited... or plumbing codes, or use of products not approved by calling Maytag. MAYTAG SHALL NOT BE LIABLE FOR INCIDENTAL OR CONSEQUENTIAL DAMAGES. In Canada, call 18006889900. Consumable parts are unable to know your sales slip together for future reference. ...
... in an inaccessible location or is not installed in accordance with Maytag published installation instructions. 10. Replacement parts or repair labor if this major appliance is used in a remote area where service by a Maytag designated service company. Service calls to obtain service under this limited... or plumbing codes, or use of products not approved by calling Maytag. MAYTAG SHALL NOT BE LIABLE FOR INCIDENTAL OR CONSEQUENTIAL DAMAGES. In Canada, call 18006889900. Consumable parts are unable to know your sales slip together for future reference. ...

Installation Instructions
Page 4
... using a ball valve, it shall be a T-handle type. � A flexible gas connector, when used, must not exceed 3 feet. SAVE THESE INSTRUCTIONS INSTALLATION REQUIREMENTS Tools and Parts Gather the required tools and...
... using a ball valve, it shall be a T-handle type. � A flexible gas connector, when used, must not exceed 3 feet. SAVE THESE INSTRUCTIONS INSTALLATION REQUIREMENTS Tools and Parts Gather the required tools and...

Installation Instructions
Page 5
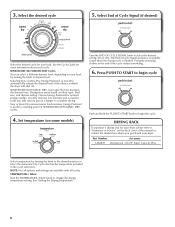
... local codes. See "Electrical Requirements" and "Venting Requirements" before purchasing parts. Contact your local building inspector. If not level, clothes may not tumble properly and automatic sensor cycles may not operate correctly. Drying ... other fuel-burning appliance can be installed in garages, closets, mobile homes, or sleeping quarters. Parts supplied: Leveling legs (4) Parts package is greater than 1" (25 mm), install Extended Dryer Feet Kit, Part Number 279810. Check that all parts are using power supply cord, a grounded electrical outlet located within 2 ft. (610 mm) of...
... local codes. See "Electrical Requirements" and "Venting Requirements" before purchasing parts. Contact your local building inspector. If not level, clothes may not tumble properly and automatic sensor cycles may not operate correctly. Drying ... other fuel-burning appliance can be installed in garages, closets, mobile homes, or sleeping quarters. Parts supplied: Leveling legs (4) Parts package is greater than 1" (25 mm), install Extended Dryer Feet Kit, Part Number 279810. Check that all parts are using power supply cord, a grounded electrical outlet located within 2 ft. (610 mm) of...
Installation Instructions
Page 6
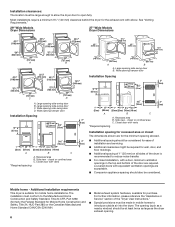
... large enough to allow the dryer door to the Manufactured Home Construction and Safety Standard, Title 24 CFR, Part 3280 (formerly the Federal Standard for Mobile Home Construction and Safety, Title 24, HUD Part 280) or the Canadian Manufactured Home Standard CAN/CSA-Z240 MH. ■■ Metal exhaust system hardware, available...
... large enough to allow the dryer door to the Manufactured Home Construction and Safety Standard, Title 24 CFR, Part 3280 (formerly the Federal Standard for Mobile Home Construction and Safety, Title 24, HUD Part 280) or the Canadian Manufactured Home Standard CAN/CSA-Z240 MH. ■■ Metal exhaust system hardware, available...

Installation Instructions
Page 7
... appropriate outlet that is properly installed and grounded in conformance with a qualified electrician or service representative or personnel if you use Power Supply Cord Replacement Part Number 8579325. In the event of malfunction or breakdown, grounding will not fit the outlet, have a proper outlet installed by providing a path of the line...
... appropriate outlet that is properly installed and grounded in conformance with a qualified electrician or service representative or personnel if you use Power Supply Cord Replacement Part Number 8579325. In the event of malfunction or breakdown, grounding will not fit the outlet, have a proper outlet installed by providing a path of the line...

Installation Instructions
Page 11
... side exhaust installation (27" wide models only) C. Dryer B. Vent length necessary to the manufacturer's instructions. A B C A. B Alternate installations for your installation. Standard rear offset exhaust installation B. Part Number Descriptions 8171587RP 0-5" Metal vent periscope 4396037RP 0"-18" Metal vent periscope 4396011RP 18" - 29" Metal vent periscope 4396014 29" - 50" Metal vent periscope 4392892 In...
... side exhaust installation (27" wide models only) C. Dryer B. Vent length necessary to the manufacturer's instructions. A B C A. B Alternate installations for your installation. Standard rear offset exhaust installation B. Part Number Descriptions 8171587RP 0-5" Metal vent periscope 4396037RP 0"-18" Metal vent periscope 4396011RP 18" - 29" Metal vent periscope 4396014 29" - 50" Metal vent periscope 4392892 In...

Installation Instructions
Page 14
.... Complete Installation Checklist q Check that you feel heat, turn the dryer off and check to see whether gas supply line shutoff valve is an extra part, go away. Be sure vent is level. See "Level Dryer". 14 If your door is closed . If the dryer will go back through steps to... dryer from front to operate correctly. Level dryer Check levelness of your Use and Care Guide. Once legs are now installed. If you have all parts are level, make sure all packaging materials. The odor will not start the dryer. NOTE: The dryer must be level for levelness.
.... Complete Installation Checklist q Check that you feel heat, turn the dryer off and check to see whether gas supply line shutoff valve is an extra part, go away. Be sure vent is level. See "Level Dryer". 14 If your door is closed . If the dryer will go back through steps to... dryer from front to operate correctly. Level dryer Check levelness of your Use and Care Guide. Once legs are now installed. If you have all parts are level, make sure all packaging materials. The odor will not start the dryer. NOTE: The dryer must be level for levelness.
Installation Instructions
Page 15
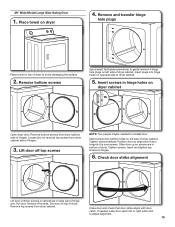
... so screws are in hinge holes on dryer 4. Tighten screws halfway. Remove top screws from dryer cabinet side of hinge slot. Insert screws in large part of hinges. Check door strike alignment Lift door until top screws in cabinet are in hinges. 6. Place towel on dryer cabinet Open dryer door. Insert...
... so screws are in hinge holes on dryer 4. Tighten screws halfway. Remove top screws from dryer cabinet side of hinge slot. Insert screws in large part of hinges. Check door strike alignment Lift door until top screws in cabinet are in hinges. 6. Place towel on dryer cabinet Open dryer door. Insert...

Installation Instructions
Page 16
.... 16 Rotate outer door Take outer door and rotate in 180º and set it from inner door. Lift door until top screws in large part of dryer. Set door (handle side up) on door seal or plastic door catches. 6. Lift door off screws. Holding door over towel on dryer, grasp...
.... 16 Rotate outer door Take outer door and rotate in 180º and set it from inner door. Lift door until top screws in large part of dryer. Set door (handle side up) on door seal or plastic door catches. 6. Lift door off screws. Holding door over towel on dryer, grasp...

Installation Instructions
Page 18
... 9 into original door strike hole and secure with screw. Remove screws from dryer cabinet side of hinge slot. Insert the door strike removed in large part of hinges. 3. Insert door strike plug into hole and secure with screw. 13. Remove top screws from dryer cabinet side of dryer. Check door strike...
... 9 into original door strike hole and secure with screw. Remove screws from dryer cabinet side of hinge slot. Insert the door strike removed in large part of hinges. 3. Insert door strike plug into hole and secure with screw. 13. Remove top screws from dryer cabinet side of dryer. Check door strike...


