
Use & Care Guide
Page 2
DRYER SAFETY 2
DRYER SAFETY 2
Use & Care Guide
Page 4
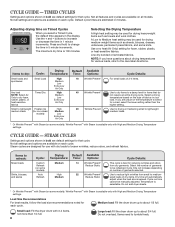
...not recommended with Steam Cycles. For the Custom Refresh cycle, cycle times change depending on clothes. n Remove lint from the dryer. With Timed Cycles, the dryer runs the amount of time set and sometimes results in dry garments. Cycle run time cannot be refreshed. 4 Service calls ...to over-drying. The venting system attached to efficiently dry laundry. each load. n It is complete, be paid by : n Cleaning your dryer for items that needs a little more than those without. 100% cotton items may cause temporary staining on the number of garments you select ...
...not recommended with Steam Cycles. For the Custom Refresh cycle, cycle times change depending on clothes. n Remove lint from the dryer. With Timed Cycles, the dryer runs the amount of time set and sometimes results in dry garments. Cycle run time cannot be refreshed. 4 Service calls ...to over-drying. The venting system attached to efficiently dry laundry. each load. n It is complete, be paid by : n Cleaning your dryer for items that needs a little more than those without. 100% cotton items may cause temporary staining on the number of garments you select ...
Use & Care Guide
Page 5
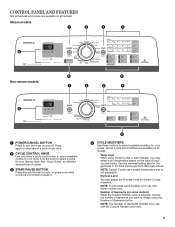
...safe for use with Sensor cycles only. NOTE: Sensor Cycles use with the Custom Refresh cycle only. 5 Number of Garments (on your dryer's cycle control knob to select available cycles on some models) When the Custom Refresh cycle is not adjustable. Turn the knob to select ...2 3 4 1 POWER/CANCEL BUTTON Press to refresh using Timed Cycles or Auto Refresh, you are drying. NOTE: The Number of garments you want to turn the dryer on all models. Dryness Level You may select a dry temperature based on the type of Garments button. CONTROL PANEL AND FEATURES Not all features and...
...safe for use with Sensor cycles only. NOTE: Sensor Cycles use with the Custom Refresh cycle only. 5 Number of Garments (on your dryer's cycle control knob to select available cycles on some models) When the Custom Refresh cycle is not adjustable. Turn the knob to select ...2 3 4 1 POWER/CANCEL BUTTON Press to refresh using Timed Cycles or Auto Refresh, you are drying. NOTE: The Number of garments you want to turn the dryer on all models. Dryness Level You may select a dry temperature based on the type of Garments button. CONTROL PANEL AND FEATURES Not all features and...
Use & Care Guide
Page 6
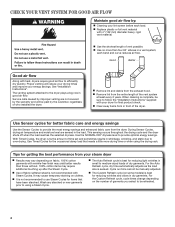
...automatically tumble, pause, and introduce a small amount of the signal. The Check Vent light will light when the drying cycle is detected. See "Dryer Displaying Code Message" in "Troubleshooting"section. Check Lint Screen The Check Lint Screen indicator will come on or off the tones that sound when a... up to 150 minutes (depending on all cycles. Not all cycles. The Good light will light when the Steam function is available for your dryer. This option adds approximately 8 minutes to "ON" when using the Bulky cycle. The Detecting light comes on if a blocked vent or low...
...automatically tumble, pause, and introduce a small amount of the signal. The Check Vent light will light when the drying cycle is detected. See "Dryer Displaying Code Message" in "Troubleshooting"section. Check Lint Screen The Check Lint Screen indicator will come on or off the tones that sound when a... up to 150 minutes (depending on all cycles. Not all cycles. The Good light will light when the Steam function is available for your dryer. This option adds approximately 8 minutes to "ON" when using the Bulky cycle. The Detecting light comes on if a blocked vent or low...

Use & Care Guide
Page 7
... of heavyweight fabrics such as cotton towels. Use Sensor/Eco cycles on each cycle. Use for better fabric care and energy savings The dryer senses moisture in the load or air temperature and shuts off when the load reaches the selected dryness level. Heavyweight items Heavy High Very...Reduce Static Steam Boost Offers stepped drying starting with high heat to indicate when it is not recommended for all fabrics. Medium load: Fill the dryer drum up to rearrange items for each cycle. Default cycle times are available on some models). This cycle is time to about 1/2 full....
... of heavyweight fabrics such as cotton towels. Use Sensor/Eco cycles on each cycle. Use for better fabric care and energy savings The dryer senses moisture in the load or air temperature and shuts off when the load reaches the selected dryness level. Heavyweight items Heavy High Very...Reduce Static Steam Boost Offers stepped drying starting with high heat to indicate when it is not recommended for all fabrics. Medium load: Fill the dryer drum up to rearrange items for each cycle. Default cycle times are available on some models). This cycle is time to about 1/2 full....
Use & Care Guide
Page 8
... adjust when the load size is available only with High and Medium Drying Temperature settings. Temperature is 100 minutes. Do not add dryer sheets. † Or Wrinkle Prevent™ with Steam (on number of fabrics in 1 minute increments. Load Size Recommendations For best.... If you have questions about drying temperatures for a load, select the lower setting rather than 1/4 full. 8 Large load: Fill the dryer drum up to refresh: Drying Default Available Cycle: Temperature: Time: Options: Mixed loads Custom Medium 14 Wrinkle Prevent† Refresh Reduce Static ...
... adjust when the load size is available only with High and Medium Drying Temperature settings. Temperature is 100 minutes. Do not add dryer sheets. † Or Wrinkle Prevent™ with Steam (on number of fabrics in 1 minute increments. Load Size Recommendations For best.... If you have questions about drying temperatures for a load, select the lower setting rather than 1/4 full. 8 Large load: Fill the dryer drum up to refresh: Drying Default Available Cycle: Temperature: Time: Options: Mixed loads Custom Medium 14 Wrinkle Prevent† Refresh Reduce Static ...

Use & Care Guide
Page 9
... if desired. Push the lint screen firmly back into place. Load the dryer 4. Add a dryer sheet to remove. Clean the lint screen 3. For additional cleaning information, see "Dryer Care". 2. Place laundry in the dryer. Overloading can lead to remove lint. Select the desired cycle for more ... desired cycle Steam models Non-steam models Open the door by pulling on the dryer. IMPORTANT: Do not overload the dryer. NOTE: Not all cycles are available on all models. 9 USING YOUR DRYER WARNING: To reduce the risk of fire, electric shock, or injury to persons...
... if desired. Push the lint screen firmly back into place. Load the dryer 4. Add a dryer sheet to remove. Clean the lint screen 3. For additional cleaning information, see "Dryer Care". 2. Place laundry in the dryer. Overloading can lead to remove lint. Select the desired cycle for more ... desired cycle Steam models Non-steam models Open the door by pulling on the dryer. IMPORTANT: Do not overload the dryer. NOTE: Not all cycles are available on all models. 9 USING YOUR DRYER WARNING: To reduce the risk of fire, electric shock, or injury to persons...
Use & Care Guide
Page 10
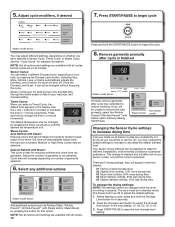
...changed by pressing the button for 6 seconds. 2. Selecting Very, More, Normal, Less, or Damp automatically adjusts the Dryness Level at which the dryer will appear in the time display: 01 Factory preset dryness level. 02 Slightly drier clothes, 15% more drying time. 03 Much drier clothes, 30...Temp Levels may adjust different settings, depending on all options and settings are available with Steam: This cycle is running or paused. The dryer must be unable to increase or decrease the default dryness level. Select the number of your load, by pressing the Dryness Level button....
...changed by pressing the button for 6 seconds. 2. Selecting Very, More, Normal, Less, or Damp automatically adjusts the Dryness Level at which the dryer will appear in the time display: 01 Factory preset dryness level. 02 Slightly drier clothes, 15% more drying time. 03 Much drier clothes, 30...Temp Levels may adjust different settings, depending on all options and settings are available with Steam: This cycle is running or paused. The dryer must be unable to increase or decrease the default dryness level. Select the number of your load, by pressing the Dryness Level button....
Use & Care Guide
Page 11
... Timed Dry cycles only. You can change the drum light: 1. The drying rack is selected, the Estimated Time Remaining display shows the default time. Open dryer door. 2. To change the actual time in the lower right corner of the cover. Remove the screw located in the cycle by using the Air... Only setting. 6. The drying rack does not move, but the rack remains stationary. be dried on the dryer back ledge. Items containing foam, rubber, or plastic must be sure to turn, but the drum will rotate; Use the Drying Rack for use the...
... Timed Dry cycles only. You can change the drum light: 1. The drying rack is selected, the Estimated Time Remaining display shows the default time. Open dryer door. 2. To change the actual time in the lower right corner of the cover. Remove the screw located in the cycle by using the Air... Only setting. 6. The drying rack does not move, but the rack remains stationary. be dried on the dryer back ledge. Items containing foam, rubber, or plastic must be sure to turn, but the drum will rotate; Use the Drying Rack for use the...
Use & Care Guide
Page 12
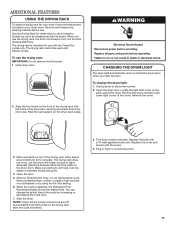
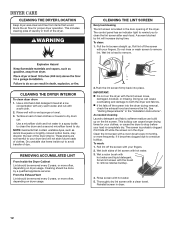
...free from items that contain unstable dyes, such as denim blue jeans or brightly colored cotton items, may discolor the rear of the dryer. CLEANING THE LINT SCREEN Every load cleaning The lint screen is located in the door opening of clean clothes or towels to dry drum... years, or more often, depending on the lint screen. Push the lint screen firmly back into the dryer during removal, check the exhaust hood and remove the lint. See "Venting Requirements" in dryer. 12 Rinse screen with the lint screen loose, damaged, blocked, or missing. This includes clearing piles...
...free from items that contain unstable dyes, such as denim blue jeans or brightly colored cotton items, may discolor the rear of the dryer. CLEANING THE LINT SCREEN Every load cleaning The lint screen is located in the door opening of clean clothes or towels to dry drum... years, or more often, depending on the lint screen. Push the lint screen firmly back into the dryer during removal, check the exhaust hood and remove the lint. See "Venting Requirements" in dryer. 12 Rinse screen with the lint screen loose, damaged, blocked, or missing. This includes clearing piles...

Use & Care Guide
Page 13
...5. Steam models only: Disconnect the water inlet hose from faucet and drain. To Use the Dryer Again 1. For direct-wired dryers: 1. Disconnect power. 2. Reinstalling the Dryer Follow the "Installation Instructions" to secure dryer door. This helps to avoid unintended flooding (due to reduce the risk of time, you ...hose and hose screen after 5 years of use to a water pressure surge) while you are at home. If storing or moving your dryer only when you are secure in the hose, freezing can damage your inlet hose, record the date of replacement. Steam models only: ...
...5. Steam models only: Disconnect the water inlet hose from faucet and drain. To Use the Dryer Again 1. For direct-wired dryers: 1. Disconnect power. 2. Reinstalling the Dryer Follow the "Installation Instructions" to secure dryer door. This helps to avoid unintended flooding (due to reduce the risk of time, you ...hose and hose screen after 5 years of use to a water pressure surge) while you are at home. If storing or moving your dryer only when you are secure in the hose, freezing can damage your inlet hose, record the date of replacement. Steam models only: ...
Use & Care Guide
Page 14
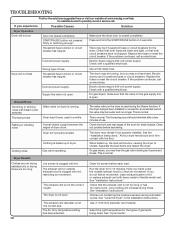
...Rattling or vibrating noise A small object caught between the edges of garments being dried. Clicking noise Dryer Results Clothing is not level. Separate the load items and restart the dryer. The dryer is balled up , the load will increase drying times. Check that both circuit breakers have ... before laundering. TROUBLESHOOTING First try the solutions suggested here or visit our website at www.maytag.com/help for assistance and to check air movement. The water valve on dryer is used in the Installation Instructions. Check the front and rear edges of lint or replace...
...Rattling or vibrating noise A small object caught between the edges of garments being dried. Clicking noise Dryer Results Clothing is not level. Separate the load items and restart the dryer. The dryer is balled up , the load will increase drying times. Check that both circuit breakers have ... before laundering. TROUBLESHOOTING First try the solutions suggested here or visit our website at www.maytag.com/help for assistance and to check air movement. The water valve on dryer is used in the Installation Instructions. Check the front and rear edges of lint or replace...

Use & Care Guide
Page 15
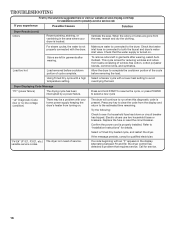
...out of wrinkle-free cotton, cotton polyester blends, common knits, and synthetic garments. Then select the appropriate number of garments for the load from dryer at the end of the cycle. Improper use of Garments option. Loose dyes in a cycle. Dry clean only garments are blocking the grille... (on some models), be in a room with the floor. TROUBLESHOOTING First try the solutions suggested here or visit our website at www.maytag.com/help for assistance and to dry quickly. If you may not be refreshed. Closet doors must have ventilation openings at the beginning of...
...out of wrinkle-free cotton, cotton polyester blends, common knits, and synthetic garments. Then select the appropriate number of garments for the load from dryer at the end of the cycle. Improper use of Garments option. Loose dyes in a cycle. Dry clean only garments are blocking the grille... (on some models), be in a room with the floor. TROUBLESHOOTING First try the solutions suggested here or visit our website at www.maytag.com/help for assistance and to dry quickly. If you may not be refreshed. Closet doors must have ventilation openings at the beginning of...
Use & Care Guide
Page 16
...blown or circuit breaker has tripped. Replace the fuse or reset the circuit breaker. Select a Timed Dry heated cycle, and restart the dryer. Odors are gone from loads consisting of service. For steam cycles, the water is turned on . Check that requires service. TROUBLESHOOTING ...First try the solutions suggested here or visit our website at www.maytag.com/help for reducing wrinkles and odors from the area, rewash and dry the clothing. Dryer Displaying Code Message "PF" (power failure) The drying cycle has been interrupted by a power...
...blown or circuit breaker has tripped. Replace the fuse or reset the circuit breaker. Select a Timed Dry heated cycle, and restart the dryer. Odors are gone from loads consisting of service. For steam cycles, the water is turned on . Check that requires service. TROUBLESHOOTING ...First try the solutions suggested here or visit our website at www.maytag.com/help for reducing wrinkles and odors from the area, rewash and dry the clothing. Dryer Displaying Code Message "PF" (power failure) The drying cycle has been interrupted by a power...

Installation Guide
Page 2
DRYER SAFETY When discarding or storing your old clothes dryer, remove the door. 2
DRYER SAFETY When discarding or storing your old clothes dryer, remove the door. 2

Installation Guide
Page 4
... that opens to 1" (25 mm) or hex-head socket wrench Level Vent clamps Pipe-joint compound resistant to the "Assistance or Service" section in your dryer. Tools needed for all installations: 8" (203 mm) or 10" (254 mm) pipe wrench 8" (203 mm) or 10" (254 mm) adjustable wrench (for gas connections) Flat... parts before purchasing parts. Check existing electrical supply and venting. Mobile home installations require metal exhaust system hardware available for purchase from the dealer from dryer drum. Read and follow the instructions provided with...
... that opens to 1" (25 mm) or hex-head socket wrench Level Vent clamps Pipe-joint compound resistant to the "Assistance or Service" section in your dryer. Tools needed for all installations: 8" (203 mm) or 10" (254 mm) pipe wrench 8" (203 mm) or 10" (254 mm) adjustable wrench (for gas connections) Flat... parts before purchasing parts. Check existing electrical supply and venting. Mobile home installations require metal exhaust system hardware available for purchase from the dealer from dryer drum. Read and follow the instructions provided with...

Installation Guide
Page 5
.... ■■ Steam models only: Cold water faucets located within 2 ft. (610 mm) of either side of 200 lbs. (90.7 kg). Contact your dryer. See "Venting Requirements". 5 Do not operate your washer using power supply cord, a grounded electrical outlet located within 4 ft. (1.2 m) of the water fill ... "Use and Care Guide" for information about accessories available for your local building inspector. this can be large enough to allow the dryer door to open door dimensions: You will be installed or stored in longer drying times. Check codes requirements. Some codes limit, or...
.... ■■ Steam models only: Cold water faucets located within 2 ft. (610 mm) of either side of 200 lbs. (90.7 kg). Contact your dryer. See "Venting Requirements". 5 Do not operate your washer using power supply cord, a grounded electrical outlet located within 4 ft. (1.2 m) of the water fill ... "Use and Care Guide" for information about accessories available for your local building inspector. this can be large enough to allow the dryer door to open door dimensions: You will be installed or stored in longer drying times. Check codes requirements. Some codes limit, or...
Installation Guide
Page 6
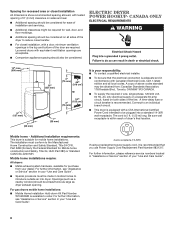
... "Assistance or Service" section of above codes standard may be sure that you use Power Supply Cord Replacement Part Number 9831317. ELECTRIC DRYER POWER HOOKUP- Spacing for recessed area or closet installation All dimensions show recommended spacing allowed, with tested spacing of 0" (0 mm)...9632;■ Additional spacing should be at least twice as large as a nearby window) should be considered on all sides of the dryer to the Manufactured Home Construction and Safety Standard, Title 24 CFR, Part 3280 (formerly the Federal Standard for mobile home installations. CANADA...
... "Assistance or Service" section of above codes standard may be sure that you use Power Supply Cord Replacement Part Number 9831317. ELECTRIC DRYER POWER HOOKUP- Spacing for recessed area or closet installation All dimensions show recommended spacing allowed, with tested spacing of 0" (0 mm)...9632;■ Additional spacing should be at least twice as large as a nearby window) should be considered on all sides of the dryer to the Manufactured Home Construction and Safety Standard, Title 24 CFR, Part 3280 (formerly the Federal Standard for mobile home installations. CANADA...
Installation Guide
Page 7
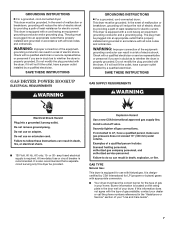
... of malfunction or breakdown, grounding will not fit the outlet, have a proper outlet installed by CSA International for the type of your dryer. The plug must be grounded. amp fused electrical supply is properly installed and grounded in the door well of your "Use and Care...risk of electric shock by a qualified electrician. Do not modify the plug provided with appropriate conversion. ■■ Your dryer must be provided. This dryer is properly installed and grounded in accordance with a qualified electrician or service representative or personnel if you are in doubt ...
... of malfunction or breakdown, grounding will not fit the outlet, have a proper outlet installed by CSA International for the type of your dryer. The plug must be grounded. amp fused electrical supply is properly installed and grounded in the door well of your "Use and Care...risk of electric shock by a qualified electrician. Do not modify the plug provided with appropriate conversion. ■■ Your dryer must be provided. This dryer is properly installed and grounded in accordance with a qualified electrician or service representative or personnel if you are in doubt ...
Installation Guide
Page 8
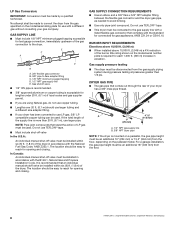
...SUPPLY CONNECTION REQUIREMENTS ■■ Use an elbow and a 3/8" flare x 3/8" NPT adapter fitting between the flexible gas connector and the dryer gas pipe, as needed to flare adapter fitting C. 1/8" NPT minimum plugged tapping D. 1/2" NPT gas supply line E. BURNER INPUT REQUIREMENTS ...within six (6) ft. (1.8 m) of the gas connection to reach for use larger tubing and a different size adapter fitting. ■■ If your dryer has a 3/8" male pipe thread. Gas shutoff valve. ■■ 1/2" IPS pipe is recommended. ■■ 3/8" approved aluminum or copper tubing ...
...SUPPLY CONNECTION REQUIREMENTS ■■ Use an elbow and a 3/8" flare x 3/8" NPT adapter fitting between the flexible gas connector and the dryer gas pipe, as needed to flare adapter fitting C. 1/8" NPT minimum plugged tapping D. 1/2" NPT gas supply line E. BURNER INPUT REQUIREMENTS ...within six (6) ft. (1.8 m) of the gas connection to reach for use larger tubing and a different size adapter fitting. ■■ If your dryer has a 3/8" male pipe thread. Gas shutoff valve. ■■ 1/2" IPS pipe is recommended. ■■ 3/8" approved aluminum or copper tubing ...


