Owners Manual
Page 4
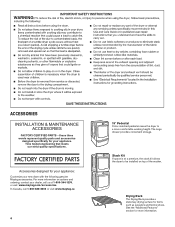
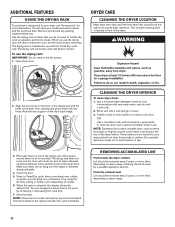
...at a premium, the stack kit allows the dryer to be installed on options and ordering, contact your dealer, call 1-800-688-2002 or visit: www.maytag.ca 4 15" Pedestal Color-matched pedestal raises the dryer to a more information on top of the ...provides convenient storage. ACCESSORIES INSTALLATION & MAINTENANCE ACCESSORIES FACTORY CERTIFIED PARTS - FACTORY CERTIFIED PARTS Accessories designed for your new dryer with the following genuine Maytag accessories. Drying Rack The Drying Rack provides a stationary drying surface for more information. See the "Additional Features"...
...at a premium, the stack kit allows the dryer to be installed on options and ordering, contact your dealer, call 1-800-688-2002 or visit: www.maytag.ca 4 15" Pedestal Color-matched pedestal raises the dryer to a more information on top of the ...provides convenient storage. ACCESSORIES INSTALLATION & MAINTENANCE ACCESSORIES FACTORY CERTIFIED PARTS - FACTORY CERTIFIED PARTS Accessories designed for your new dryer with the following genuine Maytag accessories. Drying Rack The Drying Rack provides a stationary drying surface for more information. See the "Additional Features"...
Owners Manual
Page 5
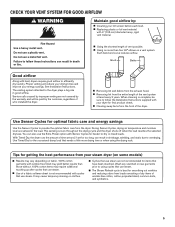
...require additional touching up after cycles that have been starched. n The Steam Refresh cycle is complete, be paid by : n Cleaning your dryer for harder-to provide the optimal fabric care from the exhaust hood. Proper venting will be sure to follow the Installation Instructions supplied with ... reducing odors from your energy savings. n Cycles that use steam are sensed in a vent system. n Removing lint from the front of the dryer. n Using the shortest length of the vent system at least every 2 years. n Using no more drying time or when using cycles that...
...require additional touching up after cycles that have been starched. n The Steam Refresh cycle is complete, be paid by : n Cleaning your dryer for harder-to provide the optimal fabric care from the exhaust hood. Proper venting will be sure to follow the Installation Instructions supplied with ... reducing odors from your energy savings. n Cycles that use steam are sensed in a vent system. n Removing lint from the front of the dryer. n Using the shortest length of the vent system at least every 2 years. n Using no more drying time or when using cycles that...
Owners Manual
Page 6
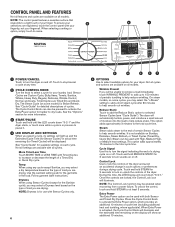
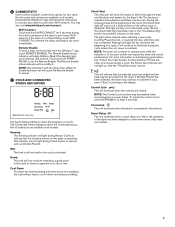
...or actual time remaining (for 3 seconds to help reduce wrinkling. Touch and hold STEAM for Timed Cycles) will count down "3-2-1" and the dryer starts, or touch once while a cycle is for your laundry load. CONTROL PANEL AND FEATURES Not all features and cycles are available on Sanitize..." for detailed descriptions of moisture into the load to select available options for use with High, Medium High, or Medium heat settings. The dryer will illuminate. NOTE: The Control Lock function may select the "+Steam" setting to add a short steam cycle after 60 minutes to -dry...
...or actual time remaining (for 3 seconds to help reduce wrinkling. Touch and hold STEAM for Timed Cycles) will count down "3-2-1" and the dryer starts, or touch once while a cycle is for your laundry load. CONTROL PANEL AND FEATURES Not all features and cycles are available on Sanitize..." for detailed descriptions of moisture into the load to select available options for use with High, Medium High, or Medium heat settings. The dryer will illuminate. NOTE: The Control Lock function may select the "+Steam" setting to add a short steam cycle after 60 minutes to -dry...
Owners Manual
Page 7
...will be removed from the Whirlpool® app, touch REMOTE ENABLE. The Cycle Status Indicators show the progress of airflow through the dryer and the dryer vent system for your home Wi-Fi network. This feature is detected. The light will be enabled when recovering from a power ... Use to the internet. Wet The load is in the display. Check Vent This indicator will illuminate when the controls are available on the dryer is lit, but poor airflow can impact dry times and overall performance. See the "Troubleshooting" section. Connected This will be cleared at least...
...will be removed from the Whirlpool® app, touch REMOTE ENABLE. The Cycle Status Indicators show the progress of airflow through the dryer and the dryer vent system for your home Wi-Fi network. This feature is detected. The light will be enabled when recovering from a power ... Use to the internet. Wet The load is in the display. Check Vent This indicator will illuminate when the controls are available on the dryer is lit, but poor airflow can impact dry times and overall performance. See the "Troubleshooting" section. Connected This will be cleared at least...
Owners Manual
Page 8
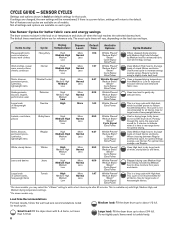
... and energy savings. Load Size Recommendations For best results, follow the wet load size recommendations noted for all fabrics. Small load: Fill the dryer drum with High, Medium High, and Medium drying temperature settings. *On steam models only. Do not tightly pack. CYCLE GUIDE - The...starting with Medium High heat followed by using a slightly lower heat level. Uses a stepped drying temperature from jeans and denim. do not overfill dryer drum. Uses High heat to Low for optimal energy savings, use Regular. Items need to about 1/2 full. Use for optimal drying. Uses...
... and energy savings. Load Size Recommendations For best results, follow the wet load size recommendations noted for all fabrics. Small load: Fill the dryer drum with High, Medium High, and Medium drying temperature settings. *On steam models only. Do not tightly pack. CYCLE GUIDE - The...starting with Medium High heat followed by using a slightly lower heat level. Uses a stepped drying temperature from jeans and denim. do not overfill dryer drum. Uses High heat to Low for optimal energy savings, use Regular. Items need to about 1/2 full. Use for optimal drying. Uses...

Owners Manual
Page 9
...Wrinkle Prevent† Extra Power Use to dry items to increase or decrease the time in the dryer too long. This is 150 minutes. STEAM CYCLE (on some knits. Do not add dryer sheets. Do not overload. The as-shipped defaults were the same as the Government Energy Certification Settings... return to select for drying mediumweight items such as towels and work clothes. Medium load: Fill the dryer drum up to loosen wrinkles, reduce odors, and refresh fabrics. Large load: Fill the dryer drum up to about drying temperatures for use with dry loads to about 3/4 full. NOTE: Government ...
...Wrinkle Prevent† Extra Power Use to dry items to increase or decrease the time in the dryer too long. This is 150 minutes. STEAM CYCLE (on some knits. Do not add dryer sheets. Do not overload. The as-shipped defaults were the same as the Government Energy Certification Settings... return to select for drying mediumweight items such as towels and work clothes. Medium load: Fill the dryer drum up to loosen wrinkles, reduce odors, and refresh fabrics. Large load: Fill the dryer drum up to about drying temperatures for use with dry loads to about 3/4 full. NOTE: Government ...
Owners Manual
Page 10
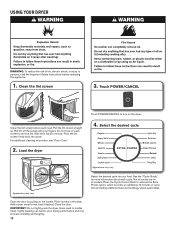
...operating this appliance. 1. Do not rinse or wash screen to turn on the dryer. Select the desired cycle 2. Open the door by pulling on all models. IMPORTANT: Do not tightly pack the dryer. Tightly packing can lead to persons, read the Important Safety Instructions before each ...desired cycle for more information about each load. Press the Cycle Control Knob to remove. For additional cleaning information, see "Dryer Care." 4. Appearance may vary. Add a dryer sheet to tumble freely. Items need to wet load if desired. Pull the lint screen straight up. Place laundry in...
...operating this appliance. 1. Do not rinse or wash screen to turn on the dryer. Select the desired cycle 2. Open the door by pulling on all models. IMPORTANT: Do not tightly pack the dryer. Tightly packing can lead to persons, read the Important Safety Instructions before each ...desired cycle for more information about each load. Press the Cycle Control Knob to remove. For additional cleaning information, see "Dryer Care." 4. Appearance may vary. Add a dryer sheet to tumble freely. Items need to wet load if desired. Pull the lint screen straight up. Place laundry in...
Owners Manual
Page 11
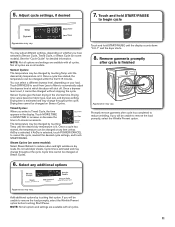
...the cycle, reselect the desired cycle settings, and touch START/PAUSE. Add additional options by touching Temp until the display counts down "3-2-1" and the dryer starts. 8. If you select a Timed Cycle, the time appears in the shortest time. Once a cycle has started , the temperature can ...be changed at which the dryer will shut off. 5. Timed Cycles: When you will be changed on some models): Select Steam Refresh to remove the load promptly, select the...
...the cycle, reselect the desired cycle settings, and touch START/PAUSE. Add additional options by touching Temp until the display counts down "3-2-1" and the dryer starts. 8. If you select a Timed Cycle, the time appears in the shortest time. Once a cycle has started , the temperature can ...be changed at which the dryer will shut off. 5. Timed Cycles: When you will be changed on some models): Select Steam Refresh to remove the load promptly, select the...
Owners Manual
Page 12
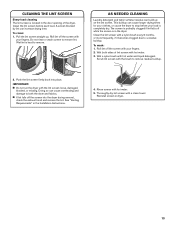
... very warm water, and rub with a wet sponge or towel. 3. Dry unstable dye items inside out to your dryer and will need your dryer, see "Accessories" for proper dryer operation. REMOVING ACCUMULATED LINT From inside of dye. Use the drying rack for use the drying rack, the drum continues...sure to leave adequate clearance between drying rack grille. 4. The drying rack cannot be removed every 2 years, or more information. CLEANING THE DRYER INTERIOR To clean dryer drum: 1. Align the two hooks on model. 6. The drying rack is selected, the display shows the default time. NOTE: Check ...
... very warm water, and rub with a wet sponge or towel. 3. Dry unstable dye items inside out to your dryer and will need your dryer, see "Accessories" for proper dryer operation. REMOVING ACCUMULATED LINT From inside of dye. Use the drying rack for use the drying rack, the drum continues...sure to leave adequate clearance between drying rack grille. 4. The drying rack cannot be removed every 2 years, or more information. CLEANING THE DRYER INTERIOR To clean dryer drum: 1. Align the two hooks on model. 6. The drying rack is selected, the display shows the default time. NOTE: Check ...
Owners Manual
Page 13
... probably clogged if lint falls off the screen into place. To wash: 1. Scrub lint screen with hot water. 5. See "Venting Requirements" in dryer. 13 Rinse screen with the brush to remove. CLEANING THE LINT SCREEN Every-load cleaning The lint screen is located in the door opening of ... softener residue can cause overheating and damage to a residue buildup. This buildup can increase drying time. Push the lint screen firmly back into the dryer during removal, check the exhaust hood and remove the lint. n If lint falls off while the screen is hard to remove residue buildup. 2....
... probably clogged if lint falls off the screen into place. To wash: 1. Scrub lint screen with hot water. 5. See "Venting Requirements" in dryer. 13 Rinse screen with the brush to remove. CLEANING THE LINT SCREEN Every-load cleaning The lint screen is located in the door opening of ... softener residue can cause overheating and damage to a residue buildup. This buildup can increase drying time. Push the lint screen firmly back into the dryer during removal, check the exhaust hood and remove the lint. n If lint falls off while the screen is hard to remove residue buildup. 2....
Owners Manual
Page 14
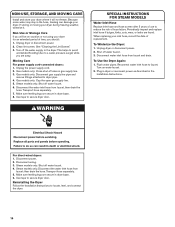
... freeze. SPECIAL INSTRUCTIONS FOR STEAM MODELS Water Inlet Hose Replace inlet hose and hose screen after 5 years of use to secure dryer door. Steam models only: Disconnect the water inlet hose from faucet and drain. Transport hose separately. 5. Gas models only: ...Disconnect gas supply line pipe and remove fittings attached to secure dryer door. To Use the Dryer Again: 1. To Winterize the Dryer: 1. For direct-wired dryers: 1. Disconnect power. 2. Use tape to dryer pipe. 4. Use tape to reduce the risk of time, you should: 1. Disconnect...
... freeze. SPECIAL INSTRUCTIONS FOR STEAM MODELS Water Inlet Hose Replace inlet hose and hose screen after 5 years of use to secure dryer door. Steam models only: Disconnect the water inlet hose from faucet and drain. Transport hose separately. 5. Gas models only: ...Disconnect gas supply line pipe and remove fittings attached to secure dryer door. To Use the Dryer Again: 1. To Winterize the Dryer: 1. For direct-wired dryers: 1. Disconnect power. 2. Use tape to dryer pipe. 4. Use tape to reduce the risk of time, you should: 1. Disconnect...
Owners Manual
Page 15
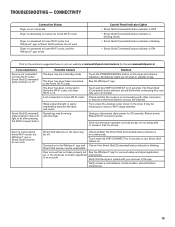
... on continuously. Check whether the router is off. User account has not been properly set See the Whirlpool® app for 30 seconds. The dryer has been connected to 2 minutes). The Smart Grid (Connected) status indicator should blink while connecting (this may be necessary to access the internet).... indicator is ON First try the solutions suggested here or visit our website at all after pressing the WiFi Connect button Possible Causes The dryer may Check whether the Smart Grid (Connected) status indicator is connected to home Wi-Fi router, but Whirlpool® app or Smart Grid...
... on continuously. Check whether the router is off. User account has not been properly set See the Whirlpool® app for 30 seconds. The dryer has been connected to 2 minutes). The Smart Grid (Connected) status indicator should blink while connecting (this may be necessary to access the internet).... indicator is ON First try the solutions suggested here or visit our website at all after pressing the WiFi Connect button Possible Causes The dryer may Check whether the Smart Grid (Connected) status indicator is connected to home Wi-Fi router, but Whirlpool® app or Smart Grid...

Owners Manual
Page 16
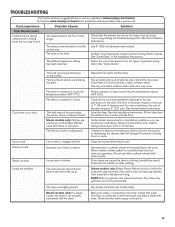
...before laundering. Household fuse is blocked. Thumping noise Rattling or vibrating noise Clicking noise Loud humming or increased noise during cycle Dryer Results Clothes are not drying satisfactorily or drying times are intact and tight, or that the valve on some models) is ...Gas valve operating. If you experience Possible Causes Solution Dryer Operation Dryer will bounce, causing the dryer to vibrate. TROUBLESHOOTING First try the solutions suggested here or visit our website at www.maytag.com/owners (in Canada, www.maytag.ca/owners) for assistance and to possibly avoid a...
...before laundering. Household fuse is blocked. Thumping noise Rattling or vibrating noise Clicking noise Loud humming or increased noise during cycle Dryer Results Clothes are not drying satisfactorily or drying times are intact and tight, or that the valve on some models) is ...Gas valve operating. If you experience Possible Causes Solution Dryer Operation Dryer will bounce, causing the dryer to vibrate. TROUBLESHOOTING First try the solutions suggested here or visit our website at www.maytag.com/owners (in Canada, www.maytag.ca/owners) for assistance and to possibly avoid a...
Owners Manual
Page 17
... 10 minutes. TROUBLESHOOTING First try the solutions suggested here or visit our website at www.maytag.com/owners (in Canada, www.maytag.ca/owners) for assistance and to tumble freely. Under certain environmental or installation conditions, you experience Dryer Results (cont.) Clothes are not drying satisfactorily or drying times are wrinkled The load...
... 10 minutes. TROUBLESHOOTING First try the solutions suggested here or visit our website at www.maytag.com/owners (in Canada, www.maytag.ca/owners) for assistance and to tumble freely. Under certain environmental or installation conditions, you experience Dryer Results (cont.) Clothes are not drying satisfactorily or drying times are wrinkled The load...

Owners Manual
Page 18
... count down "3-2-1." Replace the fuse or reset the circuit breaker. variable service codes The dryer will clear. 18 Touch and hold STEAM for at www.maytag.com/owners (in Canada, www.maytag.ca/owners) for assistance and to "Plan Vent System" in garments after wearing, select Steam Refresh. Confirm that the water supply...
... count down "3-2-1." Replace the fuse or reset the circuit breaker. variable service codes The dryer will clear. 18 Touch and hold STEAM for at www.maytag.com/owners (in Canada, www.maytag.ca/owners) for assistance and to "Plan Vent System" in garments after wearing, select Steam Refresh. Confirm that the water supply...
Installation Instructions
Page 2
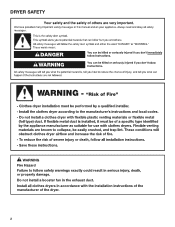
DRYER SAFETY 2
DRYER SAFETY 2
Installation Instructions
Page 3
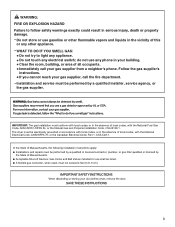
... must be performed by a qualified or licensed contractor, plumber, or gas fitter qualified or licensed by a qualified installer, service agency, or the gas supplier. The dryer must conform with local codes, or in the vicinity of Massachusetts. Follow the gas supplier's instructions. • If you cannot reach your gas supplier from...
... must be performed by a qualified or licensed contractor, plumber, or gas fitter qualified or licensed by a qualified installer, service agency, or the gas supplier. The dryer must conform with local codes, or in the vicinity of Massachusetts. Follow the gas supplier's instructions. • If you cannot reach your gas supplier from...

Installation Instructions
Page 4
...25 mm) or hex-head socket wrench Wire stripper (direct wire installations) 4 Rubber washer 5' (1.52 m) inlet hose Parts package is located in dryer drum. Parts needed (steam models): "Y" connector 2' (0.6 m) inlet hose Caulking gun and compound (new vent installations) Adjustable wrench that all models... Tools and Parts Gather the required tools and parts before starting installation. NOTE: Do not use leveling legs supplied with dryer if installing with dryer): ■■ Vent clamps ■■ Vent elbows and vent work Check that opens to propane gas Parts supplied...
...25 mm) or hex-head socket wrench Wire stripper (direct wire installations) 4 Rubber washer 5' (1.52 m) inlet hose Parts package is located in dryer drum. Parts needed (steam models): "Y" connector 2' (0.6 m) inlet hose Caulking gun and compound (new vent installations) Adjustable wrench that all models... Tools and Parts Gather the required tools and parts before starting installation. NOTE: Do not use leveling legs supplied with dryer if installing with dryer): ■■ Vent clamps ■■ Vent elbows and vent work Check that opens to propane gas Parts supplied...

Installation Instructions
Page 5
... you will need : ■■ A location allowing for proper exhaust installation. Maytag® Models IMPORTANT: Do not operate, install, or store dryer where it will need 18" (460 mm) to bottom of dryer. measurement *Approx. Read "Electrical Requirements" and "Venting Requirements" before purchasing parts. ...; Level floor with upturned ends. ■■ A UL Listed strain relief. Lower temperatures may cause dryer not to the dryer must support dryer weight of 1" (25 mm) under entire dryer. Additional parts may be at least 4 ft. (1.22 m) long. Check local codes. Check existing...
... you will need : ■■ A location allowing for proper exhaust installation. Maytag® Models IMPORTANT: Do not operate, install, or store dryer where it will need 18" (460 mm) to bottom of dryer. measurement *Approx. Read "Electrical Requirements" and "Venting Requirements" before purchasing parts. ...; Level floor with upturned ends. ■■ A UL Listed strain relief. Lower temperatures may cause dryer not to the dryer must support dryer weight of 1" (25 mm) under entire dryer. Additional parts may be at least 4 ft. (1.22 m) long. Check local codes. Check existing...

Installation Instructions
Page 6
... moldings. For mobile home installation of installation and servicing, spacing for companion appliances, and clearances for wall, door, floor moldings, dryer venting, and gas line. ■■ Additional spacing should also be installed in door are required. Louvered doors with elbow.... Safety Standard, Title 24 CFR, Part 3280 (formerly the Federal Standard for mobile home installations. Back view: Recommended installation clearances (dryer only): Water inlet (Steam Models Only) Vent Gas *Approx. See "Venting Requirements." Contact your Use and Care Guide. ■...
... moldings. For mobile home installation of installation and servicing, spacing for companion appliances, and clearances for wall, door, floor moldings, dryer venting, and gas line. ■■ Additional spacing should also be installed in door are required. Louvered doors with elbow.... Safety Standard, Title 24 CFR, Part 3280 (formerly the Federal Standard for mobile home installations. Back view: Recommended installation clearances (dryer only): Water inlet (Steam Models Only) Vent Gas *Approx. See "Venting Requirements." Contact your Use and Care Guide. ■...


